Low Syn Cheesy Taco Salsa Spaghetti Bake Recipe

Cheesy Taco Salsa Spaghetti Bake – Are you looking for a scrumptious and hassle-free family meal that will have everyone at the dinner table asking for seconds? Look no further! We have a mouthwatering treat for you – Imagine flavourful taco meat sauce, tangy salsa, and al dente spaghetti baked together to perfection, topped with a generous layer of gooey melted cheese and colorful bell peppers. It’s a delightful blend of Tex-Mex flavors that will instantly become a family favourite.

The magic of this Baked Cheesy Taco Spaghetti lies in its incredible flavor fusion. When it comes to satisfying my family’s taste buds, there’s nothing quite like a variety of tacos—they simply adore the delicious combinations. With this recipe, I aimed to bring a fresh twist to the table by blending the best elements of a taco with the comfort of pasta. It’s a delightful fusion dish that promises to be a new family favourite!


Jump to:

Calories in Cheesy Taco Salsa Spaghetti Bake

Ingredients for Cheesy Taco Salsa Spaghetti Bake

Family-Friendly and Easy to Prepare

Variations on the Recipe

Sides for Taco Spaghetti Bake

More Pasta Bake Recipes

Cheesy Taco Salsa Spaghetti Bake

Calories in Cheesy Taco Salsa Spaghetti Bake

Enjoy this cheesy taco pasta bake, which serves four people and has 542 calories per serving.


If you’re looking for more recipes within the same calorie range, you’ll find an abundance of options in my dedicated collection of 500+ calorie recipes.


If you’re following a calorie-controlled diet or a healthy eating plan, it’s important to calculate your daily calorie intake using a reliable calorie calculator. Please note that the calorie counts provided are estimates and can vary based on specific ingredients and serving sizes. Personalizing your calculations is essential to meet your individual needs. By using a calorie calculator, you can make informed choices and stay on track with your dietary goals.


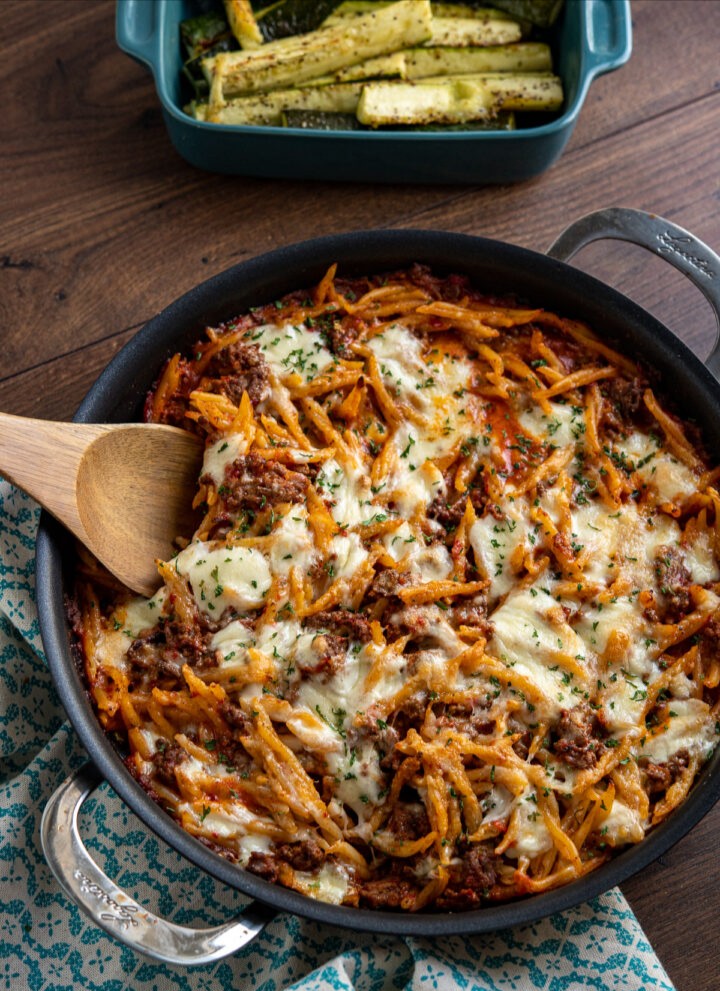
close up of taco spaghetti bake in white oven proof dish

Ingredients for Cheesy Taco Salsa Spaghetti Bake

To prepare this delectable Taco Spaghetti Bake, here are some notes on the ingredients used:


Ground Beef (beef mince) – Opt for 5% fat extra lean beef mince for a healthier option, but any ground meat will work just as well. Feel free to switch to turkey or chicken if you prefer.

Garlic and Onion – Essential base ingredients for enhancing the flavour of most recipes. For the best taste, use fresh ingredients.

Taco Seasoning – You can either my suggested blend of spices for taco seasoning or a ready-made taco spice mix for convenience.

Fresh Salsa – For optimal flavor, choose a mild fresh salsa from a tub. However, jarred salsa works fine too. If you enjoy spicier dishes, you can swap for a medium or hot version instead of mild

Variations on the Recipe

Here are some delicious variations you can try for the ingredients in the Taco Spaghetti Bake:

Meat Variations:

Diced Chicken: Swap the ground meat for some diced uncooked chicken and fry it in the taco spices. Chicken thigh will offer better flavor, but chicken breast is fine too.

Vegetarian Option: Substitute the meat with plant-based alternatives like crumbled tofu, cooked lentils, or black beans for a flavorful vegetarian version.

Pasta Variations:

Whole Wheat or Gluten-Free Pasta: Use whole wheat spaghetti or gluten-free pasta to make the dish healthier or suitable for those with gluten sensitivities.

Lower Carb Ideas: If you are trying to reduce the carbs or calories, you could also try swapping out the pasta for some spiralized vegetables or spaghetti squash if it is available.

Spice Level:

Extra Spicy: If you love heat, add chopped fresh or pickled jalapeños or red pepper flakes to the taco meat sauce and use hot salsa for an extra kick.

Cheese Variations:

Pepper Jack Cheese: Swap the cheddar cheese with pepper jack cheese to add a spicy and zesty flavor to the dish.

Monterey Jack: Use Monterey Jack cheese for a milder and creamier cheesy topping.

Vegetable and Bean Additions:

Corn: Add sweet corn kernels to the taco meat sauce for extra texture and sweetness.

Zucchini or Spinach: Incorporate grated zucchini or chopped spinach to sneak in some extra veggies.

Beans: Half the ground meat used and instead add in some black beans to bulk out the dish.

Soured Cream Alternatives:

Coconut Milk: Use coconut milk instead of soured cream for a unique and slightly tropical flavor profile.

Low-Fat Single Cream or Half and Half: If you prefer a creamier dish, you can swap the soured cream for some single cream or half and half.

Light Cream Cheese: Light cream cheese is also a great addition instead of soured cream. However, if you opt for this, you may need to stir in a little more stock.

Yoghurt: If you prefer to use yoghurt instead, I recommend skipping the step of stirring it into the sauce to prevent curdling. Instead, serve a dollop on top of the dish once it’s dished up.

Seasoning Experimentation:

Homemade Taco Seasoning: Create your own custom taco seasoning blend using your favorite spices and adjust the flavors to your liking.

Chipotle or Smoked Paprika: Introduce a smoky element by adding chipotle powder or smoked paprika to the seasoning mix.

Remember to adjust the quantities and cooking times accordingly when making these variations to ensure a well-balanced and delicious Taco Spaghetti Bake that suits your preferences. Enjoy experimenting and creating your perfect family meal!

serving of taco spaghetti bake in white oven proof dish on turquoise and white plate with fork to left

Sides for Taco Spaghetti Bake

For a family meal centered around Taco Spaghetti Bake, you can complement the main dish with a variety of delicious sides. Here are some ideas to serve in the middle of the table:

Mixed Salad – this is my preferred choice as it’s so quick and easy to prepare and can combine any salad items you like. For my mixed salad I use crisp romaine lettuce, halved grape tomatoes, red onion slices, baby cucumber, and shredded carrot. Add it to a big bowl and place in the middle of the table with the spaghetti bake.

Mexican Corn Salad: A refreshing and colourful salad made with grilled corn kernels, finely diced bell peppers, cherry tomatoes, red onions, and chopped cilantro, dressed with a little lime juice and salt and pepper. This side adds a burst of freshness and balances the richness of the bake.

Cilantro-Lime Coleslaw: Prepare a tangy coleslaw with shredded cabbage, carrots, and a dressing made with plain fat free yoghurt, lime juice, cilantro, honey, and a dash of hot sauce. The crisp and refreshing coleslaw complements the rich and cheesy bake.

Grilled or Roasted Vegetables: Lightly grilled or roasted vegetables, such as courgette (zucchini), bell peppers, and onions, add a healthy touch to the meal and bring a burst of natural sweetness to counterbalance the spices in the bake.

Remember, the key to a balanced and filling meal is to pair the main dish with some low-calorie sides, such as vegetables, which will bulk out your plate and add extra nutritional value.

With this diverse selection of sides, your Taco Spaghetti Bake family meal is sure to be a hit, satisfying everyone’s taste buds and creating a memorable dining experience. Enjoy!

Cheesy Taco Salsa Spaghetti Bake – flavourful taco meat sauce, tangy salsa, and al dente spaghetti baked together to perfection, topped with a generous layer of gooey melted cheese and colourful bell peppers. It’s a delightful blend of Tex-Mex flavors that will instantly become a family favourite.

INGREDIENTS:

455g (1lb) of extra lean ground beef (mince)

1 onion, finely diced

2 cloves of garlic, crushed

250g (8.5oz) of uncooked spaghetti

4 tablespoons of tomato paste

1 cup (250g) of salsa (mild of medium)

1 cup (240ml) of chicken or beef stock

6 tablespoons of reduced fat soured cream

50g (1.8oz) of mozzarella, grated

50g (1.8oz) of cheddar or red leicester, grated

½ red bell pepper, finely diced

½ green bell pepper, finely diced

salt and pepper

olive oil spray

For the Taco seasoning:

1 tablespoon paprika (not smoked)

1.5 teaspoon of cumin

1.5 teaspoon mild chilli​ powder

½ teaspoon of oregano

½ teaspoon garlic powder

½ teaspoon onion powder

¼ teaspoon of cayenne pepper (can add more or less depending on your preferred spice level)

INSTRUCTIONS:

Combine the taco seasoning ingredients in a small bowl

Heat a frying pan over a medium high heat, add the mince, onion and garlic and fry until mince is browned and onion is softened.

Add in the taco seasoning, tomato paste, salsa and stock, bring to a boil and then simmer for 10 mins

Cook spaghetti in boiling salted water as per package directions, reserve ⅓ cup (80ml) of pasta water, drain, spray spaghetti with olive oil spray and toss to coat.

Add the pasta to the meat mixture with the soured cream and reserved pasta water and mix to combine. Taste and season with salt and black pepper as needed.

Preheat oven to 190c, 170c fan, 375f or gas mark 5

Add spaghetti mixture to an ovenproof dish and top with cheese, add diced bell peppers

Cover tightly with foil and bake for 20 mins then remove foil and bake uncovered for an additional 10 minutes until cheese is melted and golden.

Serve and enjoy

Notes:

WW Points and other Slimming or Weight Loss programs: due to plans regularly changing and updating, we recommend calculating with the official tools you get as a member to those plans to ensure accuracy of values

Gluten Free Friendly – use gluten free pasta and stock

Suitable for Freezing ❄️

If you wish to share this recipe, then please do so by using the share buttons provided at top of this post.

NUTRITIONAL INFO:

Yield: 4

Serving Size: 1 SERVING

Amount Per Serving

Calories:542Total Fat:16gSaturated Fat:8gTrans Fat:0gUnsaturated Fat:7gCholesterol:56mgSodium:427mgCarbohydrates:56gFiber:5gSugar:6gProtein:41g

Syn Free Slow Cooker Maxican Casserole

This is the first time I have tried quinoa in this type of dish and it’s ideal- it provides a filling bulk that cooks nicely but doesn’t go mushy or squishy, and actually quinoa itself is packed full of protein and high in fibre. If you feel a bit unsure about the quinoa I urge you to try it- it’s a common enough ingredient that you can buy it almost anywhere these days and it is such a useful ingredient! It’s great for bulking out a meal like this, but also as an alternative to breadcrumbs or pasta.

You may think it odd that I have used cup measures here when I usually use grams for my recipes, but this one is ideal for the easy of using a cup- if you don’t have an ‘official’ measuring cup, a regular sized teacup or coffee cup will do- one of the joys of this recipe is that there is no need to be precise- it’ll taste great even if you end up with a bit extra of one ingredient.

I use 2 chicken breasts in this (which feeds 4 people)- there is extra protein in both the black beans and the quinoa and once shredded this is plenty of chicken. It really does make a difference buying free-range fillets- they are more expensive (hence using less), but at least you know that they aren’t factory farmed, and they have the consistency and taste that chicken should have.

If you end up with leftovers of this, you can use it to fill wraps, cook into a quesadilla… it’s a great easy lunch to reheat too!

 Total Time: 5 minutes

Yield: 4 servings 

A tasty Mexican ‘dump dinner’

Syn-free

INGREDIENTS:

1 large onion (finely diced (or 1 cup of frozen pre-chopped onion))

2 chicken breasts

1 tin black beans (drained)

1 red pepper (1 green pepper, deseeded and diced)

1 cup frozen sweet corn

1 tin chopped tomatoes (refill with water, and also add 1 tin of water)

1 cup uncooked quinoa

Juice of 1 lime

1 tsp garlic granules

1 tsp paprika

1 tsp oregano

1 tsp cumin

1/2 cup pickled jalapenos (roughly chopped)

salt & pepper

Low calorie cooking spray (or spray oil if you prefer)

Coriander to serve

INSTRUCTIONS:

Into your slow-cooker pot add in the onion, whole chicken breasts, quinoa, black beans, sweet corn, pepper, chopped tomatoes, water, lime juice

Add in the garlic granules, paprika, oregano, cumin, jalapenos and salt and pepper

Give everything a little mix together, and put the slow-cooker on

Cook on high for 3 hours, or low for 7-8 hours.

Once cooking time is finished, shred the chicken breasts using 2 forks and mix everything together

Serve with fresh lime wedges and chopped coriander.

Notes:

If you want to take it to the next level then serve into portions, cover with grated cheddar, and pop under the grill to melt the cheese before serving.


Porcupine Meatballs Recipe

Tender beef meatballs with rice in a rich and delicious tomato sauce – A perfect recipe for the whole family.

Porcupine Beef Meatballs

Despite the name, these delicious meatballs definitely do not contain any porcupine, intead they get their name from because they resemble little porcupine balls from the rice that is combined into the meatball mix.

These are one of my kids favourites. I mean what is not to love about meatballs in a yummy rich sauce. So simple to make an will be a regular feature on your meal plan.

Best Rice For Porcupine Meatballs

I use just basic long grain rice for these meatballs, this is neither Jasmine (a sticky long grain rice) or Basmati which is an extra long grain rice.

Sides for Meatballs

Because these meatballs contain rice, they are quite filling, so my family likes to enjoy these just a they are in a bowl with a little grated cheese (parmesan or cheddar0 on top and then vegetables on the side.

You can serve these with any vegetables you like, but some of my favourites are:

  • Grilled Zucchini
  • Roasted Green Beans
  • Roasted Asparagus
  • Broccoli or Cauliflower

If you prefer a more substantial side, these are great with some mashed potatoes, or a baked potato too.

YIELD: SERVES 4

PREP TIME: 15 minutes

COOK TIME: 40 minutes

TOTAL TIME: 55 minutes

INGREDIENTS:

For the meatballs

500g (17.5oz) extra lean beef mince (ground beef)

2 tablespoons of tomato paste (puree)

60ml of water

90g (½ cup) of uncooked long grain rice

1.5 tablespoons of fresh chopped parsley

1 teaspoon of onion powder

½ teaspoon of garlic powder

1 teaspoon of salt

1 teaspoon of Worcestershire sauce

pinch of black pepper

spray oil

For the sauce

400g (14oz) of passata (sieved tomatoes)

2 tablespoons of tomato paste (puree)

300ml of chicken stock

1 tablespoon of maple syrup

1 tablespoon of balsamic vinegar

½ tablespoon of paprika

1 teaspoon of Worcestershire sauce

salt and black pepper

fresh chopped parsley to serve

INSTRUCTIONS:

Combine all the ingredients for the meatballs together in a bowl and form into meatballs (I make 16).

Spray a frying pan over a medium high heat with spray oil, add the meatballs a lightly brown.

Mix all the sauce ingredients together ina large bowl.

Pour into the frying pan, bring a to a boil, reduce heat, then cover and simmer for approx 30-35 minutes, carefully turning once to cover in sauce.

Sauce should have reduced down and thickened around meatballs and rice in meatballs should be cooked after this time. If it the sauce reduces too much just add in a little more stock or water.

Taste and season as needed with salt and black pepper.

Sprinkle with some fresh chopped parsley

Enjoy with your favourites sides.

Notes:

WW Points and other Slimming or Weight Loss programs – due to plans regularly changing and updating, we recommend calculating with the official tools you get as a member to those plans to ensure accuracy of values.

NUTRITIONAL INFO:

Yield: 4

Serving Size: 1 SERVING

Amount Per Serving

Calories:304/Total Fat:7g/Saturated Fat:3g/Trans Fat:0g/Unsaturated Fat:0g/Cholesterol:21mg/Sodium:844mg/Carbohydrates:31g/Fiber:2g/Sugar:9g/Protein:28g


Low Syn Skinny Trifle Recipe

Delicious Fruity Low Syn Skinny Trifle – a perfect summer time treat

We have had some glorious summer weather here the last few days and so I really fancied a summery fruity treat to enjoy while sat out in the garden.

I don’t know why but summer time always makes me crave jelly, probably because it is nice and cold and fruit when out of the fridge.

However rather than just make up a bowl of jelly, I decided on this lovely Skinny Trifles, which are perfect for enjoying while sat out in the garden.

Traditionally Trifle is Jelly with sponge fingers, thick creamy custard and fresh cream. My mum made the most amazing trifles, occasionally though she would add Sherry, but truth be told, I hated it with sherry and wasn’t keen on the sponge fingers either. I much prefer just jelly, custard and cream with a few sprinkles on top.

As these are a skinny trifle version, I’ve skipped the custard and instead gone for a layer of banana yoghurt and berries. It’s a perfect combination, lovely and fruity and refreshing for a warm summers day.

YIELD: 4 SERVINGS

PREP TIME: 10 minutes

TOTAL TIME: 10 minutes

Ingredients:

  • 1 box of sugar free jelly (I used raspberry) – 2 syns
  • 4x80g fat free yoghurt (I used banana)
  • 1.5 cups of mixed berries
  • 4×4 tbs of light aerosol cream – 6 syns
  • 1 tbs of rainbow sprinkles – 1 syn

Instructions:

  1. Make up the jelly by packet instructions
  2. Equally divided among 4 glasses and refrigerate too set.
  3. Top each glass with 80g of yoghurt and mixed berries, then 4 tbs of light aerosol cream.
  4. Sprinkle each glass with 1 tsp of sprinkles.
  5. If only using one, I recommend layering when ready to eat.
  6. Add to a glass, top with the yoghurt, then some fresh fruit and lastly the squirty cream.
  7. ENJOY!!!

A yummy and quick dessert

Notes

This recipe is gluten free, Slimming World and Weight Watchers friendlyExtra Easy – 2.5 syns per servingOriginal – 2.5 syns per servingGreen – 2.5 syns per servingWW Smart Points – 3Gluten Free – ensure all toppings are gluten free

Nutritional information is an estimate and is to be used for informational purposes only.

Nutritional Info:

Yield: 4

Serving Size: 1 serving

Amount Per Serving

Calories99TotalFat2.4gSaturatedFat2.1gSodium97mgCarbohydrates13.2gFiber1.9gSugar9.4gProtein4.6g

Syn Free HomeMade Chicken Nuggets

A Healthy Slimming World Fakeaway Recipe

If you love a good Fakeaway, then you’ll love these Homemade Syn Free Chicken Nuggets! They’re the same texture as the unhealthy kind you’d buy at a fast food restaurant, but are oven baked and 100% syn free using your Healthy Extra B on Slimming World.

Not only are these the perfect Slimming World family dinner recipe, they’re also freezer friendly, packed with flavour and super simple to make. You can freeze them before cooking, once you’ve covered the chicken with the breadcrumbs (best done flat to avoid the nuggets losing their shape), or you can freeze once cooked.

This recipe for Homemade Syn Free Chicken Nuggets is a healthy, family friendly recipe that knocks any unhealthy takeaway out of the park!

This recipe uses breadcrumbs to coat the chicken, mixed with some delicious spices to give them tonnes of flavour! The recipe below shows you how to make your breadcrumbs from scratch using wholemeal bread, which keeps these totally syn free too. The full recipe includes two Healthy Extra B servings on Slimming World, which simply needs to be divided between the number of servings.

These Syn Free Chicken Nuggets are a delicious Slimming World fakeaway recipe that the whole family will love!

Prep Time: 15 min

Cook Time: 20 min

Total Time: 35 min

Serves: 6

INGREDIENTS:

Breadcrumbs

120g Wholemeal Bread (2-3 slices aprox.)

1/2tsp Garlic Powder

1/2tsp Salt

1/2tsp Paprika

1/4tsp Mustard Powder

1/2 Chicken Oxo Cube (crushed)

1/4tsp Cumin

Chicken Nuggets

2x Chicken Breasts

1/2tsp Garlic Powder

1/2tsp Salt

Handful Fresh Parsley

Low Calorie Cooking Spray

2x Eggs (plus a pinch of salt)

INSTRUCTIONS:

  1. Break 120g wholemeal bread into chunks and toast until browned and crispy.
  2. Blitz the toasted bread in a food processor with the remaining breadcrumb ingredients until you have an evenly textured mixture.
  3. Whisk two eggs with a pinch of salt. The salt helps to break down the egg yolk and makes it easier to bread your syn free chicken nuggets.
  4. Chop two chicken breasts and combine with garlic powder, salt and fresh parsley and blitz in the food processor until you have a chunky paste.
  5. Wet your hands and shape the chicken mince into nuggets by rolling out balls of the mixture and then pressing them flat between your fingers.
  6. Once formed, dip your syn free chicken nuggets into the whisked egg yolks and then into the breadcrumbs, making sure to completely coat each one.Place on to a baking tray sprayed liberally with low calorie cooking spray.
  7. Bake your syn free chicken nuggets at 180 degrees for 20-25 minutes, or until crispy and cooked all the way through. Serve with your choice of sides and sauces!

NOTES:

Serves 2-4 people depending on the size of the nuggets. Recipe is SYN FREE on Slimming World using 2x Healthy Extra B portions. Divide the number of Healthy Extra B portions by the number of servings made. This recipe is the property of Basement Bakehouse (owned by Atuin Digital Ltd) and is therefore subject to Copyright laws. Do not copy, or use the images or text in this recipe or blog post without permission.

If cooking raw from frozen, cook for aprox. 30 minutes or until cooked through and crispy. To reheat frozen cooked nuggets, you can use the microwave or oven. Please ensure that they are piping hot all the way through before serving.

Syn Free Chicken Supreme Recipe

This Slimming World chicken supreme is Syn free, quick and easy to make, and perfect for the whole family.

This comforting chicken supreme is packed with tender chunks of chicken and bacon – an easy chicken recipe that’s supremely satisfying

Lean meat with all the visible fat removed is a Free Food! Remove the skin from the chicken breast and trim the visible fat from the bacon… a total saving of 6 Sy

Prep Time: 5mins

Cook Time: 25mins

Course: Main Course

Cuisine: French

Servings: 2 

Ingredients:

  • 2 skinless and boneless chicken breasts, thickly sliced
  • 4 back bacon rashers, visible fat removed, roughly chopped
  • 1 small onion finely chopped
  • 2 cloves garlic finely chopped
  • 200 g button mushrooms sliced
  • 125 g plain quark
  • 1 chicken stock cube made up with 100ml boiling water
  • 1.5 tsp mustard powder
  • Low calorie cooking spray
  • Bunch of asparagus, woody ends snapped off
  • 1 red and 1 yellow pepper, deseeded and roughly chopped

INSTRUCTIONS:

  1. Heat a heavy based pan over a low-medium heat and spritz with low calorie cooking spray.
  2. Add the onion and garlic and stir fry for 5 minutes, or until softened.
  3. Put the asparagus and peppers in a non-stick roasting tin. Spray with low-calorie cooking spray and roast for 15-20 minutes or until tender.
  4. Meanwhile, add the chicken stock, quark, and mustard powder to a large jug, and mix thoroughly until a sauce is formed.
  5. Season with salt and pepper to taste.
  6. Pour the sauce into the pan and stir well. Continue to simmer for 10 minutes, or until the sauce is reduced as desired.
  7. Sprinkle with the parsley and serve with a third of a plate of the roasted veg and enjoy!

Notes:

The nutritional and Syn values provided are carefully calculated and correct at time of publication but may not always be completely accurate.

If you’re serious about sticking rigidly to your plan, it’s always worth doing your own calculations for extra peace of mind – and remember, we may be using different brands or variations of ingredients which can significantly impact the nutritional and Syn values!

Nutrition:

Calories: 358kcal

Slimming World Ham & Mushroom Pizza Calzone Recipe

As much as I love cooking, there are some nights when I absolutely just can’t be bothered.

For these kind of evenings, it’s always wise to have a couple of recipes up your sleeve that are fuss free, can be made from ingredients that you’ve probably already got in your fridge, and can be on the table in hardly any time at all.

IS THIS RECIPE REALLY SLIMMING FRIENDLY?!

Yes! Coming in at just 240 calories, this slimming friendly pizza calzone is also a great option if you’re a calorie counter.

MIXING AND MATCHING YOUR PIZZA CALZONE FILLINGS

Ham and mushroom is my favourite calzone filling, but you can get creative as you like. This kind of recipe is a great opportunity to get in some more speed foods, and use up anything that you might have in your fridge.

You could try peppers, pulled chicken, tuna, olives, fresh tomatoes, or anything else you might fancy.

You’ll notice that I’ve used light mozzarella cheese, and the main reason for this is that I find it’s less greasy when melted than some alternatives, so the wrap stays nice and crispy once cooked. Of course though, you can experiment with your favourite cheese if you’d prefer.

SERVING YOUR PIZZA CALZONE

This pizza calzone makes a filling meal, so you might find that it’s enough to serve it with a leafy salad.

If you’re really feeling hungry though, you could cook up some slimming chips as a side dish.

These calzones are quick, easy, and surprisingly filling. A great option after a long day at work!

Prep Time: 5mins

Cook Time: 20mins

Total Time: 25mins

Course: Main Course

Cuisine: Italian

Servings: 1 

INGREDIENTS:

  • 1 Weight Watchers wrap
  • 4 tbsp tinned tomatoes
  • 40 grams light mozzarella grated
  • 1 slice cooked ham chopped
  • 2 mushrooms sliced
  • 1 tbsp red onion finely sliced
  • 1 egg beaten
  • Low calorie cooking spray

INSTRUCTIONS:

  1. Preheat your oven to 200 degrees.
  2. Spritz a baking tray with low calorie cooking spray. Place the wrap on top, and spread the tinned tomatoes over one half, being careful not to get too close to the edge.
  3. wrap tomato sauce
  4. Add the mozzarella, ham, mushrooms, and onions. Brush the outer edges of the wrap with the beaten egg.
calzone filling
  1. Fold over the wrap to form the calzone, and use the back of a fork to crimp together.
  2. Brush the calzone with the beaten egg, and place in the oven for 10-15 minutes or until golden brown.
  3. Remove from the oven, turn over, brush the opposite side with the beaten egg, and place back in the over for 10-15 minutes or until golden brown.
  4. Serve and enjoy!

NOTES:

The nutritional values provided are carefully calculated and correct at time of publication but may not always be completely accurate.

If you’re serious about sticking rigidly to your plan, it’s always worth doing your own calculations for extra peace of mind – and remember, we may be using different brands or variations of ingredients which can significantly impact the nutritional values!

Nutritional Info:

Calories: 240kcal

Creamy Beef Roasted Red Pepper Pasta Bake Recipe

Creamy Beef Roasted Red Pepper Pasta Bake – Indulge in the ultimate comfort food with our creamy ground beef pasta recipe. This delectable dish features trofie pasta, roasted red peppers, and a heavenly blend of torn mozzarella and Parmesan. Baked to perfection, each bite is a symphony of flavors that will leave you craving more. Get ready to experience a mouthwatering culinary delight like no other.

There’s something undeniably irresistible about the combination of pasta and a hearty meat sauce turned into a delicious pasta bake. Imagine a bubbling casserole dish, brimming with layers of mouthwatering goodness, proudly displayed at the center of our table.

As a family, we value the time spent together at the dinner table, and I believe that enjoying a healthy, low-calorie meal doesn’t mean sacrificing the joy of sharing the same foods. That’s why I always make sure to include nutritious sides that encourage healthy eating habits for everyone. By incorporating wholesome ingredients and smart choices, we can all indulge in the same delicious spread while maintaining a balanced lifestyle.

Trust me, once you experience the magic of this dish, it will become an absolute favourite, and you’ll be inspired to recreate it again and again. So gather around the table, savour the delightful flavors, and revel in the knowledge that a healthy meal can be both satisfying and enjoyed by the whole family.

Variations on the the Recipe

Bring your own unique twist to the classic Creamy Beef Roasted Red Pepper Pasta Bake with these creative variations. Customize the dish to suit your preferences and add an exciting burst of flavor to your culinary creation. Here are a few ideas to get you started:

Vegetarian Option: Embrace a vegetarian lifestyle or simply explore meat-free alternatives by swapping the ground beef with plant-based ground meat. The plant-based version will provide a delicious and satisfying vegetarian option, without compromising on taste or texture.

Different Mince/Ground Meat: Experiment with various types of mince or ground meat to suit your preferences. Turkey, chicken, or pork mince can be excellent alternatives to beef, bringing their unique flavors and characteristics to the dish. Each variety will lend a distinct taste and create a delightful variation.

Additional Spicy Kick: For those who enjoy a fiery culinary adventure, amplify the heat level by adding a dash of hot sauce, such as Tabasco. This extra kick will infuse your pasta bake with an irresistible zing, tantalizing your taste buds with every bite.

Additional Flavor: Explore the depths of flavor by substituting sweet regular paprika with smoky paprika. The smoky variation will impart a rich, smoldering essence, adding complexity and a touch of intrigue to the dish. However, if you prefer a milder flavor, stick to sweet paprika for a more delicate taste.

Herbaceous Twist: Elevate the freshness of your pasta bake by incorporating fragrant herbs like basil, thyme, or oregano. The addition of these aromatic herbs will infuse the dish with a burst of natural flavors, enhancing its overall appeal and providing a delightful herbaceous twist.

Added Vegetables: Amp up the nutritional value and add vibrant colors to your dish by including additional vegetables. Choose vegetables that complement the flavors of the pasta bake, being mindful of their water content. Spinach, bell peppers, mushrooms, or any vegetable of your choice can be sautéed or lightly cooked before being added to the pasta bake, ensuring they retain their texture and flavor.

Unleash your culinary creativity with these variations, allowing you to personalize the Creamy Beef Roasted Red Pepper Pasta Bake to your liking. Whether you’re exploring different protein sources, enhancing the spice level, or infusing fresh herbs and vegetables, these modifications will elevate your dining experience and create a dish that truly reflects your unique tastes.

Tips for Freezing

To enjoy this scrumptious pasta bake on a busy weeknight or store leftovers for later, follow these freezing suggestions. Keep in mind that not everyone finds frozen, defrosted, and reheated pasta appealing due to its slightly overcooked texture. However, if you’re content with the outcome of frozen pasta dishes, you can confidently freeze this particular dish.

Creamy Beef Roasted Red Pepper Pasta Bake – This delectable dish features trofie pasta, roasted red peppers, and a heavenly blend of torn mozzarella and Parmesan. Baked to perfection, each bite is a symphony of flavors that will leave you craving more. Get ready to experience a mouthwatering culinary delight like no other.

PREP TIME: 15 mins

COOK TIME: 40 mins

TOTAL TIME: 55 mins

INGREDIENTS:

  • olive oil spray
  • 1 onion, finely diced
  • 3 cloves of garlic, crushed
  • 455g (1lb) of extra lean ground beef (mince)
  • 1 teaspoon of sweet paprika
  • salt and black pepper
  • pinch of red chilli flakes (optional)
  • 200g (7oz) of roasted red peppers (jarred in brine), drained
  • 1 cup (240ml) of chicken stock
  • 2 tablespoons of tomato paste (puree)
  • 1 tablespoon of granulated sweetener
  • 80ml of reduced fat single cream or half and half
  • 240g of trofie pasta, uncooked – or use your preferred pasta shape)
  • 90g (3oz) of fresh mozzarella, torn into pieces
  • 30g (1oz) of freshly finely grated parmesan
  • 2 teaspoons of dried parsley

INSTRUCTIONS:

  1. Spray a deep ovenproof frying pan with olive spray
  2. Add the onion and fry for a few minutes until softened.
  3. Add in the mince and garlic and fry until browned.
  4. Season well with salt and black pepper and stir in the paprika and pinch of chilli flakes if using.
  5. Add the drained roasted red peppers, tomato paste, stock and sweetener to a blend and pulse until sauce like.
  6. Pour this into the mince along with the cream , and simmer for 10 minutes.
  7. Taste the meat sauce and season as needed to your desired taste with salt and black pepper
  8. Cook the pasta in a pot of salted boiling water until al dente, reserve a 1/3 cup (80ml) of the cooked pasta water, then drain the pasta, spray with olive oil spray and toss to coat to prevent it from sticking together.
  9. Preheat oven to 170c fan, 190c, 375f or gas mark 5
  10. Add to the meat sauce, along with the reserved pasta water and stir until all combined and coated.
  11. Scatter with the torn fresh mozzarella and sprinkle inbetween with the parmesan.
  12. Bake in the oven for 20 minutes until cheese on top is melted and lightly golden
  13. Sprinkle with the dried parsley and enjoy!!

Notes:

WW Points and other Slimming or Weight Loss programs: due to plans regularly changing and updating, we recommend calculating with the official tools you get as a member to those plans to ensure accuracy of values

Gluten Free Friendly – use gluten free pasta and stock

Suitable for Freezing ❄️

If you wish to share this recipe, then please do so by using the share buttons provided at top of this post.

Nutritional Info:

Yield: 4

Serving Size

1 SERVING

Calories547TotalFat13gSaturatedFat7gTransFat0gUnsaturatedFat10gCholesterol66mgSodium521mgCarbohydrates54gFiber2gSugar4gProtein39g

Mexican Barbecue Chicken Skewers

Mexican Barbecue – tender chicken skewers marinated with a delicious Mexican blend of spices for the perfect barbecue meal.

Mexican Chicken Skewers

Barbecue food doesn’t need to be unhealthy and it doesn’t need to be the usual burger and sausages, there are so many possibilities for food you can cook on your grill. We had some lovely weather here over the weekend, so I decided to do a Mexican inspired Barbecue.

A simple seasoning blend to marinate some pieces of chicken thighs along with vegetables like mixed bell peppers and onion and these are cooked perfectly on the grill or barbecue

The marinade is for these skewers is so easy and uses ingredients most of us have on hand. It will also work well for shrimp, pork or beef.

PREP TIME: 20 minutes

COOK TIME: 15 minutes

TOTAL TIME: 35 minutes

Ingredients:

  • 8 small boneless chicken thighs, any visible fat removed (approx 650g/22.5oz)
  • 2 cloves of garlic
  • 1 jalapeño pepper, seeds removed
  • 3 tablespoons of tomato paste
  • 2 teaspoons of cumin
  • 2 teaspoons of paprika
  • 1/2 teaspoon of oregano
  • handful of fresh coriander
  • juice of half a lime
  • salt and black pepper
  • 1 red bell pepper, chopped into square pieces
  • 1 green bell pepper, chopped into square pieces
  • 1 yellow bell pepper, chopped into square pieces
  • 1 white onion, chopped, chopped into square pieces
  • cooking oil spray

Instructions:

  1. Add in the spices, jalapeno, lime juice, coriander and a good pinch of salt and black pepper to a mini food processor and pulse until a paste. Add in a little water at a time if needed to help it pulse.
  2. Dice the chicken thighs into bite sized pieces, add the marinade to the chicken and toss to thoroughly coat.
  3. Refrigerate overnight or for a few hours at least.
  4. If using wooden skewers soak this in warm water for at least 30 minutes before cooking.
  5. Then add the chicken to the skewers along with the peppers and onion (I alternate the pieces (so chicken, vegetable, chicken, vegetable on the skewer).
  6. Spray the skewers or chicken and vegetables with cooking oil spray
  7. Cook on a hot barbecue, turning frequently until chicken is cooked through (approx 15 minutes)
  8. Alternatively you can bake these in the oven for 25-30 minutes at 220c, fan 200c or 425f (gas mark 7) or on a grill pan (approx 7 minutes each side)
  9. Great served with Mexican Chopped Salad and Mexican Rice

Notes:

WW Points and other Slimming or Weight Loss programs – due to plans regularly changing and updating, we recommend calculating with the official tools you get as a member to those plans to ensure accuracy of values. 

Nutritional Info:

Yield: 4

Serving Size: 1 SKEWER

Amount Per Serving

Calories251TotalFat7.1gSaturatedFat1.7gTransFat0gCholesterol159mgSodium434mgCarbohydrates11.2gFiber3gSugar3.7gProtein34.6g

Slimming World Hunter Chicken Recipe

Hunters Chicken – tender chicken breasts in a delicious homemade barbecue sauce with slices of smoky bacon, all topped with cheese and baked until melted and golden. 

PREP TIME: 15 minutes

COOK TIME: 40 minutes

TOTAL TIME: 55 minutes

INGREDIENTS:

  • 2 large uncooked boneless skinless chicken breasts (approx 250g/9oz each)
  • 8 slices of uncooked back bacon (trimmed of visible fat)
  • 100g (7oz) of mozzarella
  • 60g (2.1oz) of cheddar
  • pinch of black pepper
For the sauce:
  • 1 400ml can of crushed tomatoes (or use passata)
  • 1 cup (240ml) of water
  • 1 small onion, halved and sliced thinly
  • 2 cloves of garlic, minced
  • 3 tablespoon of 100% pure maple syrup (do not use sugar free)
  • 2 teaspoons of paprika
  • 2 teaspoons of smoked paprika (not the hot variety)
  • 1 tablespoon of balsamic vinegar
  • 1/2 tablespoon of apple cider vinegar
  • 1 tablespoon of light soy sauce
  • 1 tablespoon of dark soy sauce (ensure it says dark on the bottle)
  • 1 teaspoon of yellow mustard
  • 1 teaspoon onion powder
  • 1/2 teaspoon garlic powder
  • 2 tablespoon tomato paste (puree) – add four if using passata
  • optional: liquid smoke (I add 1/2 teaspoon)
  • low calorie spray

INSTRUCTIONS:

  1. Carefully Slice the two chicken breast into 4 cutlets, by using a sharp knife to cut the chicken breasts in half crosswise.
  2. Place the cutlet in a ziplock bag one at a time and use a meat tenderiser or rolling plan to flatten. Set aside.
  3. Spray a deep frying pan over a medium high heat with cooking oil spray.
  4. Add the onion and garlic and fry until softened.
  5. Add in all other ingredients for the sauce, bring to a boil, reduce heat slightly, cover and and let the sauce bubble to reduce down and really thicken (approx 10 minutes, don’t put the heat too low), ensure you let the sauce reduce down and thicken before proceeding to the next steps, or your sauce will be too runny.
  6. Preheat oven to 200c, 180c fan, 400f, gas mark 6
  7. Once the sauce has thickened, add the sauce in a even layer to baking tray or oven proof dish.
  8. Place the flattened chicken breasts into the sauce. Brush over the top with the barbecue sauce to ensure they are all fully coated.
  9. Place 2 slices of bacon on top of each chicken breast, and again brust over the top with the barbecue sauce, so that the bacon pieces are also fully covered.
  10. Top with the cheese and pinch of black pepper and bake in the oven for approx 20 minutes until chicken is cooked through and cheese is melted.
  11. You can then place under a medium heat on the grill (broil) until the top is golden.
  12. Serve with your choice of sides and enjoy!!

Notes:

This recipe is gluten free, Slimming World and Weight Watchers friendly

Slimming World – 1 HEa and 2 syns per serving

WW Green Smart Points – 8 per serving

WW Blue Smart Points – 6 per serving

WW Purple Smart Points – 6 per serving

Nutritional Info:

Serving Size

1 SERVING

Amount Per Serving

Calories436TotalFat14.6gSaturatedFat8.2gCholesterol45.6mgCarbohydrates25.2gFiber4gSugar15.8gProtein49.1g

Syn Free Chicken Fajita Pasta Recipe

You can’t go wrong with fajitas for dinner, can you?

Well actually, sadly, you can.

One of those off-the-shelf kits can set you back up to 10 Syns per fajita when you’re following Slimming World, and I don’t know many self-respecting hungry people who would be happy to draw the line at just one.

But bear with me, because it’s not all doom and gloom here.

In fact, it’s quite the opposite.

After much faffing about with various ingredients, I came up with an alternative that ticks all the right boxes, will leave you feeling satisfied, and shakes things up just enough to keep you excited. Without sacrificing any of those gorgeous Mexican flavours.

This Slimming World chicken fajita pasta is Syn free, has a very reasonable 471 calories per portion, I hope you’ll love it as much as I do…

Slimming World chicken fajita pasta recipe

This creamy chicken fajita pasta is Syn free, and full of authentic Mexican flavour.

Prep Time: 5mins

Cook Time: 25mins

Course: Main Course

Cuisine: Mexican

Servings: 2

INGREDIENTS:

  • 2 large chicken breasts chopped into thin slices/chunks
  • 140 g dried pasta shapes I used farfalle, but feel free to use your favourite or whatever you have in the cupboard
  • 1 small onion sliced
  • 1 red pepper sliced
  • 1 red chilli sliced, optional
  • 100 g plain quark
  • 1 chicken stock cube made up with 100ml boiling water
  • 1 tbsp Schwartz Fajita Seasoning
  • Low calorie cooking spray

INSTRUCTIONS:

  • Heat a heavy based pan over a medium-high heat and spritz with low calorie cooking spray.
  • Add the chicken and stir fry for 5 minutes, or until sealed.
  • Add the onion and red chilli (if using) to the pan, and continue to fry for 2 minutes.
  • Add the red pepper, and fry for a further 5 minutes, or until the chicken is cooked through and the vegetables have softened but still retain their crunch.
  • Add the Schwartz Fajita Seasoning for the last minute.
  • Meanwhile, cook the pasta according to packet instructions. Drain and set to one side.
  • Add the chicken stock and quark to a jug, and mix thoroughly until a sauce is formed.
  • Continue to simmer for 10 minutes, or until a thick and creamy sauce is formed.
  • Add the pasta to the pan and stir well, ensuring that everything is piping hot.
  • Serve and enjoy!
HOW TO SERVE YOUR CHICKEN FAJITA PASTA
  • With pasta, chicken, and vegetables all included in the recipe, this is pretty much a complete meal in its own right.
  • To make sure that you’re getting enough Speed Foods though, add a big leafy green salad on the side.
  • I also love adding a few wedges of lime, a little guacamole, and a small scoop of quark, in place of sour cream.
  • If you are adding your own extras, just make sure that you account for the Syns or calories, in line with your diet plan.

Notes:

The nutritional and Syn values provided are carefully calculated and correct at time of publication but may not always be completely accurate.

If you’re serious about sticking rigidly to your plan, it’s always worth doing your own calculations for extra peace of mind – and remember, we may be using different brands or variations of ingredients which can significantly impact the nutritional and Syn values!

Nutritional Info:

Calories: 471kcal

Grilled Cabbage Wraps

Grilled Cabbage Wraps These cabbage wraps are filled with flavorful sticky rice, then wrapped and grilled to achieve that smoky flavor. They are then paired with a simple sweet and spicy sauce for a perfect meal. Enjoy! PREP TIME20:minutes mins COOK TIME20: minutes mins RICE COOKING: TIME45minutes mins TOTAL TIME:  1hour hr 25minutes mins INGREDIENTS for Grilled Cabbage Wraps 3 cups cooked glutinous … Read more

Syn Free Spinach Chicken Recipe

Syn Free Ricotta Spinach Topped Chicken is the ultimate family meal. Tender Chicken breasts over a rich tomato sauce topped with garlicky ricotta and spinach. Yum!!

Ingredients:

  • 4 Skinless/Boneless Chicken Breasts, raw (approx 160g/5.6oz per breast)
  • salt and black pepper
  • cooking oil spray
for the tomato sauce
  • 1 onion, diced
  • 1 clove of garlic, crushed
  • pinch of mixed Italian herbs
  • 1 cup (240ml) of crushed tomatoes (or passata)
  • 1 tbs of tomato paste
  • 1 cup (240ml) of chicken stock
  • for the ricotta and spinach
  • 2 cloves of garlic, crushed
  • 3 large handfuls of spinach, roughly chopped
  • 270g/9.5oz of ricotta – 3 HEa’s
  • 15g of parmesan – 1/2 HEa
  • 25g of mozzarella – 1/2 HEa
  • 1 egg

Instructions:

  1. Place the chicken breast on a chopped board, cover with cling film, and flatten down with a meat mallet/tenderizer, season both sides with salt and black pepper.
  2. Spray a frying pan over a medium high heat with some cooking oil spray, once hot, add the chicken and brown till lightly golden on both sides. Remove and set aside.
For the tomato sauce:
  1. Spray the pan with some more cooking oil spray, add the onion and garlic and fry for a few minutes to soften.
  2. Add the crushed tomatoes, mixed herbs, tomato paste and stock, bring to a boil and reduce heat and simmer until the sauce reduces down and thickens.
  3. Add this to an oven proof dish and spray all across the bottom. Then place in the chicken breast.
For the ricotta spinach:
  1. Wipe the frying pan clean and spray with some more cooking oil spray.
  2. Add the spinach and garlic and fry until the spinach just starts to wilt.
  3. Remove from heat, add in the ricotta until all combined and then stir in the egg.
  4. Spoon this over the top of the chicken.
  5. Crumble the parmesan and mozzarella together and loosely scatter over the top.
  6. Preheat oven to 180c/350f
  7. Cover over the dish with foil and bake for about 20 mins, remove foil then continue to bake for another 10-15 mins, until the cheese on top has all melted and is lightly golden and chicken is cooked through.
  8. Serve and enjoy!!

Notes:

This recipe is gluten free, Slimming World and Weight Watchers friendly

Extra Easy – 1 HEa per serving

Original/SP – 1 HEa per serving

WW Smart Points – 6 per serving

suitable for freezing

Nutritional Info:

Yield:4

Serving Size: 1

Calories385TotalFat12.7gSaturatedFat7.6gCholesterol88mgSodium497mgCarbohydrates12.4gFiber2.3gSugar5.1gProtein53.3g


Hamburger Steak with Mushroom Onion Gravy

Let the sizzle of this hearty hamburger steak cooking in the skillet call your family to the dinner table. Hamburger Steak with Mushroom Onion Gravy Ingredients for Hamburger Steak with Mushroom Onion Gravy 2 pounds ground chuck 2 tablespoons Worcestershire sauce 1 tablespoon prepared horseradish 2 teaspoons minced garlic 1/4 teaspoon salt 1/4 teaspoon ground black … Read more

Cauliflower Cheese Recipe

An easy healthy cauliflower cheese recipe that’s so creamy and cheesy without butter or traditional flour. Using oat flour, it’s high in protein, low in fat, and the perfect side dish for weight loss!
WHY YOU’LL LOVE THIS RECIPE
  • If you love cauliflower cheese, here are a few reasons why we think you’ll enjoy it without butter!
  • It’s comforting
  • Naturally gluten free
  • It’s really easy to make
  • Has fewer calories per serving
  • Unofficially Slimming World friendly
  • High in fibre and protein to keep you fuller for longer
  • A truly delicious side for a roast dinner or main course
 SUBSTITUTIONS:

Depending on your dietary needs, here are a few simple swaps you can make to this cauliflower & cheese:

Cauliflower – you could make an easy cauliflower and broccoli bake by swapping some of the florets for more nutrition

Oats – swap for cornflour instead of blended oats to thicken the sauce if more accessible

Milk – swap for full fat, or plant based if wanting to make vegan cauliflower cheese

Dijon mustard – swap for English mustard or wholegrain mustard, or try nutritional yeast flakes for extra flavour

Cheddar cheese – you can use any good melty cheese

Slimming World cheese sauce recipe with cauliflower and cottage pie in a white Denby Natural Canvas bowl

VARIATIONS:

Here are some different ways you can take this simple cauliflower cheese to another level:

Spicy – add some spices such as cayenne pepper, curry powder or smoked paprika to the sauce for a kick of heat

Deluxe – for a luxury cauliflower cheese, try a good vintage cheddar, parmesan, or gruyére for a stronger taste

Meaty – add some crispy bacon, ham, or cooked diced gammon to the cauliflower cheese for a meaty twist

You might also like this roasted cauliflower cheese bake that requires no boiling whatsoever.

 STORAGE:

Storing – we prefer eating this recipe fresh, but it can be stored in an airtight container and refrigerated for up to 3 days.

Freezing – cool to room temperature and again, store in a freezer-safe container for up to 3 months.

Reheating – If you want to eat the next day, defrost in the fridge if required and microwave until piping hot throughout, or reheat while covered with tin foil in the oven,

Cauliflower Cheese Recipe

SERVING SUGGESTIONS

Here are some ideas on what to serve with cauliflower cheese:

Roast meats: serve as a saucy side with meats such as beef, gammon steaks, sausagess or roast chicken with gravy, mashed potatoes and cranberry sauce

Potatoes: enjoy as a vegetarian main on jacket potatoes with butter and salt

Vegetables: it’s perfect with roasted vegetables such as onion, peppers, courgette, beetroot, carrots, and sweet potatoes with garlic and lemon that need a sauce

Salad: use it as a dressing with a leafy green salad with tomatoes or shredded brussels sprout salad with balsamic vinegar and olive oil

Breads: mop up the cheese sauce with herby garlic bread or warm crusty bread

Stews: add a dollop alongside a hearty and flavourful stew with a extra indulgent taste

 FAQ

Can you make cauliflower cheese in advance?

Cauliflower cheese is perfect for making in advance, then stored in the freezer. After cooking, simply defrost overnight and bake in the oven again while covered with foil.

 Is this an unofficial Slimming World cauliflower cheese recipe?

The only fats used in this recipe are milk and cheese. As long as you count them or use them as part of your allowance, I don’t see why you can’t eat this as part of your Slimming club. Also, the same goes for milled oats which are used instead of flour

Can I thicken the butterless cheese sauce in a pan instead?

Yes, absolutely! Simply place all your cold milk and blended oats in a saucepan and very slowly simmer and stir to thicken. Then continue with the rest of the method.

Does it taste like porridge?

I personally think its porridge taste is extremely subtle. But so subtle, my family didn’t know it was there. I do suggest though to use plenty of sea salt and ground black pepper with a dash of mustard. Note, I’ve used oats to thicken many of my healthy beef stews for example where you can’t taste them at all! It makes them so comforting and healthy on Slimming plans.

Can I use skimmed of semi skimmed milk?

Yes, you can use lighter milk and the great thing is, it has more calcium than full fat. However, for a truly creamy tasty, I do prefer whole milk in all of my cauliflower cheeses, but it has more calories.

But at around 200 calories per person, I think this recipe for cauliflower cheese is relatively low anyway.

Can I make cauliflower cheese in the slow cooker?

Yes, you can make cauliflower cheese in a slow cooker as I do here on low heat for 2 hours without stirring.

Can I cook it in an air fryer?

Cauliflower cheese is perfect for baking in an air fryer! All you need to do is find a big enough dish to fit in your machine.

I would bake it at 180c fan/200c/400F and reduce the time to 10 minutes.

Healthy Cauliflower Cheese Recipe 

This healthy cauliflower cheese recipe is so creamy and cheesy without butter and traditional flour. It’s perfect for anyone following a Slimming World plan!

PREP TIME: 6 mins

COOK TIME: 20 mins

TOTAL TIME: 26 mins

Cauliflower Cheese Recipe

INGREDIENTS:
  • 1 large cauliflower broken into florets
  • 32 g oats blended
  • 500 ml whole milk *or skimmed/semi if following a slimming club
  • 100 g low fat cheese grated
  • 1 teaspoon mustard
  • Sea salt To your taste
  • Ground Black pepper To your taste
INSTRUCTIONS:
  1. Pre heat your oven at 220 degrees.
  2. Meanwhile, par boil your cauliflower florets for about 10 minutes.
  3. Blend the oats in a good blender or mini food processor. Note: if you prefer to use flour, feel free to use it.
  4. Transfer the oats into a 1 litre microwavable jug. Note: if you have a smaller one, you’ll need to watch carefully that it doesn’t boil over. OR you continue with a saucepan.
  5. Mix in the milk and generous amount of seasoning.
  6. Then microwave in 1 minute bursts for 3 minutes to prevent spilling – possibly 4 minutes if you want it thicker.
  7. Stir in 70g of the grated cheese and mustard.
  8. Now drain your cauliflower and place in a baking dish.
  9. Pour over the slimming cheese sauce, top with the remaining cheese and season again.
  10. Bake for 20 minutes, top with fresh herbs and serve!
  11.  Any syn values are personal estimates an not verified by Slimming World.
NOTES:
  • I recommend blitzing the oats while dry first unless you have a really powerful vacuum blender, then you could blend the milk and oats together
  • If thickening the sauce in a pan, use a whisk to make the cheese sauce smooth and lump-free, and cook it over a gentle heat to avoid scorching and overboiling
  • Add some mustard to the cheese sauce for a tangy kick and to balance the richness of the cheese
  • Use a mature cheddar cheese for a stronger and cheesier flavour, and grate it coarsely for better melting
  • Sprinkle some bread crumbs or dry stuffing for a bit of crunch
  • Add some other vegetables such as broccoli, green beans or cherry tomatoes to the dish for extra colour and nutrition
  • Roast the cauliflower florets instead of boiling if preferred to enhance their flavour and prevent them from becoming too soggy
NUTRITIONAL INFO:

Calories: 203kcalCarbohydrates: 22gProtein: 15gFat: 7gSaturated Fat: 4gCholesterol: 18mgSodium: 284mgPotassium: 838mgFiber: 5gSugar: 11gVitamin A: 254IUVitamin C: 101mgCalcium: 295mgIron: 1mg