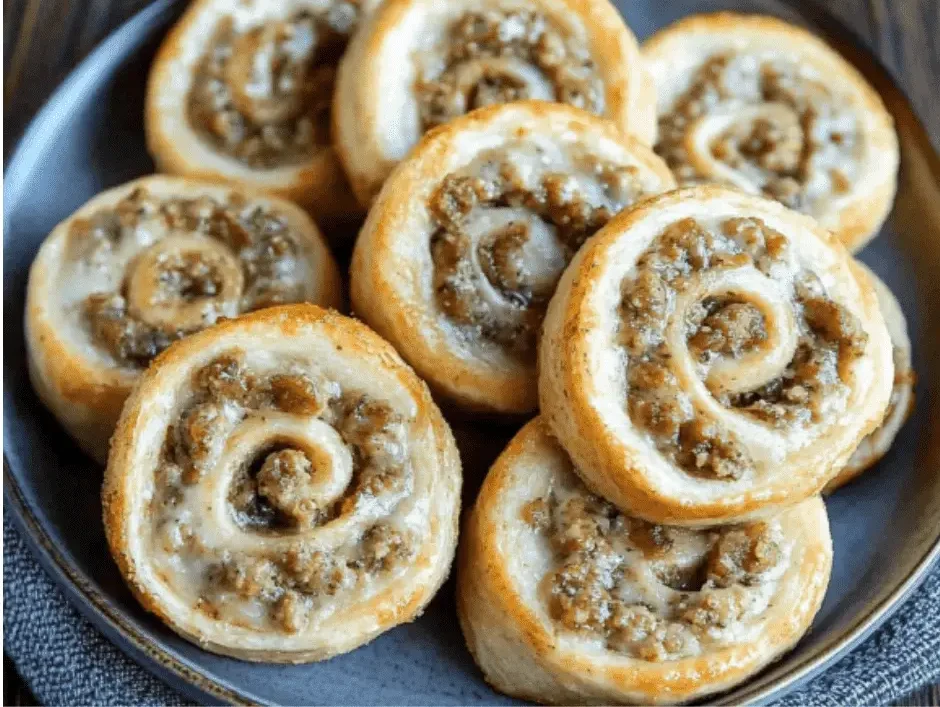
Garlic Soy Glazed Brussels Sprouts

Garlic Soy Glazed Brussels Sprouts
Table of Contents
These Mediterranean Garlic Soy Glazed Brussels Sprouts are a vibrant fusion of flavors. Roasted until caramelized and crispy, the sprouts are then tossed in a glossy garlic-soy glaze with Mediterranean twists like olive oil, lemon, and fresh herbs. The result is a sweet, savory, and tangy side dish that pairs well with grilled meats, fish, or grain bowls. It’s simple to make yet bold in flavor—perfect for weeknights or entertaining guests.

Prep & Cook Time
Prep Time: 10 minutes

Cook Time: 25 minutes

Total Time: 35 minutes

Servings: 4

Ingredients
For the Brussels Sprouts:
1 lb (450g) Brussels sprouts, trimmed and halved

2 tbsp extra virgin olive oil

½ tsp sea salt

¼ tsp black pepper

For the Garlic Soy Glaze:
2 tbsp low-sodium soy sauce (or tamari for gluten-free)

1 tbsp honey (or maple syrup for vegan option)

2 tbsp fresh lemon juice

3 cloves garlic, minced

1 tbsp balsamic vinegar

1 tbsp extra virgin olive oil

½ tsp smoked paprika

¼ tsp red pepper flakes (optional, for heat)

For Garnish:
2 tbsp chopped fresh parsley or basil

1 tbsp toasted sesame seeds or pine nuts

Lemon wedges (for serving)

Instructions
Prepare and Roast the Brussels Sprouts:
Preheat the oven to 400°F (200°C).

See also Spinach and Feta Chicken Rolls
In a large bowl, toss the Brussels sprouts with olive oil, salt, and black pepper until well coated.

Spread them on a baking sheet, cut side down, in a single layer.

Roast for 20–25 minutes, or until the edges are crispy and browned, stirring halfway through.

Make the Garlic Soy Glaze:
While the sprouts are roasting, in a small saucepan over medium heat, add olive oil and sauté the garlic for about 30 seconds, just until fragrant (do not burn).

Stir in the soy sauce, honey, lemon juice, balsamic vinegar, smoked paprika, and red pepper flakes.

Bring to a gentle simmer, stirring constantly, for about 2–3 minutes until the glaze slightly thickens.

Remove from heat.

Toss and Finish:
Once the Brussels sprouts are done roasting, transfer them to a large mixing bowl.

Pour the garlic soy glaze over the sprouts and toss well to coat.

Sprinkle with fresh parsley (or basil) and toasted sesame seeds (or pine nuts).

Serve:
Serve immediately with lemon wedges on the side for extra brightness.

Enjoy as a side dish, part of a Mediterranean grain bowl, or even as a warm salad topping.

Tips
Get Them Crispy:
Place the Brussels sprouts cut side down on the baking sheet. This ensures a golden, caramelized surface.

Don’t Overcrowd:
Spread the sprouts in a single layer without overlap to avoid steaming and get that crisp-roasted texture.

Watch the Glaze:
The garlic soy glaze can burn quickly if overheated. Simmer gently just until it thickens slightly, then remove from heat.

Use Fresh Lemon:
Freshly squeezed lemon juice makes the flavor pop and balances the sweet and savory glaze.

See also Mediterranean Best-Ever Herb Chicken Penne with Crispy Potatoes
Make It Ahead:
You can roast the sprouts ahead of time and reheat them in a skillet with the glaze right before serving.

Variations
Flavor Twists:
Add Feta or Goat Cheese:
Crumble some feta cheese or goat cheese over the finished dish for creamy, tangy contrast.

Mediterranean Herbs:
Stir in oregano, thyme, or rosemary for a more herbaceous Mediterranean flavor.

Umami Boost:
Add a teaspoon of white miso paste to the glaze for deeper umami richness.

Spicy Kick:
If you like it spicier, increase the red pepper flakes or drizzle with Mediterranean chili oil.

Ingredient Swaps:
Soy Sauce Alternative:
Use tamari for gluten-free or coconut aminos for a lower-sodium option.

Honey Substitute:
Use maple syrup or agave nectar for a vegan-friendly glaze.

Nuts & Seeds:
Swap toasted sesame seeds for pine nuts, slivered almonds, or crushed pistachios for extra texture.

Serving Ideas:
Pair with grilled chicken, salmon, or lamb kebabs.

Serve over quinoa or couscous bowls.

Use as a topping for Mediterranean flatbreads or wraps.

Q&A
Q: Can I use frozen Brussels sprouts?
A: Fresh Brussels sprouts work best for roasting because they caramelize and crisp up better. However, if you only have frozen, thaw and pat them dry very well before roasting. Expect a softer texture.

Q: What other vegetables can I use with this glaze?
A: This garlic soy glaze is versatile! Try it with broccoli, cauliflower, zucchini, green beans, or eggplant for a similar Mediterranean-inspired side.

Q: How do I store leftovers?
A: Store leftovers in an airtight container in the refrigerator for up to 3 days. Reheat in a skillet or oven to maintain crispness.

See also Mediterranean Parmesan Chicken Alfredo Wraps
Q: Can I make this recipe oil-free?
A: You can reduce the oil or omit it in the glaze, but roasting the Brussels sprouts without oil will result in less browning and crispiness.

Q: Is this recipe suitable for meal prep?
A: Yes! Roast the sprouts and make the glaze separately. Toss them together just before serving to keep the texture fresh.

Nutrition Facts (Per Serving – Approximate for 4 servings)
Nutrient Amount
Calories 155 kcal
Protein 4 g
Carbohydrates 15 g
Fiber 5 g
Sugars 6 g
Fat 9 g
Saturated Fat 1 g
Sodium 430 mg
Vitamin C 80% DV
Vitamin K 140% DV
Note: Nutrition values are estimates and may vary depending on specific ingredients used.

Conclusion
These Mediterranean Garlic Soy Glazed Brussels Sprouts are the perfect combination of bold flavor and healthy eating. Roasted until crisp, then tossed in a glossy glaze packed with garlic, soy, lemon, and balsamic, they offer an irresistible balance of savory, sweet, and tangy. Whether you’re looking for a unique side dish, a vegetarian main, or a meal prep component, this recipe delivers both nutrition and taste.

Enjoy this dish as part of your Mediterranean-inspired table, and feel free to customize it with your favorite herbs, cheeses, or proteins!

Fresh Pickled Cucumber Salad

Fresh Pickled Cucumber Salad 

Table of Contents

Description:
Fresh Pickled Cucumber Salad is a tangy, crunchy, and refreshing side dish that’s perfect for summer BBQs, family dinners, or as a healthy snack. The best part? It gets even better as it sits in the refrigerator. This easy recipe lasts up to two months in the fridge, but trust us—it’ll be gone long before that!

Servings: Makes about 2 quarts
Prep Time: 15 minutes
Marinating Time: Minimum 24 hours
Total Time: 24 hours 15 minutes

Ingredients

  • 4 medium cucumbers, thinly sliced

  • 1 small onion, thinly sliced

  • 1 cup white vinegar

  • 1 cup granulated sugar

  • 1 tablespoon salt

  • ½ teaspoon black pepper

  • ½ teaspoon celery seed (optional for extra flavor)

  • ½ teaspoon mustard seed (optional)

  • 1 cup water

Instructions

  1. Prepare the Cucumbers & Onion:
    Wash and thinly slice the cucumbers. Slice the onion into thin rings.

  2. Mix the Brine:
    In a medium saucepan, combine vinegar, sugar, salt, water, pepper, and optional spices (celery & mustard seeds). Heat over medium heat until the sugar and salt dissolve completely (do not boil).

  3. Assemble the Pickles:
    In two clean quart-sized jars, layer cucumbers and onion slices.

  4. Pour the Brine:
    Carefully pour the warm brine over the cucumber and onion mixture, ensuring they are fully submerged.

  5. Seal and Chill:
    Seal the jars tightly and refrigerate for at least 24 hours before serving for the best flavor.

Serving Suggestions

  • Perfect with grilled meats (BBQ chicken, burgers, hot dogs)

  • Adds crunch to sandwiches & wraps

  • Great as a healthy snack straight from the jar

See also  Sweet and Spicy Zucchini Relish Recipe

Storage

  • Refrigerate up to 2 months (but it usually disappears in a few days!)

Nutritional Info (per ½ cup serving)

  • Calories: 35 kcal

  • Carbs: 8g

  • Protein: 0.5g

  • Fat: 0g

  • Fiber: 1g

Benefits of Fresh Pickled Cucumber Salad

  • Low in calories – great for weight management

  • Hydrating – cucumbers are 95% water

  • Rich in antioxidants – onion & cucumber provide vitamin C

  • Probiotic potential (if using natural fermentation)

Q&A Section

Q1: Can I use apple cider vinegar instead of white vinegar?
Yes! Apple cider vinegar adds a slightly sweet and fruity flavor to your pickles.

Q2: Do I have to heat the brine?
Heating helps dissolve sugar and salt properly and enhances flavor, but you can also do a cold brine for a crunchier texture.

Q3: How soon can I eat them?
You can taste them after 4–6 hours, but for best flavor, wait 24–48 hours.

Q4: Can I reduce the sugar?
Yes, you can cut it in half for a more tangy taste, or substitute with honey or a sugar substitute.

Q5: How long will they last?
Up to 2 months in the refrigerator, as long as they stay submerged in the brine.

Keto Cool Whip Cookies

These Keto Cool Whip Cookies are ideal for satisfying the sweet tooth without crushing the keto diet. These whipped cookies are soft, fluffy, delicious, and very light. These cookies are prepared very quickly, and they take just thirty minutes. These cookies just require a few basic ingredients like almond flour, keto cool whip, & a keto-friendly sweetener, which is easily available in the home. We can easily customize these low-carb & gluten-free whip cookies and add nuts or chocolate chips as we like. They have a distinct softness due to the whipped cream texture, which makes them seem decadent while controlling carbs. These Keto Cool Whip Cookies make perfect for a perfect quick dessert, snacks, or even as a keto treat for your friends.


STATS:

  • Serving size: 1 cookie
  • Cook time: 10–12 mints.
  • Cuisine: American
  • Prep time: Five mints.
  • Total time: 20–25 mints.
  • Course: Dessert, Snack
  • Calories: 90 kcal
  • Diet: Keto, Low-Carb, Gluten-Free
  • Servings: 12 cookies

EQUIPMENT:

  • Baking sheet
  • Parchment paper
  • Cookie scoop
  • Mixing bowl
  • Spatula
  • Whisk

INGREDIENTS:

  • 1 cup almond flour
  • 1 cup keto cool whip
  • 1 egg
  • ½ cup monk fruit powder
  • 1 tsp. vanilla extract
  • ¼ cup keto chocolate chips

INGREDIENTS NOTES:

ALMOND FLOUR:

  • We have to use the finely ground blanched almond flour for the nice and soft texture of these cookies and we don’t have to use the almond meal as the cookies will become dense and grainy.

WHIPPED CREAM:

  • We have to use the homemade whipped cream with the keto sweetener like Erythritol or we can also use the keto-friendly whipped topping like Truwhip Zero. We don’t have to use the regular whip cream as it increases the carbs count.

KETO SWEETENER:

  • We have to use keto sweeteners like Erythritol, Monk fruit, or Allulose in powder form to avoid the grainy texture of these cookies.

EGGS:

  • Egg provides moisture and it also aids in binding the dough. We have to utilize a big egg for the best quality.

VANILLA EXTRACT:

  • Vanilla extract enhances the taste of these cookies and we have to use pure vanilla extract but we can also use the lemon extract for the different taste and flavor profile.

TOPPING:

  • We can add some nuts like almonds, peanuts, or pistachios as well as keto chocolate chips to change the taste and make it more flavorful.


INSTRUCTION:

  1. We have to on the oven at three-fifty degrees F.
  2. Then we would place the paper on a baking pan.
  3. Now we can put the egg, Erythritol, almond flour, & vanilla extract in a mixing dish and stir these ingredients till they get just mixed.
  4. We can add the cool whip and fold gently to form the dough and it should be sticky and soft.
  5. Then we can place the cookie dough in tray by using the spoon.
  6. Now we can add some crushed nuts or chocolate chips to the cookies.
  7. We can put the cookies in the oven for 10 to 12 minutes or till the edges get golden brown.

TIPS:

  • We have to wet our hands with water or oil to handle the dough easily.
  • You would include cinnamon, cocoa, or lemon zest for the additional taste.
  • We can also turn these cookies into sandwiches by placing the keto icing between the two cookies.

STORAGE INFORMATION:

FRIDGE:

  • We can put the leftover cookies in the sealed box and store these cookies for 5 days.

FREEZER:

  • We can store these cookies for around 3 months.

FAQs:

Are these cookies low in carb content?

  • These cookies are low in carbs content and they just comprise 2g net carbs and 1g fiber in a single serving.

Can I make these cookies with coconut flour?

  • We can’t make these cookies with the coconut flour as it absorbs more moisture content so we just have to use the almond flour.

Is cool whip keto?

  • The cool whip is not keto but we have to look for keto-friendly brands like Truwhip Zero or just prepare our cool whip.

Can I make the non-dairy cookies?

  • We can make the cookies non-dairy and use the coconut cream as a dairy-free alternative.

Will we store these cookies?

  • We can preserve these cookies in a sealed box and preserve these cookies for five days in the refrigerator and three months in the freezer.


NUTRITIONAL INFORMATION:

Calories: 90 kcal
Carbs: 3g
Net carbs: 2g
Fiber: 1g
Protein: 2g
Fat: 7g
Sodium: 50mg
Potassium: 40mg
Calcium: 20mg
Iron: 0.3mg
Vitamin A: 15 IU
Serving size: 1 cookie

Shrimp & Avocado Rice Bowls with Lemon-Herb Tahini Sauce

Shrimp & Avocado Rice Bowls with Lemon-Herb Tahini Sauce
Table of Contents
These Mediterranean Shrimp & Avocado Rice Bowls are a vibrant, nourishing meal packed with lean protein, healthy fats, and bold flavors. Juicy shrimp are seasoned and pan-seared, then served over fluffy rice with creamy avocado, crisp veggies, and a tangy lemon-herb tahini sauce. This bowl combines the heart-healthy benefits of the Mediterranean diet with the comfort of a warm rice bowl.

It’s a gluten-free, protein-rich meal that’s quick to prepare and easy to customize for meal prep or weeknight dinners.

Prep & Cook Time:
Prep Time: 15 minutes

Cook Time: 10 minutes

Total Time: 25 minutes

Yield: 4 servings

Ingredients:
For the Shrimp:
1 lb large shrimp, peeled and deveined

1 tbsp olive oil

1 tsp smoked paprika

½ tsp garlic powder

½ tsp dried oregano

Salt and black pepper to taste

Juice of ½ lemon

For the Lemon-Herb Tahini Sauce:
¼ cup tahini

2 tbsp fresh lemon juice

1 tbsp olive oil

2 tbsp water (more if needed for thinning)

1 clove garlic, minced

1 tbsp fresh parsley, chopped

1 tbsp fresh dill or mint, chopped (optional)

Salt and black pepper to taste

See also Italian drunken noodle recipe
For the Bowls:
2 cups cooked basmati or jasmine rice (use brown rice or cauliflower rice for variation)

1 avocado, sliced

½ cup cherry tomatoes, halved

½ cup cucumber, diced

¼ cup red onion, thinly sliced

¼ cup Kalamata olives, sliced (optional)

2 tbsp fresh parsley, chopped

Lemon wedges for serving

Instructions:
Prepare the Lemon-Herb Tahini Sauce:
In a small bowl, whisk together tahini, lemon juice, olive oil, garlic, and herbs.

Add water gradually until the sauce reaches a drizzly consistency.

Season with salt and pepper to taste. Set aside.

Cook the Shrimp:
Toss shrimp with olive oil, smoked paprika, garlic powder, oregano, salt, pepper, and lemon juice.

Heat a skillet over medium-high heat.

Sear shrimp for 2-3 minutes per side, or until pink and cooked through. Remove from heat.

Assemble the Bowls:
Divide rice among 4 bowls.

Top each bowl with shrimp, avocado, tomatoes, cucumber, red onion, olives, and fresh parsley.

Drizzle & Serve:
Drizzle the lemon-herb tahini sauce over each bowl.

Serve with lemon wedges on the side for extra zing.

Serving Suggestions:
Serve warm for a cozy meal or cold as a refreshing salad-style bowl.

Pair with pita bread or naan for a more filling meal.

Great for meal prep—store shrimp, rice, and sauce separately for best texture.

Tips:
Don’t Overcook the Shrimp:
Shrimp cook quickly! 2-3 minutes per side is usually enough. Overcooking will make them rubbery.

Make Sauce Ahead:
The lemon-herb tahini sauce can be prepared up to 3 days in advance. Store it in the fridge and stir before using.

Rice Options:
Use warm rice for a comfort food-style bowl, or chilled rice for a refreshing meal prep bowl.

See also Baked Spinach and Sun-Dried Tomato Rigatoni
Thin the Sauce Gradually:
Tahini thickens as you stir, so add water slowly until it’s pourable but not runny.

Use Pre-Cooked Rice for Speed:
Microwaveable rice packets or leftover rice make this meal even faster.

Variations:
Protein Swaps:
Chicken:
Use grilled chicken breast or thighs in place of shrimp for a different protein.

Salmon:
Top with seared or baked salmon for a heart-healthy omega-3 boost.

Plant-Based:
Swap shrimp for chickpeas, falafel, or grilled tofu for a vegetarian or vegan version.

Grain Alternatives:
Quinoa or Farro:
Use quinoa, farro, or bulgur for added fiber and protein.

Low-Carb:
Use cauliflower rice or riced broccoli for a lighter, low-carb bowl.

Toppings & Extras:
Feta Cheese:
Sprinkle with crumbled feta (or vegan feta) for creaminess and saltiness.

Pickled Onions:
Swap raw red onions for quick-pickled onions for extra tang.

Hummus or Baba Ghanoush:
Add a dollop of hummus or baba ghanoush for extra Mediterranean flair.

Herb Variations:
Use mint, cilantro, or basil in the tahini sauce for different flavor profiles.

Q&A:
Can I meal prep this recipe?
Yes! For best results, store the components separately:

Keep the shrimp and rice together in meal containers.

Store the vegetables and avocado separately to keep them fresh.

Keep the lemon-herb tahini sauce in a small container and drizzle just before eating.

What can I use instead of tahini?

If you don’t have tahini, you can substitute with:

Greek yogurt (for a creamy, tangy dressing)

Almond butter or cashew butter (for a mild nutty taste)

Hummus thinned with lemon juice and water

Is this recipe gluten-free?

Yes! This recipe is naturally gluten-free, especially when served with rice or cauliflower rice.

See also Crispy Garlic Herb Rice Balls
Can I serve this bowl cold?

Absolutely. This dish is delicious warm or cold, making it perfect for packed lunches or summer meals.

Can I use frozen shrimp?

Yes! Just thaw the shrimp completely before cooking. Pat them dry to prevent excess moisture in the pan.

Nutrition Facts (Per Serving – Based on 4 Servings):
Nutrient Amount
Calories 420 kcal
Protein 28 g
Carbohydrates 28 g
Fiber 5 g
Sugar 3 g
Fat 23 g
Saturated Fat 3 g
Sodium 520 mg
Note: Nutrition may vary based on rice type and toppings.

Conclusion:
The Mediterranean Shrimp & Avocado Rice Bowls with Lemon-Herb Tahini Sauce are a balanced, vibrant meal that’s packed with fresh flavors and nourishing ingredients. From the juicy shrimp to the creamy avocado and zesty tahini drizzle, this dish checks all the boxes for a healthy, satisfying Mediterranean-style bowl.

It’s perfect for quick weeknight dinners, meal prep, or lunch on-the-go. Plus, it’s highly customizable—adapt it with different proteins, grains, or veggies to suit your taste or dietary needs.

Carrot Apple Zucchini Muffins with Cream Cheese Frosting

Carrot Apple Zucchini Muffins with Cream Cheese Frosting
Ingredients:
For the Muffins:
1 cup all-purpose flour
1 cup whole wheat flour
1 teaspoon baking soda
1/2 teaspoon baking powder
1/2 teaspoon salt
1 teaspoon ground cinnamon
1/2 teaspoon ground nutmeg
1/2 teaspoon ground ginger
1/2 cup granulated sugar
1/2 cup brown sugar
1/2 cup vegetable oil
1/4 cup applesauce
3 large eggs
1 teaspoon vanilla extract
1 cup grated carrots
1 cup grated zucchini
1 cup grated apple (peeled and cored)
For the Cream Cheese Frosting:
8 oz cream cheese, softened
1/4 cup unsalted butter, softened
1/2 cup powdered sugar
1 teaspoon vanilla extract
Instructions:
Prepare the Muffins:
Preheat your oven to 350°F (175°C). Line a muffin tin with paper liners or lightly grease it.
In a large bowl, whisk together the flours, baking soda, baking powder, salt, cinnamon, nutmeg, and ginger.
In another bowl, combine the granulated sugar, brown sugar, vegetable oil, applesauce, eggs, and vanilla extract until well mixed.
Gradually add the dry ingredients to the wet ingredients, stirring until just combined.
Fold in the grated carrots, zucchini, and apple.
Divide the batter evenly among the muffin cups, filling each about 2/3 full.
Bake for 20-25 minutes, or until a toothpick inserted into the center comes out clean.
Allow the muffins to cool in the tin for 5 minutes, then transfer to a wire rack to cool completely.
Prepare the Cream Cheese Frosting:
In a medium bowl, beat the softened cream cheese and butter until creamy and smooth.
Gradually add the powdered sugar and vanilla extract, beating until smooth and well combined.
Assemble the Muffins:
Once the muffins are completely cool, spread or pipe the cream cheese frosting over the top of each muffin.
Optionally, garnish with additional grated carrots, zucchini, and apple for a decorative touch.

Ginger Water Recipe

🥤 Description

Ginger water is a wonderfully refreshing and detoxifying drink made by simmering fresh ginger root in water. It’s known for its zesty flavor and numerous wellness benefits — from aiding digestion to boosting immunity. Enjoy it warm or chilled, on its own or with a squeeze of lemon or drizzle of honey.

🍽️ Servings

Makes 4 cups (about 1 liter) — serves 2–4

🛒 Ingredients for Ginger Water

  • 4 cups (1 liter) water

  • 2–3 inches fresh ginger root (peeled and thinly sliced)

  • Optional:

    • 1–2 tbsp honey or maple syrup (for sweetness)

    • 1 tbsp lemon juice (for brightness)

    • A few mint leaves (for freshness)

🔪 Instructions

  1. Prep Ginger: Peel the ginger root using the edge of a spoon. Slice it thinly to maximize flavor release.

  2. Simmer: Add sliced ginger and water to a small saucepan. Bring to a gentle boil over medium heat.

  3. Infuse: Reduce heat and simmer for 10–15 minutes (longer for a stronger flavor).

  4. Strain: Remove from heat. Strain the liquid into a jar or jug to remove ginger pieces.

  5. Finish: Stir in sweetener and/or lemon juice if using.

  6. Serve: Enjoy hot immediately — or refrigerate and serve chilled over ice.

📝 Notes

  • The more thinly you slice the ginger, the stronger the infusion.

  • If you prefer an extra-strong flavor, simmer up to 30 minutes.

  • Store leftovers in the refrigerator for up to 3 days.

  • Great served warm in winter or iced in summer.

💡 Tips

  • Add a cinnamon stick or turmeric slice while simmering for a spice boost.

  • Use sparkling water after cooling for a homemade ginger soda.

  • Drink first thing in the morning to help wake up digestion.

⚖️ Approximate Nutritional Info (per 1 cup without sweetener)

Nutrient Amount
Calories 2
Carbohydrates 0.5 g
Sugars 0 g
Fat 0 g
Protein 0 g
Sodium 5 mg

(Add ~60 calories per tablespoon of honey.)

🌟 Health Benefits

  • Digestive Aid: Ginger stimulates digestion and reduces bloating/nausea.

  • Anti-inflammatory: Gingerol compounds in ginger help reduce inflammation.

  • Immunity Boost: Antioxidants in ginger support immune function.

  • Hydration: Helps you stay hydrated while giving plain water a flavorful twist.

❓ Q & A

Q: Can I drink ginger water every day?
A: Yes — 1–2 cups per day is generally safe and beneficial for most people.

Q: Can I reuse the ginger slices?
A: You can reuse once for a lighter second batch, though flavor will be milder.

Q: Is it safe during pregnancy?
A: Ginger can help with nausea, but stick to moderate amounts and consult your doctor.

Q: Can I sweeten it with sugar instead of honey?
A: Absolutely — use any sweetener you prefer, or leave it unsweetened.

Healthy Tomato Zucchini Pasta

Ingredients:
1 lb (450 g) whole wheat spaghetti
2 tablespoons olive oil
3 cloves garlic, minced
2 medium zucchinis, sliced into thin half-moons
2 cups cherry tomatoes, halved (or 1 can diced tomatoes, drained)
Salt and black pepper, to taste
1/2 teaspoon red pepper flakes (optional, for a kick)
1/4 cup grated Parmesan cheese (optional)
Fresh basil or parsley, chopped (for garnish)
Juice of 1/2 lemon (optional but adds brightness)
Instructions:
1. Cook the Pasta
Bring a large pot of salted water to a boil.
Cook the whole wheat spaghetti according to package instructions until al dente.
Drain, reserving about 1/2 cup of pasta water, and set aside.
2. Sauté the Garlic and Veggies
In a large skillet, heat olive oil over medium heat.
Add the minced garlic and sauté for about 30 seconds until fragrant.
Add the sliced zucchini and cook for 4–5 minutes, stirring occasionally, until just tender.
Toss in the cherry tomatoes and cook for another 2–3 minutes until they start to soften and release their juices.
Season with salt, pepper, and red pepper flakes (if using).
3. Combine with Pasta
Add the cooked pasta to the skillet with the veggies.
Toss everything together, adding a splash of reserved pasta water to loosen the sauce if needed.
Drizzle with lemon juice and adjust seasoning to taste.
4. Serve
Serve warm, topped with freshly grated Parmesan and chopped herbs.
Add a drizzle of olive oil or a few toasted pine nuts for extra richness and crunch, if desired.

Keto Cheeseburger Quesadillas

The Keto Cheeseburger Quesadillas are the most suitable Mexican dish and recipe. it is using a low-carb tortilla in each slice of cheeseburger quesadillas. Furthermore, it is the finest and most comfortable dinner recipe. In this recipe, bacon and ground beef are the best combinations of tomato sauce and Worcestershire. The keto cheeseburger quesadillas are the best combination of bacon, ground beef, chopped onion, tomato paste, Worcestershire sauce, mustard, cream cheese, tortillas, and shredded cheddar cheese. With the help of these things, you can make the keto cheeseburger quesadillas very tasty, crispy, creamy, and favorable.


Ingredients:

  • Shredded cheddar cheese 1 1/4 cup
  • Regular and low-carb tortillas 5 small
  • Cream cheese 2 ounces
  • Mustard 1 tsp.
  • Tomato paste 2 tbsp.
  • Worcestershire sauce 2 tsp.
  • Chopped onion 1/2 cup
  • Ground beef 1 pound
  • Bacon 3 slices


Instructions:

  1. Use a large skillet, add the bacon, and cook it until it becomes brown and crisp.
  2. Take out the bacon from the skillet add the onion and ground beef to the same skillet and cook it for 3 minutes.
  3. Decrease the heat from medium to low and add the Worcestershire sauce, cream cheese, cooked bacon, mustard, and tomato paste, and sprinkle them with the shredded cheddar cheese.
  4. Top them with beef mixture and fold them in the tortillas.
  5. Cook them for 5 to 6 minutes and take them out from the heat.
  6. Now, serve it.


Notes:

Detail:

  • The keto cheeseburger quesadillas are made with ground portions of beef and portions of beef.
  • To make this recipe creamy, you can use the cream cheese.
  • Chop the slices of bacon into the small pieces.

Frequently asked questions:

Information:

What should I serve with the keto cheeseburger quesadillas?
  • You can serve the keto cheeseburger quesadillas with Chuy’s jalapeno ranch, avocado ranch dip, smoked queso, ranch zucchini chips, zucchini tortillas, fajita veggies, no-bake cheesecake, chili cheese collard green chips, and keto cinnamon twist.
Is meal prep is good for cheeseburger quesadillas?
  • Yes, meal prep is good for the cheeseburger quesadillas.
Nutritional facts:

Seving size: 1 quesadillas
Total carbohydrates: 22 g
Calories: 394 kcal
Protein: 33 g
Total fat: 24 g
Sodium: 698 mg
Cholesterol: 99 mg
Fiber: 15.6 g
Sugar: 1.8 g

Chicken Bacon Ranch Taquitos

🥓 Chicken Bacon Ranch Taquitos

Yield: ~12 taquitos
Prep Time: 15 minutes
Cook Time: 20 minutes
Total Time: 35 minutes


🧾 Ingredients:

Filling:

  • 2 cups cooked chicken, shredded (rotisserie works great)

  • 6 slices bacon, cooked and crumbled

  • 1 cup shredded cheddar cheese (or cheese blend)

  • 4 oz cream cheese, softened

  • ¼ cup ranch dressing

  • 1 tsp garlic powder

  • ½ tsp onion powder

  • Salt & pepper to taste

  • 2 green onions, thinly sliced (optional)

For Assembly:

  • 10–12 small flour tortillas (or corn if you prefer)

  • Cooking spray or a bit of oil for brushing

Optional for Serving:

  • Extra ranch dressing

  • Salsa or pico de gallo

  • Sour cream


🍳 Instructions:

1. Preheat Oven:

  • Preheat oven to 425°F (220°C).

  • Line a baking sheet with parchment paper or lightly grease it.

2. Make the Filling:

In a large bowl, mix together:

  • Shredded chicken

  • Crumbled bacon

  • Cheddar cheese

  • Cream cheese

  • Ranch dressing

  • Garlic powder

  • Onion powder

  • Salt, pepper

  • Green onions (if using)

Mix until well combined and creamy.

3. Assemble Taquitos:

  • Warm tortillas slightly (in the microwave wrapped in a damp paper towel for ~20 seconds) to make them more pliable.

  • Place 2–3 tablespoons of filling on the lower third of each tortilla.

  • Roll tightly and place seam-side down on the baking sheet.

4. Bake:

  • Lightly spray or brush the tops with oil.

  • Bake for 15–20 minutes, or until golden brown and crispy.

Optional: For extra crispiness, broil for 1–2 minutes at the end — watch closely!

5. Serve:

  • Serve warm with ranch, sour cream, or your favorite dip.


🔄 Variations & Tips:

  • Air Fryer Option: Cook at 375°F for 6–8 minutes, flipping halfway through.

  • Add Heat: Mix in diced jalapeños or a bit of hot sauce.

  • Make Ahead: Assemble and freeze unbaked taquitos. Bake from frozen at 400°F for 20–25 minutes.

Low-Carb Cauliflower Steaks

Looking for a delicious low-carb alternative to baked potatoes? Look no further! This Keto Cauliflower Steak recipe is not only flavorful but also packed with nutrients, making it the perfect side dish or even a main course. Featuring crispy edges, a cheesy topping, and delicious garnishes, these cauliflower steaks are sure to impress. Follow this detailed guide for a comprehensive step-by-step approach, nutritional information, and tips to create the perfect dish.
Ingredients
For the Cauliflower Steaks
1 large head of cauliflower
2 tablespoons olive oil (extra virgin for better flavor)
1 teaspoon salt
1 teaspoon black pepper
1 teaspoon garlic powder
1 teaspoon onion powder
1 teaspoon dried parsley (or fresh, finely chopped if available)
For the Topping
2 tablespoons unsalted butter (melted)
1 cup shredded cheese (cheddar, mozzarella, or a blend)
1/2 cup crumbled bacon (cooked until crispy)
1/2 cup sour cream (full-fat for best flavor)
Equipment Needed
Baking sheet
Parchment paper (optional, for easy cleanup)
Sharp knife
Basting brush
Oven
Large mixing bowl
Instructions
Step 1: Preheat Your Oven
Begin by preheating your oven to 400°F (200°C). Preheating is crucial for achieving a crispy exterior on your cauliflower steaks.

Step 2: Prepare the Cauliflower
Take a large head of cauliflower and remove the outer leaves. Rinse it under cold water to clean it. Pat it dry with a kitchen towel.

Step 3: Slice the Cauliflower
Using a sharp knife, carefully slice the cauliflower into thick steaks, approximately 1-inch thick. You should aim for about 4-6 steaks, depending on the size of your cauliflower head. Keep any florets that fall off for roasting or other recipes.

Step 4: Season the Steaks
In a large mixing bowl, combine 2 tablespoons of olive oil, 1 teaspoon of salt, 1 teaspoon of black pepper, 1 teaspoon of garlic powder, 1 teaspoon of onion powder, and 1 teaspoon of dried parsley. Whisk these ingredients together until well combined.

Step 5: Brush the Cauliflower
Place the cauliflower steaks on a baking sheet lined with parchment paper (if using). Brush each steak generously with the olive oil seasoning mixture using a basting brush. Make sure to coat both sides for maximum flavor.

Step 6: Bake the Cauliflower
Place the baking sheet in the preheated oven and bake the cauliflower steaks for 30 minutes, flipping them halfway through. This ensures even cooking and helps develop a nice golden-brown color.

Step 7: Add Butter and Cheese
After the initial baking time, remove the cauliflower steaks from the oven. Brush each steak with 2 tablespoons of melted unsalted butter for added richness. Then, sprinkle 1 cup of shredded cheese evenly over the top of each steak.

Step 8: Broil for Perfection
Return the baking sheet to the oven and switch the setting to broil. Broil the cauliflower steaks for 2-3 minutes or until the cheese is bubbly and golden brown. Keep a close eye on them during this step to prevent burning.

Step 9: Add Bacon and Sour Cream
Once the cheese is melted and bubbly, remove the baking sheet from the oven. Sprinkle 1/2 cup of crumbled bacon over the top of each steak. Finally, add a dollop of 1/2 cup of sour cream on top of each steak for a creamy finish.

Step 10: Serve and Enjoy
Plate the cauliflower steaks and garnish with additional parsley if desired. Serve immediately while hot and enjoy your delicious, low-carb alternative to baked potatoes!
Nutritional Information (per serving, based on 4 servings)
Calories: 290
Total Fat: 24g
Saturated Fat: 12g
Carbohydrates: 7g
Fiber: 3g
Net Carbs: 4g
Protein: 12g
SmartPoints: 7 points per serving (may vary based on specific ingredients used)
Tips for Making the Best Cauliflower Steaks
Select a Fresh Cauliflower: Choose a firm, heavy head of cauliflower with tightly packed florets. Avoid any that have brown spots or blemishes.
Thickness Matters: Aim for 1-inch thick steaks to ensure they hold together during cooking. Thinner slices may fall apart or become too crispy.
Season Generously: Don’t shy away from seasoning! The flavor of the cauliflower is subtle, so robust seasoning is essential to elevate the dish.
Experiment with Cheese: Feel free to mix and match cheeses based on your preference. Gruyère, pepper jack, or even feta can add unique flavors to the dish.
Bacon Alternatives: If you’re looking for a lower-fat option, consider turkey bacon or leave out the bacon altogether for a vegetarian version.
Meal Prep: This recipe is great for meal prepping. The steaks can be baked in advance and reheated as needed throughout the week.
Storage: Store any leftovers in an airtight container in the refrigerator for up to 3 days. Reheat in the oven or microwave before serving.
Conclusion
This Keto Low-Carb Cauliflower Steak recipe offers a delicious, satisfying alternative to traditional baked potatoes. Bursting with flavor from the olive oil, garlic, and cheese, it’s a dish that everyone will love—keto dieters and non-dieters alike. Not only is it simple to prepare, but it also provides a healthy dose of vegetables and can be customized to suit your taste. Enjoy these cauliflower steaks as a side dish or make them the star of your next meal!

Garlic Herb Roasted Veggies

This recipe for Garlic Herb Roasted Potatoes, Carrots, and Zucchini is a delicious and colorful side dish that’s easy to prepare and goes well with a variety of main courses. Whether you’re serving it alongside a roast, grilled chicken, or fish, these roasted vegetables bring a healthy and flavorful addition to any meal. Here’s how to make it:

Ingredients:

3 medium potatoes, cubed
4 carrots, sliced
2 zucchinis, sliced
3 tablespoons olive oil
4 cloves garlic, minced
1 teaspoon dried thyme
1 teaspoon dried rosemary
1/2 teaspoon dried oregano
Salt and pepper, to taste
Optional: Fresh parsley, chopped for garnish

Instructions:

Preheat the Oven:
Preheat your oven to 400°F (200°C). Line a large baking sheet with parchment paper or lightly grease it to prevent sticking.
Prepare the Vegetables:
Wash and peel the potatoes and carrots. Cube the potatoes and slice the carrots into thin rounds or sticks, depending on your preference.
Wash the zucchinis and slice them into rounds. Try to keep the slices of all vegetables approximately the same thickness for even cooking.
Season the Vegetables:
In a large mixing bowl, combine the cubed potatoes, sliced carrots, and zucchini slices.
Add the minced garlic, olive oil, dried thyme, rosemary, oregano, salt, and pepper to the bowl. Mix everything together until the vegetables are uniformly coated with the oil and seasonings.
Roast the Vegetables:
Arrange the seasoned vegetables in an even layer on the prepared baking sheet. Ensure they are in a single layer and not overcrowded to promote even roasting.
Place in the preheated oven and roast for about 25-30 minutes, or until the vegetables are tender and golden brown. Give the vegetables a gentle stir halfway through the cooking time to ensure they brown evenly.
Serve:
After roasting, take the vegetables out of the oven. If desired, sprinkle with freshly chopped parsley for a burst of color and additional flavor.
Serve hot as a side dish with your favorite protein or enjoy them on their own as a tasty and healthy snack.
Tips:
Uniform Cutting: Ensure all the vegetables are cut into similar-sized pieces to ensure they cook evenly.
Variations: Feel free to add other vegetables like bell peppers or onions to the mix for added flavor and color. You can also experiment with other herbs like basil or marjoram for different flavor profiles.
Storage: Leftover roasted vegetables can be stored in an airtight container in the refrigerator for up to 3 days and reheated in the oven or microwave.
Conclusion:
Garlic Herb Roasted Potatoes, Carrots, and Zucchini is a versatile and easy-to-make dish that adds a healthy and flavorful touch to any meal. It’s perfect for busy weeknights and can be customized with various herbs and vegetables based on your preferences or what you have on hand. Enjoy this delicious mix of roasted vegetables and make the most of your side dishes!

Banana pineapple bread Recipe

Banana pineapple bread is a moist, tropical-flavored quick bread that combines the sweetness of ripe bananas with the tangy juiciness of crushed pineapple. This flavorful loaf is often enriched with warm spices like cinnamon and nutmeg, and sometimes includes chopped nuts or shredded coconut for added texture. The pineapple adds moisture, making the bread extra soft and tender.

Ingredients:

Wet Ingredients:

2 large ripe bananas, mashed

1/4 cup extra virgin olive oil (heart-healthy fat)

1/4 cup unsweetened applesauce (replaces some oil for moisture)

1/4 cup honey or pure maple syrup (natural sweetener)

2 large eggs (or flax eggs for vegan option)

1 teaspoon pure vanilla extract

Dry Ingredients:

1 1/2 cups almond flour (or spelt flour for Mediterranean-friendly fiber)

1 teaspoon baking soda

1/2 teaspoon baking powder

1/2 teaspoon cinnamon

Pinch of sea salt

Add-Ins:

3/4 cup fresh pineapple, diced (or canned in its juice, drained)

1/2 cup unsweetened shredded coconut

1/4 cup chopped walnuts or almonds (optional for added crunch)

Instructions:

Preheat the Oven:

Preheat your oven to 350°F (175°C). Lightly grease a 9×5-inch loaf pan with olive oil or line it with parchment paper.

Mix the Wet Ingredients:

In a large bowl, whisk together the mashed bananas, olive oil, applesauce, honey/maple syrup, eggs, and vanilla extract until smooth.

Combine Dry Ingredients:

In another bowl, whisk together the almonds flour, baking soda, baking powder, cinnamon, and a pinch of sea salt.

Combine Wet and Dry Mixtures:

Gradually fold the dry ingredients into the wet mixture, stirring until just combined. Avoid overmixing.

Add the Pineapple and Coconut:

Gently fold in the diced pineapple, shredded coconut, and chopped nuts (if using).

Bake the Bread:

Pour the batter into the prepared loaf pan. Smooth the top with a spatula.

Bake for 45–55 minutes, or until a toothpick inserted in the center comes out clean.

Let the bread cool in the pan for 10 minutes, then transfer it to a wire rack to cool completely.

Serve and Enjoy:

Slice the bread and enjoy it as a breakfast, snack, or light dessert!

Why It’s Mediterranean-Friendly:

Healthy Fats:

Extra virgin olive oil and nuts provide heart-healthy unsaturated fats.

Natural Sweeteners:

Honey or maple syrup replace refined sugar.

Whole Grains: Whole wheat flour boosts fiber content.

Nutrient-Rich Additions:

Pineapple and coconut add natural sweetness, vitamins, and antioxidants.

Crispy Roasted Cauliflower

Cauliflower has transcended its reputation as a bland, overlooked vegetable and emerged as a culinary superstar, especially when roasted to perfection. My Crispy Roasted Cauliflower recipe is a testament to the versatility and deliciousness of this humble vegetable. Infused with Italian herbs and Parmesan, this dish promises a crispy, flavorful experience that rivals any meat dish. Whether you are a dedicated vegetarian or simply looking to add more vegetables to your diet, this recipe will win you over with its crispy texture and rich, savory taste.

Ingredients
Main Ingredients:
1 head of cauliflower
3 slices of lemon
A handful of dill
1 1/4 cups panko breadcrumbs
1 clove of minced garlic
3/4 cup all-purpose flour
3 eggs

5 tbsp olive oil
1 tsp Italian herbs
A handful of chopped parsley
1 cup grated Parmesan cheese
Salt, to taste
Ground black pepper, to taste
Sauce:
3/4 cup sour cream
1/2 cup yogurt

Freshly chopped parsley
Salt and ground black pepper
Lemon juice
Directions
Step 1: Prepare the Cauliflower
Start by cutting the cauliflower into florets. Bring a pot of salted water to a boil and add the lemon slices, a handful of dill, and the cauliflower florets. Boil for five minutes, then drain and set aside. This step helps to infuse the cauliflower with subtle flavors and tenderize it slightly before roasting.

Step 2: Prepare the Coating Mixture
In a large mixing bowl, combine the panko breadcrumbs, minced garlic, olive oil, Italian herbs, salt, ground black pepper, chopped parsley, and grated Parmesan cheese. Mix until well combined. This breadcrumb mixture will give the cauliflower its irresistible crispy coating.

Step 3: Coat the Cauliflower
Set up a dredging station with a plate of all-purpose flour, a bowl of whisked eggs, and the bowl of breadcrumb mixture. Dredge each cauliflower floret first in the flour, then dip it in the whisked eggs, and finally coat it in the breadcrumb mixture. Ensure each piece is evenly coated for maximum crispiness.

Step 4: Bake the Cauliflower
Place the coated cauliflower florets on a parchment-lined baking tray. Preheat your oven to 350°F (175°C) and bake for 20 minutes, or until the cauliflower is golden brown and crispy. The aroma of the herbs and Parmesan will fill your kitchen, making it hard to wait for the finished product.

Step 5: Prepare the Sauce
While the cauliflower is baking, prepare the sauce. In a small bowl, combine the sour cream, yogurt, freshly squeezed lemon juice, chopped parsley, salt, and ground black pepper. Mix well. This creamy, tangy sauce complements the crispy cauliflower perfectly, adding a refreshing contrast to each bite.

Step 6: Serve and Enjoy
Once the cauliflower is done baking, remove it from the oven and let it cool slightly. Serve the crispy roasted cauliflower with the prepared sauce. Garnish with extra parsley if desired. Enjoy this delicious, meat-free dish that is sure to impress both vegetarians and meat-lovers alike.

Nutrition Information
Per Serving:

Calories: 220
Protein: 10g
Carbohydrates: 25g
Dietary Fiber: 3g
Sugars: 3g
Fat: 10g
Saturated Fat: 3g
Cholesterol: 75mg
Sodium: 320mg
Vitamin A: 8% DV
Vitamin C: 70% DV
Calcium: 20% DV
Iron: 10% DV
Conclusion
This Crispy Roasted Cauliflower recipe is a delightful alternative to traditional meat dishes. The combination of herbs, Parmesan, and a crispy breadcrumb coating makes it a standout dish that will leave you craving more. Perfect for a weeknight dinner or as a side dish for a special occasion, this recipe is sure to become a favorite in your household.

KETO SHEPHARD’S PIE RECIPE

Using Parmesan-mashed cauliflower in instead of mashed potatoes creates a low-carb and keto KETO SHEPHARD’S PIE. This simple casserole dish is delicious and a wonderful way to honor St. Patrick’s Day.

A great way to observe the holiday is with this low-carb shepherd’s pie dish. I used my parmesan-mashed cauliflower as a substitute for the conventional mashed potatoes crust. Before baking, I added extra parmesan cheese to the mashed cauliflower shell.


For St. Patrick’s Day, I also enjoy making corned beef, but if you don’t like corned beef and want a hearty lunch, this keto Shepherd’s pie is a terrific alternative.

Ground meat topped with delicious vegetables, mashed potatoes, and cheese? Please, yes! In this keto shepherd’s pie recipe, I used excellent cauliflower mash in place of the potatoes and swapped out the peas, corn, and carrots that I would often use as low-carb vegetables. YUM!!!

Seriously, this Keto Shepherd’s Pie tastes so much better than the classic version, plus you won’t experience the terrible carb bloat afterward. This recipe has me super excited, especially for Nick who loves shepherd’s pie.


RECIPE FOR SHEPHERD’S PIE FILLING

Traditional Shepherd’s Pie is made using lamb, but as ground lamb is less common in the US, ground beef is frequently substituted. For this recipe, either one may be used. I used ground beef since although I adore lamb, my husband does not.

I used frozen peas and fresh carrots for my vegetables. English peas would have been ideal, but they can be difficult to find. Swap out peas and carrots can be with other veggies like green beans and celery if you’re following a ketogenic diet.

The remaining filling ingredients are tomato paste, onions, broth, rosemary, thyme, and Worchester sauce. The filling is really tasty and easy to make.


Why it functions

The ground beef topped with gravy and low-carb vegetables make this recipe the pinnacle of layered comfort cuisine.
This dish reheats well, making it a terrific meal for a small family or a busy home.

Expert Advice

Sprinkle the xanthan gum sparingly on top of the beef when adding it. It will clump up if you add it all at once, just like flour does when it’s added to a hot recipe.
See below for advice on how to prepare the best cauliflower mash.


HOW TO MAKE CAULIFLOWER MASHED WITH PARMESAN

I use a food processor to prepare my mashed cauliflower topping.

Boil the cauliflower until it is quite tender. To keep your cauliflower mash from tasting watery, pat the cauliflower dry after which you put it to your food processor.

Combine cream cheese and heavy cream with the cauliflower to create a creamy cauliflower mash consistency.

The mash has a great flavor that helps to hide the flavor of the cauliflower thanks to the parmesan cheese.

What distinguishes this from Cottage Pie?

It is cooked with lamb in the UK. Cottage pie is made with beef. In the US, a meat and vegetable filling topped with mashed potatoes is known by the titles cottage pie and shepherd’s pie interchangeably.

I’ve always thought of this shepherd’s pie made with beef, but if you want the conventional form, use the same amount of ground lamb instead.

GROUND TURKEY?

Use the same quantity of ground turkey for the shepherd’s pie filling for a leaner variation. Since turkey has a light flavour, you can wish to brown it with some Worcestershire sauce to give it a savoury flavour.


This keto shepherd’s pie dish is a terrific option to try if you’re in the mood for comfort cuisine but prefer something lighter. I do hope you like it!

INGREDIENTS

SCRUBBERY CAULIFLOWER

  • Cauliflower florets, 1 lb
  • Cream cheese, 3 ounces
  • a half-cup of grated parmesan cheese
  • 2 to 4 ounces of heavy cream, salt to taste

MEATS INSULATION

  • 1 small onion, diced finely
  • 1 pound of ground lamb or beef
  • a half cup of cubed, tiny carrots
  • Frozen or fresh peas, half a cup
  • 1 cup beef broth 1 teaspoon coarsely chopped rosemary
  • 1 teaspoon finely chopped thyme
  • 1 teaspoon Worcester sauce
  • 2 teaspoons of tomato paste, salt to taste

TOPPINGS (OPTIONAL) (OPTIONAL)

  • Shredded 1/4 cup parmesan cheese
  • 0.5 tsp of finely chopped rosemary or thyme

INSTRUCTIONS

MASHED CAULIFLOWER WITH PARMESAN

  1. Soften cauliflower in boiling water. Drain, remove, and pat dry the cauliflower. Put in the food processor. Till the cauliflower is totally mashed, add the Parmesan cheese and cream cheese.
  2. Blend the mashed cauliflower, then 1 oz at a time, gradually add the heavy cream. The mashed cauliflower should not be too thin, therefore you must be careful not to add too much liquid. As required, salt the food.

DELICIOUS MEATS

  1. Add onions and ground beef to a big skillet. Heat skillet to a medium-high temperature. While the ground beef cooks, stir and crumble it. Cook beef until browned and onions are transparent.
  2. Add tomato paste, Worcestershire sauce, rosemary, thyme, carrots, peas, and broth. Mix Worcester sauce and tomato paste. If necessary, add salt. Simmer mixture before the heat is reduced to medium. Simmer combination for the duration necessary for the broth to decrease and slightly thicken.

PUFFING UP THE PIE

  1. Set the oven to 350°F. Spread the filling in a casserole, measuring 7 by 11 inches.
  2. Mash the cauliflower and top the meat filling. Over the mashed cauliflower, spread 1/4 cup of grated parmesan cheese .
  3. Bake the mashed potatoes for TWENTY to TWENTY FIVE minutes in a preheated oven until the edges begin to brown. After that, turn the oven’s broiler to low and cook the dish for a few more minutes, or until the cheese is lightly browned.
  4. I suggest closely monitoring the oven because this should only take 2-4 minutes.
    Before serving, if preferred, sprinkle on 1/2 tsp of rosemary or thyme.

NOTES

  • Fresh rosemary and thyme can be substituted with dried versions.
  • Don’t forget to utilise the entire one pound of cauliflower florets. You won’t have enough mash otherwise to cover the entire baking pan.
  • 85/15 ground beef and 2 oz. of heavy cream were used to compute the nutritional information. There is no salt in it.

NUTRITION

calories: 340kcal,
carbohydrates: 9g,
protein: 22g,
fat: 23g,
saturated fat: 11g,
sodium: 508mg,
fiber: 2g,
sugar: 4g,
net carbs: 7g

Green Enchilada Chicken Soup

Directions:

  1. Prepare the Chicken and Broth Base:
    • Place chicken, green enchilada sauce, and chicken broth into the Crock Pot.
    • Cook on low for 6-8 hours.
  2. Shred the Chicken:
    • Remove chicken, shred with two forks, and return to the Crock Pot.
  3. Add Creamy Ingredients:
    • Add Monterey Jack cheese, cream cheese, half and half or Greek yogurt, and green salsa.
    • Stir well and cook on low for an additional 30 minutes.
  4. Taste and Adjust Seasoning:
    • Add salt and pepper to taste.
  5. Serve and Garnish:
    • Ladle soup into bowls and top with desired garnishes like avocado, cilantro, green onion, and sour cream.

Tips:

  • Use chicken thighs for more flavor.
  • Adjust spice level with mild or hot enchilada sauce.
  • Make ahead and store in the fridge for up to 3 days or freeze for up to 3 months.
  • Customize with toppings like shredded cheese, jalapeños, or crispy tortilla strips.

Enjoy your comforting and flavorful Crock Pot Green Enchilada Chicken Soup! 🍲😊

This soup combines the tangy flavor of green enchilada sauce, tender chicken, and creamy cheeses for a delightful meal. Perfect for busy weeknights or cozy weekends, it’s sure to become a family favorite.

Cheesy Baked Vegetables Casserole Ingredients

Cheesy Baked Vegetables Casserole
This Cheesy Baked Vegetables Casserole is a wholesome, veggie-packed bake layered with tender roasted vegetables, a creamy herbed béchamel-style sauce, and plenty of gooey melted cheese. It’s the ultimate comfort food that’s still full of nourishing ingredients — a fantastic way to enjoy your favorite vegetables in one satisfying dish. Ideal for family dinners, potlucks, or meal prep!

Total Time: 55 minutes
Prep Time: 20 minutes

Cook Time: 35 minutes

Ingredients
For the Vegetables:
1 medium zucchini, sliced

1 medium carrot, thinly sliced

1 small head broccoli, cut into florets

1 red bell pepper, sliced

1 small red onion, sliced

2 tbsp olive oil

Salt and black pepper, to taste

½ tsp dried oregano

½ tsp garlic powder

For the Sauce & Topping:
2 tbsp butter

2 tbsp all-purpose flour

1½ cups milk (or plant-based milk)

½ tsp dried thyme or Italian seasoning

½ tsp Dijon mustard (optional, for depth)

Salt and pepper, to taste

1½ cups shredded cheese (mozzarella, cheddar, gouda, or a blend)

½ cup grated Parmesan (optional)

2 tbsp chopped fresh parsley or chives, for garnish

Instructions
Preheat Oven & Prepare Vegetables:
Preheat oven to 400°F (200°C).
Toss zucchini, carrot, broccoli, bell pepper, and red onion in olive oil, oregano, garlic powder, salt, and pepper.
Spread onto a parchment-lined baking sheet and roast for 15 minutes, just until slightly tender. Set aside.

Make the Cheese Sauce:
In a saucepan over medium heat, melt butter. Whisk in flour and cook for 1 minute to form a roux.
Slowly add milk while whisking to avoid lumps. Simmer and stir until the sauce thickens (about 3–4 minutes).
Stir in thyme (or Italian seasoning), mustard (if using), and salt/pepper to taste.
Remove from heat and mix in 1 cup of shredded cheese until smooth.

Assemble the Casserole:
In a greased 9×9″ or similar baking dish, layer the roasted vegetables.
Pour the cheese sauce evenly over the veggies. Top with the remaining ½ cup shredded cheese and grated Parmesan (if using).

Bake:
Bake uncovered at 400°F (200°C) for 20 minutes, or until the top is golden and bubbly.

Finish & Serve:
Remove from oven, sprinkle with fresh herbs, and let sit for 5 minutes before serving.

Tips
Veggie Prep Tips:
Cut vegetables evenly so they cook uniformly during roasting and baking.

Pre-roast or steam firm veggies like carrots and broccoli to ensure tenderness in the final bake.

Pat moisture-heavy veggies dry (like zucchini or mushrooms) before roasting to prevent a watery casserole.

Cheese Tips:
For best meltability and flavor, grate your own cheese — pre-shredded cheese contains anti-caking agents that can affect the sauce’s texture.

Use a mix of mild and sharp cheeses (like mozzarella + sharp cheddar) for balance.

Sauce Tips:
If the sauce thickens too much, whisk in a little extra milk before pouring over the vegetables.

Add a spoonful of cream cheese or ricotta to the sauce for a silkier texture and extra richness.

Variations
Add Protein:
Stir in cooked shredded chicken, ground turkey, or white beans for a more filling casserole.

Top with crispy bacon or sautéed sausage before baking.

Go Green:
Add spinach, kale, or Swiss chard into the vegetable mix — just sauté or steam before layering.

Mushroom Lover’s Version:
Add sliced mushrooms (button, cremini, or portobello) to the roasted veggie mix for a savory, meaty depth.

Low-Carb Swap:
Replace carrots or potatoes with cauliflower florets or celery root for a lower-carb version.

Spice It Up:
Add a pinch of chili flakes, smoked paprika, or harissa paste to the sauce for a gentle kick.

Vegan Option:
Use plant-based milk and butter, and swap in your favorite vegan cheese shreds or nutritional yeast.

Add a spoonful of blended cashew cream to the sauce for richness.

Crunchy Topping Twist:
Sprinkle with buttered panko breadcrumbs or crushed nuts for a golden, crispy top layer.

Q&A
Q: Can I prepare this casserole ahead of time?
A: Yes! You can assemble it fully (without baking) up to 24 hours ahead and refrigerate. When ready, bake as directed — just add 5–10 extra minutes to the baking time if going straight from the fridge.

Q: Can I freeze Cheesy Vegetable Casserole?
A: Yes, but for best results, freeze it before baking. Wrap tightly and freeze for up to 2 months. Thaw overnight in the fridge and then bake until bubbly.

Q: What are the best cheeses to use?
A: Use melty cheeses like mozzarella, cheddar, gouda, or fontina. Combine with Parmesan or Pecorino for flavor depth.

Q: How do I make it more filling as a main dish?
A: Add proteins like chicken, turkey, beans, or tofu, or stir in a grain like cooked quinoa, bulgur, or brown rice to make it a complete meal.

Q: Can I make it gluten-free?
A: Yes! Substitute the all-purpose flour in the cheese sauce with a gluten-free flour blend or cornstarch (1 tbsp cornstarch = 2 tbsp flour).

Nutrition Facts
Calories: 270

Protein: 10g

Fat: 18g

Carbohydrates: 18g

Fiber: 4g

Sugar: 6g

Sodium: 350mg

Calcium: ~20% DV

Note: Nutritional values vary depending on cheese, vegetables, and milk used.

Conclusion
This Cheesy Baked Vegetables Casserole is proof that comfort food and wholesome eating can go hand in hand. It’s rich, creamy, packed with vibrant veggies, and endlessly adaptable — making it a hit for busy weeknights, festive gatherings, or cozy weekends at home. Whether served as a meatless main or a hearty side, this casserole delivers warmth and satisfaction in every bite.

Keto Strawberry Cream Cheese Cobbler

This delectable recipe for quick Keto Strawberry Cobbler, which uses almond flour and strawberries, is a wonderful gluten-free and low-carb dessert.


Ingredients

  • 1/2 cup of almond flour
  • 1/2 cup softened unsalted butter
  • two medium eggs
  • 1/2 cup of low-carb erythritol sweetener
  • 0.5 teaspoons baking powder
  • ONE teaspoon vanilla extract
  • 4 grains of salt
  • 4 ounces of cream cheese, broken up.
  • 8 strawberries, quartered

Instructions

  • The oven to 190C/380F for preheating
  • The butter and erythritol should be thoroughly combined in a bowl.
  • Add the eggs and vanilla essence after that.
  • Continue(when you have a smooth mixture) to add the baking powder, salt, and almond flour.
  • Batter should be poured into baking pan.
  • The batter should be covered with the strawberries.
  • Sprinkle the cream cheese bits on top.
  • Bake the baking dish for 45 to 50 minutes, or until it is firm and brown. After baking for 25 minutes, take off the foil. Fruit may poke out from the top as the crust grows over and around it.
  • Eat and have fun!

Notes

The overall carb count less the fibre count will be the net carbohydrates. The carb count does not include sugar alcohols.

NUTRITION

serving size: oneEnergy: 264kcal3.6g of carbohydrates5.3g of proteinFat: 26g1.3g of fibre

Strawberry Cheesecake Chimichangas

Ingredients

→ Chimichangas

 6 (8-inch) soft flour tortillas
 8 oz cream cheese, room temperature
 2 tablespoons sour cream
 1 tablespoon sugar
 1 teaspoon vanilla extract
 3/4 cup sliced strawberries
 Vegetable oil for frying

→ Coating

 1 tablespoon cinnamon
 1/3 cup sugar

→ Serving

 1 cup sliced strawberries

Instructions

Beat the cream cheese, sour cream, sugar, and vanilla extract in a bowl until smooth. Fold in 3/4 cup of sliced fresh strawberries.

Divide the filling evenly among the 6 tortillas. Spread the filling in the lower third of each tortilla. Fold the sides of each tortilla toward the center and roll it up like a burrito. Secure with toothpicks.

Combine 1/3 cup sugar with 1 tablespoon cinnamon in a shallow bowl and set aside.

Line a large plate with paper towels to drain fried chimichangas.

Place about 2 to 2 1/2 inches of vegetable oil in a saucepan and heat it over medium-high heat until the oil reaches 360ºF.

Fry the chimichangas in batches until golden brown and crispy, about 2-3 minutes, flipping as needed.

Drain the chimichangas briefly on the paper towel-lined plate, then roll them in the cinnamon and sugar mixture.

Ensure all toothpicks are removed before serving.

Tools You’ll Need

  • Mixing bowl
  • 5-inch deep saucepan
  • Paper towels
  • Toothpicks

Allergy Information

Please check ingredients for potential allergens and consult a health professional if in doubt.

Nutrition Facts (Per Serving)

It is important to consider this information as approximate and not to use it as definitive health advice.


Balsamic-Garlic Marinated Steak

Indulge in succulent Balsamic-Garlic Marinated Steak, a tantalizing dish bursting with flavors of tangy balsamic vinegar, aromatic garlic, and fragrant rosemary. Elevate your dining experience with this tender and flavorful recipe. Perfect for any occasion, whether grilled, seared, or oven-cooked. Try it tonight and savor a culinary masterpiece!

•Ingredients:

2 tablespoons balsamic vinegar
2 cloves garlic, minced
1 to 2 steaks (your choice of cut)
2 tablespoons olive oil
1 teaspoon dried rosemary
Salt and pepper to taste

•Instructions:

In a small bowl, whisk together olive oil, balsamic vinegar, minced garlic, dried rosemary, salt, and pepper to create the marinade.
Place steaks in a shallow dish or resealable plastic bag. Pour the marinade over the steaks, ensuring they are evenly coated.
Marinate the steaks in the refrigerator for at least 30 minutes, or up to 4 hours for optimal flavor and tenderness.
Preheat grill, skillet, or oven to high heat.
Remove steaks from the marinade and discard excess marinade.
Cook steaks to desired doneness, flipping once halfway through cooking.
Allow steaks to rest for a few minutes before serving to allow juices to redistribute.

Homemade 3-Ingredient Lemon Cake

Indulging in desserts while adhering to dietary restrictions often feels like a distant dream. However, W-W Lemon Cake recipe unveils a delightful solution, merging health consciousness with sweet cravings. This culinary masterpiece requires only three ingredients, making it a minimalist marvel in the world of confectionary delights.

The Ingredients: At the heart of this recipe lies a harmonious blend of simplicity and flavor. A box of lemon cake mix, approximately 18.25 ounces in weight, serves as the foundation. Opting for a sugar-free or low-sugar variant aligns with W-W’ principles, ensuring a guilt-free treat. Complementing the mix is a can of diet lemon-lime soda, typically 12 ounces, infusing effervescence and tanginess. Finally, a cup of fat-free Greek yogurt, whether plain or lemon-flavored, adds a creamy texture and enriches the lemony essence.

The Process: Preparation begins with a preheated oven, set to the temperature recommended on the cake mix box, laying the groundwork for baking perfection. In a mixing bowl, the lemon cake mix intertwines with the fizzy embrace of diet lemon-lime soda, undergoing a transformative fusion until smooth and lump-free. This amalgamation forms the luscious batter, destined for a prepared cake pan of choice, be it a bundt pan or a traditional round vessel. As the oven works its magic, baking the cake to golden perfection, anticipation mounts, filling the kitchen with tantalizing aromas.

The Finishing Touch: Once the cake emerges, a testament to culinary prowess, it requires a moment of reprieve, cooling gracefully on the countertop. Meanwhile, a velvety frosting materializes, crafted from fat-free Greek yogurt, potentially elevated with a hint of lemon zest for added vibrancy. With artistic precision, the yogurt dressing envelops the cake, bestowing it with a final flourish of elegance and flavor. Sliced with anticipation, each portion promises a symphony of lemony delight, satisfying both palate and conscience.

Conclusion: W-W Lemon Cake transcends the boundaries of traditional baking, offering a guilt-free indulgence that champions health and flavor in equal measure. With just three ingredients and a dash of creativity, this culinary masterpiece underscores the notion that simplicity is the ultimate sophistication. Embrace the zestful journey and savor every delectable bite of this lemon-infused triumph.


W-W 3-Ingredient Lemon Cake

Table of Contents

Ingredients:

  • 1 box (about 18.25 ounces) lemon cake mix (look for a sugar-free or low-sugar option if you’re following W/W)
  • 1 can (12 ounces) diet lemon-lime soda (such as Sprite Zero or Diet Sierra Mist)
  • 1 cup fat-free Greek yogurt (plain or lemon-flavored)

Instructions:

  1. Preheat your oven to the temperature specified on the cake mix box.
  2. In a mixing bowl, combine the lemon cake mix and the can of diet lemon-lime soda. Stir until well combined and there are no lumps.
  3. Pour the cake batter into a prepared cake pan. You can use a bundt pan, round cake pan, or any other type of pan you prefer.
  4. Bake the cake according to the instructions on the cake mix box, or until a toothpick inserted into the center comes out clean.
  5. Once the cake is done baking, remove it from the oven and let it cool completely.
  6. While the cake is cooling, prepare the frosting by mixing the fat-free Greek yogurt with a little lemon zest if desired. Spread the yogurt frosting over the cooled cake.
  7. Slice and serve!


Premium Dark-Rum Fried Piña Colada Rings

Ingredients:
8 fresh pineapple rings (canned rings can be used)
1 cup premium dark rum
1 cup coconut rum
1 1/2 cups all-purpose flour
1 (10 oz) bag sweetened coconut flakes
2 large eggs
1/2 cup coconut milk
Vegetable oil, for frying (heat to 350°F)
4 oz cream cheese, softened
1/2 cup powdered sugar
Instructions:
Soak the pineapple rings in a bowl covered with dark rum and coconut rum. Refrigerate for at least 1 hour. Drain and reserve 2 tablespoons of rum for the dip. Pat pineapple dry.
Set up three shallow bowls: one with flour, one with coconut flakes, and one with whisked eggs and coconut milk.
Dip each pineapple ring into the flour, then the egg mixture, then press into coconut flakes to coat.
Heat vegetable oil in a deep fryer or heavy pot to 350°F (175°C).
Fry the coated pineapple rings in batches until golden brown, about 1 minute per side. Remove with a slotted spoon and drain on paper towels.
In a medium bowl, beat cream cheese with powdered sugar until smooth. Stir in reserved 2 tablespoons of rum until combined.
Arrange fried pineapple rings on a serving platter and serve warm with the rum cream cheese dip.
Prep Time: 15 minutes
Cooking Time: 10 minutes
Total Time: 1 hour 25 minutes
Per Serving: 300 kcal
Servings: 8 servings

Slow Cooker Cabbage, Potatoes, and Smoked Sausage

Ingredients:
½ head cabbage, cut into chunks
5-6 potatoes cut into chunks
1 lb smoked sausage, cut into pieces (such as Hillshire Farm)
Salt and pepper, to taste
Water, enough to fill the slow cooker halfway
Directions:
Prepare the Ingredients:
Cut the cabbage into large chunks and peel and chop the potatoes into similar-sized pieces.
Slice the smoked sausage into bite-sized rounds.
Assemble in the Slow Cooker:
Add the cabbage, potatoes, and smoked sausage to the slow cooker.
Season generously with salt and pepper.
Pour in enough water to fill the slow cooker about halfway, helping the vegetables cook evenly and stay tender.
Cook:
Cover and cook on high for about 4 hours or on low for about 6 hours, until the potatoes are fork-tender and everything is well cooked.
Serve:
Stir gently, taste and adjust seasoning if needed, and serve hot for a cozy, comforting meal.
Prep Time: 10 minutes | Cooking Time: 4-6 hours | Total Time: 4 hours 10 minutes (on high)
Servings: 4-6

Carnivore Crack Recipe

Table of Contents

Carnivore Crack Recipe:

Ingredients:

  • 8 oz (225g) beef jerky (or your choice of other jerky like pork or turkey)

  • 8 oz (225g) cheese (cheddar or mozzarella work well)

  • 1 tablespoon butter or tallow (optional, for extra crispiness)

  • Salt (optional, to taste)

  • Pepper (optional, to taste)

  • Paprika (optional, for extra flavor)

Instructions:

  1. Preheat Oven: Preheat your oven to 375°F (190°C).

  2. Prepare the Meat: Cut your beef jerky (or other preferred jerky) into smaller bite-sized pieces. If your jerky is on the tough side, you may want to slice it thinly.

  3. Prepare the Cheese: Cut the cheese into small cubes or shred it, depending on your preference.

  4. Butter or Tallow: If you want extra crispy, flavorful bites, melt butter or tallow in a pan over medium heat.

  5. Layer Ingredients: On a baking sheet lined with parchment paper, arrange the beef jerky pieces, followed by a layer of cheese cubes or shreds. If you’ve melted butter/tallow, you can drizzle it over the top of the meat and cheese for extra flavor.

  6. Bake: Bake in the preheated oven for 8-10 minutes, or until the cheese is melted and bubbling and the jerky starts to crisp up.

  7. Add Seasonings: Once done, remove from the oven and sprinkle with optional seasonings like salt, pepper, and paprika for extra flavor.

  8. Serve and Enjoy: Let it cool for a few minutes, then break it into pieces and enjoy your homemade carnivore crack!


You can experiment with different types of jerky or add more cheese for extra richness. It’s a great snack for those on a carnivore or keto diet. Would you tweak this recipe to your liking?

Butter Pecan Keto Ice Cream

Indulge in the velvety richness and nutty flavors of Butter Pecan Keto Ice Cream, a guilt-free treat that won’t disrupt your low-carb lifestyle. Made with wholesome ingredients and no added sugars, this keto-friendly ice cream is the perfect way to satisfy your sweet cravings while keeping your carb intake in check. Creamy, buttery, and studded with toasted pecans, this homemade keto ice cream promises a delightful dessert experience that aligns with your dietary goals. So, let’s dive into the recipe and relish in the pleasure of this luscious and creamy butter pecan ice cream.

Servings: Makes approximately 8 servings

Ingredients:

  • 2 cups heavy cream
  • 1 cup unsweetened almond milk (or any other keto-friendly milk of choice)
  • 1/2 cup powdered erythritol or keto-friendly sweetener of choice
  • 4 large egg yolks
  • 2 teaspoons vanilla extract
  • 2 tablespoons unsalted butter
  • 1 cup pecans, roughly chopped
  • Pinch of salt

Instructions:

  1. In a medium saucepan, heat the heavy cream and unsweetened almond milk over medium heat until it begins to simmer. Do not let it boil.
  2. In a separate bowl, whisk the egg yolks and powdered erythritol until well combined.
  3. Slowly pour about 1/2 cup of the hot cream mixture into the egg yolk mixture, whisking continuously to temper the eggs and prevent curdling.
  4. Gradually pour the tempered egg mixture back into the saucepan with the remaining cream, whisking constantly.
  5. Continue to cook the mixture over medium heat, stirring frequently, until it thickens and coats the back of a spoon. This will create a custard-like base for the ice cream.
  6. Remove the saucepan from the heat and stir in the vanilla extract. Let the custard base cool to room temperature.
  7. In a separate skillet, melt the unsalted butter over medium heat. Add the chopped pecans and a pinch of salt, toasting the pecans until they become fragrant and slightly browned. Remove the skillet from the heat.
  8. Once the custard base has cooled, cover the bowl or transfer it to an airtight container and refrigerate it for at least 4 hours or preferably overnight.
  9. Once the custard is chilled and ready, churn it in an ice cream maker according to the manufacturer’s instructions. This will give the ice cream its creamy texture.
  10. During the last minute of churning, add the toasted pecans into the ice cream.
  11. Transfer the churned butter pecan keto ice cream to an airtight container and freeze it for an additional 2-3 hours or until it reaches the desired firmness.
Nutrition Facts per Serving (1/2 cup, approximate values):
  • Calories: 332
  • Total Fat: 32g
  • Saturated Fat: 15g
  • Cholesterol: 150mg
  • Sodium: 31mg
  • Total Carbohydrate: 4g
  • Dietary Fiber: 1g
  • Sugars: 1g
  • Protein: 5g

Cauliflower Potato Salad

Mock potato salad made with all the same ingredients as a classic potato salad, except this version is perfect for low carb followers. Roast the cauliflower to enhance the nutty flavor and serve along with your favorite main dish.
Keyword: cauliflower potato salad, cauliflower salad, Low carb potato salad
Prep Time: 20minutes 
Cook Time: 15minutes 
Total Time: 35minutes 
Servings: 8 servings
Calories: 253kcal
Author: Sandra Shaffer

Ingredients

    • 6 cups cauliflower florets
    • 1 cup mayonnaise
    • 1 tablespoon prepared mustard
    • 1 teaspoon kosher salt
    • 1/4 teaspoon pepper
    • 2 tablespoons pickle relish
    • 4 hard boiled eggs chopped (reserve one for garnish)

Instructions

  • Clean and cut cauliflower into bite size florets.
  • Place cauliflower on a baking sheet and bake at 425°F degrees for 15 minutes, turning every 5 minutes. Remove from oven and cool.
  • Mix mayonnaise, mustard, salt, and pepper in a large bowl. Add cooled cauliflower and relish. Stir in 3 chopped eggs.
  • Cover dish and refrigerate for 2 hours.
  • Slice the remaining egg and top on salad before serving.

Notes

You’ll need on large cauliflower to yield 6 cups of florets.

The smaller the pieces the quicker the edges may brown. Keep an eye on the cauliflower while baking so they don’t get too toasted.

Nutrition

Serving: 1g | Calories: 253kcal | Carbohydrates: 6g | Protein: 5g | Fat: 24g | Saturated Fat: 4g | Polyunsaturated Fat: 19g | Cholesterol: 105mg | Sodium: 536mg | Fiber: 2g | Sugar: 3g

Disclaimer

Please note that the nutritional information provided are guidelines and may vary based on the brand of products used. For your specific nutritional goals use My Fitness Pal or Verywell Fit recipe calculators. All content within this site is not intended as medical diagnosis or treatment and should not be considered a substitute for professional medical expertise.