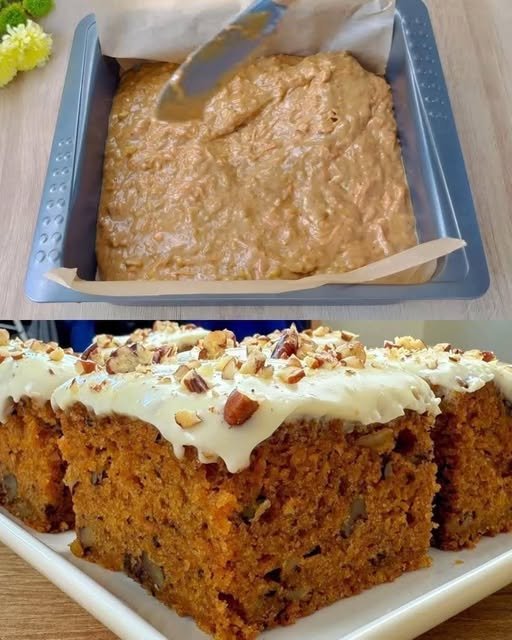
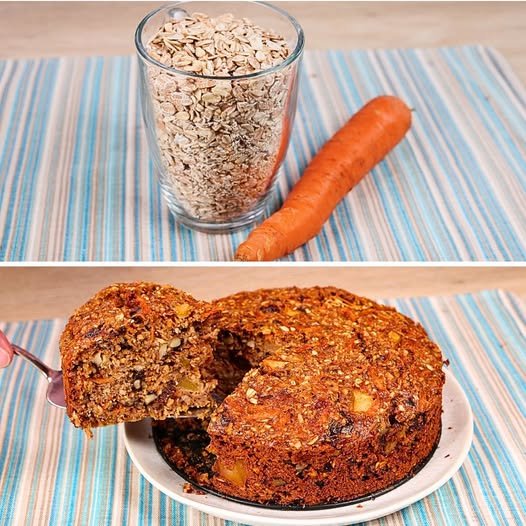
Crispy Roasted Cauliflower

Cauliflower has transcended its reputation as a bland, overlooked vegetable and emerged as a culinary superstar, especially when roasted to perfection. My Crispy Roasted Cauliflower recipe is a testament to the versatility and deliciousness of this humble vegetable. Infused with Italian herbs and Parmesan, this dish promises a crispy, flavorful experience that rivals any meat dish. Whether you are a dedicated vegetarian or simply looking to add more vegetables to your diet, this recipe will win you over with its crispy texture and rich, savory taste.

Ingredients
Main Ingredients:
1 head of cauliflower
3 slices of lemon
A handful of dill
1 1/4 cups panko breadcrumbs
1 clove of minced garlic
3/4 cup all-purpose flour
3 eggs

5 tbsp olive oil
1 tsp Italian herbs
A handful of chopped parsley
1 cup grated Parmesan cheese
Salt, to taste
Ground black pepper, to taste
Sauce:
3/4 cup sour cream
1/2 cup yogurt

Freshly chopped parsley
Salt and ground black pepper
Lemon juice
Directions
Step 1: Prepare the Cauliflower
Start by cutting the cauliflower into florets. Bring a pot of salted water to a boil and add the lemon slices, a handful of dill, and the cauliflower florets. Boil for five minutes, then drain and set aside. This step helps to infuse the cauliflower with subtle flavors and tenderize it slightly before roasting.

Step 2: Prepare the Coating Mixture
In a large mixing bowl, combine the panko breadcrumbs, minced garlic, olive oil, Italian herbs, salt, ground black pepper, chopped parsley, and grated Parmesan cheese. Mix until well combined. This breadcrumb mixture will give the cauliflower its irresistible crispy coating.

Step 3: Coat the Cauliflower
Set up a dredging station with a plate of all-purpose flour, a bowl of whisked eggs, and the bowl of breadcrumb mixture. Dredge each cauliflower floret first in the flour, then dip it in the whisked eggs, and finally coat it in the breadcrumb mixture. Ensure each piece is evenly coated for maximum crispiness.

Step 4: Bake the Cauliflower
Place the coated cauliflower florets on a parchment-lined baking tray. Preheat your oven to 350°F (175°C) and bake for 20 minutes, or until the cauliflower is golden brown and crispy. The aroma of the herbs and Parmesan will fill your kitchen, making it hard to wait for the finished product.

Step 5: Prepare the Sauce
While the cauliflower is baking, prepare the sauce. In a small bowl, combine the sour cream, yogurt, freshly squeezed lemon juice, chopped parsley, salt, and ground black pepper. Mix well. This creamy, tangy sauce complements the crispy cauliflower perfectly, adding a refreshing contrast to each bite.

Step 6: Serve and Enjoy
Once the cauliflower is done baking, remove it from the oven and let it cool slightly. Serve the crispy roasted cauliflower with the prepared sauce. Garnish with extra parsley if desired. Enjoy this delicious, meat-free dish that is sure to impress both vegetarians and meat-lovers alike.

Nutrition Information
Per Serving:

Calories: 220
Protein: 10g
Carbohydrates: 25g
Dietary Fiber: 3g
Sugars: 3g
Fat: 10g
Saturated Fat: 3g
Cholesterol: 75mg
Sodium: 320mg
Vitamin A: 8% DV
Vitamin C: 70% DV
Calcium: 20% DV
Iron: 10% DV
Conclusion
This Crispy Roasted Cauliflower recipe is a delightful alternative to traditional meat dishes. The combination of herbs, Parmesan, and a crispy breadcrumb coating makes it a standout dish that will leave you craving more. Perfect for a weeknight dinner or as a side dish for a special occasion, this recipe is sure to become a favorite in your household.

KETO SHEPHARD’S PIE RECIPE

Using Parmesan-mashed cauliflower in instead of mashed potatoes creates a low-carb and keto KETO SHEPHARD’S PIE. This simple casserole dish is delicious and a wonderful way to honor St. Patrick’s Day.

A great way to observe the holiday is with this low-carb shepherd’s pie dish. I used my parmesan-mashed cauliflower as a substitute for the conventional mashed potatoes crust. Before baking, I added extra parmesan cheese to the mashed cauliflower shell.


For St. Patrick’s Day, I also enjoy making corned beef, but if you don’t like corned beef and want a hearty lunch, this keto Shepherd’s pie is a terrific alternative.

Ground meat topped with delicious vegetables, mashed potatoes, and cheese? Please, yes! In this keto shepherd’s pie recipe, I used excellent cauliflower mash in place of the potatoes and swapped out the peas, corn, and carrots that I would often use as low-carb vegetables. YUM!!!

Seriously, this Keto Shepherd’s Pie tastes so much better than the classic version, plus you won’t experience the terrible carb bloat afterward. This recipe has me super excited, especially for Nick who loves shepherd’s pie.


RECIPE FOR SHEPHERD’S PIE FILLING

Traditional Shepherd’s Pie is made using lamb, but as ground lamb is less common in the US, ground beef is frequently substituted. For this recipe, either one may be used. I used ground beef since although I adore lamb, my husband does not.

I used frozen peas and fresh carrots for my vegetables. English peas would have been ideal, but they can be difficult to find. Swap out peas and carrots can be with other veggies like green beans and celery if you’re following a ketogenic diet.

The remaining filling ingredients are tomato paste, onions, broth, rosemary, thyme, and Worchester sauce. The filling is really tasty and easy to make.


Why it functions

The ground beef topped with gravy and low-carb vegetables make this recipe the pinnacle of layered comfort cuisine.
This dish reheats well, making it a terrific meal for a small family or a busy home.

Expert Advice

Sprinkle the xanthan gum sparingly on top of the beef when adding it. It will clump up if you add it all at once, just like flour does when it’s added to a hot recipe.
See below for advice on how to prepare the best cauliflower mash.


HOW TO MAKE CAULIFLOWER MASHED WITH PARMESAN

I use a food processor to prepare my mashed cauliflower topping.

Boil the cauliflower until it is quite tender. To keep your cauliflower mash from tasting watery, pat the cauliflower dry after which you put it to your food processor.

Combine cream cheese and heavy cream with the cauliflower to create a creamy cauliflower mash consistency.

The mash has a great flavor that helps to hide the flavor of the cauliflower thanks to the parmesan cheese.

What distinguishes this from Cottage Pie?

It is cooked with lamb in the UK. Cottage pie is made with beef. In the US, a meat and vegetable filling topped with mashed potatoes is known by the titles cottage pie and shepherd’s pie interchangeably.

I’ve always thought of this shepherd’s pie made with beef, but if you want the conventional form, use the same amount of ground lamb instead.

GROUND TURKEY?

Use the same quantity of ground turkey for the shepherd’s pie filling for a leaner variation. Since turkey has a light flavour, you can wish to brown it with some Worcestershire sauce to give it a savoury flavour.


This keto shepherd’s pie dish is a terrific option to try if you’re in the mood for comfort cuisine but prefer something lighter. I do hope you like it!

INGREDIENTS

SCRUBBERY CAULIFLOWER

  • Cauliflower florets, 1 lb
  • Cream cheese, 3 ounces
  • a half-cup of grated parmesan cheese
  • 2 to 4 ounces of heavy cream, salt to taste

MEATS INSULATION

  • 1 small onion, diced finely
  • 1 pound of ground lamb or beef
  • a half cup of cubed, tiny carrots
  • Frozen or fresh peas, half a cup
  • 1 cup beef broth 1 teaspoon coarsely chopped rosemary
  • 1 teaspoon finely chopped thyme
  • 1 teaspoon Worcester sauce
  • 2 teaspoons of tomato paste, salt to taste

TOPPINGS (OPTIONAL) (OPTIONAL)

  • Shredded 1/4 cup parmesan cheese
  • 0.5 tsp of finely chopped rosemary or thyme

INSTRUCTIONS

MASHED CAULIFLOWER WITH PARMESAN

  1. Soften cauliflower in boiling water. Drain, remove, and pat dry the cauliflower. Put in the food processor. Till the cauliflower is totally mashed, add the Parmesan cheese and cream cheese.
  2. Blend the mashed cauliflower, then 1 oz at a time, gradually add the heavy cream. The mashed cauliflower should not be too thin, therefore you must be careful not to add too much liquid. As required, salt the food.

DELICIOUS MEATS

  1. Add onions and ground beef to a big skillet. Heat skillet to a medium-high temperature. While the ground beef cooks, stir and crumble it. Cook beef until browned and onions are transparent.
  2. Add tomato paste, Worcestershire sauce, rosemary, thyme, carrots, peas, and broth. Mix Worcester sauce and tomato paste. If necessary, add salt. Simmer mixture before the heat is reduced to medium. Simmer combination for the duration necessary for the broth to decrease and slightly thicken.

PUFFING UP THE PIE

  1. Set the oven to 350°F. Spread the filling in a casserole, measuring 7 by 11 inches.
  2. Mash the cauliflower and top the meat filling. Over the mashed cauliflower, spread 1/4 cup of grated parmesan cheese .
  3. Bake the mashed potatoes for TWENTY to TWENTY FIVE minutes in a preheated oven until the edges begin to brown. After that, turn the oven’s broiler to low and cook the dish for a few more minutes, or until the cheese is lightly browned.
  4. I suggest closely monitoring the oven because this should only take 2-4 minutes.
    Before serving, if preferred, sprinkle on 1/2 tsp of rosemary or thyme.

NOTES

  • Fresh rosemary and thyme can be substituted with dried versions.
  • Don’t forget to utilise the entire one pound of cauliflower florets. You won’t have enough mash otherwise to cover the entire baking pan.
  • 85/15 ground beef and 2 oz. of heavy cream were used to compute the nutritional information. There is no salt in it.

NUTRITION

calories: 340kcal,
carbohydrates: 9g,
protein: 22g,
fat: 23g,
saturated fat: 11g,
sodium: 508mg,
fiber: 2g,
sugar: 4g,
net carbs: 7g

Green Enchilada Chicken Soup

Directions:

  1. Prepare the Chicken and Broth Base:
    • Place chicken, green enchilada sauce, and chicken broth into the Crock Pot.
    • Cook on low for 6-8 hours.
  2. Shred the Chicken:
    • Remove chicken, shred with two forks, and return to the Crock Pot.
  3. Add Creamy Ingredients:
    • Add Monterey Jack cheese, cream cheese, half and half or Greek yogurt, and green salsa.
    • Stir well and cook on low for an additional 30 minutes.
  4. Taste and Adjust Seasoning:
    • Add salt and pepper to taste.
  5. Serve and Garnish:
    • Ladle soup into bowls and top with desired garnishes like avocado, cilantro, green onion, and sour cream.

Tips:

  • Use chicken thighs for more flavor.
  • Adjust spice level with mild or hot enchilada sauce.
  • Make ahead and store in the fridge for up to 3 days or freeze for up to 3 months.
  • Customize with toppings like shredded cheese, jalapeños, or crispy tortilla strips.

Enjoy your comforting and flavorful Crock Pot Green Enchilada Chicken Soup! 🍲😊

This soup combines the tangy flavor of green enchilada sauce, tender chicken, and creamy cheeses for a delightful meal. Perfect for busy weeknights or cozy weekends, it’s sure to become a family favorite.

Cheesy Baked Vegetables Casserole Ingredients

Cheesy Baked Vegetables Casserole
This Cheesy Baked Vegetables Casserole is a wholesome, veggie-packed bake layered with tender roasted vegetables, a creamy herbed béchamel-style sauce, and plenty of gooey melted cheese. It’s the ultimate comfort food that’s still full of nourishing ingredients — a fantastic way to enjoy your favorite vegetables in one satisfying dish. Ideal for family dinners, potlucks, or meal prep!

Total Time: 55 minutes
Prep Time: 20 minutes

Cook Time: 35 minutes

Ingredients
For the Vegetables:
1 medium zucchini, sliced

1 medium carrot, thinly sliced

1 small head broccoli, cut into florets

1 red bell pepper, sliced

1 small red onion, sliced

2 tbsp olive oil

Salt and black pepper, to taste

½ tsp dried oregano

½ tsp garlic powder

For the Sauce & Topping:
2 tbsp butter

2 tbsp all-purpose flour

1½ cups milk (or plant-based milk)

½ tsp dried thyme or Italian seasoning

½ tsp Dijon mustard (optional, for depth)

Salt and pepper, to taste

1½ cups shredded cheese (mozzarella, cheddar, gouda, or a blend)

½ cup grated Parmesan (optional)

2 tbsp chopped fresh parsley or chives, for garnish

Instructions
Preheat Oven & Prepare Vegetables:
Preheat oven to 400°F (200°C).
Toss zucchini, carrot, broccoli, bell pepper, and red onion in olive oil, oregano, garlic powder, salt, and pepper.
Spread onto a parchment-lined baking sheet and roast for 15 minutes, just until slightly tender. Set aside.

Make the Cheese Sauce:
In a saucepan over medium heat, melt butter. Whisk in flour and cook for 1 minute to form a roux.
Slowly add milk while whisking to avoid lumps. Simmer and stir until the sauce thickens (about 3–4 minutes).
Stir in thyme (or Italian seasoning), mustard (if using), and salt/pepper to taste.
Remove from heat and mix in 1 cup of shredded cheese until smooth.

Assemble the Casserole:
In a greased 9×9″ or similar baking dish, layer the roasted vegetables.
Pour the cheese sauce evenly over the veggies. Top with the remaining ½ cup shredded cheese and grated Parmesan (if using).

Bake:
Bake uncovered at 400°F (200°C) for 20 minutes, or until the top is golden and bubbly.

Finish & Serve:
Remove from oven, sprinkle with fresh herbs, and let sit for 5 minutes before serving.

Tips
Veggie Prep Tips:
Cut vegetables evenly so they cook uniformly during roasting and baking.

Pre-roast or steam firm veggies like carrots and broccoli to ensure tenderness in the final bake.

Pat moisture-heavy veggies dry (like zucchini or mushrooms) before roasting to prevent a watery casserole.

Cheese Tips:
For best meltability and flavor, grate your own cheese — pre-shredded cheese contains anti-caking agents that can affect the sauce’s texture.

Use a mix of mild and sharp cheeses (like mozzarella + sharp cheddar) for balance.

Sauce Tips:
If the sauce thickens too much, whisk in a little extra milk before pouring over the vegetables.

Add a spoonful of cream cheese or ricotta to the sauce for a silkier texture and extra richness.

Variations
Add Protein:
Stir in cooked shredded chicken, ground turkey, or white beans for a more filling casserole.

Top with crispy bacon or sautéed sausage before baking.

Go Green:
Add spinach, kale, or Swiss chard into the vegetable mix — just sauté or steam before layering.

Mushroom Lover’s Version:
Add sliced mushrooms (button, cremini, or portobello) to the roasted veggie mix for a savory, meaty depth.

Low-Carb Swap:
Replace carrots or potatoes with cauliflower florets or celery root for a lower-carb version.

Spice It Up:
Add a pinch of chili flakes, smoked paprika, or harissa paste to the sauce for a gentle kick.

Vegan Option:
Use plant-based milk and butter, and swap in your favorite vegan cheese shreds or nutritional yeast.

Add a spoonful of blended cashew cream to the sauce for richness.

Crunchy Topping Twist:
Sprinkle with buttered panko breadcrumbs or crushed nuts for a golden, crispy top layer.

Q&A
Q: Can I prepare this casserole ahead of time?
A: Yes! You can assemble it fully (without baking) up to 24 hours ahead and refrigerate. When ready, bake as directed — just add 5–10 extra minutes to the baking time if going straight from the fridge.

Q: Can I freeze Cheesy Vegetable Casserole?
A: Yes, but for best results, freeze it before baking. Wrap tightly and freeze for up to 2 months. Thaw overnight in the fridge and then bake until bubbly.

Q: What are the best cheeses to use?
A: Use melty cheeses like mozzarella, cheddar, gouda, or fontina. Combine with Parmesan or Pecorino for flavor depth.

Q: How do I make it more filling as a main dish?
A: Add proteins like chicken, turkey, beans, or tofu, or stir in a grain like cooked quinoa, bulgur, or brown rice to make it a complete meal.

Q: Can I make it gluten-free?
A: Yes! Substitute the all-purpose flour in the cheese sauce with a gluten-free flour blend or cornstarch (1 tbsp cornstarch = 2 tbsp flour).

Nutrition Facts
Calories: 270

Protein: 10g

Fat: 18g

Carbohydrates: 18g

Fiber: 4g

Sugar: 6g

Sodium: 350mg

Calcium: ~20% DV

Note: Nutritional values vary depending on cheese, vegetables, and milk used.

Conclusion
This Cheesy Baked Vegetables Casserole is proof that comfort food and wholesome eating can go hand in hand. It’s rich, creamy, packed with vibrant veggies, and endlessly adaptable — making it a hit for busy weeknights, festive gatherings, or cozy weekends at home. Whether served as a meatless main or a hearty side, this casserole delivers warmth and satisfaction in every bite.

Keto Strawberry Cream Cheese Cobbler

This delectable recipe for quick Keto Strawberry Cobbler, which uses almond flour and strawberries, is a wonderful gluten-free and low-carb dessert.


Ingredients

  • 1/2 cup of almond flour
  • 1/2 cup softened unsalted butter
  • two medium eggs
  • 1/2 cup of low-carb erythritol sweetener
  • 0.5 teaspoons baking powder
  • ONE teaspoon vanilla extract
  • 4 grains of salt
  • 4 ounces of cream cheese, broken up.
  • 8 strawberries, quartered

Instructions

  • The oven to 190C/380F for preheating
  • The butter and erythritol should be thoroughly combined in a bowl.
  • Add the eggs and vanilla essence after that.
  • Continue(when you have a smooth mixture) to add the baking powder, salt, and almond flour.
  • Batter should be poured into baking pan.
  • The batter should be covered with the strawberries.
  • Sprinkle the cream cheese bits on top.
  • Bake the baking dish for 45 to 50 minutes, or until it is firm and brown. After baking for 25 minutes, take off the foil. Fruit may poke out from the top as the crust grows over and around it.
  • Eat and have fun!

Notes

The overall carb count less the fibre count will be the net carbohydrates. The carb count does not include sugar alcohols.

NUTRITION

serving size: oneEnergy: 264kcal3.6g of carbohydrates5.3g of proteinFat: 26g1.3g of fibre

Strawberry Cheesecake Chimichangas

Ingredients

→ Chimichangas

 6 (8-inch) soft flour tortillas
 8 oz cream cheese, room temperature
 2 tablespoons sour cream
 1 tablespoon sugar
 1 teaspoon vanilla extract
 3/4 cup sliced strawberries
 Vegetable oil for frying

→ Coating

 1 tablespoon cinnamon
 1/3 cup sugar

→ Serving

 1 cup sliced strawberries

Instructions

Beat the cream cheese, sour cream, sugar, and vanilla extract in a bowl until smooth. Fold in 3/4 cup of sliced fresh strawberries.

Divide the filling evenly among the 6 tortillas. Spread the filling in the lower third of each tortilla. Fold the sides of each tortilla toward the center and roll it up like a burrito. Secure with toothpicks.

Combine 1/3 cup sugar with 1 tablespoon cinnamon in a shallow bowl and set aside.

Line a large plate with paper towels to drain fried chimichangas.

Place about 2 to 2 1/2 inches of vegetable oil in a saucepan and heat it over medium-high heat until the oil reaches 360ºF.

Fry the chimichangas in batches until golden brown and crispy, about 2-3 minutes, flipping as needed.

Drain the chimichangas briefly on the paper towel-lined plate, then roll them in the cinnamon and sugar mixture.

Ensure all toothpicks are removed before serving.

Tools You’ll Need

  • Mixing bowl
  • 5-inch deep saucepan
  • Paper towels
  • Toothpicks

Allergy Information

Please check ingredients for potential allergens and consult a health professional if in doubt.

Nutrition Facts (Per Serving)

It is important to consider this information as approximate and not to use it as definitive health advice.


Balsamic-Garlic Marinated Steak

Indulge in succulent Balsamic-Garlic Marinated Steak, a tantalizing dish bursting with flavors of tangy balsamic vinegar, aromatic garlic, and fragrant rosemary. Elevate your dining experience with this tender and flavorful recipe. Perfect for any occasion, whether grilled, seared, or oven-cooked. Try it tonight and savor a culinary masterpiece!

•Ingredients:

2 tablespoons balsamic vinegar
2 cloves garlic, minced
1 to 2 steaks (your choice of cut)
2 tablespoons olive oil
1 teaspoon dried rosemary
Salt and pepper to taste

•Instructions:

In a small bowl, whisk together olive oil, balsamic vinegar, minced garlic, dried rosemary, salt, and pepper to create the marinade.
Place steaks in a shallow dish or resealable plastic bag. Pour the marinade over the steaks, ensuring they are evenly coated.
Marinate the steaks in the refrigerator for at least 30 minutes, or up to 4 hours for optimal flavor and tenderness.
Preheat grill, skillet, or oven to high heat.
Remove steaks from the marinade and discard excess marinade.
Cook steaks to desired doneness, flipping once halfway through cooking.
Allow steaks to rest for a few minutes before serving to allow juices to redistribute.

Homemade 3-Ingredient Lemon Cake

Indulging in desserts while adhering to dietary restrictions often feels like a distant dream. However, W-W Lemon Cake recipe unveils a delightful solution, merging health consciousness with sweet cravings. This culinary masterpiece requires only three ingredients, making it a minimalist marvel in the world of confectionary delights.

The Ingredients: At the heart of this recipe lies a harmonious blend of simplicity and flavor. A box of lemon cake mix, approximately 18.25 ounces in weight, serves as the foundation. Opting for a sugar-free or low-sugar variant aligns with W-W’ principles, ensuring a guilt-free treat. Complementing the mix is a can of diet lemon-lime soda, typically 12 ounces, infusing effervescence and tanginess. Finally, a cup of fat-free Greek yogurt, whether plain or lemon-flavored, adds a creamy texture and enriches the lemony essence.

The Process: Preparation begins with a preheated oven, set to the temperature recommended on the cake mix box, laying the groundwork for baking perfection. In a mixing bowl, the lemon cake mix intertwines with the fizzy embrace of diet lemon-lime soda, undergoing a transformative fusion until smooth and lump-free. This amalgamation forms the luscious batter, destined for a prepared cake pan of choice, be it a bundt pan or a traditional round vessel. As the oven works its magic, baking the cake to golden perfection, anticipation mounts, filling the kitchen with tantalizing aromas.

The Finishing Touch: Once the cake emerges, a testament to culinary prowess, it requires a moment of reprieve, cooling gracefully on the countertop. Meanwhile, a velvety frosting materializes, crafted from fat-free Greek yogurt, potentially elevated with a hint of lemon zest for added vibrancy. With artistic precision, the yogurt dressing envelops the cake, bestowing it with a final flourish of elegance and flavor. Sliced with anticipation, each portion promises a symphony of lemony delight, satisfying both palate and conscience.

Conclusion: W-W Lemon Cake transcends the boundaries of traditional baking, offering a guilt-free indulgence that champions health and flavor in equal measure. With just three ingredients and a dash of creativity, this culinary masterpiece underscores the notion that simplicity is the ultimate sophistication. Embrace the zestful journey and savor every delectable bite of this lemon-infused triumph.


W-W 3-Ingredient Lemon Cake

Table of Contents

Ingredients:

  • 1 box (about 18.25 ounces) lemon cake mix (look for a sugar-free or low-sugar option if you’re following W/W)
  • 1 can (12 ounces) diet lemon-lime soda (such as Sprite Zero or Diet Sierra Mist)
  • 1 cup fat-free Greek yogurt (plain or lemon-flavored)

Instructions:

  1. Preheat your oven to the temperature specified on the cake mix box.
  2. In a mixing bowl, combine the lemon cake mix and the can of diet lemon-lime soda. Stir until well combined and there are no lumps.
  3. Pour the cake batter into a prepared cake pan. You can use a bundt pan, round cake pan, or any other type of pan you prefer.
  4. Bake the cake according to the instructions on the cake mix box, or until a toothpick inserted into the center comes out clean.
  5. Once the cake is done baking, remove it from the oven and let it cool completely.
  6. While the cake is cooling, prepare the frosting by mixing the fat-free Greek yogurt with a little lemon zest if desired. Spread the yogurt frosting over the cooled cake.
  7. Slice and serve!


Premium Dark-Rum Fried Piña Colada Rings

Ingredients:
8 fresh pineapple rings (canned rings can be used)
1 cup premium dark rum
1 cup coconut rum
1 1/2 cups all-purpose flour
1 (10 oz) bag sweetened coconut flakes
2 large eggs
1/2 cup coconut milk
Vegetable oil, for frying (heat to 350°F)
4 oz cream cheese, softened
1/2 cup powdered sugar
Instructions:
Soak the pineapple rings in a bowl covered with dark rum and coconut rum. Refrigerate for at least 1 hour. Drain and reserve 2 tablespoons of rum for the dip. Pat pineapple dry.
Set up three shallow bowls: one with flour, one with coconut flakes, and one with whisked eggs and coconut milk.
Dip each pineapple ring into the flour, then the egg mixture, then press into coconut flakes to coat.
Heat vegetable oil in a deep fryer or heavy pot to 350°F (175°C).
Fry the coated pineapple rings in batches until golden brown, about 1 minute per side. Remove with a slotted spoon and drain on paper towels.
In a medium bowl, beat cream cheese with powdered sugar until smooth. Stir in reserved 2 tablespoons of rum until combined.
Arrange fried pineapple rings on a serving platter and serve warm with the rum cream cheese dip.
Prep Time: 15 minutes
Cooking Time: 10 minutes
Total Time: 1 hour 25 minutes
Per Serving: 300 kcal
Servings: 8 servings

Slow Cooker Cabbage, Potatoes, and Smoked Sausage

Ingredients:
½ head cabbage, cut into chunks
5-6 potatoes cut into chunks
1 lb smoked sausage, cut into pieces (such as Hillshire Farm)
Salt and pepper, to taste
Water, enough to fill the slow cooker halfway
Directions:
Prepare the Ingredients:
Cut the cabbage into large chunks and peel and chop the potatoes into similar-sized pieces.
Slice the smoked sausage into bite-sized rounds.
Assemble in the Slow Cooker:
Add the cabbage, potatoes, and smoked sausage to the slow cooker.
Season generously with salt and pepper.
Pour in enough water to fill the slow cooker about halfway, helping the vegetables cook evenly and stay tender.
Cook:
Cover and cook on high for about 4 hours or on low for about 6 hours, until the potatoes are fork-tender and everything is well cooked.
Serve:
Stir gently, taste and adjust seasoning if needed, and serve hot for a cozy, comforting meal.
Prep Time: 10 minutes | Cooking Time: 4-6 hours | Total Time: 4 hours 10 minutes (on high)
Servings: 4-6

Carnivore Crack Recipe

Table of Contents

Carnivore Crack Recipe:

Ingredients:

  • 8 oz (225g) beef jerky (or your choice of other jerky like pork or turkey)

  • 8 oz (225g) cheese (cheddar or mozzarella work well)

  • 1 tablespoon butter or tallow (optional, for extra crispiness)

  • Salt (optional, to taste)

  • Pepper (optional, to taste)

  • Paprika (optional, for extra flavor)

Instructions:

  1. Preheat Oven: Preheat your oven to 375°F (190°C).

  2. Prepare the Meat: Cut your beef jerky (or other preferred jerky) into smaller bite-sized pieces. If your jerky is on the tough side, you may want to slice it thinly.

  3. Prepare the Cheese: Cut the cheese into small cubes or shred it, depending on your preference.

  4. Butter or Tallow: If you want extra crispy, flavorful bites, melt butter or tallow in a pan over medium heat.

  5. Layer Ingredients: On a baking sheet lined with parchment paper, arrange the beef jerky pieces, followed by a layer of cheese cubes or shreds. If you’ve melted butter/tallow, you can drizzle it over the top of the meat and cheese for extra flavor.

  6. Bake: Bake in the preheated oven for 8-10 minutes, or until the cheese is melted and bubbling and the jerky starts to crisp up.

  7. Add Seasonings: Once done, remove from the oven and sprinkle with optional seasonings like salt, pepper, and paprika for extra flavor.

  8. Serve and Enjoy: Let it cool for a few minutes, then break it into pieces and enjoy your homemade carnivore crack!


You can experiment with different types of jerky or add more cheese for extra richness. It’s a great snack for those on a carnivore or keto diet. Would you tweak this recipe to your liking?

Butter Pecan Keto Ice Cream

Indulge in the velvety richness and nutty flavors of Butter Pecan Keto Ice Cream, a guilt-free treat that won’t disrupt your low-carb lifestyle. Made with wholesome ingredients and no added sugars, this keto-friendly ice cream is the perfect way to satisfy your sweet cravings while keeping your carb intake in check. Creamy, buttery, and studded with toasted pecans, this homemade keto ice cream promises a delightful dessert experience that aligns with your dietary goals. So, let’s dive into the recipe and relish in the pleasure of this luscious and creamy butter pecan ice cream.

Servings: Makes approximately 8 servings

Ingredients:

  • 2 cups heavy cream
  • 1 cup unsweetened almond milk (or any other keto-friendly milk of choice)
  • 1/2 cup powdered erythritol or keto-friendly sweetener of choice
  • 4 large egg yolks
  • 2 teaspoons vanilla extract
  • 2 tablespoons unsalted butter
  • 1 cup pecans, roughly chopped
  • Pinch of salt

Instructions:

  1. In a medium saucepan, heat the heavy cream and unsweetened almond milk over medium heat until it begins to simmer. Do not let it boil.
  2. In a separate bowl, whisk the egg yolks and powdered erythritol until well combined.
  3. Slowly pour about 1/2 cup of the hot cream mixture into the egg yolk mixture, whisking continuously to temper the eggs and prevent curdling.
  4. Gradually pour the tempered egg mixture back into the saucepan with the remaining cream, whisking constantly.
  5. Continue to cook the mixture over medium heat, stirring frequently, until it thickens and coats the back of a spoon. This will create a custard-like base for the ice cream.
  6. Remove the saucepan from the heat and stir in the vanilla extract. Let the custard base cool to room temperature.
  7. In a separate skillet, melt the unsalted butter over medium heat. Add the chopped pecans and a pinch of salt, toasting the pecans until they become fragrant and slightly browned. Remove the skillet from the heat.
  8. Once the custard base has cooled, cover the bowl or transfer it to an airtight container and refrigerate it for at least 4 hours or preferably overnight.
  9. Once the custard is chilled and ready, churn it in an ice cream maker according to the manufacturer’s instructions. This will give the ice cream its creamy texture.
  10. During the last minute of churning, add the toasted pecans into the ice cream.
  11. Transfer the churned butter pecan keto ice cream to an airtight container and freeze it for an additional 2-3 hours or until it reaches the desired firmness.
Nutrition Facts per Serving (1/2 cup, approximate values):
  • Calories: 332
  • Total Fat: 32g
  • Saturated Fat: 15g
  • Cholesterol: 150mg
  • Sodium: 31mg
  • Total Carbohydrate: 4g
  • Dietary Fiber: 1g
  • Sugars: 1g
  • Protein: 5g

Cauliflower Potato Salad

Mock potato salad made with all the same ingredients as a classic potato salad, except this version is perfect for low carb followers. Roast the cauliflower to enhance the nutty flavor and serve along with your favorite main dish.
Keyword: cauliflower potato salad, cauliflower salad, Low carb potato salad
Prep Time: 20minutes 
Cook Time: 15minutes 
Total Time: 35minutes 
Servings: 8 servings
Calories: 253kcal
Author: Sandra Shaffer

Ingredients

    • 6 cups cauliflower florets
    • 1 cup mayonnaise
    • 1 tablespoon prepared mustard
    • 1 teaspoon kosher salt
    • 1/4 teaspoon pepper
    • 2 tablespoons pickle relish
    • 4 hard boiled eggs chopped (reserve one for garnish)

Instructions

  • Clean and cut cauliflower into bite size florets.
  • Place cauliflower on a baking sheet and bake at 425°F degrees for 15 minutes, turning every 5 minutes. Remove from oven and cool.
  • Mix mayonnaise, mustard, salt, and pepper in a large bowl. Add cooled cauliflower and relish. Stir in 3 chopped eggs.
  • Cover dish and refrigerate for 2 hours.
  • Slice the remaining egg and top on salad before serving.

Notes

You’ll need on large cauliflower to yield 6 cups of florets.

The smaller the pieces the quicker the edges may brown. Keep an eye on the cauliflower while baking so they don’t get too toasted.

Nutrition

Serving: 1g | Calories: 253kcal | Carbohydrates: 6g | Protein: 5g | Fat: 24g | Saturated Fat: 4g | Polyunsaturated Fat: 19g | Cholesterol: 105mg | Sodium: 536mg | Fiber: 2g | Sugar: 3g

Disclaimer

Please note that the nutritional information provided are guidelines and may vary based on the brand of products used. For your specific nutritional goals use My Fitness Pal or Verywell Fit recipe calculators. All content within this site is not intended as medical diagnosis or treatment and should not be considered a substitute for professional medical expertise.

Keto Blueberry Cobbler

Keto Blueberry Cobbler is a delightful and low-carb dessert that showcases the natural sweetness of blueberries while keeping you in ketosis. This delicious cobbler features a juicy blueberry filling topped with a buttery and crumbly almond flour crust. It’s a perfect treat for those following a ketogenic diet or anyone looking for a healthier dessert option. Let’s dive into the recipe!

Recipe:

Ingredients: For the Filling:

  • 3 cups fresh or frozen blueberries
  • 2 tablespoons granulated sweetener (such as erythritol or stevia)
  • 1 tablespoon lemon juice
  • 1 teaspoon vanilla extract

For the Topping:

  • 1 cup almond flour
  • 1/4 cup granulated sweetener
  • 1/4 cup melted butter
  • 1/2 teaspoon cinnamon
  • Pinch of salt

Instructions:

  1. Preheat your oven to 350°F (175°C).
  2. In a mixing bowl, combine the blueberries, granulated sweetener, lemon juice, and vanilla extract. Stir well to coat the blueberries evenly with the sweetener and flavors.
  3. Transfer the blueberry filling to a greased baking dish or individual ramekins.
  4. In a separate bowl, combine the almond flour, granulated sweetener, melted butter, cinnamon, and salt. Mix until the ingredients form a crumbly texture.
  5. Sprinkle the topping evenly over the blueberry filling, covering it completely.
  6. Place the baking dish or ramekins in the preheated oven and bake for 25-30 minutes, or until the blueberry filling is bubbly, and the topping is golden brown.
  7. Remove from the oven and let it cool for a few minutes before serving.
  8. Serve the Keto Blueberry Cobbler warm as is or with a dollop of whipped cream or a scoop of low-carb vanilla ice cream, if desired.

Nutrition Facts (per serving):

  • Calories: Approximately 180
  • Fat: 15g
  • Protein: 4g
  • Total Carbohydrates: 10g
    • Dietary Fiber: 4g
    • Net Carbs: 6g

Servings: This recipe makes approximately 6

Keto Meatballs Stuffed Mushrooms

Keto Meatballs Stuffed Mushrooms is a tasty low-carb appetizer that is ideal for anyone on a ketogenic or gluten-free diet. These meatballs are made from ground beef, almond flour, Parmesan cheese, and Italian spices and are filled in large mushroom caps. This dish is rich and loaded with savory flavors and has a pleasant texture. It is very easy and quick to make this dish, and it is perfect for hectic weeknights, meal prep, or party platters. This dish is filled with good fats and proteins and doesn’t ruin the keto diet without compromising the flavor. These Keto Meatballs Stuffed Mushrooms are so delicious and filling that we have this dish with fresh salad or even without anything.

STATS:

  • Serving size: 2 stuffed mushrooms
  • Cook time: Twenty-five mints.
  • Cuisine: American / Low-Carb
  • Total time: Forty mints.
  • Course: Appetizer / Snack / Main
  • Diet: Keto, Low Carb, Gluten-Free
  • Calories: 180 kcal
  • Serving: Makes 12 stuffed mushrooms
  • Prep time: Fifteen mints.

EQUIPMENT:

  • Baking sheet
  • Knife
  • Parchment paper
  • Chopping board

INGREDIENTS:

  • 12 white or cremini mushrooms
  • ½ lb. ground beef
  • ¼ cup almond flour
  • Quarter cup parmesan cheese
  • One huge egg
  • One Teaspoon Italian seasoning
  • ½ tsp. garlic powder
  • ½ tsp. onion powder
  • Salt & pepper
  • ¼ cup mozzarella
  • 1 tbsp. olive oil

INGREDIENTS NOTES:

MUSHROOMS:

  • We have to use large and firm mushrooms like white or cremini so that we can easily stuff the stuffing.

BEEF:

  • We have to use the 80/20 ground beef to make the juicy meatballs or we would also utilize the pork or turkey as well.

ALMOND FLOUR:

  • We have to use almond flour as the low-carb binder in place of breadcrumbs to make the keto-friendly dish.

PARMESAN CHEESE:

  • Parmesan cheese is added to this dish and it helps to keep meatballs together and it also adds the umami flavor.

LARGE EGGS:

  • We use the large eggs in this dish to keep the components by binding the ingredients.

HERBS:

  • We add the oregano and basil herbs to the dish as it adds the traditional Italian flavor to the meatballs.

ONION & GARLIC SEASONING:

  • We can add the onion & garlic seasoning to the dish as it prepares the dish more flavorful and delicious without the addition of additional carbs.

MOZZARELLA CHEESE:

  • Mozzarella cheese is added to make this dish cheese-rich.

OLIVE OIL:

  • Olive oil is used to roast the mushrooms and to also help to keep the mushrooms juicy.

INSTRUCTION:

  1. We can heat the oven at three-seventy-five degrees F.
  2. Then we can put parchment paper on a baking pan.
  3. We can cut the stems & clean the mushrooms then set aside the caps.
  4. Now we can add the meat, almond flour, onion seasoning, Parmesan, egg, seasoning, garlic seasoning, salt, and pepper powder and mix these components.
  5. We can make the 12 little meatballs with the mixture.
  6. Now we can add one meatball in one mushroom cap and put it in the tray.
  7. We can drizzle the olive oil on the mushrooms.
  8. Now we can put the mushrooms in the oven for twenty to twenty-five minutes or till the mushrooms get soft and the beef gets properly cooked.
  9. We can sprinkle the shredded cheese over the mushrooms in the last 5 minutes then serve warm.

SERVING IDEAS:

  • We would serve this dish with keto marinara sauce.
  • You would also sprinkle the parsley and basil leaves to make the dish bright & aromatic.
  • We would have the crispy green salad along with these mushrooms for the filling meal.
  • You would also have the cauliflower rice with the mushrooms to have them in the dinner.
  • We would also serve these mushrooms in the tray as a party appetizer.
  • We would also add some garlic butter to make this Keto Meatballs Stuffed Mushrooms richer.

TIPS:

  • We don’t have to fill the mushrooms too much otherwise it will spill during the cooking.
  • You could use the parchment paper to prevent the mushrooms from getting stuck.
  • We would also sprinkle red flakes to make the spicy meatballs.
  • You shouldn’t have to mix the meatballs too much otherwise they won’t remain juicy.

STORAGE INFORMATION:

FRIDGE:

  • We would put the remaining dish in an airtight container and preserve the dish for 3 days.

FREEZER:

  • We would preserve this dish for 2 months.

FAQs:

Is this dish low in carbs?

  • This dish is low in carbs and it just comprised of 2g net carbs and 14g proteins are present per portion of this dish.

Can I add a different variety of meat to this dish?

  • We can add chicken, sausages, or turkey to this dish to make the taste different.

Will I bake these mushrooms in air fryer?

  • We can make this dish in the air fryer and cook this dish at three-fifty degrees F for 15 minutes.

NUTRITIONAL INFORMATION:

Calories: 180 kcal
Total carbs: 3g
Fiber: 1g
Net carbs: 2g
Protein: 14g
Fat: 12g
Sodium: 280mg
Potassium: 320mg
Calcium: 80mg
Iron: 1.4mg
Vitamin A: 120IU
Serving size: 2 mushrooms

Weight watchers cheesecake Recipe

Just because you are on a diet does not mean you can’t enjoy a slice of cheesecake. I am going to share with you the best zero point WW cheesecake recipe! This Weight Watchers recipe is super easy to make too!
Weight watchers cheesecake
INGREDIENTS
2 Tbsp Vanilla Extract
3 Eggs
1 Box Instant Sugar-Free Cheesecake Pudding Mix (unmade)
3 Cups Fat Free greek Yogurt
1/4 Cup Splenda
INSTRUCTIONS
Preheat the oven to 350 degrees F.
In a large mixing bowl or stand mixer, mix eggs, Splenda, vanilla, and yogurt until fully blended.
Add in dry cheesecake pudding mix a little at a time until well blended. Do not dump it all in at one time or you will end up with a big lump.
Grease a 7-inch push or springform cheesecake pan. I also used a greased piece of parchment paper at the bottom of my pan.
Pour cheesecake mixture into greased pan.
Bake in the center of the oven for 40 minutes. Will be just slightly golden and just starting to crack when done. The center will still be slightly jiggly.
Let cool to room temperature. Then cover and store in the fridge until fully chilled before serving.

Cream cheese frosted Banana Cake

This delicious and moist double layer banana cake is absolutely scrumptious and is frosted with a cream cheese frosting that tastes amazing.

Ingredients

For The Banana Cake

  • 2 cups all purpose flour
  • 1 tsp baking soda
  • ¼ tsp salt
  • ½ cup butter, softened
  • 1 ⅓ cups sugar
  • 2 eggs
  • 1 cup sour cream
  • 1 tsp vanilla extract
  • 4 medium bananas, mashed (about 2 cups)

For The Cream Cheese Frosting

    • 8 oz cream cheese, room temperature
    • ½ cup butter, room temperature
    • 1 tsp vanilla extract
    • 3 cups powdered sugar

Instructions

  • Preheat oven to 350° and right before filling, spray (2) 8 inch cake pans with non stick spray.

Banana Cake

    • In a large bowl, beat butter and sugar together until creamy.
    • Add eggs and beat until combined then beat in sour cream and vanilla.
    • Next, add flour, baking soda and salt then beat just until combined.
  • Stir in mashed bananas and mix until combined.
  • Pour equally into prepared cake pans and bake for approximately 35-40 minutes or until toothpick inserted comes out clean.

Cream Cheese Frosting

  • In a medium bowl, beat cream cheese and butter together until combined then add vanilla.
  • Gradually add powdered sugar and beat until smooth and creamy.
  • Once cake has cooled, frost cake and enjoy!

Notes

Nutritional values are approximate.
Please note that these values can change with different brands and any modifications made to the recipe. For the most accurate information, use a nutritional calculator with the exact brands and measurements.

Nutrition

Calories: 565kcalCarbohydrates: 79gProtein: 5gFat: 27gSaturated Fat: 16gPolyunsaturated Fat: 1gMonounsaturated Fat: 7gTrans Fat: 1gCholesterol: 98mgSodium: 339mgPotassium: 229mgFiber: 2gSugar: 58gVitamin A: 911IUVitamin C: 4mgCalcium: 52mgIron: 1mg

Keto Cherry Cheesecake Fluff

This Keto Cherry Cheesecake Fluff is ideal for anyone on the keto diet. It is a rich, creamy, low-carb dessert made quickly without baking. This dessert is prepared using cream cheese, whipped cream, and a hint of cherry flavor; it offers all the delights of cheesecake without the added sugar or guilt. With its light and fluffy texture and well-balanced sweetness, it’s the perfect way to satisfy sweet cravings while maintaining ketosis. You can easily add extra cherries, crushed almonds, or sugar-free chocolate chips to make it your own. Try this cherry cheesecake fluff. Savor decadence in a keto manner!


STATS:

  • Calories: 200 kcal
  • Prep time: 10 minutes
  • Cook time: Nil
  • Total time: Ten mins
  • Serving size: ½ cup
  • Servings: 6
  • Cuisine: American
  • Course: Dessert
  • Diet: Keto, Low Carb

EQUIPMENT:

  • Mixing bowl
  • Beater
  • Separate bowl
  • Spatula
  • Jars
  • Chopping board
  • Knife

INGREDIENTS:

  • 8 oz. cream cheese
  • ½ cup heavy whipping cream
  • 1/3 cup powdered Erythritol
  • 1 tsp. vanilla extract
  • Chocolate shavings(choczero), two tbsp. in total
  • 0.25-0.5 tsp of keto cherry extract(pure)

INGREDIENTS NOTES:

CREAM CHEESE:

  • We can use softened full-fat cream cheese for optimal texture and flavor. This will assist in making the fluff’s base smooth and creamy.

HEAVY WHIPPING CREAM:

  • We can use heavy whipping cream to give the fluff its light and airy texture, which is whipped till it forms soft peaks, and then we can fold the heavy cream into the cream cheese mixture.

ERYTHRITOL POWDER:

  • It is advised to use powdered Erythritol or similar keto-friendly sweetener to prevent any grittiness and we can taste and adjust the amount to the preferred level of sweetness.

CHERRY ESSENCE:

  • Although cherries are naturally delicious, they do contain some carbohydrates. In order to be strictly keto, here, we are using the keto-friendly pure essence of cherries in place of real cherry fruit.

SHAVINGS OF CHOCOLATE:

  • Keto chocolate shavings in combination with cherry extract will keep your carb count low & give you the amazing flavor combo.

VANILLA ESSENCE:

  • We can use the vanilla essence to make the fluff more flavorful. We can go for pure vanilla extract for the greatest taste.

OPTIONAL GARNISH:

  • We can customize by adding crushed almonds, sugar-free chocolate chips, or a few additional cherries for taste and texture.


INSTRUCTION:

  1. We can beat the cream cheese till the cream cheese gets smooth in a mixing bowl.
  2. Mix in vanilla essence and powdered sweetener till it gets completely blended.
  3. Take another bowl and beat heavy cream till it forms a soft peaks form.
  4. Then we can gently fold the whipped cream into the cream cheese mixture till it is completely combined.
  5. Then we can stir in pure keto cherry extract along with chocolate shavings.
  6. Transfer to dishes or cups and refrigerate for half an hour.
  7. Then we can garnish the fluff with the optional toppings on top, and serve.

TIPS:

  • We can allow the cream cheese to reach room temperature before combining to prevent lumps.
  • You can add a drop of cherry extract for a stronger taste of cherries in this fluff.
  • We can add additional sweeteners as needed depending on the taste.

STORAGE INFORMATION:

FRIDGE:

  • You could store the cheesecake fluff in a sealed box and store the fluff for 4 days in the fridge.

FREEZER:

  • We can put this cheesecake fluff in individual containers and store this fluff for 1 month.

FAQs:

Is this cheesecake fluff keto-friendly?

  • Yes, this cheesecake fluff is keto-friendly and it is comprised of 3g net carbs, 2g fiber, 3g proteins, and 5g of carbs per serving of this fluff.

Can I use real cherries to make this cheesecake fluff?

  • No, As real cherries are high in carbs that’s why we have replaced them with pure keto cherry essence to make this cheesecake fluff.

How to make this cheesecake fluff dairy-free?

  • You can use the coconut cream as a substitute for heavy cream to make this cheesecake fluff dairy-free.

Is cherry keto-friendly?

  • Cherries have a slighter high in carbs as compared to other keto-friendly fruits but the cherry is still keto and we can able to use the cherry in moderation.


NUTRITIONAL INFORMATION:

Calories: 200 kcal
Total carbs: 5g
Net carbs: 3g
Fiber: 2g
Protein: 3g
Fat: 18g
Sodium: 90mg
Potassium: 120mg
Calcium: 60mg
Iron: 0.4mg
Vitamin A: 800 IU

3 Points Lasagna Bombs

it is 3 weight watchers points total for 2 bombs! Beyond satisfying! recipe makes 4 servings.
Ingredients
  • Canned fire roasted tomatoes 2 cup s 0 Canned tomato sauce 1/2 cup(s) 0
  • 1 % low fat cottage cheese 1 cup s
  • Shredded fat free mozzarella cheese 4 Oz
  • Carla nada fettuccine 2 serving s
Instructions
  • I just made a homemade spaghetti sauce with , onion, minced garlic and chopped red pepper with seasoning of salt pepper onion powder garlic powder oregano Italian seasoning. I don’t measure stuff when I’m cooking.
  • Then I cooked 4 dry cups of Carba Nada fettuccine al dente.
  • I mixed 1 cup low fat cottage cheese with 1/4 -1/3 cup fat free mozzarella and seasoned with some of same seasonings I used in sauce.
  • Sprayed Pam in 8 mini loaf pan.
  • Put a dollop of sauce in to cover bottom, then 1/8 of noodles, then dollop of cottage cheese mixture spread around topped with another dollop of sauce.
  • Baked 350 for 20 minutes. Added a little shredded non fat mozzarella to top and baked 5 more minutes. Let rest then scooped out with spatula.
Recipe Notes
Would try Egglife wraps if I had them for lasagna noodles or manicotti.
Could lower points with fat fee cottage cheese but that’s not what was in my fridge. Hope this helps someone get creative and make something delicious that’s satisfying and low points. Over and out.
(notes Nancy includes meat in her recipe -i don’t include meat recipes on the blog so didn’t include in the recipe

Zero Point Crustless Pumpkin Pie

An easy recipe for a homemade crustless pumpkin pie.  This Zero Point Crustless Pumpkin Pie recipe is perfect for fall-it so good. I won’t regret making this for your next family gathering!

PREP TIME5 minutes

COOK TIME45 minutes

ADDITIONAL TIME5 minutes

TOTAL TIME55 minutes

Ingredients

  • 1 (15 oz) can 100% canned pumpkin purée
  • 1/3 cup zero-point brown sugar substitute – I use Lakanto Golden Monkfruit Sweetener
  • 1 tsp cinnamon
  • 1/2 tsp nutmeg
  • 1/2 tsp vanilla extract
  • 1 tsp pumpkin spice
  • 2 large eggs or 1/2 cup liquid egg substitute
  • 8 oz. unsweetened almond milk, premier protein, unsweetened coconut milk, or Carbmaster no sugar added milk

Instructions

  1. Preheat oven to 375 degrees.
  2. Spray a 9-inch pie dish with nonstick cooking spray.
    In a large mixing bowl, combine all ingredients and mix until all ingredients are well combined.
  3. Pour into prepared pie dish.
  4. Bake for 40-45 minutes or until knife inserted in the center comes out clean.
  5. Remove from oven and let it cool for 10 minutes before serving.
  6. Store in the fridge for up to a week.

0-1 Personal.Points™ p.er slice
*This number shows the PersonalPoints™ range. The points will vary based on your individualized plan.

Notes

Smartpoints for crustless pie: GREEN: Zero Smart.points if using liquid egg substitute or 1 Smart.points per slice if using whole eggs BLUE/PURPLE: Zero SmartPoints per slice

Easy Fajita Chicken Breasts Casserole

The  Fajita Chicken Breasts Casserole is a delightful twist on a classic Tex-Mex favorite, carefully crafted to be both flavorful and health-conscious. This wholesome dish features tender chicken breasts seasoned with a harmonious blend of cumin, chili powder, garlic, and paprika, offering a burst of vibrant flavors with every bite. The addition of colorful bell peppers and minced onions not only adds a pleasing visual appeal but also contributes a delightful crunch and sweetness to the dish. Topped with a generous sprinkling of reduced-fat mozzarella cheese, this casserole bakes to golden perfection, creating a satisfyingly gooey and cheesy layer over the succulent chicken and vegetables.

Thank you for reading this post, don’t forget to subscribe!

Garnished with freshly chopped cilantro or parsley for a final touch of brightness, this dish is as visually stunning as it is delicious. Whether served over cauliflower rice, steamed vegetables, or enjoyed on its own, this Fajita Chicken Breasts Casserole promises to be a comforting and nutritious meal option that’s perfect for any occasion. With its balanced flavors, customizable spice level, and suitability for meal prep, it’s a versatile recipe that’s sure to become a household favorite among those following a  plan or simply looking for a lighter take on a beloved classic.

Ingredients:

  • 3-4 small boneless, skinless chicken breasts (about 1 1/2 lbs/750g), or 2 large chicken breasts, sliced lengthwise
  • 2 bell peppers (1 red and 1 green), seeded and sliced into strips
  • 1 medium onion, minced
  • 1 teaspoon ground cumin
  • 1 1/2 teaspoons chili powder
  • 1 teaspoon garlic powder or minced garlic
  • 2 teaspoons paprika
  • Salt and freshly ground black pepper to taste
  • 1 tablespoon vegetable oil
  • 1 cup grated reduced-fat mozzarella cheese or your favorite reduced-fat cheese
  • Chopped fresh cilantro or parsley for garnish

Directions:

  1. Preheat your oven to 400°F (200°C) and lightly coat a baking dish with cooking spray.
  2. Season chicken breasts on both sides with cumin, chili powder, garlic, paprika, salt, and pepper. Reserve some seasoning for later use.
  3. Place the chicken breasts in the prepared baking dish and drizzle with oil. Top with peppers and onions, and sprinkle with the remaining fajita seasonings. Finish with grated reduced-fat mozzarella cheese.
  4. Bake the chicken fajita casserole for 20 to 30 minutes (depending on thickness) or until the chicken is cooked through and reaches an internal temperature of 165°F (74°C). You can broil the dish for 2 minutes at the end to crisp the top if desired.
  5. Serve immediately over cauliflower rice, steamed vegetables, zucchini noodles, or on its own.
  6. Garnish with chopped fresh cilantro or parsley before serving.

Points:

  • This recipe makes approximately 4 servings.
  • Points per serving (without accompaniments): Each serving is approximately 4-5  SmartPoints, depending on specific ingredients used.

Notes:

  • Adjust the spiciness according to your preference by increasing or decreasing the amount of chili powder and black pepper.
  • For a smoky flavor, you can substitute the paprika with smoked paprika.
  • This recipe is great for meal prep as it can be easily reheated for a quick and delicious lunch or dinner.

Honey Lemon Chicken & Avocado Rice Stack

Mediterranean Honey Lemon Chicken & Avocado Rice Stack
Table of Contents
This Mediterranean Honey Lemon Chicken & Avocado Rice Stack is a vibrant, layered dish that combines warm, zesty chicken with a fragrant herb rice base and creamy avocado. It’s not only visually stunning but also packed with bold flavors and nutritious ingredients. Perfect for a summer lunch, light dinner, or a meal-prep-friendly option, this recipe brings together the brightness of the Mediterranean with a modern presentation. Think of it as a wholesome grain bowl—stacked!

Total Time:
Prep Time: 15 minutes

Cook Time: 20 minutes

Total Time: 35 minutes

Servings: 2–3 stacks

Ingredients:
For the Chicken:
2 boneless, skinless chicken breasts

2 tablespoons extra virgin olive oil

1 tablespoon honey

Juice of 1 lemon (about 2 tablespoons)

2 garlic cloves, minced

1 teaspoon dried oregano

½ teaspoon dried thyme

Salt and black pepper, to taste

For the Rice Layer:
1 cup cooked basmati or brown rice

1 tablespoon olive oil

½ teaspoon dried mint or parsley

Pinch of salt

For the Avocado Layer:
1 ripe avocado, diced

Juice of ½ lemon

Salt and pepper, to taste

Optional Toppings:
Cherry tomatoes, halved

Cucumber, finely diced

Crumbled feta cheese

Chopped fresh parsley or basil

See also Mushroom Rice
Drizzle of extra virgin olive oil

Instructions:
1. Marinate and Cook the Chicken:
In a bowl, combine olive oil, honey, lemon juice, minced garlic, oregano, thyme, salt, and pepper.

Add the chicken breasts and coat well. Marinate for at least 15 minutes (or overnight if time allows).

Heat a skillet or grill pan over medium heat. Cook the chicken 5–6 minutes per side until golden brown and cooked through.

Let it rest for 5 minutes, then slice thinly.

2. Prepare the Rice Layer:
In a bowl, toss the cooked rice with olive oil, dried mint or parsley, and a pinch of salt.

Warm slightly if desired or use at room temperature.

3. Make the Avocado Layer:
In a separate bowl, gently mix the diced avocado with lemon juice, salt, and pepper.

Mash slightly for a chunky texture, or keep in cubes depending on preference.

4. Assemble the Stack:
Use a food ring mold or a clean measuring cup to layer the stack (lightly oil it if needed).

Press a layer of herbed rice into the bottom.

Add a layer of avocado mix and press gently.

Top with sliced honey lemon chicken.

Gently lift the mold to reveal your stack.

5. Garnish and Serve:
Top with cherry tomatoes, diced cucumber, crumbled feta, chopped herbs, and a drizzle of olive oil.

Serve immediately for the best presentation and flavor.

Tips for Success:
Marinate Longer for Deeper Flavor:
If time permits, marinate the chicken for 2–4 hours or overnight in the fridge. The longer soak enhances the lemon-honey-garlic notes.

Use a Mold for a Clean Stack:
A stainless steel food ring or a 1-cup measuring cup works great for clean layering. Lightly oil the inside to release easily.

See also Rotisserie Chicken Mushroom Soup
Keep Avocado Fresh:
Toss avocado with lemon juice immediately after dicing to prevent browning. Assemble just before serving for the best color and texture.

Warm or Room Temp:
The rice can be served warm, but make sure the avocado isn’t hot when layering. Keep components at similar temperatures for best stacking and taste.

Slice Chicken Thinly:
For the best bite and presentation, let the chicken rest after cooking and then slice it thinly across the grain.

Customize Texture:
You can mash the avocado slightly for a creamier middle layer or keep it cubed for a chunkier, fresher feel.

Variations:
Grain Swap:
Substitute the rice with:

Quinoa for extra protein

Farro for a nutty bite

Cauliflower rice for a low-carb option

Protein Options:

Swap chicken with grilled shrimp, salmon, or chickpeas for a pescatarian or vegetarian version.

Spicy Kick:
Add red pepper flakes or a dash of harissa paste to the chicken marinade for a spicy Mediterranean flair.

Avocado Sauce Alternative:
Blend the avocado with a bit of yogurt, lemon, olive oil, and garlic to create a smooth avocado cream layer or drizzle.

Add Crunch:
Top with toasted pine nuts, crispy chickpeas, or crushed pita chips for added texture.

Make It a Bowl:
If you don’t want to stack, simply layer all components in a bowl and serve as a deconstructed version.

Vegan Version:
Use maple syrup instead of honey, and substitute chicken with grilled tofu, tempeh, or roasted vegetables.

Q&A: Frequently Asked Questions
Q1: Can I make this ahead of time?
Yes, you can prep the components (chicken, rice, and avocado) ahead of time. Store them separately in airtight containers. Assemble the stacks just before serving for best texture and presentation.

See also Mediterranean-Style Creamy Beef & Tortellini Pasta
Q2: What can I use if I don’t have a food ring mold?
You can use a 1-cup measuring cup or even a cleaned tuna can with both ends removed. Lightly oil it for easy release.

Q3: How do I store leftovers?
Store leftovers in separate containers. Avocado may brown over time, so it’s best eaten fresh. Add lemon juice to slow oxidation.

Q4: Can I serve this cold?
Yes! This recipe works well chilled, especially in summer. Just let the rice and chicken cool completely before stacking.

Q5: Is this gluten-free?
Yes—this dish is naturally gluten-free as long as you use certified gluten-free rice and ingredients.

Estimated Nutrition (Per Stack – serves 2–3)
Note: Values are estimates and may vary based on exact portions and toppings.

Calories: ~450–500 kcal

Protein: 28–32g

Carbohydrates: 35–40g

Fat: 22–25g

Fiber: 5–7g

Sugar: 6–8g

Sodium: ~400–500mg

Includes chicken, avocado, rice, olive oil, and toppings like feta and vegetables.

Conclusion
The Mediterranean Honey Lemon Chicken & Avocado Rice Stack is a perfect harmony of flavors—sweet, citrusy, herbaceous, and creamy—all layered into a stunning stack. Whether you’re preparing a beautiful brunch, an elegant lunch, or simply want a fresh, wholesome meal-prep idea, this dish fits the bill. It’s easy to adapt, impressively presented, and bursting with Mediterranean goodness.

Try it once, and you’ll be stacking it again and again!

One-Pan Garlic Herb Chicken with Potatoes & Green Beans Recipe

One-Pan Garlic Herb Chicken with Potatoes & Green Beans Recipe

‼️

Ingredients
For the Chicken
4 boneless, skinless chicken breasts 🍗
2 tbsp olive oil 🛢
2 tsp garlic powder
1 tsp onion powder
1 tsp dried oregano 🌿
1 tsp paprika 🌶
Salt &  black pepper to taste 🧂
For the Vegetables
3 cups baby potatoes 🥔 (quartered)
2 cups fresh green beans 🥦
2 tbsp olive oil 🛢
2 garlic cloves 🧄 (minced)
1 tsp dried thyme 🌱
1 tsp smoked paprika 🌶
Salt &  pepper to taste 🧂
For the Sauce
1/4 cup chicken bone broth 🍲
Juice of 1 lemon 🍋
1 tbsp Dijon mustard 🥄
Directions
Preheat the oven: Preheat to 400°F (200°C) and lightly grease a large  baking dish.
Season the chicken: Rub chicken breasts with olive oil, garlic powder, onion powder, oregano, paprika, salt, and pepper. Set aside.
Prepare the veggies: Toss potatoes and green beans in olive oil, minced garlic, thyme, paprika, salt, and pepper. Spread evenly in the baking dish.
Assemble the dish: Nestle the chicken breasts on top of the veggies.
Make the sauce: Whisk together chicken broth, lemon juice, and Dijon mustard. Drizzle over the chicken and vegetables.
Bake: Roast for 40-45 minutes or until the chicken reaches an internal temperature of 165°F (74°C) and the potatoes are tender.
Serve & enjoy: Let rest for 5 minutes before slicing the chicken. Plate with veggies and drizzle any remaining sauce from the pan for extra flavor!
Notes & Variations
Veggie swap: Use carrots, zucchini, or bell peppers instead of green beans.
Make it spicy: Add a dash of chili flakes for a kick. 🌶
Add cheese: Sprinkle Parmesan over the dish during the last 10 minutes of baking for a cheesy finish. 🧀

Apple Salad with Honeycrisp Apples, Celery, Grapes, Pecans, and Dried Cranberrie

Introduction: A Fresh, Flavorful, and Nutrient-Dense Salad
Salads are a cornerstone of healthy eating, and when prepared thoughtfully, they can serve as both a satisfying and nutrient-packed meal. This WW Apple Salad with Honeycrisp Apples, Celery, Grapes, Pecans, and Dried Cranberries brings together the best of fresh fruits, crunchy vegetables, and healthy fats for a refreshing dish that’s perfect for any occasion. Whether you’re seeking a light lunch, an energizing snack, or a flavorful side dish, this salad delivers on both taste and health benefits while keeping SmartPoints low.

Made with the crisp sweetness of Honeycrisp apples, the freshness of celery, and the sweetness of grapes and dried cranberries, this salad is bursting with vibrant flavors and textures. Pecans add a delightful crunch while also providing healthy fats and protein, making the dish more filling. It’s the perfect balance of sweet, savory, and satisfying, without being too heavy.

by TaboolaSponsored Links
You May Like
Play War Thunder now for free
War Thunder
War Thunder – Register now for free and play against over 75 Million real Players
War Thunder
Villas For Sale in Dubai Might Surprise You
Villas In Dubai | Search Ads
In this comprehensive guide, we’ll take you through the step-by-step process of creating this Apple Salad, providing the exact measurements, detailed instructions, and nutritional information. Whether you’re following the WW program, a Keto lifestyle, or simply want to enjoy a refreshing and delicious salad, this recipe will suit all your needs.

Ingredients for WW Apple Salad with Honeycrisp Apples, Celery, Grapes, Pecans, and Dried Cranberries
The key to making this WW Apple Salad both tasty and nutritious is the careful selection of fresh ingredients. Each component adds its own unique texture, flavor, and nutritional value, resulting in a delightful mix of sweetness, crunch, and tang.

For the Salad:
2 medium Honeycrisp apples (or any other variety you prefer) – Honeycrisp apples are known for their crisp texture and perfect balance of sweetness and tartness. This variety of apple is ideal for a fresh salad, providing a refreshing crunch and natural sweetness.
2 stalks celery, finely chopped – Celery adds a refreshing, crunchy texture and is low in calories, which makes it the perfect low-carb ingredient. It’s also packed with fiber and antioxidants.
1 cup red or green grapes, halved – Grapes are naturally sweet, which complements the apples and dried cranberries in this salad, adding a burst of juiciness.
1/2 cup pecans, roughly chopped – Pecans provide healthy fats, fiber, and protein, making them a great addition to balance the sweetness of the fruit and offer some crunch.
1/4 cup dried cranberries, unsweetened or lightly sweetened – Dried cranberries provide a chewy texture and a pop of color, while also contributing some natural sweetness and antioxidants.
1/4 cup crumbled feta cheese (optional) – Feta cheese adds a salty, tangy flavor that enhances the sweetness of the fruit, though you can omit it if you’re looking for a dairy-free version.
For the Dressing:
1/4 cup plain Greek yogurt – The creamy base of this dressing, Greek yogurt, is rich in protein and provides a tangy, smooth texture. For a lighter version, you can substitute it with non-fat yogurt.
1 tablespoon honey or maple syrup – A touch of honey or maple syrup adds a natural sweetness to balance the tartness of the apples and cranberries.
1 tablespoon apple cider vinegar – Apple cider vinegar is a great addition to the dressing for a tangy kick that balances out the sweetness of the honey and fruits.
1 tablespoon fresh lemon juice – Lemon juice adds a fresh and zesty flavor that brightens up the dressing and helps tie all the flavors together.
1 teaspoon Dijon mustard – Adds a mild kick and depth of flavor to the dressing, perfectly complementing the sweetness and creaminess.
Salt and pepper, to taste – Season the dressing to taste with salt and black pepper to enhance the overall flavor.
1 teaspoon olive oil (optional) – For a little extra creaminess and smooth texture, you can add a small amount of olive oil to the dressing.

Step-by-Step Instructions
Now that we’ve gathered all the ingredients for the WW Apple Salad, let’s walk through the process of making this delicious, healthy dish. The steps are simple and easy to follow, and the salad can be prepared in about 15-20 minutes. Let’s get started:

Step 1: Prepare the Ingredients
Start by prepping all your ingredients before assembling the salad. This ensures everything is ready to go when you’re ready to toss everything together.

Chop the apples: Core and slice the Honeycrisp apples into bite-sized pieces. You can choose to leave the skin on for added fiber, or peel them if you prefer a smoother texture. To prevent the apples from browning, you can toss them in a small amount of lemon juice or apple cider vinegar.
Chop the celery: Wash and chop the celery stalks into small pieces. Celery adds a wonderful crunch and is low in calories, so it’s a perfect base for the salad.
Prepare the grapes: Wash the grapes thoroughly, then slice them in half. Grapes add a sweet burst of flavor, so be sure to evenly distribute them throughout the salad.
Chop the pecans: Roughly chop the pecans. If you prefer, you can toast them for an added flavor boost, though this is optional.
Prepare the cranberries: If you’re using dried cranberries, make sure they’re unsweetened or lightly sweetened to keep the carb count low. If the cranberries are too sticky, you can lightly coat them with a dusting of cornstarch or arrowroot powder to keep them from clumping together.
Crumbled feta: If using, crumble the feta cheese into small pieces and set aside. It will be sprinkled on top at the end.
Step 2: Make the Dressing
While the salad ingredients are being prepped, make the creamy dressing.

In a small bowl, combine the Greek yogurt, honey, apple cider vinegar, lemon juice, and Dijon mustard. Whisk them together until smooth and well combined.
Taste the dressing and adjust the seasoning. Add salt and pepper as needed to enhance the flavors. If you prefer a slightly thinner dressing, you can add a small amount of water or additional lemon juice.
Step 3: Assemble the Salad
Once all the ingredients are ready, it’s time to assemble the salad.

In a large mixing bowl, add the prepared Honeycrisp apples, celery, grapes, pecans, and dried cranberries.
Pour the dressing over the salad and toss gently to combine. Be sure that each piece of fruit and vegetable is coated in the creamy dressing.
If using, sprinkle the crumbled feta cheese over the top and toss again lightly.
Step 4: Serve and Enjoy
Serve the salad immediately or refrigerate it for later use. This WW Apple Salad is a perfect side dish for grilled chicken or as a standalone meal. It’s perfect for meal prepping and can last for up to 2-3 days when stored in an airtight container in the fridge.

Tips for Making the Best WW Apple Salad
Use fresh ingredients: The key to a flavorful salad is using the freshest ingredients you can find, especially when it comes to the apples and grapes. Honeycrisp apples are sweet and crisp, which makes them ideal for this salad.
Dressing options: If you prefer a dairy-free version of this salad, you can swap the Greek yogurt for a plant-based yogurt (such as coconut or almond milk yogurt). Additionally, you can opt for agave syrup or stevia as a substitute for honey if you’re avoiding sugar.
Make it a meal: To turn this side salad into a more substantial meal, consider adding some grilled chicken, shrimp, or a scoop of your favorite protein. It will help balance out the macronutrients and keep you full for longer.
Keep it crunchy: If you plan to make the salad ahead of time, it’s a good idea to keep the dressing separate until just before serving to ensure the fruits and vegetables stay crisp.
Add extra texture: If you’re looking for additional crunch, try adding some chopped almonds, walnuts, or sunflower seeds for a boost of healthy fats.
Nutritional Breakdown
This WW Apple Salad is not only delicious but also a healthy choice, providing a good balance of vitamins, antioxidants, and fiber with low SmartPoints. Here’s the nutritional breakdown per serving:

Per Serving (1/4 of the recipe):
Calories: 140 kcal
Protein: 2g
Fat: 9g
Carbohydrates: 17g
Fiber: 3g
Net Carbs: 14g
Sugar: 12g
Sodium: 90mg
SmartPoints Breakdown (Weight Watchers):
Blue Plan: 4 SmartPoints per serving
Green Plan: 5 SmartPoints per serving
Purple Plan: 4 SmartPoints per serving
Conclusion
This WW Apple Salad is an ideal dish for anyone following the Weight Watchers program or anyone simply looking for a nutritious, low-carb salad option. It’s packed with fresh fruits, vegetables, healthy fats, and a creamy dressing that ties everything together in a delightful way. Whether served as a side dish or enjoyed as a standalone meal, this salad will keep you satisfied and on track with your dietary goals.

Enjoy it as a refreshing snack, a light lunch, or a side at your next gathering—this salad is sure to become a favorite in your meal prep rotation!

Sugar-Free Apple Cocoa Cake

Just Apples & Cocoa!

If you’ve been searching for a guilt-free dessert that’s naturally sweet, rich in flavor, and supports your health goals, this recipe is a game-changer. With only a few wholesome ingredients — apples, eggs, and cocoa — you can make a moist, chocolaty cake without a single grain of sugar. Perfect for breakfast, snacks, or dessert!

Ingredients

  • 4 medium sweet apples (Fuji, Honeycrisp, Gala) – naturally sweet and juicy.

  • 4 large eggs – for structure and protein.

  • 5 tablespoons unsweetened cocoa powder – deep chocolate flavor without sugar.

  • 1 teaspoon baking powder – for a light rise.

  • Olive oil – for greasing the baking mold.

Instructions

  1. Prepare the apples
    Wash, peel, and core the apples. Cut them into chunks and blend into a smooth purée.

  2. Make the batter
    In a large mixing bowl, combine the apple purée, eggs, cocoa powder, and baking powder. Whisk or blend until the mixture is lump-free and silky.

  3. Get the pan ready
    Lightly grease a baking pan with olive oil. Pour in the batter and smooth the top.

  4. Bake
    Preheat the oven to 180°C (350°F). Bake for 35–40 minutes, or until a toothpick inserted in the center comes out clean.

  5. Cool & enjoy
    Let the cake cool completely before slicing. Serve plain, or with a sprinkle of extra cocoa powder.

Why it’s great for weight loss

This cake is naturally sweet from apples, high in fiber, rich in protein, and low in calories. Cocoa adds flavor and antioxidants without sugar.

See also  Healthy 5-Minute Breakfast Recipe: Oatmeal with Apples and Bananas

 Q&A

Q: Can I use green apples?
A: Yes, but they’re tart — the cake will be less sweet.

Q: How long does it keep?
A: Store in an airtight container in the fridge for up to 4 days, or freeze for 1 month.

Q: Can I make it vegan?
A: Replace each egg with 1 tbsp ground flaxseed + 3 tbsp water.

Q: Is it sweet like regular cake?
A: No, it’s mildly sweet — think of it as a healthy chocolate loaf.