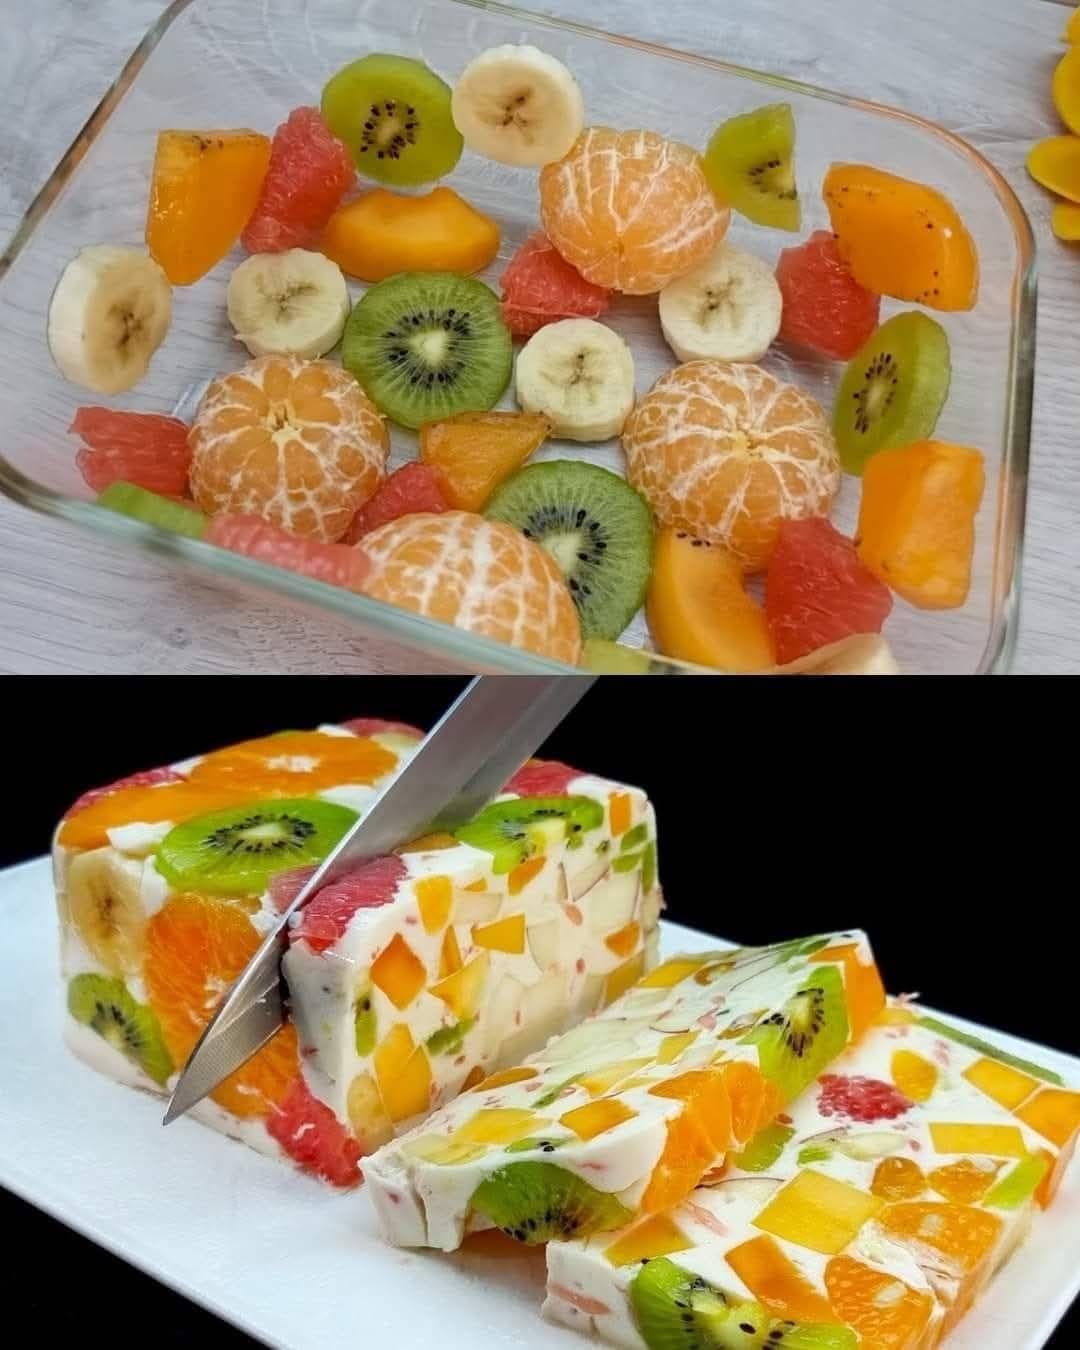
Creamy Milk & Fruit Terrine (Agar-Agar Dessert)
Prep Time: 15 minutes
Setting Time: 2–3 hours
Servings: 6–8 slices
This colorful terrine is a light, refreshing dessert made with fresh fruit and creamy milk, set naturally with agar-agar. Each slice looks like stained glass and tastes cool, smooth, and fruity.
🧾 Ingredients
🍊 Fruit Layer
-
2–3 tangerines, peeled and separated
-
2 kiwis, peeled and sliced
-
1–2 persimmons, peeled and sliced
-
½ grapefruit, peeled and segmented (white pith removed)
-
1 apple, cored and finely chopped
-
1 banana, sliced
🥛 Milk Layer
-
500 ml (2 cups) milk
-
3–4 tablespoons sugar or honey (adjust to taste)
-
8 g agar-agar powder
-
50 ml water (to dissolve agar)
-
1 teaspoon vanilla extract (optional)
👩🍳 Step-by-Step Instructions
🍓 Step 1: Prepare the Fruit
-
Wash, peel, and slice all fruits as listed.
-
Arrange the fruit evenly inside a rectangular glass dish or silicone loaf mold.
-
Mix colors and shapes for a bright, mosaic look in every slice.
🌿 Step 2: Dissolve the Agar-Agar
-
In a small bowl, combine agar-agar powder and water.
-
Stir until smooth and lump-free.
-
Let it sit for 1 minute.
🔥 Step 3: Heat the Milk Mixture
-
Pour milk and sugar (or honey) into a saucepan.
-
Heat gently over medium heat until warm.
-
Add the agar mixture to the milk and stir well.
🍲 Step 4: Activate the Agar-Agar
-
Bring the mixture to a gentle boil while stirring continuously.
-
Let it boil for 1–2 minutes to fully activate the agar.
-
Remove from heat and stir in vanilla extract.
🥄 Step 5: Assemble the Terrine
-
Let the milk mixture cool for 3–5 minutes (it must remain liquid).
-
Slowly pour over the arranged fruit.
-
Use a spoon to gently press down floating fruit so everything stays covered.
❄ Step 6: Set and Chill
-
Allow the dish to cool at room temperature until it begins to firm.
-
Transfer to the refrigerator for 2–3 hours until fully set and chilled.
🔪 Step 7: Serve
-
Run a thin knife around the edges of the dish.
-
Turn out onto a serving plate.
-
Slice and serve chilled.
🌟 Helpful Tips
✔ Use firm fruit for clean slices
✔ Adjust sweetness to taste
✔ Coconut milk can replace regular milk
✔ Add a little citrus zest for extra aroma
✔ Best served cold