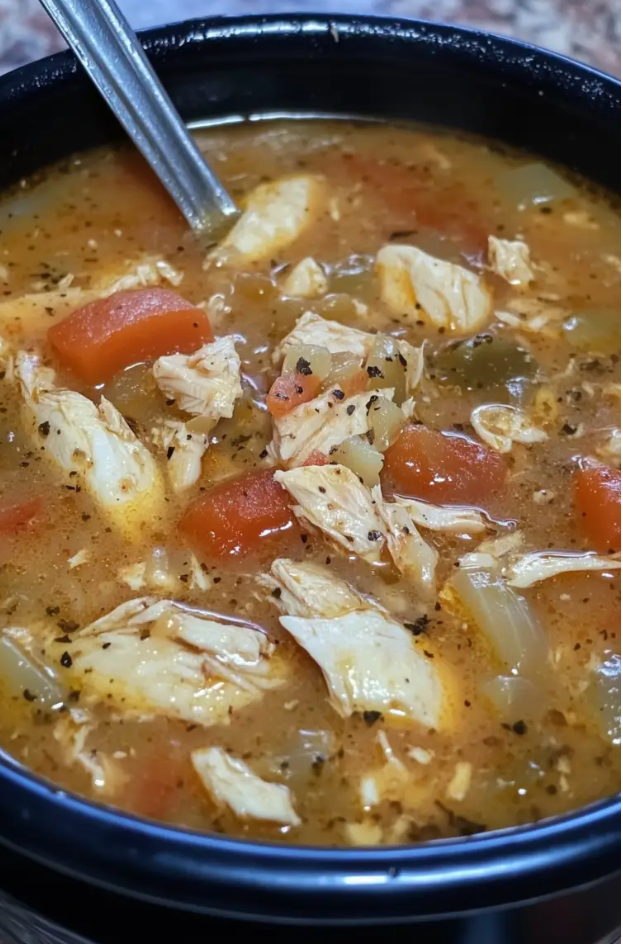
Green Chile Stew With Chicken
This Green Chile and Poblano Chicken Stew is a comforting bowl brimming with tender chicken, smoky poblano and Hatch green chiles, fragrant vegetables, and warming spices. With each spoonful, you’ll taste the melding of roasted chile depth, bright aromatics from veggies, and cozy undertones from cumin and oregano—perfect for weeknight meals or casual get-togethers.
The beauty of this stew lies in its vibrant layers—roasting the poblano chiles before simmering imbues a smoky richness, while slow cooking the chicken and finishing with tender potatoes ensures everything is just the right texture. Serve with warm tortillas or cornbread and watch it bring everyone back for seconds.
Why You’ll Love It
Rustic blend of smoky, spicy, and savory flavors
Full of tender chicken, roasted chiles, and hearty vegetables
Cozy, satisfying meal that still feels bright and fresh
Feeds a crowd or makes excellent leftovers
Easy to customize with additional spices or garnishes
Ingredients (Serves ~6)
1½–2 lb boneless chicken breasts, cut into 6 pieces
1–2 Tbsp oil
4 garlic cloves, roasted and chopped (or finely chopped raw)
1 cup diced celery
1 cup diced carrots
1 onion, diced
1½ Tbsp dried Mexican oregano
1 tsp New Mexico red chile powder
2 tsp ground cumin
Salt and pepper to taste
2 poblano peppers, broiled until charred, peeled, seeded, and chopped
12–14 oz roasted, peeled, chopped Hatch green chiles
6–8 cups chicken (or mixed chicken/vegetable) broth
2 medium russet potatoes, cubed
Instructions
1. Roast Poblano Peppers
Broil the poblano peppers until well-charred. Let cool, peel off skin, remove seeds, and chop roughly.
2. Sauté Vegetables
Heat the oil in a Dutch oven over medium heat. Sauté celery, carrots, and onion for 5–7 minutes until soft. Add oregano and cook 2 minutes, then stir in garlic until fragrant.
3. Add Chiles & Chicken
Stir in chopped poblanos and green chiles. Add salt and pepper to taste and cook for 3–4 minutes more. Mix in red chile powder and cumin, then nestle the chicken pieces into the pot.
4. Simmer in Broth
Pour in enough broth to submerge the chicken. Bring to a boil, then reduce to a gentle simmer and cover. Simmer for about 45 minutes, stirring occasionally.
5. Cook Potatoes Separately
While the stew simmers, boil the potatoes until just tender. Drain and set aside.
6. Shred Chicken & Combine
Remove stew from heat briefly. Transfer chicken to a plate to cool for 5–10 minutes, then shred with forks or a mixer. Return shredded chicken to the pot, add cooked potatoes, and gently warm everything together so the potatoes absorb stew flavor without breaking down.
7. Serve with Flair
Ladle stew into bowls and garnish with fresh cilantro, chopped onion, sliced jalapeño, or any preferred toppings. Serve with warm tortillas or cornbread for a complete meal.
Chef’s Tips
Roasting chiles deepens flavor—don’t skip it!
Simmer gently to keep broth flavorful and chicken tender
Shredding the chicken after cooking preserves texture and juiciness
Add lime juice or chopped fresh salsa as a bright contrast
Storage Tips
Store leftovers in an airtight container in the fridge for up to 4 days.
Reheat gently on the stovetop, adding a splash of broth if it seems thick.
Freeze in meal-sized portions for up to 3 months—thaw overnight for easy reheating.
Final Thoughts
This Green Chile and Poblano Chicken Stew is the kind of dish that feels both wholesome and festive. It’s smoky, spicy, and deeply layered, yet simple enough for a comforting midweek dinner. Whether you’re cooking for yourself or serving loved ones, this stew delivers warmth and satisfaction in every bowl.