This bread relies on “psyllium husk” to bind the seeds together, making it incredibly high in fiber and low in net carbs.
Ingredients
1 cup Sunflower seeds
½ cup Flax seeds (whole)
½ cup Hazelnuts or almonds (roughly chopped)
1 ½ cups Rolled oats (ensure they are gluten-free if needed)
2 tbsp Chia seeds
4 tbsp Psyllium husk powder (this is the “glue”)
1 tsp Fine sea salt
1 tbsp Maple syrup or honey (optional, for a hint of balance)
3 tbsp Melted coconut oil or ghee
1 ½ cups Water
Step-by-Step Instructions
Combine Dry Ingredients: In a flexible silicone loaf pan (or a greased metal one), whisk together the sunflower seeds, flax seeds, chopped nuts, oats, chia seeds, psyllium husk, and salt. Mix very well.
Whisk Wet Ingredients: In a separate small bowl, whisk together the water, melted oil, and sweetener.
Mix Everything: Pour the liquid over the dry ingredients. Mix with a spoon until everything is soaked and the dough becomes very thick (the psyllium husk will absorb the water quickly).
Smooth the Top: Level the top of the dough with the back of a spoon.
The “Secret” Rest: Let the dough sit on the counter for at least 2 hours, or even overnight. This is vital so the seeds and husk bind together; otherwise, the bread will crumble.
Preheat and Bake: Preheat your oven to 175°C (350°F). Place the loaf pan on the middle rack and bake for 20 minutes.
The Flip: Remove the loaf from the oven, carefully take the bread out of the pan, and place it upside down directly on the oven rack. Bake for another 30 to 40 minutes. It is done when it sounds hollow when tapped.
The Wait: Let the bread cool completely before slicing. If you cut it while hot, it will be gummy inside.
5 Breads to Look For (or Bake)
If you prefer traditional textures, look for these varieties which have a lower Glycemic Index (GI):
100% Stone-Ground Whole Wheat: Less processed than “enriched” wheat.
Sprouted Grain Bread: (Like Ezekiel bread) Uses germinated grains which are easier to digest.
Traditional Sourdough: The fermentation process creates acids that slow down starch digestion.
Pumpernickel: Real pumpernickel is made from coarsely ground rye and is very dense and fibrous.
Almond Flour Bread: Uses nut flour instead of grain, resulting in very low carb counts.
Pro-Tip: To further reduce the blood sugar impact, always pair your bread with a healthy fat or protein, like avocado, peanut butter, or a boiled egg.
1. Prep filling: In a bowl mix mozzarella, pepperoni, bell pepper, Italian seasoning, and red‑pepper flakes.
2. Assemble: Lay a tortilla flat. Spread a thin layer of pizza sauce, then sprinkle the cheese‑pepperoni mix evenly. Top with another tortilla.
3. Cook: Heat a skillet over medium heat, add a little olive oil or butter. Place the assembled quesadilla and cook 2‑3 min per side, pressing gently, until golden brown and melty.
4. Slice & serve: Cut into wedges. Serve with extra pizza sauce or ranch for dipping/..
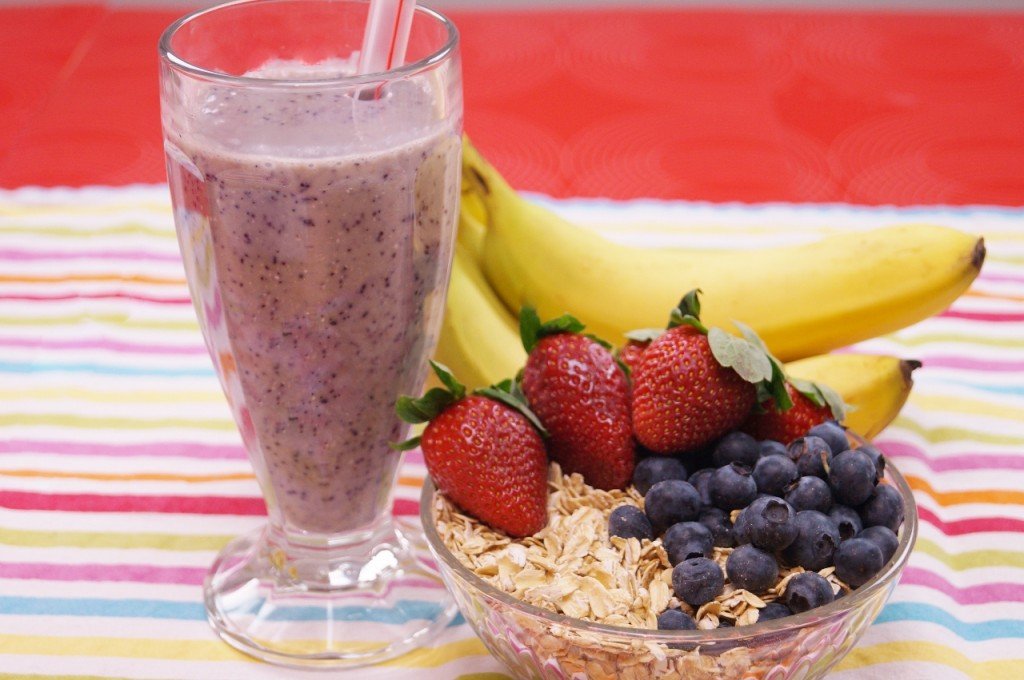
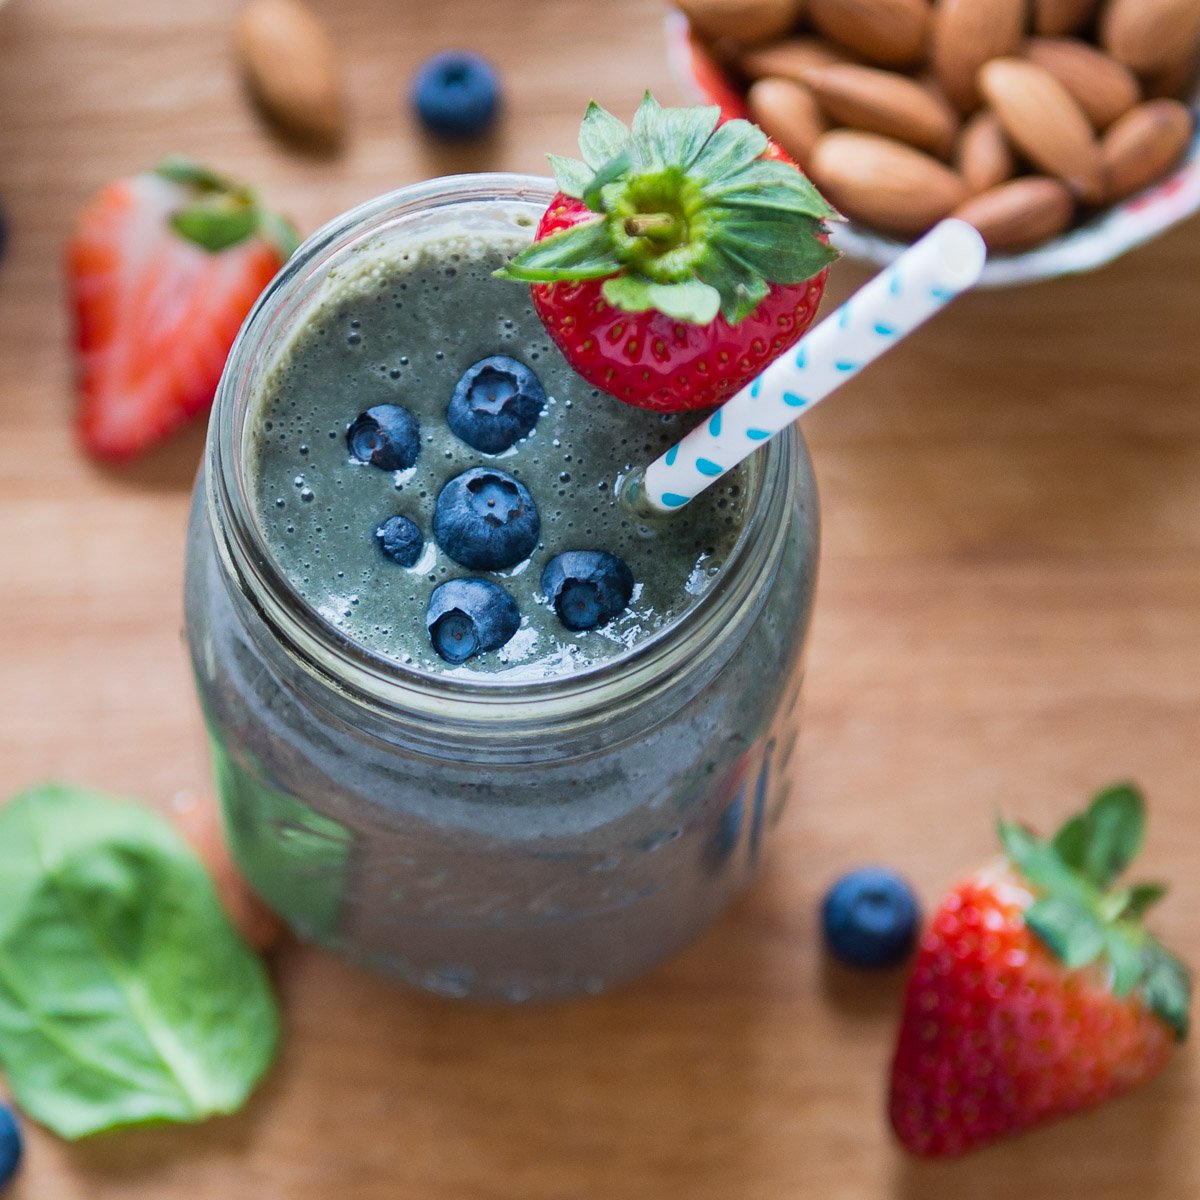
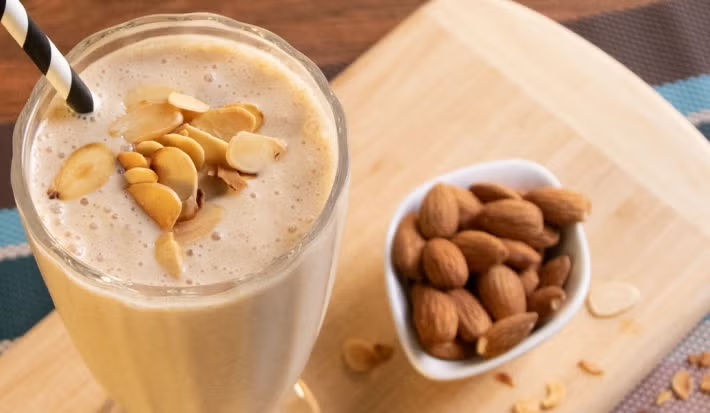
This recipe is packed with antioxidants, healthy fats, and fiber to keep you energized.
Ingredients
Liquid: 1 cup unsweetened almond milk (or any milk of your choice).
Fruit: 1/2 cup frozen blueberries and 1/2 cup fresh or frozen strawberries.
Greens: 1 handful of fresh baby spinach (adds color and nutrients without changing the taste).
Creaminess & Protein: 1 tablespoon almond butter or a small handful of raw almonds.
Sweetener (Optional): 1-2 pitted dates or 1/2 a frozen banana for extra thickness.
Toppings: Extra blueberries, a strawberry slice, and a sprinkle of sliced almonds.
Instructions
Layer the Ingredients: Add the almond milk to your blender first (this helps it blend smoother), followed by the spinach, almond butter, and finally the frozen berries.
Blend: Start on a low speed and gradually increase to high. Blend for 45–60 seconds until the spinach is completely pulverized and the texture is creamy.
Adjust Consistency: If it’s too thick, add a splash more almond milk. If it’s too thin, add a few ice cubes or more frozen fruit.
Serve: Pour into a glass or mason jar. Top with fresh berries and almonds as seen in your image for that perfect “insta-worthy” look!
Quick Tips for the Best Result
Freeze your fruit: Using frozen blueberries and strawberries gives the smoothie a thick, milkshake-like consistency without needing ice.
Boost it: Feel free to add a teaspoon of chia seeds or flax seeds for extra Omega-3s.
WW-Friendly Low-Carb Crock Pot Chicken Pot Pie – Creamy, comforting shredded chicken and vegetables slow-cooked to perfection, topped with light golden protein biscuits for a cozy meal that fits your goals.
Servings & Timing
Servings: 6
Prep Time: 15 minutes
Cook Time: 6–7 hours (Low) or 4 hours (High)
Total Time: Up to 7 hours
Estimated WW Points
Approximately 4–5 Points per serving (may vary by plan and specific brands used).
2 pounds boneless, skinless chicken breasts (trimmed of visible fat)
Creamy Light Sauce
1 cup plain nonfat Greek yogurt
½ cup reduced-fat cream cheese (softened)
1 cup low-sodium chicken broth
½ teaspoon dried thyme
½ teaspoon dried parsley
Vegetables
1 cup frozen peas
1 cup diced carrots
1 cup diced celery
½ cup diced onion
Seasonings
2 teaspoons garlic powder, divided
2 teaspoons onion powder, divided
1 teaspoon black pepper, divided
1 teaspoon salt (optional, to taste)
Biscuit Topping (Light Protein Drop Biscuits)
1 cup almond flour
½ cup plain nonfat Greek yogurt
1 egg
1 teaspoon baking powder
¼ teaspoon salt
Instructions
Prepare Slow Cooker: Lightly coat the crock pot with non-stick spray.
Season Chicken: Arrange chicken breasts in a single layer. Sprinkle with 1 teaspoon garlic powder, 1 teaspoon onion powder, and ½ teaspoon pepper.
Mix Sauce: In a bowl, whisk Greek yogurt, cream cheese, broth, thyme, and parsley until smooth. Spread evenly over chicken.
Add Vegetables: Layer peas, carrots, celery, and onion on top. Sprinkle with remaining seasonings.
Cook: Cover and cook on Low for 6–7 hours or High for 4 hours, until chicken is tender and shreds easily.
Shred & Combine: Use two forks to shred chicken directly in the crock pot. Stir well to create a thick, creamy filling.
Prepare Biscuits: Preheat oven to 375°F (190°C). Mix almond flour, baking powder, and salt. Stir in yogurt and egg until a soft dough forms. Drop spoonfuls onto a lined baking sheet. Bake 12–14 minutes until lightly golden.
Serve: Spoon filling into bowls and top with one biscuit per serving.
Additional Notes
Using chicken breast keeps the recipe lean and lowers Points.
For thicker sauce without added Points, stir in ½ teaspoon xanthan gum during the last 20 minutes.
Naturally lower in carbs than traditional pot pie and significantly lighter than versions made with canned condensed soup.
Introduction
Traditional chicken pot pie is comfort food at its finest—but it’s often heavy in both carbs and Points. This slow cooker version keeps the creamy texture and hearty flavor while lightening the sauce and swapping traditional pastry for a protein-forward, lower-carb biscuit. It’s cozy enough for Sunday dinner but smart enough for everyday tracking.
Step-by-Step Cooking Guide
Stage 1: Build the Base
Placing the chicken on the bottom ensures even cooking and full moisture absorption. Spreading the creamy mixture evenly helps prevent dry spots.
Tip: If the cream cheese isn’t fully softened, microwave it briefly so it blends smoothly.
Stage 2: Slow Cooking
Cooking low and slow develops deeper flavor while keeping chicken tender.
Visual cue: Chicken should shred effortlessly and appear opaque throughout.
If sauce looks thin before shredding, it will thicken once mixed together.
Stage 3: Shredding & Thickening
Shred directly in the pot and stir thoroughly. The yogurt and cream cheese create a naturally creamy consistency without flour or canned soup.
For extra thickness without added Points, leave the lid slightly ajar during the last 20 minutes.
Stage 4: Baking the Light Biscuits
These protein biscuits provide the nostalgic topping without a traditional flour crust.
Visual cue: Tops should be lightly golden and firm to the touch.
If slightly soft in the center, bake 1–2 minutes longer.
Ingredient Details & Substitution Tips
Chicken Breast
Zero Points on most WW plans, making it the ideal protein base.
Substitute: Trimmed chicken thighs for richer flavor (Points may increase).
Nonfat Greek Yogurt
Adds creaminess and boosts protein while keeping fat and Points low.
Substitute: Fat-free plain skyr for similar results.
Reduced-Fat Cream Cheese
Provides structure and richness without excessive fat.
Lower-Point Option: Replace half with additional Greek yogurt.
Almond Flour
Lower in carbs than all-purpose flour.
Alternative: Use whole wheat flour for lower cost (carbs increase and Points may adjust).
Vegetables
Classic pot pie vegetables add bulk and fiber.
Lower-Carb Option: Replace carrots with mushrooms or zucchini.
Recipe Variations & Serving Suggestions
Flavor Variations
Add ½ teaspoon poultry seasoning for classic pot pie flavor.
Stir in fresh chopped parsley before serving for brightness.
Add diced mushrooms for extra volume with minimal Points.
Dietary Variations
Dairy-Free: Use dairy-free yogurt and light dairy-free cream cheese (recalculate Points).
Extra Low-Carb: Skip carrots and peas, increase celery and mushrooms.
Serving Suggestions
Serve in individual ramekins for a traditional pot pie feel.
Pair with a crisp side salad dressed with lemon vinaigrette.
Add cracked black pepper on top just before serving for depth.
Storage & Make-Ahead Information
Storage
Refrigerate in airtight containers for up to 4 days.
Freezing
Freeze filling only (without biscuits) for up to 2 months.
Reheating
Reheat on stovetop over medium-low heat, stirring occasionally. Add a splash of broth if needed.
Make-Ahead Tip
Prepare filling one day ahead; bake biscuits fresh before serving for best texture.
Quality Note
Biscuits soften in the fridge. For best texture, reheat briefly in the oven.
Estimated WW Points: 4–5 per serving (varies by tracking method and brands used)
Dietary Highlights:
High-Protein | Lower-Carb than Traditional Pot Pie | WW-Friendly
Allergens: Contains dairy, eggs, tree nuts (almonds).
Frequently Asked Questions
Q: Can I skip the biscuit topping?
Yes. The filling alone lowers carbs and Points further.
Q: Why is my filling watery?
Vegetables release moisture during cooking. Let it cook uncovered for the last 20–30 minutes or stir in xanthan gum.
Q: Can I use frozen chicken?
For food safety, thaw chicken before adding to the slow cooker.
Q: Can I cook biscuits on top in the crock pot?
Low-fat biscuits will not bake properly in a moist slow cooker environment. Oven baking ensures structure.
Personal Notes
This version was created to keep the cozy feeling of chicken pot pie while fitting into a balanced lifestyle. After testing multiple lighter sauce combinations, Greek yogurt proved to deliver the best creamy texture without sacrificing protein or increasing Points unnecessarily.
Reader Engagement
If you try this WW-friendly version, share how you customized it. Leave a rating and comment with your Point calculation and favorite variations. Your feedback helps others confidently recreate this lighter comfort classic.
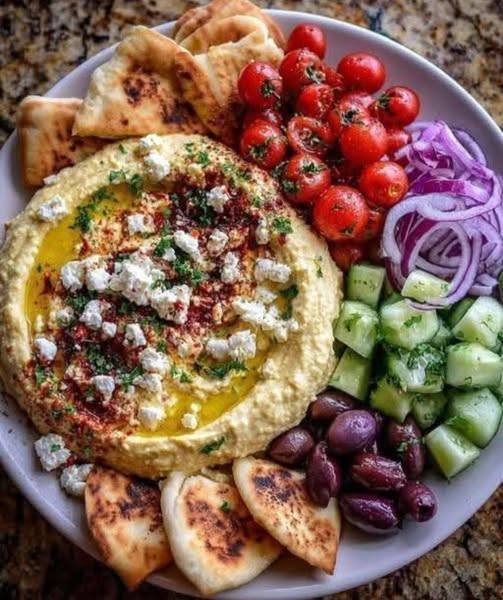
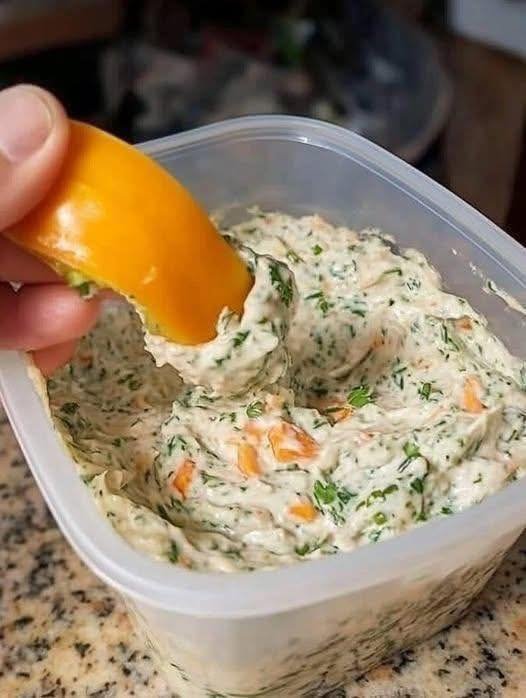
Say goodbye to greasy chips and hello to this Creamy Veggie & Herb Dip with Bell Pepper Scoops — a refreshing, protein-rich snack that perfectly balances creaminess, crunch, and clean ingredients.
Whether you’re following Keto, Slimming , Weight Watchers, or the Mediterranean diet, this dip checks all the boxes: low-carb, wholesome, packed with nutrients, and naturally satisfying.
It’s made with Greek yogurt, cottage cheese, and fresh herbs for a silky, protein-packed texture — and paired with crisp, colorful bell peppers that double as edible “scoops.” Quick to make, endlessly customizable, and so refreshing, it’s your new go-to for guilt-free snacking or party platters that everyone can enjoy.
Look at the Recipe
Texture & Visual: Silky smooth dip contrasted with crisp, vibrant bell pepper “cups.”
Flavor Highlight: Fresh herbs, tangy yogurt, and creamy cottage cheese.
Diet Benefit: Low in carbs, high in protein, and loaded with Mediterranean freshness.
Ingredients Needed
For the Creamy Dip
1 cup non-fat Greek yogurt
½ cup cottage cheese (or ricotta for Mediterranean twist)
1 tbsp extra-virgin olive oil
1 tbsp lemon juice
1 small garlic clove, minced
1 tbsp chopped fresh dill
1 tbsp chopped parsley
1 tsp chopped chives (optional)
Salt & black pepper, to taste
For the Bell Pepper Scoops
2 large bell peppers (mixed colors: red, yellow, or orange)
Slice into large, scoopable wedges or cups for dipping
How to Make Our Creamy Veggie & Herb Dip with Bell Pepper Scoops
Blend the base: In a food processor or blender, add Greek yogurt, cottage cheese, olive oil, lemon juice, and garlic. Blend until smooth and creamy.
Add herbs: Stir in fresh dill, parsley, and chives. Season with salt and black pepper to taste.
Prep the peppers: Slice bell peppers into thick “scoop” wedges or small cups.
Serve: Spoon the creamy dip into a bowl and surround it with bell pepper scoops for easy dipping.
Optional: Drizzle a touch of olive oil on top for extra Mediterranean flair and heart-healthy fats.
Storage & Serving Suggestions
Store: Keep the dip in an airtight container in the fridge for up to 4 days.
Serve Cold: The flavor actually improves after chilling for 1–2 hours.
Meal Prep Tip: Make a big batch and portion it into snack containers with sliced peppers for grab-and-go lunches.
Pairings:
Serve with cucumber rounds, celery sticks, or cherry tomatoes.
Spread it on whole-grain pita (for Mediterranean eaters) or keto seed crackers.
Tips & FAQs
1. Can I make this dip dairy-free?
Yes! Substitute the Greek yogurt and cottage cheese with coconut yogurt or blended silken tofu for a dairy-free version.
2. Is this Slimming -friendly?
Absolutely. Use fat-free Greek yogurt and cottage cheese, skip the olive oil, and it’s syn-free or nearly so.
3. How many Weight Watchers points per serving?
With fat-free dairy, this comes out to 1–2 WW points per serving (depending on plan and olive oil use).
4. What herbs work best?
Fresh dill, parsley, and chives add brightness, but you can mix in basil, cilantro, or mint for different flavor profiles.
5. Can I make this for meal prep?
Yes — it keeps beautifully in the fridge and is perfect for snack boxes, office lunches, or pre-workout fuel.
Servings: 8 Total Time: 50 minutes Difficulty: Easy Calories per Serving: 180 kcal Macros per Serving: Protein 12g / Carbs 7g / Fat 10g / Fiber 3g
Introduction
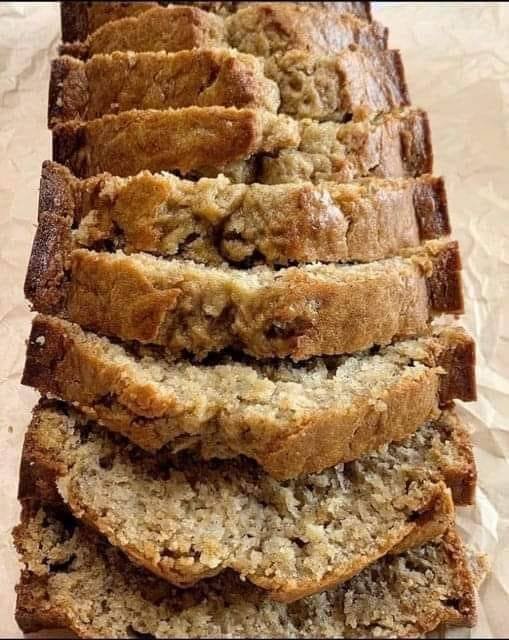
If you love the sweet, comforting taste of banana bread but want to stay on track with your keto, low-carb, or Weight Watchers goals, this Keto & Low-Carb Cottage Cheese Banana Bread is your perfect match. Packed with protein and natural flavor, it gives all the indulgence of classic banana bread without the carb overload.
The secret ingredient? Creamy cottage cheese! It keeps the bread moist, tender, and full of protein, making it ideal for breakfast, a snack, or a guilt-free dessert.
Enjoy the soft, slightly sweet, and protein-rich texture that fits seamlessly into your low-carb and high-protein lifestyle, while still satisfying your cravings.
Look at the Recipe
Sensory Appeal: Moist, tender crumb with a golden crust
Flavor Highlight: Sweet banana flavor balanced with a subtle tang from cottage cheese
Key Benefit: High-protein, low-carb, and Weight Watchers–friendly
Ingredients Needed
Wet Ingredients
1 cup mashed ripe banana (about 2 small bananas)
1 cup cottage cheese (full-fat or low-fat depending on preference)
3 large eggs
1 tsp vanilla extract
3 tbsp melted coconut oil or butter
Dry Ingredients
1 cup almond flour
½ cup coconut flour
1 tsp baking powder
½ tsp baking soda
½ tsp salt
1–2 tbsp low-carb sweetener (like erythritol or monk fruit, optional for extra sweetness)
Optional Add-ins
½ cup sugar-free chocolate chips
¼ cup chopped walnuts or pecans
How to Make Our Keto & Low-Carb Cottage Cheese Banana Bread
Preheat Oven & Prep Pan: Preheat oven to 350°F (175°C). Grease a 9×5-inch loaf pan or line with parchment paper.
Blend Wet Ingredients: In a blender or food processor, combine banana, cottage cheese, eggs, vanilla, and melted coconut oil. Blend until smooth and creamy.
Mix Dry Ingredients: In a large bowl, whisk almond flour, coconut flour, baking powder, baking soda, salt, and sweetener until well combined.
Combine Wet & Dry:Pour wet ingredients into dry ingredients and gently fold together until no lumps remain. If using add-ins, fold them in now.
Bake:Transfer batter to prepared loaf pan and bake for 40–50 minutes, or until a toothpick inserted in the center comes out clean.
Cool & Slice: Let the bread cool completely before slicing. This ensures a moist texture and easier serving.
Storage & Serving Suggestions
Storing: Keep in an airtight container at room temperature for up to 2 days, or in the fridge for up to 5 days.
Freezing: Slice and freeze individually for quick breakfasts or snacks.
Serving Pairings: Enjoy plain, with a smear of almond butter, or topped with fresh berries for extra flavor and fiber.
Tips & FAQs
Q: Can I use Greek yogurt instead of cottage cheese?
A: Yes! Use thick Greek yogurt for a similar texture and protein boost.
Q: How do I make it sweeter without adding sugar?
A: Use a low-carb sweetener like erythritol, monk fruit, or stevia.
Q: Can I make this nut-free?
A: Simply omit almond flour and use sunflower seed flour instead, adjusting the quantity slightly.
Q: Can I add chocolate chips or nuts?
A: Absolutely! Sugar-free chocolate chips or chopped walnuts enhance flavor and texture.
Q: Is this recipe Weight Watchers friendly?
A: Yes! Using almond and coconut flours keeps the carb count low while the protein content is high, keeping your points minimal.
When you crave the comfort of a cheesy, hearty skillet dinner but still want to stay aligned with your low-carb routine, this keto cheesy ground beef spaghetti skillet is exactly the kind of recipe that satisfies every craving. It’s warm, nostalgic, and full of that classic “pasta night” flavor—without the heavy carbs.
By using low-carb spaghetti alternatives and lean, protein-packed ground beef, this skillet fits beautifully into keto, high-protein, and Weight Watchers goals. Every bite delivers rich, melty cheese, savory beef, and tender noodles that taste just as comforting as traditional spaghetti.
If you want a quick weeknight dinner that’s simple, wholesome, and macro-friendly, this keto cheesy ground beef spaghetti skillet delivers on flavor, convenience, and weeknight ease.
Look at the Recipe
A golden, cheesy top over a saucy, beefy spaghetti base
Classic Italian-style flavor with rich tomato, garlic, and melted cheese
Keto-friendly, low-carb noodles paired with high-protein ground beef
Ingredients Needed
Base Ingredients
1 lb lean ground beef (90–93%)
2 cups low-carb spaghetti (hearts of palm pasta, shirataki noodles, or zucchini noodles)
1 cup sugar-free marinara sauce
½ cup diced onions
1 cup bell peppers, chopped
2 cloves garlic, minced
Seasoning Mix
1 tsp Italian seasoning
½ tsp smoked paprika
Salt & pepper, to taste
Cheese Layer
1 cup reduced-fat shredded mozzarella
¼ cup grated Parmesan
¼ cup low-fat cottage cheese (protein boost + creaminess)
Optional Add-ins
Fresh basil
Red pepper flakes
Mushrooms or spinach
How to Make Our Keto Cheesy Ground Beef Spaghetti Skillet
Brown the beef. Heat a large skillet and cook the ground beef until browned. Drain excess fat to keep the meal high-protein and Weight Watchers friendly.
Sauté the vegetables.Stir in onions, bell peppers, and garlic. Cook until soft and fragrant.
Add the sauce.Pour in the sugar-free marinara and season with Italian seasoning, paprika, salt, and pepper. Simmer for 3 minutes.
Mix in the low-carb spaghetti. Add shirataki, zucchini noodles, or hearts of palm spaghetti. Toss well to coat fully in the sauce.
Create the cheesy layer.Fold in cottage cheese for creaminess, then sprinkle mozzarella and Parmesan over the top.
Melt and finish. Cover the skillet for 2–3 minutes until the cheese melts into a bubbly, golden layer.
Serve hot. Garnish with basil if desired.
Storage & Serving Suggestions
Store: Refrigerate in an airtight container for up to 4 days.
Reheat: Warm on the stovetop or microwave until hot.
Freeze: Freeze in a sealed container for up to 2 months (best with hearts of palm pasta).
Serving Pairings: Serve with a keto side salad, steamed broccoli, or roasted zucchini.
Tips & FAQs
What’s the best low-carb noodle for this recipe?
Hearts of palm spaghetti gives the best pasta-like texture. Shirataki is ultra-low carb. Zoodles work too but release more moisture.
Can I use ground turkey instead of beef?
Yes—ground turkey or chicken makes this even lighter and more Weight Watchers friendly.
How do I keep the dish from getting watery?
Dry shirataki noodles well, or sauté zoodles briefly before adding them.
Can I make this dairy-free?
Use dairy-free mozzarella and omit cottage cheese.
How do I make it extra high-protein?
Add ½ cup cottage cheese, swap to extra-lean beef, or stir in cooked chicken chunks.
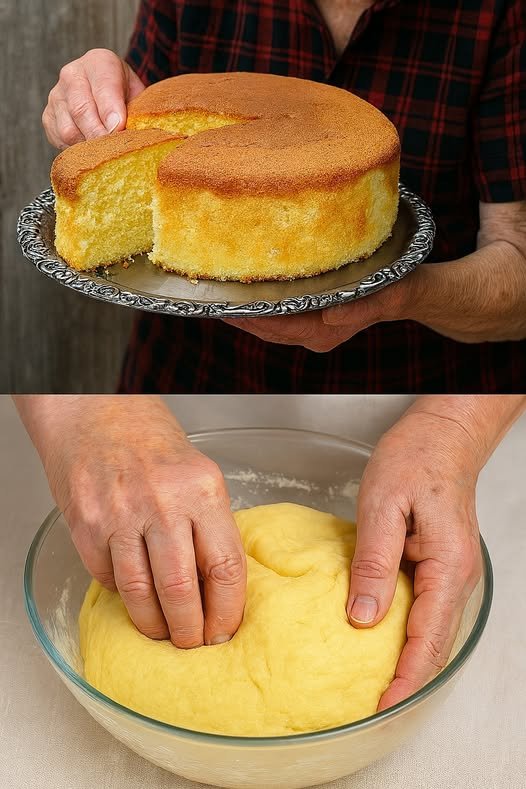
8-Measures Cake with 4 Ingredients: Easy, Light, and Very Flavorful Recipe
Hello, everyone! Welcome back to our cooking blog, where we share delicious recipes every week. Today, we’re preparing a 8-Measures Cake. So, grab your pen and paper to jot down the ingredients and let’s dive into this easy, step-by-step recipe that’s perfect for breakfast, appetizers or even to accompany fresh salads!
How to Make 8-Measures Cake with 4 Ingredients
Looking for a delicious cake with simple ingredients? This one is perfect — light texture and ideal for any moment. You don’t need cooking classes or costly meal delivery services to prepare something delicious at home. With a bit of planning and our detailed meal prep guide, you can create amazing dishes with confidence and ease.
Recipe Ingredients:
8 large eggs
5.6 oz of granulated sugar (¾ cup or 160 g)
6.7 oz of all-purpose flour (1½ cups or 190 g)
⅛ teaspoon of vanilla extract (or to taste)
1 fl oz of lemon juice (2 tablespoons or 30 ml, optional)
Instructions:
First, let’s prepare the egg whites:
Separate the egg whites from the yolks carefully.
Then, start beating the egg whites until foamy — you can add lemon juice at this point if desired.
Next, gradually add the sugar while continuing to beat.
After that, keep beating until you get a firm and glossy meringue.
After this, we’ll incorporate the yolks:
Add the yolks one at a time into the meringue.
Right after each addition, beat well to keep the batter light and airy.
Next, we’ll add the flour:
Sift the flour before using.
Then, gently fold it into the batter with upward movements, so you don’t lose the air in the mixture.
Now it’s time to bake the cake:
Grease only the bottom of a 22×10 cm (8.7×3.9 inch) glass baking dish with butter and line it with parchment paper.
Do not grease the sides — this helps the cake rise evenly.
Pour the batter into the dish and lightly smooth the top.
Bake in a preheated oven at 356 °F (180 °C) for about 35 to 40 minutes.
Finally, let’s finish the process:
Remove the cake from the oven and let it cool completely.
Then, carefully remove it from the dish.
You can top it with icing or simply serve it with coffee.
This recipe makes approximately two servings, similar to what you see in the photo.
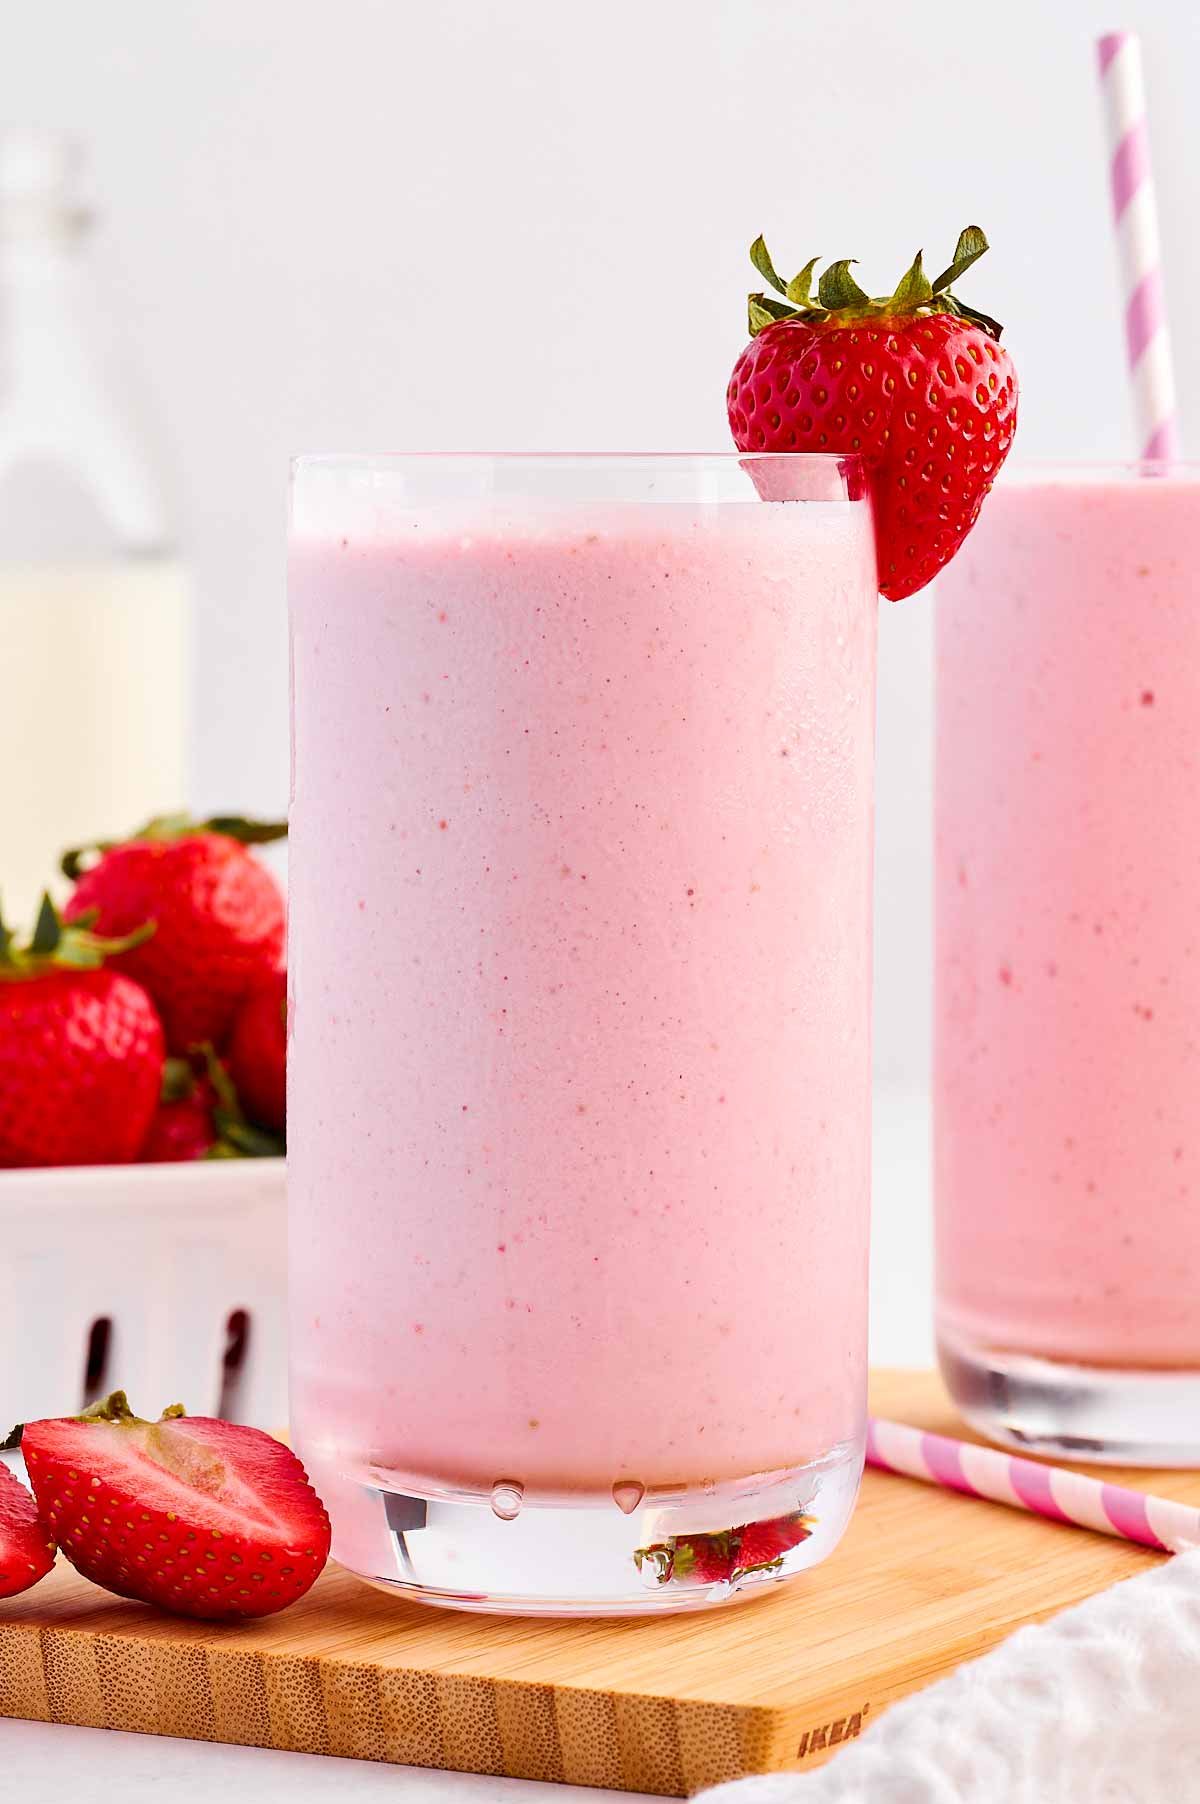
Ingredients
Frozen Strawberries: 2 cups (using frozen gives it that thick, frosty texture).
Milk of Choice: 1 ½ cups (Whole milk, almond, or oat milk all work great).
Greek Yogurt: ½ cup (Plain or vanilla for extra creaminess and protein).
Sweetener: 1–2 tablespoons of honey or maple syrup (adjust to your taste).
Vanilla Extract: ½ teaspoon (to enhance the berry flavor).
Instructions
Layer the Blender: Add the liquid (milk) and yogurt to the blender first. This helps the blades move more easily.
Add the Rest: Toss in the frozen strawberries, sweetener, and vanilla extract.
Blend: Start on a low speed and gradually increase to high. Blend for about 45–60 seconds until completely smooth with no visible fruit chunks.
Check Consistency: If it’s too thick, add a splash more milk. If you prefer it thicker, add a few more frozen berries or a handful of ice.
Serve: Pour into tall glasses.
Pro-Tips for the Aesthetic
The Garnish: Slit a fresh strawberry halfway up the middle and perch it on the rim of the glass, just like in your picture.
The Straw: Use a striped paper straw for that classic “milkshake” look.
Extra Pink: For an even more vibrant color, you can add a small slice of raw beet (don’t worry, you won’t taste it!) or a teaspoon of strawberry powder.
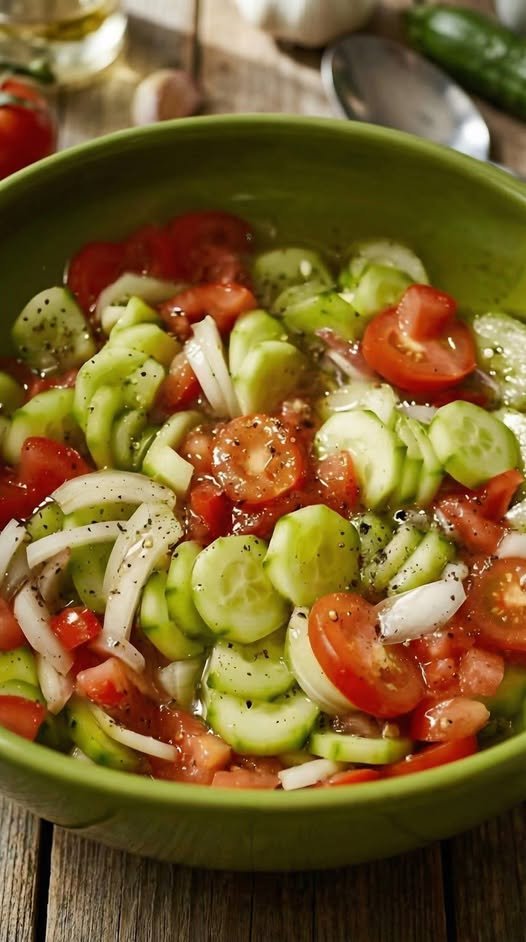
This salad is best when made at least 30 minutes before serving, as the salt draws out the juices from the tomatoes and cucumbers to create its own flavorful “broth.”
Ingredients
The Produce:
2 large English cucumbers: Partially peeled (striped) and sliced into half-moons.
3–4 medium Roma tomatoes: Or 1 pint of cherry tomatoes, halved/quartered.
1/2 large white or red onion: Thinly sliced into slivers.
The Dressing:
1/4 cup Extra virgin olive oil
2 tbsp Red wine vinegar (or Apple Cider Vinegar)
1/2 tsp Sea salt (plus more to taste)
1/2 tsp Freshly cracked black pepper
1/2 tsp Dried oregano (the secret to that Mediterranean flavor)
Instructions
Prep the Veggies: Peel your cucumbers in alternating strips to leave some green skin for texture and color. Slice them into roughly 1/4-inch rounds. Slice your tomatoes into bite-sized wedges and thinly slice your onion.
Combine: Place the cucumbers, tomatoes, and onions in a large green bowl (just like the photo!).
Whisk the Dressing: In a small jar or bowl, whisk together the olive oil, vinegar, salt, pepper, and oregano until emulsified.
Toss: Pour the dressing over the vegetables and toss gently to coat every piece.
Marinate: For the best results, let the salad sit at room temperature for 20–30 minutes. This allows the onions to mellow and the flavors to meld.
Final Touch: Give it one last toss before serving. If you have fresh parsley or dill on hand, a handful of chopped herbs takes this to the next level.
Tips for Success
The Crunch: If you use standard garden cucumbers instead of English/Seedless ones, make sure to scoop out the watery seeds first so the salad doesn’t get too soggy.
Storage: This lasts in the fridge for about 2 days, though the vegetables will soften over time.
, I spent many happy summer days at my Grandmother’s house, filled with the warm aromas of fresh baked pies cooling on the windowsills. Her blueberry pies were always my favorite – the plump, juicy berries nestled in sweet, flaky crust were simply heavenly.
On one particularly hot July afternoon, Grandma pulled me into the kitchen and said, “I have a special summer treat for us today. It’s a secret recipe I’ve been working on just for you!” My eyes grew wide as I watched her pat out rounds of buttery biscuit dough and fill them with vibrant purple pie filling. She sealed them into perfect little balls, brushed them with melted butter, and sprinkled them with sparkling sugar.
“What are these, Grandma?” I asked, licking my lips hungrily.
“Why, they’re Blueberry Pie Bombs!” she said with a wink. She placed the plump pastries into her brand new air fryer appliance and in just minutes, they emerged – golden, crisp and oozing sweet berry juice.
That first magical bite unleashed a flood of blueberry delight – the biscuits flaky and buttery, enclosing the warm, bubbling pie filling inside. Sweet, tart and perfectly messy, we devoured the entire batch, laughing until our bellies ached. Grandma made her Blueberry Pie Bombs for me every summer, keeping her recipe scribbled on a faded, cherished card that always made me think of those sun-filled days together.
Now as an adult, I carry on her tradition. When those summer berries are at their plumpest and juiciest, I take out Grandma’s timeworn recipe card and make her secret Blueberry Pie Bombs for my own children. The sweet nostalgia and burst of fruit flavor transports me right back into her warm, pie-scented kitchen, where I first discovered that the quickest way to the heart is through the stomach.
Grandma’s Top Secret Blueberry Pie Bombs Recipe
Ingredients:
1 (8 count) can Pillsbury Grand Biscuits (not the flaky layers)
1 cup blueberry pie filling (store-bought or homemade)
1⁄2 cup (1 stick) unsalted butter, melted
2 tablespoons granulated sugar
Instructions:
Remove the biscuits from the can and separate each into two rounds. Pat each round into a 4-inch circle.
Spoon about 1 tablespoon of blueberry pie filling into the center of each biscuit circle.
Fold the edges over the filling and pinch together firmly to encase the filling and shape into a ball.
Brush the top and bottom of each pie bomb generously with the melted butter. Sprinkle the tops with granulated sugar.
Spray the air fryer basket with nonstick spray and preheat to 330°F.
Working in batches, place the pie bombs into the preheated air fryer basket about 2 inches apart.
Air fry for 7-8 minutes, until the pie bombs are golden brown and crisp on the outside.
Serve the blueberry pie bombs warm and enjoy this sweet nostalgic treat!
Chef’s Tips:
For a cream cheese filling variation, spread room temperature cream cheese over the biscuits before adding the fruit filling.
Swap different fruit pie fillings like cherry, apple, or peach for variety.
Bake in a 375°F oven for 12-14 minutes if you don’t have an air fryer.
Dust with powdered sugar or serve à la mode with vanilla ice cream for extra decadence!
Delicious Oatmeal and Apples Recipe (No Flour, No Sugar)
This Oatmeal and Apples recipe is the perfect blend of hearty oatmeal, sweet apples, and warm spices. It’s simple, healthy, and naturally sweetened without added sugar or flour. Enjoy it as a wholesome breakfast or a satisfying dessert. Let’s dive into this easy-to-make, delicious recipe!
Ingredients:
Oatmeal: 1 cup (90g)
Warm Milk: 150 ml (about ⅔ cup)
Apples: 2, peeled and diced
Butter: 20g (1 ½ tablespoons), melted
Vanillin (or Vanilla Extract): ½ teaspoon
Eggs: 2 large
Instructions:
Preheat the Oven:
Preheat your oven to 180°C (350°F).
Prepare the Oatmeal Mixture:
In a bowl, mix 1 cup of oatmeal with 150 ml of warm milk. Let the mixture sit for about 5-10 minutes to allow the oatmeal to absorb the liquid.
Add Apples:
Peel and dice 2 apples, then stir them into the oatmeal mixture.
Combine with Butter, Vanilla, and Eggs:
Add 20g melted butter, ½ teaspoon vanillin (or vanilla extract), and 2 large eggs to the oatmeal and apple mixture. Stir until everything is well combined.
Pour into Baking Dish:
Grease a baking dish, then pour the oatmeal-apple mixture into the dish, spreading it evenly.
Bake:
Bake the mixture in the preheated oven for about 25-30 minutes, or until the top is golden brown and the mixture is set.
Cool and Enjoy:
Allow the dish to cool slightly before serving. Enjoy it warm as a comforting breakfast or a light dessert!
Tips & Variations:
Add Spices: For extra flavor, consider adding cinnamon or nutmeg to the oatmeal mixture.
Add Nuts or Seeds: To add a crunchy texture, mix in chopped walnuts, almonds, or chia seeds before baking.
Sweeten Naturally: If you prefer a sweeter dish, you can add mashed bananas to the oatmeal or drizzle with a little honey after baking.
Dairy-Free Option: Use almond milk or oat milk in place of regular milk to make the recipe dairy-free.
Apple Variations: You can use any type of apple you like—Granny Smith for tartness or Fuji for sweetness.
Frequently Asked Questions (Q/A)
Q: Can I use instant oats for this recipe?
It’s best to use regular oats (old-fashioned rolled oats) as instant oats may turn out too soft and mushy. Regular oats absorb the liquid better and give the dish a nice texture.
Q: Can I make this recipe ahead of time?
Yes! You can prepare the oatmeal-apple mixture and store it in the fridge for up to a day before baking. Just bake it when you’re ready to enjoy!
Q: Can I substitute the butter with something else?
Absolutely! You can use coconut oil, olive oil, or a dairy-free butter substitute to make this recipe vegan or simply to reduce the dairy content.
Q: Can I add more apples for extra flavor?
Yes, you can add more apples to the recipe for a fruitier version. Just be mindful of the texture, as too many apples might make the mixture too watery.
Q: How do I store leftovers?
Store any leftovers in an airtight container in the refrigerator for up to 3 days. You can reheat it in the microwave for a quick breakfast or snack.
Q: Can I freeze this oatmeal and apple dish?
Yes, you can freeze it! Let it cool completely, then store it in a freezer-safe container for up to 2-3 months. Thaw in the fridge overnight and reheat in the oven or microwave.
Final Thoughts:
This Oatmeal and Apples recipe is an easy, healthy, and satisfying dish that requires minimal ingredients but delivers big on flavor. It’s naturally sweetened with apples, making it the perfect guilt-free comfort food. Whether you make it for breakfast or a light dessert, this recipe is sure to be a hit in your home.
Let me know how it turns out or if you have any other questions! Enjoy your delicious and healthy dish! 😊🍏🥣
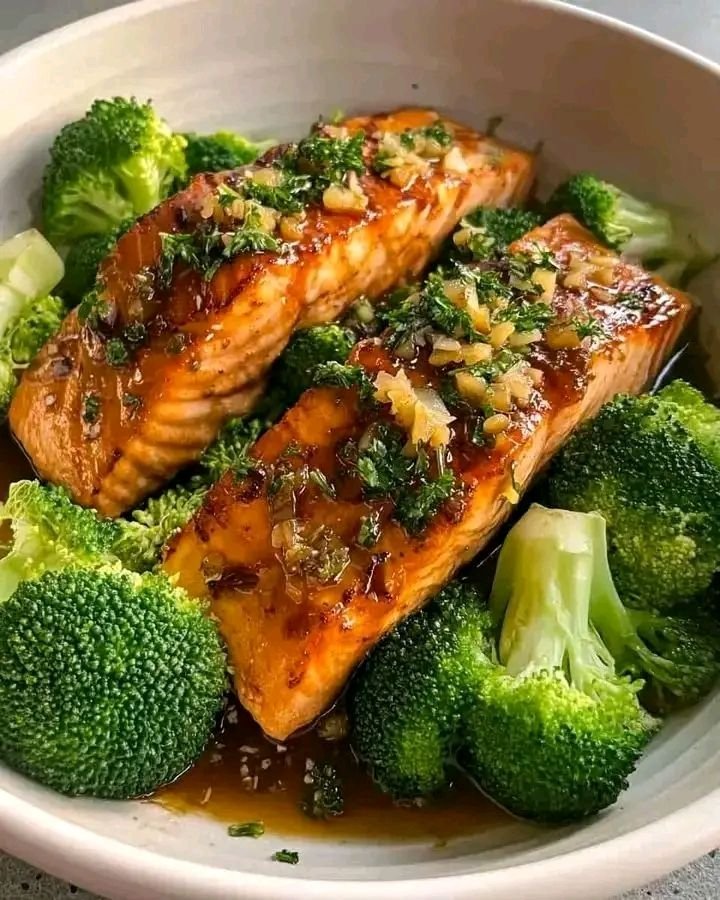
Garlic Glazed Salmon & Broccoli Power Plate This easy weeknight dinner is the best healthy comfort food!
Ingredients :
4 salmon fillets (skin-on or skinless)
3 cups fresh broccoli florets
4 cloves garlic, minced (for that bold garlic flavor)
3 tablespoons soy sauce (or coconut aminos)
2 tablespoons honey
1 tablespoon olive oil
1 tablespoon butter
1 teaspoon fresh lemon juice
1 tablespoon chopped fresh parsley
Salt & black pepper to taste
Optional: red pepper flakes for a spicy dinner upgrade
** How to Make It :**
Sear the Salmon Like a Pro:
Pat salmon dry and season with salt and pepper. Heat olive oil in a skillet over medium-high heat and place salmon skin-side down. Cook 4–5 minutes per side until golden and caramelized. This step locks in flavor for the best homemade salmon, making it a total quick weeknight dinner and healthy meal prep favorite.
Steam the Broccoli to Perfection:
While the salmon cooks, steam broccoli for 4–5 minutes until bright green and tender-crisp. You want that vibrant color for a true clean eating plate, perfect for a high-protein dinner idea and an easy family dinner.
Make the Garlic Honey Glaze:
In the same pan, melt butter and sauté minced garlic until fragrant (about 30 seconds). Stir in soy sauce, honey, and lemon juice. Simmer until slightly thickened. This glossy sauce turns your dish into the best garlic glazed salmon, a total flavor-packed dinner win, and a legit restaurant-style meal at home.
Glaze & Finish Strong:
Spoon the rich garlic glaze over the salmon and let it simmer together for 1–2 minutes. Sprinkle with fresh parsley. This creates that shiny, irresistible finish for a true healthy comfort food classic, easy protein dinner, and meal prep superstar.
Plate the Power Bowl:
Arrange broccoli around the salmon and drizzle extra glaze over everything. Serve hot and dig in! It’s the ultimate high-protein power plate, low-carb dinner idea, and quick healthy meal you’ll cr
This 3-Ingredient Sausage & Cream Cheese Casserole is the ultimate easy comfort dish—rich, creamy, and packed with savory flavor. Made with just three simple ingredients, it comes together quickly and bakes into a warm, satisfying meal perfect for busy weeknights, meal prep, or low-carb cravings. Simple ingredients, big flavor, zero stress.
Prep Time: 5minutesminutes
Cook Time: 30minutesminutes
Total Time: 35minutesminutes
Servings: 6
Ingredients
1lb450g ground sausage (mild or spicy)
8oz225g cream cheese, softened and cubed
2cups200g shredded cheese (cheddar works great, or cheddar + mozzarella blend)
Instructions
Preheat the Oven
Preheat to 375°F (190°C).
Lightly grease an 8×8-inch baking dish.
Cook the Sausage
In a skillet over medium heat, cook the sausage until browned and fully cooked.
Break it apart with a spoon as it cooks.
Drain excess grease if needed.
Add Cream Cheese
Reduce heat to low.
Add cubed cream cheese to the skillet.
Stir until melted and fully combined with the sausage.
Assemble
Transfer the mixture to the prepared baking dish.
Spread evenly.
Sprinkle shredded cheese over the top.
Bake
Bake uncovered for 20–25 minutes, until hot and bubbly and the top is lightly golden.
Rest & Serve
Let it rest for 5 minutes before serving to thicken slightly.
These No-Bake Strawberry Cheesecake Jars are the ultimate easy dessert—creamy, fruity, and beautifully layered with zero oven time required. Perfect for warm days, dinner parties, or make-ahead treats, these individual jars deliver all the flavor of classic cheesecake in a lighter, faster format. The buttery graham cracker crust, fluffy vanilla cheesecake filling, and juicy fresh strawberries come together in a dessert that looks elegant but is incredibly simple to prepare.
1–2 tablespoons sugar (optional, depending on sweetness)
Toppings (Optional)
Sliced fresh strawberries
Whipped cream
Instructions
1. Prepare the Crust
In a small bowl, combine the graham cracker crumbs and sugar. Pour in the melted butter and mix until the crumbs are evenly coated and resemble wet sand. Spoon 2–3 tablespoons of the mixture into the bottom of each jar or glass. Gently press down with the back of a spoon to create a compact base. Set aside.
2. Prepare the Strawberries
Place the diced strawberries in a bowl and toss with sugar if desired. Let them sit for 10–15 minutes to release their natural juices. This step enhances the flavor and creates a light strawberry syrup that pairs beautifully with the cheesecake layer.
3. Make the Cheesecake Filling
In a medium mixing bowl, beat the softened cream cheese with powdered sugar and vanilla extract until completely smooth and creamy. In a separate chilled bowl, whip the cold heavy cream until stiff peaks form. Gently fold the whipped cream into the cream cheese mixture using a spatula, working slowly to keep the filling light, airy, and fluffy.
4. Assemble the Jars
Spoon a generous layer of cheesecake filling over the crust. Add a layer of juicy strawberries, including some of their released juices. Repeat the layers until the jars are full, finishing with a cheesecake or strawberry layer depending on your preference.
5. Chill and Serve
Top each jar with sliced strawberries and a swirl of whipped cream if desired. Chill the jars for at least 1 hour to allow the flavors to meld and the texture to set. Serve chilled for the best taste and consistency.
Tips & Variations
Substitute strawberries with blueberries, raspberries, or mango for variety
Add lemon zest to the cheesecake filling for extra freshness
Use digestive biscuits or vanilla wafers instead of graham crackers
These No-Bake Strawberry Cheesecake Jars are creamy, refreshing, and irresistibly indulgent—perfect for any occasion, with minimal effort and maximum flavor 🍓🍰
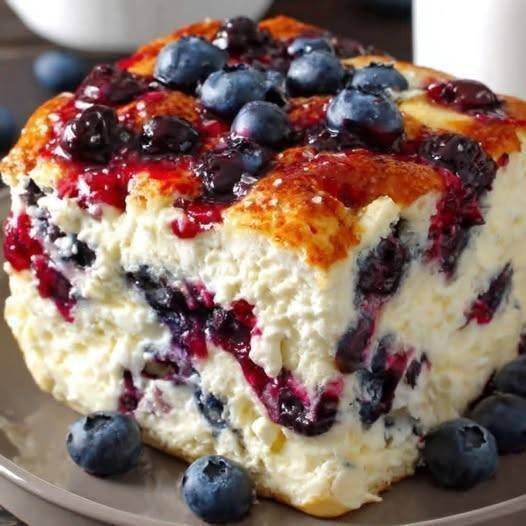
Serves 1 | Prep time: 5 mins | Bake time: 25-30 mins
Ingredients
The Base:
Bread: 2-3 slices of low-calorie/high-fiber bread or sourdough (cubed).
Blueberries: 1/2 cup fresh or frozen blueberries.
The “Protein Bomb” Liquid:
Egg Whites: 1/2 cup (liquid carton egg whites work best for volume).
Whole Egg: 1 large egg.
Protein Powder: 1 scoop (approx. 30g) Vanilla Whey or Casein/Whey blend.
Greek Yogurt: 1/4 cup non-fat plain Greek yogurt.
Milk: 1/4 cup unsweetened almond milk (or milk of choice).
Sweetener: 1-2 tbsp calorie-free sweetener (like Stevia or Monkfruit).
Flavorings: 1/2 tsp vanilla extract and a pinch of cinnamon.
Instructions
Prep the Oven: Preheat your oven to 350°F (175°C). Lightly grease a small oven-safe ramekin or individual baking dish with non-stick spray.
Layer the Dish: Place your cubed bread into the dish and sprinkle most of the blueberries over and between the bread pieces.
Mix the Liquid: In a blender or a medium bowl with a whisk, combine the egg whites, whole egg, protein powder, Greek yogurt, milk, sweetener, vanilla, and cinnamon. Pro Tip: Blending ensures the protein powder is completely smooth with no clumps.
Soak: Pour the protein mixture over the bread cubes. Use a spoon to gently press the bread down so every piece is submerged and soaking up the liquid. Let it sit for 2-3 minutes.
Bake: Top with the remaining blueberries. Bake for 25–30 minutes, or until the center is set and the top is golden brown and slightly puffed.
Cool and Serve: Let it cool for a few minutes (it will deflate slightly, which is normal).
Helpful Tips for Success
The Bread Matters: Using a slightly “stale” or toasted bread helps it absorb the liquid without becoming too mushy.
Casein vs. Whey: If you use a Casein-Whey blend protein powder, the texture will be thicker and more cake-like. Pure Whey tends to be a bit more “custard-like.”
The Topping: For an extra treat, drizzle a little sugar-free maple syrup or a “frosting” made of a tablespoon of Greek yogurt mixed with a teaspoon of protein powder.
Few things feel as comforting as warm pancakes fresh off the pan. Soft centers, lightly crisp edges, and that familiar cozy aroma instantly turn an ordinary morning into something special. These pancakes deliver all the comfort you crave without the heaviness of traditional versions
Made with simple ingredients and easy swaps, this recipe fits beautifully into low-carb, high-protein, and balanced eating plans. They’re filling, satisfying, and perfect for breakfast, brunch, or even a quick sweet meal any time of day.
If you’re looking for pancakes that feel indulgent but support your goals, these fluffy pancakes are quick to make, easy to customize, and endlessly reliable.
Look at the Recipe
Light, fluffy texture with a soft center
Mild sweetness that pairs with any topping
Protein-rich and lower in carbs than classic pancakes
Ingredients Needed
Pancake Batter
½ cup oat flour or almond flour
½ cup cottage cheese or Greek yogurt
2 large eggs
½ tsp baking powder
½ tsp vanilla extract
Sweetener of choice, to taste
Pinch of salt
For Cooking
Olive oil spray or butter
How to Make Our Pancakes
Blend all pancake batter ingredients until smooth.
Heat a non-stick pan over medium heat and lightly grease.
Pour batter into small circles to form pancakes.
Cook for 2–3 minutes until bubbles form on the surface.
Flip gently and cook another 1–2 minutes until golden.
Serve warm with your favorite toppings.
This method keeps the pancakes fluffy while maintaining a macro-friendly balance for low-carb and high-protein eating.
Macros & Plan Compatibility
Plan Notes
Keto & Low-Carb ~3–4g net carbs per pancake using almond flour and sugar-free sweetener.
Slimming About 3–4 syns per serving using oat flour as a Healthy Extra B and low-fat cottage cheese.
High-Protein ~20–22g protein per serving; add whey protein or extra egg whites for more protein.
Weight Watchers ~3–4 SmartPoints (Blue plan) using low-fat dairy and minimal oil.
Mediterranean Fits well using yogurt, eggs, olive oil, and natural sweetness.
Storage & Serving Suggestions
Store:
Refrigerate pancakes in an airtight container for up to 3 days.
Reheat:
Warm in a dry skillet or microwave for 20–30 seconds.
Freeze:
Freeze with parchment between pancakes for up to 1 month.
Serve With:
Fresh berries
Greek yogurt
Nut butter
Sugar-free syrup or honey (non-low-carb plans)
Tips & FAQs
Can I make these pancakes ahead of time?
Yes. They reheat well and are perfect for meal prep breakfasts.
Why are my pancakes too dense?
Overmixing or too much flour can cause density. Blend just until smooth.
Can I make them dairy-free?
Yes. Use plant-based yogurt and adjust thickness with water or almond milk.
Are these pancakes good for weight loss?
Yes. They’re filling, protein-rich, and lower in refined carbs.
Can I make them savory?
Absolutely. Skip sweetener and add herbs or cheese.


 Ingredients (4 servings)
 Instructions
 Preheat oven to 180°C (350°F).
 Sauté veggies
 Mix casserole
 Bake
Bake Rest & Serve
 Calories
 Weight-Loss Tips