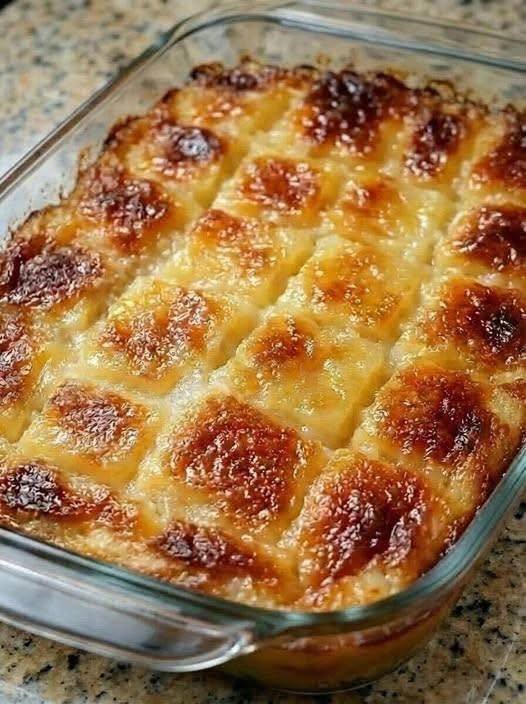
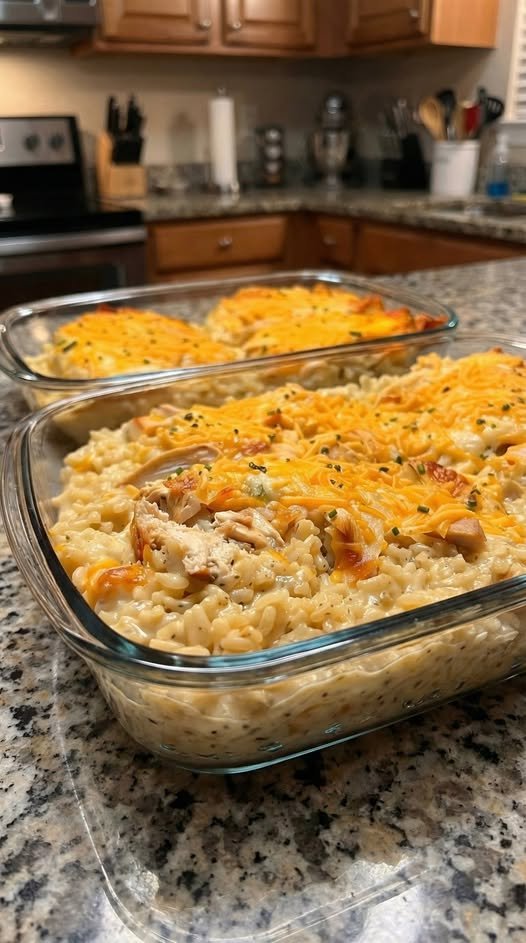
Cheesy Air Fryer Hasselback Potatoes

Cheesy Air Fryer Hasselback Potatoes

Crispy edges, soft centers, and melty cheese in every bite

These Cheesy Air Fryer Hasselback Potatoes are a comforting side dish made with simple ingredients and big flavor. Thinly sliced potatoes fan open as they cook, allowing buttery garlic seasoning and cheese to melt into every layer. The air fryer creates a crisp exterior while keeping the inside tender and fluffy.


Recipe Overview

  • Prep Time: 10 minutes

  • Cook Time: 45 minutes

  • Total Time: 55 minutes

  • Servings: 2


Ingredients

  • 2 medium russet potatoes, scrubbed clean

  • 4 tablespoons butter, melted

  • 1 tablespoon garlic paste or finely minced garlic

  • Kosher salt, to taste

  • Black pepper, to taste

  • 3–5 slices Colby Jack cheese, each slice cut into fourths

Optional Toppings

  • Sour cream

  • Fresh chives, finely chopped


Step-by-Step Instructions

1. Prepare the Potatoes

  • Rinse and scrub the potatoes thoroughly.

  • Slice a very thin piece off the bottom of each potato so it sits flat and stable.


2. Create the Hasselback Cuts

  • Place one potato between two chopsticks or wooden spoons.

  • Using a sharp knife, slice across the potato at ¼-inch intervals.

  • The chopsticks will prevent cutting all the way through, keeping the base intact.

  • Repeat with the second potato.


3. Prepare the Air Fryer Basket (Layer-Lifting Method)

  • Place the small potato slices removed from the bottoms into the air fryer basket.

  • Set the sliced potatoes on top of these pieces.

  • This helps the slices fan open during cooking, allowing better crisping and seasoning.


4. Season the Potatoes

  • In a small bowl, combine:

    • Melted butter

    • Garlic

    • Salt

    • Black pepper

  • Gently fan open the potato slices with your fingers.

  • Brush the garlic butter generously over the tops and into the gaps.

  • Sprinkle lightly with additional salt and pepper.


5. First Air Fry Stage

  • Set the air fryer to 370°F (188°C).

  • Cook the potatoes for 20 minutes.


6. Second Air Fry Stage

  • Remove the basket and brush the potatoes with any remaining garlic butter.

  • Return to the air fryer and cook for 20–25 minutes, until:

    • The edges are crisp

    • The centers are fork-tender

    • The slices are fully opened


7. Add the Cheese

  • Carefully tuck the cheese pieces between the potato slices.

  • You can add cheese to every slice or every other slice, depending on preference.

  • Return to the air fryer and cook for 1–2 minutes, just until the cheese melts and becomes lightly bubbly.


8. Serve

  • Remove from the air fryer and let rest for 2–3 minutes.

  • Top with sour cream and fresh chives if desired.

  • Serve hot as a side dish or light meal.


Helpful Tips & Variations

  • Even cooking: Choose potatoes similar in size.

  • Extra flavor: Add paprika, onion powder, or dried herbs to the butter.

  • Cheese swaps: Cheddar, mozzarella, or Monterey Jack work well.

  • Crispier texture: Brush a little butter between slices halfway through cooking.

Classic Homemade Artisan Bread

🍞 Classic Homemade Artisan Bread

Crisp Crust • Soft Interior • Simple Ingredients

This Classic Homemade Artisan Bread is perfect for everyday baking. It uses basic pantry ingredients and simple techniques to create two beautiful loaves with a golden crust and light, airy inside. The dough is easy to work with, making it ideal for both beginners and experienced home bakers.


🧾 Yield & Timing

  • Makes: 2 loaves

  • Preparation Time: 20 minutes

  • Rising Time: 1½–2 hours

  • Baking Time: 30–35 minutes


🧺 Ingredients

  • Warm Water: 600 ml total (about 3 glasses)

    • 200 ml for starting the yeast

    • 400 ml added later

  • Dry Yeast: 10 grams (1 standard packet)

  • All-Purpose Flour: 840 grams total (7 cups)

    • 120 g (1 cup) for the yeast mixture

    • 720 g (6 cups) for the dough

  • Sugar: 1 tablespoon (helps awaken the yeast)

  • Salt: 2 teaspoons

  • Olive Oil: 1 tablespoon (optional, for lightly coating the bowl)


🥣 Step-by-Step Instructions

1️⃣ Prepare the Yeast Mixture

In a large mixing bowl, add:

  • 200 ml warm water

  • Dry yeast

  • Sugar

  • 120 g (1 cup) flour

Whisk gently until smooth. Cover the bowl with a clean cloth and let it rest for 10–15 minutes.

What to look for:
The surface should become foamy and slightly bubbly, showing the yeast is active and ready.


2️⃣ Build the Dough

Once the yeast mixture is ready, pour in the remaining 400 ml warm water and add the salt.

Gradually add the remaining 720 g (6 cups) flour, one cup at a time, mixing with a wooden spoon or dough hook until a soft, rough dough forms.


3️⃣ Knead Until Smooth

Transfer the dough to a lightly floured surface. Using gentle, steady motions, knead for 8–10 minutes.

As you work:

  • The dough will become smoother

  • It should feel elastic and slightly springy

Tip: If the dough sticks too much, sprinkle in small amounts of flour—just enough to handle comfortably. A soft dough creates lighter bread.


4️⃣ First Rise

Lightly coat a clean bowl with olive oil. Place the dough inside and turn it once so the surface is lightly coated.

Cover and place in a warm, draft-free area. Allow the dough to rest until it has doubled in size, about 1 to 1½ hours.


5️⃣ Divide and Shape

Gently press the dough to release excess air. Divide it evenly into two portions.

Shape each portion into a smooth, round loaf by tucking the edges underneath. Place both loaves on a parchment-lined baking sheet, leaving space between them.


6️⃣ Second Rise & Surface Design

Cover the loaves and let them rest again for 30 minutes.

While resting:

  • Preheat your oven to 200°C (400°F)

Just before baking, use a sharp knife to gently make a shallow “X” or cross on top of each loaf. This helps the bread expand evenly while baking.


7️⃣ Bake

Place the baking sheet in the oven and bake for 30–35 minutes, until:

  • The crust turns deep golden

  • The loaf sounds hollow when lightly tapped underneath

Optional Bakery-Style Finish:
Place a small oven-safe pan with 1 cup of water on the lower rack during the first 15 minutes to create steam, giving the bread a crisp, professional crust.


8️⃣ Cool Before Slicing

Transfer the baked loaves to a wire rack. Allow them to cool for at least 20 minutes before slicing. This helps the interior texture finish setting properly.


⭐ Helpful Tips

  • Warm water should feel pleasantly warm, not hot

  • Letting the bread cool improves slicing and texture

  • Store cooled bread wrapped in cloth or paper for best freshness

Stuffed Potato Patties with Mushroom Filling

Stuffed Potato Patties with Mushroom Filling

Crispy on the outside, creamy inside, with a savory mushroom and cheese center and a bright dill yogurt sauce

Prep Time: 40–50 minutes
Cook Time: 20–25 minutes
Total Time: 1 hour 10–15 minutes
Servings: 6

These patties combine smooth mashed potatoes, flavorful mushroom filling, and melty mozzarella, coated and fried to golden perfection. Served with dill yogurt sauce, they make an elegant appetizer or a hearty main course.


Ingredients

For the Potato Mixture

  • 1 kg (2.2 lbs) starchy potatoes (Russet or Yukon Gold)

  • 2 large eggs, beaten

  • 15 g (2 tablespoons) all-purpose flour

  • 1 teaspoon fine sea salt

  • ½ teaspoon freshly ground black pepper

For the Mushroom Filling

  • 400 g (14 oz) fresh mushrooms, finely chopped

  • 1 medium onion, finely diced

  • 1 large carrot, grated

  • 45 g (3 tablespoons) unsalted butter

  • 100 g (3.5 oz) mozzarella, cut into small cubes

  • Salt and pepper to taste

For Coating and Frying

  • 120 g (1 cup) all-purpose flour

  • 1 large egg, beaten

  • Additional butter for frying

For the Dill Yogurt Sauce

  • 2 tablespoons (30 g) plain yogurt

  • 2 tablespoons fresh dill, finely chopped

  • Pinch of salt


Step-by-Step Instructions

1. Prepare the Mashed Potatoes

  1. Peel and cut potatoes into uniform chunks.

  2. Place in cold, salted water and bring to a boil.

  3. Cook until tender when pierced with a fork (about 15–20 minutes).

  4. Drain thoroughly and return potatoes to the pot over low heat for 1–2 minutes to remove excess moisture.

  5. Mash while hot until completely smooth.

  6. Add 2 beaten eggs, 2 tablespoons flour, salt, and pepper. Mix until combined but do not overmix.

  7. Let the mixture cool until comfortable to handle.


2. Make the Mushroom Filling

  1. Finely chop mushrooms with a knife or food processor.

  2. Melt butter in a large skillet over medium heat.

  3. Add diced onion and cook until soft and translucent (5–6 minutes).

  4. Add grated carrot and cook 2–3 minutes until softened.

  5. Add chopped mushrooms and increase heat to medium-high. Cook, stirring frequently, until all moisture evaporates (8–10 minutes).

  6. Season generously with salt and pepper.

  7. Transfer to a bowl and let cool completely.


3. Assemble the Patties

  1. Place 1 cup of flour on a shallow plate for coating.

  2. Take about 3 tablespoons of the potato mixture and flatten in your palm.

  3. Make a small well in the center.

  4. Place 1 tablespoon mushroom filling and a cube of mozzarella in the well.

  5. Fold edges over to enclose filling completely. Shape into an oval patty about 3 inches long.

  6. Coat thoroughly in flour, shaking off excess.

  7. Repeat with remaining mixture.


4. Cook the Patties

  1. Heat 2 tablespoons butter in a large skillet over medium heat.

  2. Dip flour-coated patties in beaten egg.

  3. Place patties in the hot pan without overcrowding.

  4. Fry 3–4 minutes per side until golden brown and crispy.

  5. Transfer to paper towels to drain excess butter.

  6. Keep warm in a 200°F oven while cooking remaining batches.


5. Prepare the Dill Yogurt Sauce

  • In a small bowl, combine yogurt, chopped dill, and a pinch of salt.

  • Refrigerate until ready to serve.


Tips for Success

  • Use starchy potatoes for a fluffy, smooth texture.

  • Ensure mashed potatoes and filling are cooled before assembly to prevent breakage.

  • If the potato mixture is too soft, chill in the refrigerator for 30 minutes.

  • Test oil temperature with a small piece of mixture; it should sizzle gently.

  • Don’t flip patties too early—wait until a golden crust forms.


Storage and Reheating

  • Uncooked Patties: Store between layers of parchment paper in the fridge for up to 24 hours.

  • Cooked Patties: Keep in an airtight container in the fridge for 2–3 days. Reheat in a 350°F oven for 10–12 minutes.

  • Dill Sauce: Refrigerate for up to 3 days.


Nutrition (Per Serving, Serves 6)

  • Calories: 380 kcal

  • Total Fat: 15 g

  • Saturated Fat: 8 g

  • Cholesterol: 120 mg

  • Sodium: 450 mg

  • Total Carbohydrates: 52 g

  • Dietary Fiber: 4 g

  • Protein: 12 g

  • Iron: 10% DV

  • Calcium: 15% DV

Egg Muffins – Quick & Nutritious Breakfast

Egg Muffins – Quick & Nutritious Breakfast

High in protein, low in carbs, and fully customizable

Prep Time: 10 minutes
Cook Time: 18–22 minutes
Total Time: 30 minutes
Yield: 6 muffins

Egg muffins are a versatile breakfast or snack option. You can add your favorite vegetables, meats, or cheeses, making them ideal for low-carb, keto, or meal-prep-friendly diets.


Ingredients

  • 6 large eggs

  • ¼ cup (60 ml) milk (or unsweetened almond/oat milk for dairy-free)

  • ½ cup shredded cheese (cheddar, feta, or your choice; optional for dairy-free)

  • ½ cup chopped vegetables (bell peppers, spinach, green onions, mushrooms, zucchini, etc.)

  • ¼ cup cooked bacon or ham (optional)

  • Salt and pepper to taste

  • ½ teaspoon garlic powder (optional)

  • ½ teaspoon paprika (optional)


Step-by-Step Instructions

1. Preheat the Oven

Preheat your oven to 375°F (190°C).
Lightly grease a 6-cup muffin tin with cooking spray, oil, or butter. Silicone muffin cups can also be used.


2. Prepare Ingredients

  • Chop your vegetables into small pieces.

  • Dice cooked bacon or ham if using.

  • Pre-sauté watery vegetables (like mushrooms or spinach) for 2–3 minutes to prevent soggy muffins.


3. Whisk the Eggs

In a large bowl, whisk together the eggs, milk, salt, pepper, garlic powder, and paprika until smooth and slightly frothy.
This ensures fluffy muffins with evenly distributed seasoning.


4. Assemble the Muffins

  • Divide the chopped vegetables and cooked meat evenly among the muffin cups.

  • Pour the egg mixture over the fillings, filling each cup about ¾ full.

  • Top each with shredded cheese, if using.


5. Bake

Place the muffin tin in the preheated oven.
Bake for 18–22 minutes, or until the egg muffins are set and lightly golden on top.
A toothpick inserted in the center should come out clean.


6. Cool and Serve

  • Allow the muffins to cool for a few minutes before removing them from the tin.

  • Serve warm, or store for meal prep.


Tips for Perfect Egg Muffins

  • Grease Well: Prevents sticking; silicone cups work best.

  • Whisk Thoroughly: Ensures light, fluffy muffins.

  • Do Not Overfill: Fill ¾ full to prevent overflow.

  • Cool Slightly Before Removing: Prevents breaking.

  • Storage & Reheating: Refrigerate in an airtight container for up to 5 days; microwave for 30–45 seconds to reheat.

  • Freezing: Let muffins cool completely, then freeze in airtight containers or freezer bags for up to 3 months. Reheat 1–2 minutes in the microwave.

Crispy Potato & Egg Nest Muffins

🥔🍳 Crispy Potato & Egg Nest Muffins

Yields: 12 muffins
Prep Time: 15 minutes
Bake Time: 25–30 minutes

These Crispy Potato & Egg Nest Muffins are a comforting and satisfying dish made with simple ingredients. Grated potatoes form a crisp outer layer, while the inside stays soft and flavorful. They are perfect for breakfast, brunch, or light meals and are easy to prepare ahead of time.


📋 Ingredients

  • 3 large potatoes, peeled and grated

  • 4–5 large eggs, well beaten

  • 1 cup shredded cheese (cheddar or mozzarella works well)

  • 12 cherry tomatoes (one per muffin)

  • 2 green onions, finely chopped

  • Salt, to taste

  • Black pepper, to taste

  • A small pinch of garlic powder or paprika (optional)

  • Vegetable oil or butter, for greasing the muffin tin


👩‍🍳 Step-by-Step Instructions

Step 1: Prepare the Potatoes

  1. Preheat your oven to 400°F (200°C).

  2. Place the grated potatoes into a bowl of cold water.

  3. Rinse well to remove excess starch.

  4. Drain and squeeze the potatoes firmly using a clean kitchen towel until they are as dry as possible.
    Dry potatoes help create a crisp texture during baking.


Step 2: Make the Potato Nests

  1. Transfer the dried potatoes to a mixing bowl.

  2. Add salt, black pepper, and half of the shredded cheese.

  3. Mix gently until evenly combined.

  4. Grease a 12-cup muffin tin thoroughly.

  5. Divide the potato mixture evenly among the cups.

  6. Press the mixture firmly into the bottom and up the sides of each cup to form a nest shape.


Step 3: Prepare the Egg Mixture

  1. In a separate bowl or jug, whisk the eggs until smooth.

  2. Add chopped green onions and any remaining seasoning.

  3. Stir gently to combine.


Step 4: Assemble and Bake

  1. Carefully pour the egg mixture into the center of each potato nest.

  2. Place one cherry tomato in the center of each muffin.

  3. Sprinkle the remaining shredded cheese evenly on top.

  4. Bake for 25–30 minutes, or until:

    • The potato edges are golden and crisp

    • The egg filling is fully set


Step 5: Cool and Serve

  1. Remove the muffin tin from the oven.

  2. Allow the muffins to rest for 5 minutes.

  3. Use a small knife to gently loosen the edges.

  4. Lift the muffins out carefully.

Serve warm for the best texture and flavor.


🌟 Why You’ll Love This Recipe

  • Crispy Outside, Soft Inside: The potato base becomes golden and crunchy while the egg stays tender.

  • Easy to Customize: Add extra vegetables like spinach, bell peppers, or mushrooms for variety.

  • Great for Planning Ahead: These muffins can be prepared in advance and reheated while keeping their texture.

Carnivore Chicken Salad recipe

Carnivore Chicken Salad

✅ Ingredients

  • 2 cups cooked shredded or chopped chicken (breast or thigh)

  • 3 tbsp mayonnaise (egg + oil based, no sugar)

  • 1 tbsp softened cream cheese (optional for extra richness)

  • 1 hard-boiled egg, chopped

  • Salt to taste

  • Black pepper (optional if you allow seasonings)


✅ Instructions

  1. In a bowl, add chicken, chopped egg, and cream cheese.

  2. Mix in the mayonnaise until creamy.

  3. Add salt (and pepper if using).

  4. Chill for 15–20 minutes for best flavor.


✅ How to Serve

  • Eat as is with a spoon

  • Roll in slices of chicken or deli meat

  • Top on seared steak or burger patty

Cheesy Baked Meat & Potato “Pillows”

Cheesy Baked Meat & Potato “Pillows”

Yields: 6–8 individual portions | Prep time: 20 mins | Bake time: 40 mins

Ingredients

The Meat Base:

  • 2.2 lb (1 kg) Ground beef (lean is best to avoid excess grease)

  • 2 oz (60 g) Breadcrumbs

  • 1 Large egg

  • 1 Carrot, finely grated

  • 1 Green onion, chopped

  • 1 Red onion, finely diced

  • 1 Garlic clove, minced

  • 2 tbsp Fresh dill, chopped

  • Seasoning: Salt, ground black pepper, and dried garlic (to taste)

The Topping & Layers:

  • 3.5 oz (100 g) Sour cream

  • 2.8 oz (80 g) Mayonnaise

  • 10.6 oz (300 g) Mushrooms, finely sliced or chopped

  • 2 Tomatoes, thinly sliced

  • 7 oz (200 g) Mozzarella cheese, shredded

  • Garnish: Paprika and fresh parsley


Step-by-Step Instructions

1. Prepare the Meat Mixture

Preheat your oven to 375°F (190°C). In a large mixing bowl, combine the ground beef, breadcrumbs, egg, grated carrot, onions, garlic, and dill. Season generously with salt, pepper, and dried garlic. Mix by hand until well combined but do not overwork the meat (this keeps them tender).

2. Shape the Portions

Instead of a flat layer, shape the meat into large, thick patties (about 1.5 inches thick) and place them on a greased baking sheet or in a large baking dish with space between them. Use your thumb to make a slight indentation in the center of each patty—this creates a “well” for the toppings.

3. Layer the Flavor

  • Cream Base: Mix the sour cream and mayonnaise in a small bowl. Spread a dollop onto each meat patty.

  • Vegetables: Press a few mushroom slices and a slice of tomato into the cream on top of each patty.

  • The Cheese: Pile a generous mound of mozzarella over the top of each portion.

  • Final Touch: Spread a tiny bit more of the cream mixture over the cheese (this helps it brown without burning) and sprinkle with paprika.

4. The Bake

Cover the tray loosely with foil (try not to let it touch the cheese). Bake for 30 minutes. Remove the foil and bake for another 10–15 minutes until the cheese is bubbly and has those characteristic golden-brown spots seen in your photo.

5. Rest and Serve

Let the dish rest for 5–10 minutes before serving. This allows the juices to redistribute so the meat stays moist. Garnish with fresh parsley.


Chef’s Pro-Tips

  • Moisture Control: If your mushrooms are very fresh/watery, sauté them for 3 minutes in a pan before putting them on the meat to prevent the “pillows” from sitting in too much liquid.

  • The “Picky Eater” Hack: If someone dislikes mushrooms, swap them for a thin layer of pre-boiled potato slices or even a spoonful of caramelized onions.

Creamy Apple Coleslaw

Creamy Apple Coleslaw

Yields: 6–8 Servings | Prep time: 15 mins | Chill time: 30 mins

Ingredients

The Dressing:

  • 1/2 cup Mayonnaise

  • 1/2 cup Sour cream or Greek yogurt

  • 1 tablespoon Fresh lime juice

  • 1 teaspoon Vinegar (white or apple cider)

  • 1 teaspoon Granulated sugar

  • Salt and pepper to taste

The Slaw Base:

  • 1 pound Coleslaw mix (shredded cabbage and carrots)

  • 1 small bunch Scallions, chopped

  • 1 Granny Smith apple, chopped fine

  • 1 Red apple (such as Gala or Fuji), chopped fine


Detailed Instructions

1. Whisk the Creamy Dressing

In a large mixing bowl, combine the mayonnaise, sour cream (or Greek yogurt), lime juice, vinegar, and sugar. Whisk the mixture vigorously until the dressing is completely smooth and the sugar has fully dissolved. Season the dressing with a pinch of salt and pepper.

2. Prep the Apples

Core and finely chop both the Granny Smith and the red apple. It is recommended to keep the skins on to provide a beautiful pop of color to the salad.

Pro Tip: To prevent the apples from browning (oxidizing) while you finish the prep, toss them directly into the prepared dressing immediately after chopping.

3. Combine the Ingredients

Add the 1-pound bag of coleslaw mix, the chopped scallions, and the chopped apples into the large bowl containing your dressing.

4. Toss and Coat

Using large spoons or salad tongs, toss the ingredients together until every shred of cabbage and piece of apple is evenly coated in the creamy dressing. Taste the mixture and add more salt or pepper if needed.

5. Chill Before Serving

Cover the bowl and refrigerate for at least 30 minutes before serving. This chilling period allows the cabbage to soften slightly and ensures the flavors of the lime and apple meld perfectly into the dressing.


Why This Recipe Works

The acidity from the lime juice and vinegar performs two roles: it prevents the apples from turning brown and balances the richness of the mayonnaise and sour cream.

Classic American Potato Salad

Classic American Potato Salad

A traditional potato salad with a creamy dressing, tender potatoes, and simple seasonings. This dish is suitable for picnics, gatherings, or everyday meals.


Yield

6–8 servings

Time

  • Preparation: 20 minutes

  • Cooking: 15 minutes


Ingredients

Salad Base

  • 6 medium potatoes, peeled and cut into 1-inch cubes

  • 4 hard-boiled eggs, peeled and chopped

  • ½ cup chopped celery

  • ½ cup chopped onion

Dressing

  • 1 cup mayonnaise

  • 2 tablespoons mustard

  • 1 tablespoon vinegar or pickle liquid

  • ½ teaspoon celery seed

  • ½ teaspoon salt (adjust to taste)

  • ¼ teaspoon black pepper

Optional Topping

  • Paprika

  • Chopped chives or green onions

  • Cooked bacon pieces


Instructions

1. Cook the Potatoes

Place the potato cubes in a large pot and cover with cold water.
Bring to a boil, then reduce to a gentle simmer.
Cook for 10–15 minutes until the potatoes are tender when pierced with a fork but still hold their shape.


2. Drain and Cool

Drain the potatoes and rinse briefly with cool water to stop further cooking.
Allow them to cool for about 15–20 minutes before mixing.


3. Prepare the Dressing

In a bowl, combine the mayonnaise, mustard, vinegar, celery seed, salt, and black pepper.
Mix until smooth.


4. Assemble the Salad

Place the cooled potatoes, eggs, celery, and onion into a large bowl.
Add the dressing and gently fold until everything is evenly coated.
Mix carefully to avoid breaking the potatoes.


5. Chill and Serve

Cover the bowl and refrigerate for at least 2 hours before serving.
This allows the flavors to blend and the salad to chill properly.


Optional Adjustments

  • Add chopped pickles for extra texture

  • Replace a portion of the mayonnaise with yogurt or sour cream for a lighter texture


Storage

Store covered in the refrigerator and use within 2 days.

Savory Baked Potato & Egg Cups

Savory Baked Potato & Egg Cups

These baked potato and egg cups are lightly crisp on the outside and soft inside. They are suitable for breakfast, brunch, or a light meal.


Yield

12 cups

Time

  • Preparation: 15 minutes

  • Baking: 25–30 minutes


Ingredients

  • 4 large potatoes, peeled and grated

  • 3 large eggs

  • 1 cup shredded cheese (cheddar, mozzarella, or Swiss)

  • 2 green onions, finely chopped

  • ½ cup finely diced bell peppers or cooked ham (optional)

  • ½ teaspoon salt

  • ¼ teaspoon black pepper

  • ½ teaspoon garlic powder

  • ½ teaspoon paprika

  • Butter or oil, for greasing


Instructions

1. Prepare the Potatoes

Peel the potatoes and grate them using the large holes of a grater.
Place the grated potatoes into a clean kitchen towel or cheesecloth and squeeze firmly to remove as much liquid as possible. This step helps the cups bake evenly and hold their shape.


2. Mix the Ingredients

In a large bowl, lightly beat the eggs.
Add the grated potatoes, shredded cheese, green onions, and optional bell peppers or ham. Mix gently to combine.


3. Season the Mixture

Add salt, black pepper, garlic powder, and paprika.
Stir until the potatoes are evenly coated with the egg and seasoning.


4. Prepare the Muffin Tin

Preheat the oven to 400°F (200°C).
Grease a 12-cup muffin tin evenly with butter or oil.

Spoon the potato mixture into each cup. Press gently so the mixture is compact but not tightly packed.


5. Bake

Place the muffin tin on the center rack of the oven.
Bake for 25–30 minutes, until the edges are golden and the tops feel firm.


6. Rest and Serve

Remove the pan from the oven and let the cups rest for 5 minutes.
Run a knife around the edges and lift them out carefully.


Serving Ideas

Serve warm on their own or with plain yogurt or sour cream mixed with fresh herbs.

Oven-Baked Garlic Herb Chicken & Vegetables

Oven-Baked Garlic Herb Chicken & Vegetables

Prep time: 15 mins | Cook time: 30-35 mins | Serves: 4

Ingredients

The Base:

  • Chicken: 1.5 lbs (approx. 3 large) boneless, skinless chicken breasts.

  • Potatoes: 1 lb baby gold potatoes, quartered.

  • Green Beans: 1/2 lb fresh green beans, trimmed.

  • Garnish: Fresh parsley or chives, chopped.

The Garlic Herb Sauce:

  • 1/4 cup olive oil

  • 3 tbsp melted butter

  • 4 cloves garlic, minced

  • 1 tsp dried oregano

  • 1 tsp dried thyme

  • 1/2 tsp onion powder

  • 1/2 tsp smoked paprika (for that golden color)

  • Salt and black pepper to taste

  • Optional: Red pepper flakes (for the red bits seen in the photo)


Instructions

  1. Prep the Oven and Pan:

    Preheat your oven to 400°F (200°C). Lightly grease a large 9×13 inch glass baking dish or a rimmed sheet pan.

  2. Season the Vegetables:

    Place the quartered potatoes and trimmed green beans in the baking dish. Drizzle with half of the Garlic Herb Sauce. Toss well to ensure they are evenly coated, then push the vegetables to the sides to make room for the chicken in the center.

  3. Prepare the Chicken:

    Pat the chicken breasts dry with a paper towel. Place them in the center of the dish. Brush the remaining Garlic Herb Sauce generously over the chicken.

    Tip: For the look in the photo, you can pre-slice the chicken halfway through (hassleback style) or slice them fully after cooking. Slicing after cooking keeps them juicier!

  4. Bake:

    Place the dish in the oven. Roast for 25–30 minutes.

    • Check for doneness: The chicken is safe when it reaches an internal temperature of $165^\circ\text{F}$ ($74^\circ\text{C}$).

    • Check the potatoes: They should be fork-tender and slightly browned.

  5. Finish and Serve:

    Remove from the oven and let the chicken rest for 5 minutes (this keeps it moist). If you didn’t slice it before, slice it now. Garnish with fresh parsley and a squeeze of fresh lemon juice if desired.


Tips for Success

  • Even Cooking: If your potatoes are large, start them in the oven 10 minutes before adding the chicken and green beans so everything finishes at the same time.

  • Crispy Texture: If you prefer crispier potatoes, use a large metal sheet pan instead of a glass dish; metal conducts heat faster for better browning.

Hamburger Potato Casserole

This hearty Hamburger Potato Casserole is the ultimate comfort food—perfect for family dinners or potlucks. Creamy mushroom soup, seasoned ground beef, and layers of cheesy potatoes come together to create a rich, flavorful dish everyone will love.


Ingredients

Ingredient Amount
Ground beef 1 ½ lb
Russet potatoes 4 large, peeled and thinly sliced
Onion 1 medium, chopped
Shredded cheddar cheese 2 cups
Cream of mushroom soup (condensed) 1 can (10.75 oz)
Milk ¾ cup
Garlic powder 1 tsp
Paprika 1 tsp
Salt & pepper To taste
Olive oil 2 tbsp
Fresh parsley Chopped, for garnish

Instructions

1. Preheat the oven
Set your oven to 375°F (190°C).

2. Prep the ingredients
Peel and thinly slice the potatoes, chop the onion, and shred the cheddar cheese.

3. Cook the ground beef
In a large skillet, heat olive oil over medium heat. Add the ground beef and chopped onion. Cook until the beef is browned and the onion is softened. Drain any excess fat.

4. Make the casserole layers
In a small bowl, whisk together cream of mushroom soup, milk, garlic powder, paprika, salt, and pepper. In a greased 9×13-inch baking dish, layer half of the sliced potatoes, then half of the cooked beef mixture, and half of the shredded cheese. Repeat the layers with the remaining ingredients.

5. Add the soup mixture
Pour the soup mixture evenly over the layered casserole.

6. Bake
Cover the dish with aluminum foil and bake for 60–70 minutes, or until the potatoes are tender.

7. Garnish and serve
Remove the foil, sprinkle with chopped parsley, and let the casserole rest a few minutes before serving.

Carnivore Crack Recipe

Table of Contents

Carnivore Crack Recipe:

Ingredients:

  • 8 oz (225g) beef jerky (or your choice of other jerky like pork or turkey)

  • 8 oz (225g) cheese (cheddar or mozzarella work well)

  • 1 tablespoon butter or tallow (optional, for extra crispiness)

  • Salt (optional, to taste)

  • Pepper (optional, to taste)

  • Paprika (optional, for extra flavor)

Instructions:

  1. Preheat Oven: Preheat your oven to 375°F (190°C).

  2. Prepare the Meat: Cut your beef jerky (or other preferred jerky) into smaller bite-sized pieces. If your jerky is on the tough side, you may want to slice it thinly.

  3. Prepare the Cheese: Cut the cheese into small cubes or shred it, depending on your preference.

  4. Butter or Tallow: If you want extra crispy, flavorful bites, melt butter or tallow in a pan over medium heat.

  5. Layer Ingredients: On a baking sheet lined with parchment paper, arrange the beef jerky pieces, followed by a layer of cheese cubes or shreds. If you’ve melted butter/tallow, you can drizzle it over the top of the meat and cheese for extra flavor.

  6. Bake: Bake in the preheated oven for 8-10 minutes, or until the cheese is melted and bubbling and the jerky starts to crisp up.

  7. Add Seasonings: Once done, remove from the oven and sprinkle with optional seasonings like salt, pepper, and paprika for extra flavor.

  8. Serve and Enjoy: Let it cool for a few minutes, then break it into pieces and enjoy your homemade carnivore crack!


You can experiment with different types of jerky or add more cheese for extra richness. It’s a great snack for those on a carnivore or keto diet. Would you tweak this recipe to your liking?

Carnivore Cake Recipe

Table of Contents

Carnivore Cake Recipe:

If you’re craving a carnivore-friendly dessert or snack, this Carnivore Cake is a unique, protein-packed option made with only animal-based ingredients. Rich in beef, eggs, and butter, it’s simple, delicious, and aligns perfectly with the carnivore diet.

Ingredients:

  • 1/2 lb ground beef (80/20 blend for some fat)
  • 4 large eggs (preferably pastured)
  • 3 tbsp melted butter (cultured butter for a richer taste)
  • 2 tbsp beef tallow (optional, for extra fat and moisture)
  • 1/2 tsp sea salt (to taste)
  • 1/4 tsp baking soda (optional, helps give the cake lift)
  • 1 tsp vanilla extract (optional, adds a subtle sweetness, check for no sugar)
  • 1 tbsp heavy cream (optional, for extra moisture)

Instructions:

  1. Preheat the Oven:
    • Preheat your oven to 350°F (175°C). Grease a small cake pan (8-inch round or square) with butter or beef tallow to ensure easy removal.
  2. Prepare the Beef Mixture:
    • In a large bowl, combine the ground beefeggsmelted butter, and beef tallow (if using).
    • Whisk well to break up the beef and fully incorporate it into the egg and fat mixture. The consistency should be a bit loose but not too runny.
  3. Add Flavoring and Rising Agents:
    • Stir in the sea saltbaking soda, and vanilla extract (if using). The baking soda helps the cake rise and gives it a slightly fluffier texture, but it’s optional.
    • If you’re using heavy cream, add it now to enhance the moisture content.
  4. Mix and Pour:
    • Mix everything thoroughly until the ingredients are evenly distributed. The batter will have a dense consistency due to the beef.
    • Pour the mixture into your prepared cake pan, smoothing the top with a spatula.
  5. Bake the Cake:
    • Place the cake pan in the preheated oven and bake for 20-25 minutes, or until the top is golden brown and a toothpick inserted into the center comes out clean.
  6. Cool and Serve:
    • Allow the cake to cool for 5-10 minutes before removing it from the pan. Slice into pieces and serve immediately.

Optional Variations:

  • Topping: If you want to add extra richness, top the cake with a dollop of whipped cream or more melted butter.
  • Flavor: For a more savory version, you can add a pinch of garlic powder or freshly cracked black pepper.

Carnivore Casserole Recipe

Ingredients:
• 1 lb ground beef
• 6 slices of bacon
• 2 cups shredded cheese (cheddar or your choice)
• 4 eggs
• 1/2 cup heavy cream
• Salt and pepper to taste
Instructions:
Preheat your oven to 350°F (175°C)
In a skillet, cook the ground beef until browned. Drain excess fat
Cook the bacon in the same skillet until crispy. Chop into pieces and set aside
In a baking dish, layer the cooked ground beef, bacon pieces, and shredded cheese
In a bowl, whisk the eggs and heavy cream together, adding salt and pepper to taste. Pour over the beef and cheese mixture in the dish
Bake for 25-30 minutes or until the eggs are fully set and the top is golden brown
Serve hot and enjoy your delicious, hearty meal!

Carnivore diet Chili recipe

Table of Contents

Carnivore diet  Chili  recipe (Beanless, No Tomato)

🧾 Ingredients:

  • 2 lbs ground beef (80/20 works great)

  • 1/2 lb ground pork or beef heart/liver (optional, for nutrient density)

  • 4–6 strips bacon, chopped

  • 1 tbsp beef tallow or butter

  • 1 tsp salt (or to taste)

  • 1/2 tsp black pepper (optional if you’re relaxed carnivore)

  • 1/2 tsp smoked paprika or chili powder (optional for keto/carnivore crossover)

  • 1/4 cup bone broth or water (for moisture)


🔪 Instructions:

  1. Fry the bacon in a large pot or Dutch oven over medium heat until crispy. Remove and set aside, leaving the fat.

  2. Add the ground beef and pork to the pot. Brown the meat well, breaking it up with a spatula.

  3. Add beef tallow or butter if needed for extra fat and flavor.

  4. Stir in salt, and if using, pepper and spices. Add bone broth to keep it moist and let it simmer gently for 20–30 minutes, stirring occasionally.

  5. Add the crispy bacon back into the pot. Simmer 5 more minutes.

  6. Taste, adjust salt/fat levels, and serve hot.


🔥 Optional Carnivore Add-ins:

  • Shredded beef, brisket, or short ribs (for texture and slow-cooked flavor)

  • Beef liver or heart, finely chopped (nutrient boost)

  • Heavy cream (dash added at the end for richness)

  • Egg yolks stirred in off heat for creaminess


🥣 Serving Ideas:

  • Top with a fried or poached egg

  • Serve with pork rind “chips” or carnivore bread

  • Add shredded cheese (if dairy is okay for you)

Carnivore Zero Carb Pancakes Recipe

These Carnivore Zero Carb Pancakes are a perfect breakfast option for anyone on a strict carnivore diet. Made with animal-based ingredients only, these pancakes are fluffy, rich, and packed with protein, while containing zero carbs. They’re ideal for those who want to indulge in a breakfast classic without breaking their diet.

Table of Contents

Ingredients:

  • 4 large eggs (pasture-raised if possible)
  • 2 oz cream cheese (softened)
  • 1/4 cup heavy cream (for a creamier texture)
  • 2 tbsp beef tallow or butter (for cooking)
  • 1/4 tsp salt
  • 1/4 tsp vanilla extract (optional, for flavor)
  • 1/2 tsp baking powder (optional, for fluffiness)
  • 1 tbsp collagen peptides (optional, for added protein and texture)
  • 2 tbsp shredded mozzarella cheese (optional, for extra fluffiness and richness)

Instructions:

  1. Prepare the Pancake Batter:
    • In a medium bowl, crack the eggs and whisk them together until fully combined.
    • Add the softened cream cheese to the eggs and mix until smooth. If the cream cheese is too firm, you can microwave it for a few seconds to soften it up.
    • Stir in the heavy cream and vanilla extract (if using) to add moisture and flavor. Add the salt and mix everything well.
    • If you want fluffier pancakes, add the baking powder. You can also add the collagen peptides for extra protein and a smooth texture. Lastly, mix in the shredded mozzarella cheese if using for added fluffiness and richness.
  2. Heat the Pan:
    • Place a skillet or griddle on medium heat and add the beef tallow or butter. Let it melt and coat the bottom of the pan evenly. You want a non-stick surface, so make sure the fat is spread out.
  3. Cook the Pancakes:
    • Pour a small amount of the pancake batter (about 1/4 cup) into the hot skillet. Use a spoon or spatula to gently spread the batter into a round shape.
    • Cook the pancakes for about 2-3 minutes on the first side until bubbles form on top and the edges start to set. Flip the pancakes gently using a spatula and cook for another 2-3 minutes on the other side, until golden brown and cooked through.
  4. Serve:
    • Once the pancakes are cooked, transfer them to a plate. You can stack them up and serve them as is, or drizzle with more melted butter if you like.
    • For a savory twist, top with crispy bacon or a dollop of whipped cream cheese.

Optional Toppings and Variations:

  • If you tolerate dairy, you can top your pancakes with a little extra cheese or serve them with cooked bacon for a more filling breakfast.
  • For a slight sweetness (if you follow a less strict carnivore approach), consider adding a few drops of stevia or erythritol to the batter, though this is optional.

These Carnivore Zero Carb Pancakes are easy to make, rich in flavor, and will keep you satisfied without straying from your carnivore lifestyle. Enjoy them as a protein-packed breakfast or even a quick meal during the day!

Carnivore Chocolate Mousse Recipe

🥩 Carnivore Chocolate Mousse Recipe

✅ Ingredients (Serves 2–3):

  • 4 large egg yolks (pasture-raised preferred)

  • ½ cup beef tallowduck fat, or unsalted butter (softened but not melted)

  • 2 tbsp collagen powder (optional, for protein boost & texture)

  • 1–2 tbsp cocoa powder (technically a plant, but tolerated by many carnivore dieters)

  • 1–2 tbsp raw honey or stevia/monk fruit (optional – skip for strict carnivore)

  • Pinch of salt

  • ¼ tsp vanilla extract (optional)

🥛 Optional additions:

  • ¼ cup whipped heavy cream or whipped egg white for a lighter mousse texture

  • Shaved raw cacao or 100% chocolate for garnish (if tolerated)


🥄 Instructions:

  1. Whip egg yolks
    In a mixing bowl, use a hand mixer to whip the yolks for 2–3 minutes until creamy and pale.

  2. Add fat
    Slowly add the softened butter, tallow, or duck fat while whipping. The mixture should become thick and smooth.

  3. Mix in flavor
    Add cocoa powder, sweetener (if using), salt, vanilla, and collagen powder. Mix until fully combined and fluffy.

  4. Optional: Fold in cream or whipped egg white
    This lightens the mousse. Use a spatula and fold gently.

  5. Chill
    Transfer into ramekins or small jars. Refrigerate for at least 1–2 hours until firm.

  6. Serve
    Garnish (optional) and enjoy!


🧊 Storage:

Keeps well in the fridge for up to 4 days. Can also be frozen and thawed slowly in the fridge.


🥩 Carnivore Compliance Notes:

  • Strict Carnivore: Skip cocoa and sweeteners; use whipped tallow + egg yolks + salt for a savory mousse.

  • Relaxed Carnivore: Cocoa, vanilla, and minimal sweetener are generally tolerated.

Carnivore Ice Cream Recipe

Get ready to unleash your inner carnivore with a spoonful of  creamy, dreamy, and oh-so-fluffy indulgence that’s as stealthy as it is satisfying.

If you’ve been prowling the web, hunting down a truly carnivore ice cream recipe.

You’ve likely been ambushed by a jungle of posers those sneaky recipes that boast a “carnivore” badge, only to reveal their true plant-based spots.

Duration:

Prep time: 15 minutes

Additional time: 6 hours

Total time:6 hours 15 minutes

Yield: 6

Ingredients

  • 1 1/2 cups = 350 ml heavy cream
  • 4 very fresh yolks from grass-fed organic eggs

Instructions

  1. Beat the heavy cream with an electric mixer until stiff peaks form.
  2. In another bowl, beat the yolks until pale and fluffy.
  3. Fold the egg yolks into the whipped cream. Mix with a spatula until smooth.
  4. Transfer into a 1-qt (1 liter) container. Level the surface with a spatula.
  5. Close the container or cover with a plastic foil.
  6. Freeze overnight, or at least 6 hours.
  7. Remove from the freezer 30 minutes before serving.
  8. Enjoy!

Steak Bites Recipe

These Garlic Butter Steak Bites are quick and easy to make – and they vanish fast! Serve them as finger food on appetizer night, as part of your game day spread or as part of a fun family dinner date.

Steak bites are especially fun for the kids. I know it’s a recipe mostly served as an appetizer (Super Bowl! or any Game Day party!) , but we don’t mind them as a regular meal at all.

They are quick and easy to whip up, and turn out so tender.

Ingredients

  • ▢ 2 pounds steak cut into bites
  • ▢ salt and ground black pepper to taste (season on the generous side)
  • ▢ 1 tablespoon oil
  • ▢ 4 tablespoons butter
  • ▢ 2 cloves garlic or more to taste
  • ▢ 2 tablespoons chopped parsleyoptional for serving

Instructions

  • Prep steak: Remove steak from fridge 30 minutes before cooking. Unwrap, cut into cubes (see notes at bottom of recipe for size recommendation) and season with salt and pepper. Let sit on plate on counter for 30 minutes. (For best results, do not skip this step.)2 pounds steak, salt and ground black pepper
  • Sear steak: Once ready, heat a large skillet (preferably cast iron) over high heat. Add oil, then sear steak for around 2 minutes per side, until a nice, browned crust forms but middle stays tender. Work in batches if needed, do not overcrowd pan! Set seared steak bites aside on a plate and tent with foil.1 tablespoon oil
  • Make garlic butter: Once steak is done and set aside on a plate, reduce heat to medium. Add butter and garlic to empty skillet. Heat about 2 minutes, until garlic is fragrant. Take off the heat.4 tablespoons butter, 2 cloves garlic
  • Finish: Add steak to skillet with garlic butter. Toss to coat. Serve immediately with chopped parsley, if desired.2 tablespoons chopped parsley

Notes

Steak: Use any tender, boneless cut of steak, cut into cubes. Sirloin steak, strip steak or ribeye all work. You can use beef tenderloin/fillet if you want them extra-tender and special.

Parsley: Totally optional, but highly recommended by my entire family, save the picky 5 year old who thinks the green bits are a waste of space ?

Bite size: You can really cut these as large or as bite-sized as you like. Smaller bites cook more quickly and are more done, larger “bites” stay more tender and have a more medium middle.

I cut mine just under 1 inch, and cooked them for around 2 minutes per side, plus some extra tossing around for 30 seconds to get the edges charred.

Searing time: 4 minutes yielded just under 1-inch bites with a medium-done middle. If you want yours more rare, stick to 1-inch cubes and go with a short and blazing hot sear.

For more done bites, sear them a little longer on medium-high heat instead; and/or cut them smaller. Just make sure you don’t overcook them, or they may turn out chewy.

Deviled Egg Hamburgers Recipe (Carnivore-Friendly and Flavorful)

These Deviled Egg Hamburgers are a fun, protein-packed twist on the classic burger. Combining the rich flavors of a juicy hamburger patty with the creamy goodness of deviled eggs, this recipe is perfect for carnivore enthusiasts looking to enjoy a flavorful, low-carb, high-fat meal. Whether you’re hosting a gathering or just craving something hearty and delicious, these deviled egg hamburgers will not disappoint.

Ingredients:

  • 4 large eggs (hard-boiled)
  • 1 lb ground beef (80/20 fat ratio, for juicy burgers)
  • 2 tbsp butter (grass-fed, for cooking)
  • 1/4 cup mayonnaise (preferably sugar-free and made with animal fats)
  • 1 tbsp Dijon mustard (optional, check ingredients for no carbs or sugar)
  • Salt and freshly cracked black pepper, to taste
  • 2 tbsp fresh chopped chives or parsley (optional, for garnish)
  • 4 small pieces of crispy bacon (optional, for topping)
  • 2 tbsp beef bone broth (optional, for extra flavor in patties)

Instructions:

  1. Prepare the Deviled Eggs: Boil the eggs by placing them in a pot of cold water. Bring to a boil, then reduce to a simmer for 10 minutes. Afterward, transfer the eggs to an ice bath to cool. Once cooled, peel the eggs, slice them in half, and carefully remove the yolks. Place the yolks in a bowl and mash them.
  2. Make the Deviled Egg Filling: To the mashed yolks, add the mayonnaise, Dijon mustard (if using), and a pinch of salt and pepper. Stir until smooth and creamy. Set aside.
  3. Form the Patties: In a bowl, season the ground beef with salt, pepper, and optional beef bone broth. Mix well and form 4 burger patties, about 1/2 inch thick.
  4. Cook the Patties: Heat a skillet over medium-high heat and melt 1 tablespoon of butter. Cook the patties for about 3-4 minutes per side, or until they reach your desired doneness.
  5. Assemble the Deviled Egg Hamburgers: Place a cooked burger patty on a plate. Spoon a generous amount of the deviled egg filling on top. Optionally, add crispy bacon and garnish with fresh herbs like chives or parsley for extra flavor.
  6. Serve: Enjoy your deviled egg hamburgers hot! These are perfect as a carnivore-friendly burger option without the bun, packed with protein and rich flavor.

This unique and delicious recipe will be your new favorite way to enjoy a burger with a creamy, indulgent twist!

Fluffy Carnivore Mug Cake

Craving something cake-like on a strict carnivore diet? This mug cake is 100% animal-based—no coffee, no chocolate, no plant ingredients. It comes together in just minutes, delivering a quick, protein-rich treat without compromising your carnivore lifestyle!

🥩 Why You’ll Love It

  • Zero Plant Ingredients: Strictly eggs, dairy, and beef-sourced collagen—nothing else.
  • Quick & Easy: Mix in one mug, microwave, and you’re done in under 2 minutes.
  • Satisfies Cravings: Enjoy a soft, cake-like texture while staying fully carnivore.

🍳 Ingredients (All From Animal Sources)

  • 1 Large Egg
  • 1 Tbsp Heavy Cream (full-fat)
  • 3/4 Tbsp Butter (melted)
  • 1 Tsp Collagen Powder (bovine-sourced)
  • Pinch of Salt (optional, but can enhance flavor)
(No coffee, cocoa, sweeteners, or plant-based spices!)

🔥 How to Make It

  • Melt Butter: Place butter in your mug and microwave for 10–15 seconds until just melted.
  • Combine Wet Ingredients: In a separate small bowl or directly in the mug, whisk together eggheavy cream, and collagen.
  • Add Butter: Swirl the melted butter around the mug to coat the sides, then pour any remaining butter into the egg mixture. Stir to fully combine.
  • Microwave: Microwave on high for 45–60 seconds. Check after 45 seconds—if it still looks runny, microwave in 5–10 second increments until set.
  • Enjoy: Let it cool slightly, then dig into your fluffy, carnivore-friendly mug cake!

🥚 Carnivore Diet Benefits

By focusing on animal-based foods—meat, eggs, dairy—and avoiding plants entirely, many people find it easier to manage cravings, maintain steady energy, and simplify meal decisions. This mug cake offers a hint of “dessert” without stepping outside carnivore principles.

🧈 Pro Tips

  • Watch the Time: Every microwave is different; overcooking can make the cake rubbery.
  • Extra Creaminess: Add an extra splash of heavy cream for a richer texture.
  • Flavor Twist: A tiny pinch of salt can bring out the natural richness of butter and cream.
Indulge in this Fluffy Carnivore Mug Cake whenever you want a quick, all-meat “dessert.” It’s proof you don’t need plants to treat yourself! 🥩✨

Carnivore Pizza Recipe

Ingredients:

For the Crust:

  • 1 1/2 cups (180g) mozzarella cheese, shredded
  • 1/4 cup (60g) cream cheese
  • 1 large egg
  • 1 cup (100g) almond flour
  • 1/2 tsp garlic powder (optional)
  • 1/4 tsp salt
  • 1/4 tsp baking powder

For the Toppings:

  • 1/2 cup (120g) pizza sauce (optional, can omit for strict carnivore)
  • 1 1/2 cups (180g) shredded mozzarella cheese
  • 1/2 cup (75g) cooked ground beef
  • 1/2 cup (75g) cooked sausage, crumbled
  • 4 slices pepperoni or other carnivore-friendly deli meats
  • 2 slices cooked bacon, chopped
  • 1/2 cup (60g) cooked chicken breast, shredded
  • 1/4 cup (30g) Parmesan cheese (optional, for extra flavor)

Instructions:

  1. Preheat Oven:
    • Preheat your oven to 400°F (200°C) and line a baking sheet with parchment paper or use a pizza stone if you have one.
  2. Make the Crust:
    • In a microwave-safe bowl, combine the shredded mozzarella and cream cheese. Microwave for 30-45 seconds until melted and easy to stir.
    • Stir in the egg, almond flour, garlic powder, salt, and baking powder. Mix until smooth and dough-like.
    • Transfer the dough to the prepared baking sheet and shape it into a pizza crust about 1/4-inch thick.
  3. Bake the Crust:
    • Bake the crust in the preheated oven for 10-12 minutes or until golden and firm.
  4. Assemble the Pizza:
    • Once the crust is done, spread a thin layer of pizza sauce (optional) over the crust. Sprinkle a generous amount of shredded mozzarella cheese over the sauce.
    • Top with your carnivore toppings: ground beef, sausage, pepperoni, bacon, and chicken.
  5. Bake Again:
    • Return the pizza to the oven and bake for an additional 5-7 minutes, until the cheese is melted and bubbly. Optionally, sprinkle Parmesan on top for extra flavor.
  6. Serve:
    • Slice and enjoy your delicious, low-carb carnivore pizza!

Tip: Customize with any other meats or toppings that fit your carnivore diet!