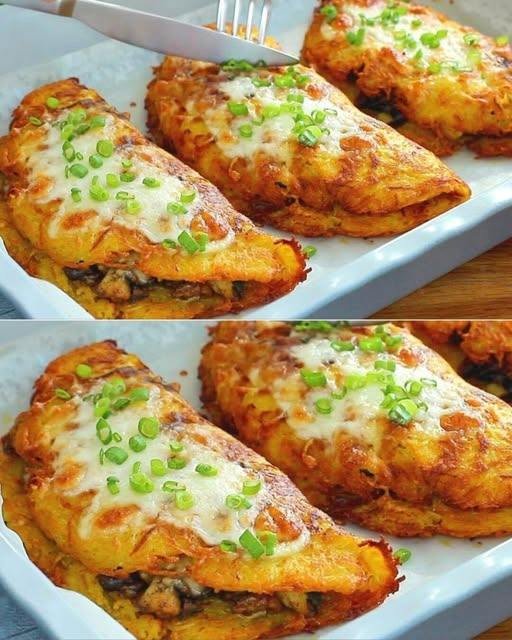
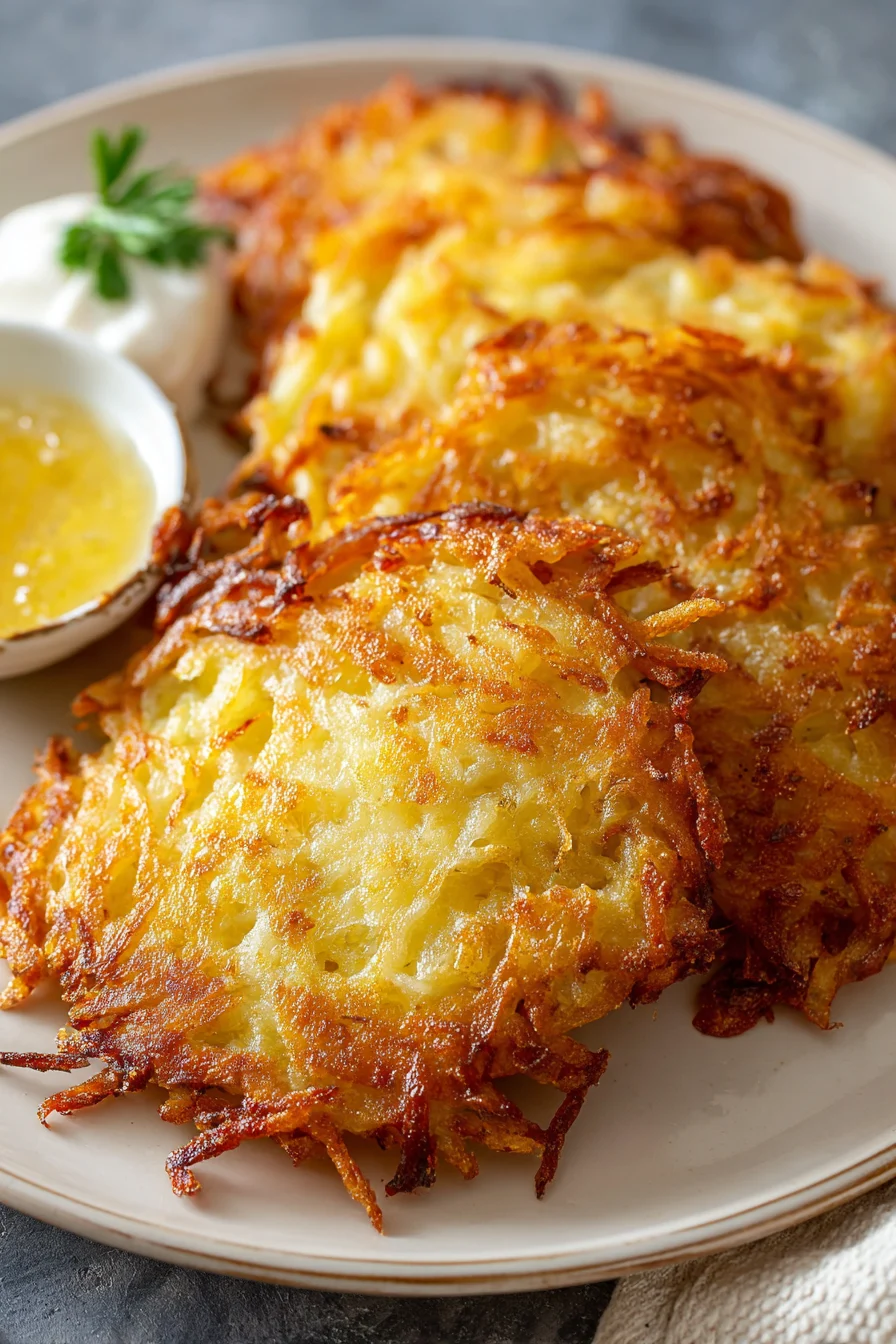
French Onion Chicken Bake

This French Onion Chicken Bake is the perfect marriage of two comfort food classics. Based on the details provided, here is the full, comprehensive recipe along with the best tips for perfecting those onions and making the dish work for your lifestyle.


French Onion Chicken Bake

Prep time: 10 mins | Cook time: 50 mins | Total time: 1 hour Yield: 4 servings

Ingredients

  • The Onions:

    • 4 large onions, peeled and sliced (Sweet onions like Vidalia are preferred)

    • 4 tbsp unsalted butter

    • 4 cloves garlic, finely chopped

    • 1 tsp fresh thyme

    • 2/3 cup low-sodium beef broth

    • 2 tbsp aged balsamic vinegar

  • The Chicken & Cheese:

    • 4 boneless, skinless chicken breasts

    • 1/2 tsp sea salt (adjust to taste)

    • 1/2 tsp black pepper

    • 1 cup shredded mozzarella cheese

    • 1/2 cup grated Parmesan cheese

Instructions

  1. Preheat and Prepare: Preheat your oven to 400°F (200°C). Lightly grease a 9×13 inch baking dish with cooking spray.

  2. Sauté the Onions: In a large skillet, melt the butter over medium-high heat. Add the sliced onions and sauté for about 5 minutes, stirring occasionally until they soften.

  3. Infuse Flavors: Reduce the heat to medium. Stir in the chopped garlic, black pepper, and fresh thyme. Cook for 1 more minute until fragrant.

  4. Create the Jam: Pour in the beef broth and balsamic vinegar. Continue to simmer on medium heat for about 10 minutes. The liquid will reduce, and the onions will become dark, tender, and “jam-like” in consistency.

  5. Assemble: Spread about one-third of the caramelized onion mixture into the bottom of your prepared baking dish. Place the chicken breasts on top of the onions and season them lightly with sea salt.

  6. Layer and Cheese: Top each chicken breast evenly with the remaining caramelized onions. Generously sprinkle the mozzarella and Parmesan over the top.

  7. Bake: Place in the oven and bake for 30 minutes, or until the chicken reaches an internal temperature of 165°F and the cheese is bubbly and golden brown.


Tips for Success

  • The Cheese Swap: For a more traditional French flavor, replace the mozzarella and Parmesan with Gruyere. If you want a sharper kick, mix in a little blue cheese with a mild melter like Fontina.

  • Keto Modification: To lower the carb count further, swap the balsamic vinegar for apple cider vinegar and a pinch of stevia. Serve with cauliflower mash instead of potatoes.

  • Make-Ahead Instructions: You can assemble the dish (onions and chicken) up to 24 hours in advance and store it covered in the fridge. Add the cheese just before baking, and add 5–10 minutes to the cook time since the dish is starting cold.

  • Wine Pairing: A Chardonnay with light oak notes or a crisp Pinot Noir pairs beautifully with the savory-sweet profile of the caramelized onions.

Loaded Cheeseburger Pastries

Cheeseburger-stuffed pastries take the classic comfort food you love and wrap it in flaky, golden pastry for a fun, flavorful twist. Juicy, seasoned beef, melty  cheese, and optional veggies are tucked inside buttery dough—perfect as a snack, appetizer, or main dish.

Food

Ingredients & Notes

  • Ground beef: Choose a mix with some fat for juiciness. Cook and season thoroughly.
  • Cheese: Cheddar is classic; mozzarella, American, or blends work too.
  • Onions & optional vegetables: Finely chop onions; cook any extra veggies first to avoid sogginess.
  • Seasonings: salt, black pepper, garlic powder, and paprika; optional mustard or ketchup for a true cheeseburger taste.
  • Pastry dough: Puff pastry gives flakiness; crescent dough is soft. Homemade dough works too.

Preparing the Filling

    1. Brown beef in a skillet over medium heat.

  1. Add onions and cook until soft.
  2. Season with spices, remove excess fat, and let cool.
  3. Stir in cheese after cooling.

Assembling the Pastries

  1. Roll out dough and cut into equal portions.
  2. Place filling in the center of each piece—don’t overfill.
  3. Fold dough over, seal edges, and crimp with a fork.
  4. Brush with egg wash for a golden finish.

Cooking Options

    • Baking: Preheat oven and bake until golden brown and crisp.

Discover more
Garlic
steaks
garlic
Beef
Steaks
Muffins
Stuffing
bread
cheese
beef

  • Frying (optional): Creates a rich, golden crust; monitor temperature carefully.

Flavor Variations

  • Bacon cheeseburger: Add cooked bacon.
  • Spicy: Mix in jalapeños, hot sauce, or chili powder; pepper jack cheese works well.
  • Vegetarian: Use plant-based ground meat or beans/vegetables; keep cheese and seasonings.

Serving Suggestions

  • Serve with ketchup, mustard, or creamy dips.
  • Pair with fries, salad, or roasted veggies.
  • Make smaller pastries for parties—they’re ideal finger food.

Storage & Reheating

    • Refrigerate: Airtight container for several days.

Discover more
garlic
beef
Stuffing Mixes
Muffins
Bread
filling
Steak
cheesy
Stuffing
Slow Cooker

  • Reheat: Bake to restore crispness; microwaving softens texture.
  • Freeze: Possible, though texture may change slightly.

Cheeseburger-stuffed pastries are proof that comfort food can be familiar and inventive—easy to make, crowd-pleasing, and endlessly customizable.

Baked Cheesy Chicken Bread Rolls

Baked Cheesy Chicken Bread Rolls

A savory, melt-in-your-mouth snack featuring seasoned shredded chicken and bubbly melted cheese nestled in soft dinner rolls.

  • Prep time: 15 minutes

  • Cook time: 15 minutes

  • Total time: 30 minutes

Ingredients

For the Chicken Filling

  • Chicken: 1 cup boiled and shredded chicken (rotisserie chicken works great here)

  • Onion: 1 small, finely chopped

  • Capsicum (Bell Pepper): ½ cup, finely chopped

  • Garlic: 1 tsp garlic paste

  • Condiments: 2 tbsp ketchup (or pizza sauce) and 2 tbsp mayonnaise

  • Seasoning: Salt (to taste), ½ tsp black pepper, ½ tsp red chili powder, and ½ tsp chili flakes (optional for heat)

For the Rolls & Topping

  • Bread: 1 pack of dinner rolls or slider buns

  • Cheese: 1½ cups mozzarella or cheddar cheese, grated

  • Butter Mixture: 2 tbsp butter (melted) mixed with 1 tsp garlic powder

  • Garnish: Freshly chopped parsley or coriander


Detailed Instructions

1. Sauté the Savory Filling

Heat 1 tablespoon of oil in a non-stick pan over medium heat. Add the finely chopped onion and garlic paste, sautéing for about 2 minutes until the onion becomes translucent and soft. Add the shredded chicken and chopped capsicum.

2. Season and Combine

Stir in the salt, black pepper, red chili powder, and chili flakes. Mix thoroughly and cook for 3–4 minutes to allow the flavors to meld and the capsicum to soften slightly. Remove the pan from the heat. Once the mixture has cooled for a minute, stir in the ketchup (or pizza sauce) and mayonnaise until the chicken is evenly coated and creamy.

3. Prepare and Stuff the Rolls

Preheat your oven to 180°C (350°F). Take your dinner rolls and make a deep slit down the center of each, being careful not to cut all the way through to the bottom. Gently pull the bread apart and stuff each roll generously with the prepared chicken filling.

4. Add Cheese and Butter

Place the stuffed rolls side-by-side on a baking tray lined with parchment paper. Sprinkle the grated mozzarella or cheddar cheese over the top of the filling in each roll. Using a pastry brush, coat the tops and sides of the bread with the melted garlic butter.

5. Bake to Perfection

Place the tray in the center rack of the oven. Bake for 12–15 minutes, or until the cheese is completely melted and bubbling, and the edges of the rolls have turned a beautiful golden brown.

6. Garnish and Serve

Remove from the oven and immediately sprinkle with fresh parsley or coriander. Serve these rolls while hot, ideally paired with extra ketchup or a creamy garlic dipping sauce.


Tips for the Best Rolls

  • Don’t Overfill: While it’s tempting to pile the chicken high, keep the filling level with the top of the bread to ensure the cheese stays on the roll rather than sliding off onto the tray.

  • Soft vs. Crusty: If you prefer a softer roll, cover the tray loosely with aluminum foil for the first 8 minutes of baking, then remove it for the final 5 minutes to melt the cheese.

Honey Glazed Chicken (Weight-Loss & WW Friendly)

Exceptional Honey Glazed Chicken (Weight-Loss & WW Friendly)

A lean, high-protein dish featuring a glossy, flavorful glaze without the excess sugar or fats found in restaurant versions.

  • Prep time: 10 minutes

  • Cook time: 15 minutes

  • Servings: 4

  • Calories: ~230 kcal per serving

Ingredients

For the Chicken:

  • 1 ½ lbs boneless, skinless chicken breast

  • 1 tsp olive oil

  • ½ tsp salt

  • ½ tsp black pepper

  • ½ tsp garlic powder

  • ½ tsp paprika

For the Honey Glaze:

  • 3 tbsp pure honey

  • 2 tbsp low-sodium soy sauce

  • 1 tbsp fresh lemon juice

  • 2 tsp Dijon mustard

  • 2 cloves garlic, finely minced

  • ¼ cup low-sodium chicken broth

  • 1 tsp cornstarch (optional, for a thicker glaze)


Instructions

  1. Season the Chicken: Pat the chicken breasts dry with paper towels. Season both sides evenly with salt, black pepper, garlic powder, and paprika.

  2. Sear: Heat the olive oil in a large nonstick skillet over medium heat. Add the chicken and cook for 5–6 minutes per side until golden brown and the internal temperature reaches 165°F (74°C). Remove chicken from the pan and set aside.

  3. Whisk the Glaze: In a small bowl, whisk together the honey, soy sauce, lemon juice, Dijon mustard, minced garlic, and chicken broth.

  4. Deglaze & Simmer: Pour the mixture into the same skillet used for the chicken. Bring to a gentle simmer, scraping up any browned bits from the bottom of the pan to incorporate that extra flavor.

  5. Thicken (Optional): If you prefer a thicker sauce, whisk the cornstarch with 1 tablespoon of water to create a slurry. Stir it into the simmering sauce for 1–2 minutes until glossy.

  6. Coat: Return the chicken to the skillet. Spoon the glaze over the meat and simmer for 2–3 minutes, turning the chicken to ensure every inch is coated in the sticky sauce.

  7. Rest: Remove from heat and let the chicken rest for 2 minutes. This allows the juices to redistribute and the glaze to fully set.


Nutritional Breakdown (Per Serving)

Metric Amount
Protein 32g
Fat 5g
Carbs 14g
Sugar 10g
WW Blue 4 Points
WW Green 5 Points
WW Purple 3 Points

Chef’s Tips for Success

  • Heat Control: Keep the pan at medium heat. Honey has a high sugar content and can burn quickly if the flame is too high.1


  • Flavor Boost: For a kick of heat, add a pinch of red chili flakes to the sauce. For an Asian-inspired twist, add 1 tsp of freshly grated ginger.

  • Meal Prep: This stores beautifully in airtight containers for up to 3 days. To keep the chicken moist when reheating, add a tiny splash of water or broth before microwaving.

🥔 Crispy Parmesan and Herb Potato Bites

These Crispy Parmesan and Herb Potato Bites are a fantastic addition to your growing collection of easy, high-impact snacks. They perfectly bridge the gap between a classic potato side and a savory “Italian bread snack” thanks to the crunchy herb and cheese crust.

Following your request, here is the full, detailed recipe for these bite-sized treats.


🥔 Crispy Parmesan and Herb Potato Bites

Tender potato chunks roasted on a savory “frico” crust of Italian herbs, garlic, and golden Parmesan cheese.

  • Prep time: 15 minutes

  • Cook time: 30–35 minutes

  • Yields: 4 servings

Ingredients

The Base:

  • 2 large potatoes (approx. 500 grams), peeled and cut into 1-inch chunks

  • 2 pinches of salt (for boiling)

The Herb & Cheese Coating:

  • 1 cup (approx. 2 oz) Parmesan cheese, finely grated

  • 1 tsp Paprika (smoked or regular)

  • 1 tsp Dried Italian herb seasoning

  • 1 tsp Garlic powder

  • 1 tsp Onion powder

  • 1/2 tsp Salt and black pepper

The Fats:

  • 2 tbsp Unsalted butter, melted

  • 1–2 tbsp Extra-virgin olive oil


Instructions

  1. Parboil the Potatoes: Place your potato chunks in a pot of cold water with two pinches of salt. Bring to a boil and cook for only 5–8 minutes. They should be slightly softened but still firm (not falling apart). Drain well and pat dry with a paper towel.

  2. Preheat the Oven: Set your oven to 400°F (200°C).

  3. Prepare the “Crisp.” Paste: In a small bowl, whisk together the finely grated Parmesan, paprika, Italian herbs, garlic powder, onion powder, salt, and pepper.

  4. Coat the Pan: Drizzle the olive oil and half of the melted butter into a 9×13-inch baking dish (glass works best so you can see the crust forming). Tilt the pan to coat it evenly.

  5. Create the Cheese Layer: Sprinkle about 3/4 of your Parmesan-herb mixture evenly over the bottom of the oiled pan to create a solid layer.

  6. Assemble: Press each potato chunk firmly into the cheese layer, flat-side down. Drizzle the remaining melted butter over the tops of the potatoes and sprinkle with the remaining cheese mixture.

  7. Roast: Bake for 30–35 minutes without flipping. You are looking for a deep golden-brown crust on the bottom.

  8. The “Set” Phase: Remove from the oven and let rest for 5 minutes. This allows the cheese to harden into a crispy “snack” texture.

  9. Serve: Use a spatula to lift the potatoes and their attached crispy cheese crusts out of the pan.


Pro-Tips for Maximum Crunch

  • The Cheese Texture: Use the “sand-like” grated Parmesan from a jar or grate a block very finely on a microplane. Larger shreds won’t form a solid, cracker-like crust.

  • Don’t Flip: The secret to the “Italian herb bread snack” vibe is leaving them face-down so the cheese fries in the butter/oil against the pan.

  • Dip It: These are excellent dipped in a cool crème fraîche ranch or a spicy marinara.

Texas Trash Dip

Texas Trash Dip

This warm, creamy bean dip is a legendary potluck favorite. It combines the heartiness of refried beans with a silky, seasoned cream cheese base and a thick blanket of melted cheese.

  • Prep time: 15 minutes

  • Cook time: 25 minutes

  • Total time: 40 minutes

  • Servings: 6–8 (large party portion)

Ingredients

The Base:

  • 1 pkg (8 oz) Cream cheese, softened to room temperature

  • 1 cup Sour cream (full-fat recommended)

  • 2 cans (16 oz each) Refried beans

  • 1 packet (1 oz) Taco seasoning

  • 1 can (4 oz) Diced green chilies, drained (optional, for a mild kick)

The Cheese:

  • 2 cups Shredded Mexican blend cheese, divided

  • 1 cup Shredded sharp cheddar cheese

The Toppings (Optional):

  • ½ cup Sliced black olives

  • ½ cup Chopped green onions

  • ½ cup Diced tomatoes or Pico de Gallo

  • Fresh cilantro


Instructions

  1. Preheat and Prep: Set your oven to 350°F (175°C). Lightly grease a 9×13-inch baking dish with non-stick spray.

  2. Cream the Base: In a large mixing bowl, beat together the softened cream cheese and sour cream until the mixture is smooth and no large lumps remain.

  3. Mix in Flavors: Add the refried beans, taco seasoning, and drained green chilies. Stir until the beans are fully incorporated into the cream base.

  4. Add Cheese: Fold in 1 cup of the Mexican blend cheese into the bean mixture. This ensures every bite is cheesy, not just the top layer.

  5. Assemble: Spread the bean mixture evenly into your prepared 9×13 baking dish using a spatula.

  6. Top it Off: Sprinkle the remaining 1 cup of Mexican blend cheese and the 1 cup of cheddar cheese evenly over the top.

  7. Bake: Bake uncovered for 20–25 minutes. You are looking for the cheese to be completely melted and the edges of the dip to be bubbling.

  8. Garnish and Serve: Remove from the oven and let it sit for about 5 minutes (this helps it thicken slightly). Top with olives, green onions, and tomatoes. Serve hot with a sturdy bag of tortilla chips or Fritos Scoops.


Tips for Success

  • The Cream Cheese Secret: If you forgot to take the cream cheese out of the fridge, pop it in the microwave (wrapper removed!) for 15-20 seconds so it blends smoothly without lumps.

  • Control the Salt: If you find store-bought taco seasoning too salty, use a “Low Sodium” version or make your own blend with chili powder, cumin, garlic powder, and onion powder.

  • Hearty Variation: If you want to turn this into a meal, stir in 1 lb of browned, drained ground beef or chorizo before spreading the mixture into the baking dish.

Baked Potato Recipe

The Perfect Crispy-Skin Baked Potato

This recipe focuses on the high-heat method to ensure the skin is salty and crunch while the inside remains light and fluffy.

  • Prep time: 10 minutes

  • Cook time: 55 minutes

  • Servings: 4 potatoes

Ingredients

  • 4 large Russet potatoes (scrubbed and dried thoroughly)

  • 2 tbsp Olive oil (or melted butter)

  • 1 tsp Kosher salt (coarse salt is best for texture)

  • ½ tsp Black pepper (freshly ground, optional)

Classic Toppings:

  • Salted butter

  • Sour cream

  • Shredded sharp cheddar cheese

  • Fresh chives or green onions

  • Crispy bacon bits


Instructions

  1. Heat the Oven: Preheat your oven to 425°F (220°C). Using a high temperature is the “secret” to getting that potato-skin-chip texture on the outside.

  2. Prep the Spuds: After washing and drying the potatoes completely (moisture on the skin will lead to steaming rather than crisping), pierce each potato 3–4 times with a fork.

  3. Season: Rub each potato generously with the olive oil until fully coated. Sprinkle the kosher salt and pepper over the entire surface.

  4. The Bake: Place the potatoes directly on the center oven rack for maximum air circulation. (You can place a baking sheet on the rack below to catch any stray oil drips).

  5. Timing: Bake for 50–60 minutes. Flip them once at the 30-minute mark to ensure even browning. They are done when the skin is crackly and a knife slides into the center with zero resistance.

  6. The Reveal: Remove from the oven and let them rest for 2–3 minutes. Use a knife to slice a long slit down the center. Use a towel to grab the ends and “pop” the potato open by pushing inward—this releases the steam immediately so the interior doesn’t get gummy.

  7. Fluff and Serve: Use a fork to mash and fluff the insides before adding a heavy pat of butter and your desired toppings.


Three Ways to Level Up Your Toppings

  • The Broccoli-Cheddar: Top with steamed broccoli florets and a quick homemade cheese sauce (or just plenty of melted sharp cheddar).

  • The Chili-Loaded: Pour a ladle of warm chili over the fluffed potato and top with red onions and pickled jalapeños.

  • The Mediterranean: Skip the butter and top with a dollop of Greek yogurt, a squeeze of lemon, and a sprinkle of dried oregano.

Egg Muffins – Quick & Nutritious Breakfast

Egg Muffins – Quick & Nutritious Breakfast

High in protein, low in carbs, and fully customizable

Prep Time: 10 minutes
Cook Time: 18–22 minutes
Total Time: 30 minutes
Yield: 6 muffins

Egg muffins are a versatile breakfast or snack option. You can add your favorite vegetables, meats, or cheeses, making them ideal for low-carb, keto, or meal-prep-friendly diets.


Ingredients

  • 6 large eggs

  • ¼ cup (60 ml) milk (or unsweetened almond/oat milk for dairy-free)

  • ½ cup shredded cheese (cheddar, feta, or your choice; optional for dairy-free)

  • ½ cup chopped vegetables (bell peppers, spinach, green onions, mushrooms, zucchini, etc.)

  • ¼ cup cooked bacon or ham (optional)

  • Salt and pepper to taste

  • ½ teaspoon garlic powder (optional)

  • ½ teaspoon paprika (optional)


Step-by-Step Instructions

1. Preheat the Oven

Preheat your oven to 375°F (190°C).
Lightly grease a 6-cup muffin tin with cooking spray, oil, or butter. Silicone muffin cups can also be used.


2. Prepare Ingredients

  • Chop your vegetables into small pieces.

  • Dice cooked bacon or ham if using.

  • Pre-sauté watery vegetables (like mushrooms or spinach) for 2–3 minutes to prevent soggy muffins.


3. Whisk the Eggs

In a large bowl, whisk together the eggs, milk, salt, pepper, garlic powder, and paprika until smooth and slightly frothy.
This ensures fluffy muffins with evenly distributed seasoning.


4. Assemble the Muffins

  • Divide the chopped vegetables and cooked meat evenly among the muffin cups.

  • Pour the egg mixture over the fillings, filling each cup about ¾ full.

  • Top each with shredded cheese, if using.


5. Bake

Place the muffin tin in the preheated oven.
Bake for 18–22 minutes, or until the egg muffins are set and lightly golden on top.
A toothpick inserted in the center should come out clean.


6. Cool and Serve

  • Allow the muffins to cool for a few minutes before removing them from the tin.

  • Serve warm, or store for meal prep.


Tips for Perfect Egg Muffins

  • Grease Well: Prevents sticking; silicone cups work best.

  • Whisk Thoroughly: Ensures light, fluffy muffins.

  • Do Not Overfill: Fill ¾ full to prevent overflow.

  • Cool Slightly Before Removing: Prevents breaking.

  • Storage & Reheating: Refrigerate in an airtight container for up to 5 days; microwave for 30–45 seconds to reheat.

  • Freezing: Let muffins cool completely, then freeze in airtight containers or freezer bags for up to 3 months. Reheat 1–2 minutes in the microwave.

Cheese-Stuffed Flatbread (Quick Yeast Dough)

Cheese-Stuffed Flatbread (Quick Yeast Dough)

Soft baked flatbreads filled with melted cheese, prepared with a simple yeast dough and baked until lightly golden.


Preparation Overview

  • Preparation time: 15 minutes

  • Resting time: 40 minutes

  • Baking time: 15–20 minutes

  • Total time: About 1 hour 15 minutes

Yield

  • Makes 4 large flatbreads


Ingredients

For the Dough

  • 480 g wheat flour (about 4 cups)

  • 400 ml milk, warm (comfortably warm, not hot)

  • 10 g dry yeast

  • 15 g sugar

  • 20 g olive oil

  • 8 g salt

For the Filling & Topping

  • 200 g mozzarella or cheddar cheese, shredded

  • 1 egg yolk (for brushing)

  • Optional: sesame seeds or nigella seeds

For Handling

  • A small amount of vegetable oil (for greasing the bowl and hands)


Step-by-Step Instructions

1. Prepare the Yeast Mixture

Pour the warm milk into a large mixing bowl. Add the sugar and dry yeast, then stir gently to combine.

Set the bowl aside for 5–10 minutes, until the surface shows light bubbles. This indicates the yeast has activated properly.


2. Form the Dough

Add the olive oil and salt to the milk mixture. Stir briefly.

Gradually add the flour, mixing with a spoon or spatula until a rough dough forms.

Transfer the dough to a clean work surface and knead gently for about 5 minutes, until smooth and flexible.

If the dough feels sticky, lightly oil your hands instead of adding extra flour to maintain a soft texture.


3. Rest the Dough

Lightly grease a bowl with vegetable oil. Place the dough inside and turn it once so the surface is lightly coated.

Cover with a clean cloth and place in a warm, draft-free area. Let it rest for about 30 minutes, or until it has increased in volume.


4. Divide and Fill

Turn the rested dough onto a lightly floured surface and divide it into 4 equal portions. Shape each portion into a smooth ball.

Flatten each ball into a small round disc using your hands or a rolling pin.

Place a portion of shredded cheese in the center of each disc.

Bring the edges of the dough up and over the filling, pinching them together to seal completely.

Gently flatten each filled ball into a thick disc, taking care not to tear the dough.


5. Final Rest and Topping

Line a baking tray with parchment paper and place the shaped flatbreads on it.

Using your fingertips, gently press small indentations across the surface of each disc. This helps maintain an even shape during baking.

Cover and let rest for 10 minutes.

Brush the tops lightly with egg yolk and sprinkle with seeds if desired.


6. Bake

Preheat the oven to 200°C (400°F).

Bake the flatbreads for 15–20 minutes, until evenly baked and lightly golden on top.

Remove from the oven and allow them to cool slightly before serving.


Serving Suggestions

  • Serve warm as a snack or alongside soups and salads

  • Optional: lightly brush with melted butter and sprinkle with chopped parsley before serving


Storage

  • Best enjoyed fresh

  • Leftovers can be stored covered at room temperature for up to 1 day or refrigerated for 2 days

  • Reheat gently in the oven or on a pan before serving


Optional Notes

  • Cheese can be mixed (mozzarella and cheddar together) for balanced flavor

  • Dough can be divided into smaller portions for mini flatbreads

Soft & Thick Chocolate Chip Cookies

Soft & Thick Chocolate Chip Cookies

These cookies are designed to bake up thick with soft centers and lightly crisp edges. The method of dissolving baking soda in warm water helps control spread and improves texture, while the full amount of brown sugar supports moisture and structure.

Prep Time: 15 minutes
Bake Time: 10–12 minutes
Yield: About 24 cookies
Oven Temperature: 350°F (175°C)


Ingredients

  • 1 cup (226 g) unsalted butter, softened

  • 1 cup granulated sugar

  • 1 cup packed brown sugar

  • 2 large eggs, room temperature

  • 2 teaspoons vanilla extract

  • 1 teaspoon baking soda

  • 2 teaspoons hot water

  • ½ teaspoon salt

  • 3 cups all-purpose flour, spooned and leveled

  • 2 cups semi-sweet chocolate chips

  • 1 cup chopped walnuts (optional)


Step-by-Step Instructions

1. Prepare the Oven and Pans

  • Preheat the oven to 350°F (175°C).

  • Line baking sheets with parchment paper or silicone baking mats.

  • Set aside.


2. Cream Butter and Sugars

  • In a large mixing bowl, add the softened butter, granulated sugar, and brown sugar.

  • Beat with a hand mixer or stand mixer on medium speed until the mixture is light, smooth, and evenly blended (about 2–3 minutes).


3. Add Eggs and Vanilla

  • Add the eggs one at a time, mixing well after each addition.

  • Stir in the vanilla extract until fully combined.


4. Prepare the Baking Soda Mixture

  • In a small bowl, dissolve the baking soda completely in the hot water.

  • Add this mixture to the dough along with the salt.

  • Mix gently until incorporated.


5. Add the Flour

  • Gradually add the flour to the bowl.

  • Mix on low speed or by hand just until no dry flour remains.

  • Avoid overmixing to maintain a soft texture.


6. Fold in Add-Ins

  • Gently fold in the chocolate chips and walnuts (if using) using a spatula.


7. Portion the Dough

  • Scoop dough in portions of about 2 tablespoons.

  • Place cookies about 2½ inches apart on the prepared baking sheets.


8. Bake

  • Bake for 10–12 minutes, or until:

    • Edges are lightly golden

    • Centers appear soft but set


9. Cool

  • Allow cookies to rest on the baking sheet for 5 minutes.

  • Transfer to a wire rack to cool completely.


Storage Tips

  • Store in an airtight container at room temperature for up to 4 days.

  • Dough may be refrigerated for up to 48 hours before baking.

Soft Custard & Chocolate Chip Spirals

Soft Custard & Chocolate Chip Spirals

Pillowy Dough • Creamy Vanilla Custard • Melting Chocolate Chips

Prep Time: 30 minutes
Rising Time: About 1½ hours
Bake Time: 20–25 minutes
Yield: 12–15 soft spirals


Ingredients

For the Soft Dough

  • 500 g all-purpose flour or bread flour

  • 250 ml warm milk (comfortably warm, not hot)

  • 70 g sugar

  • 7 g dry yeast (1 standard packet)

  • 1 egg, at room temperature

  • 60 g unsalted butter, softened

  • ½ teaspoon salt

For the Vanilla Custard (Pastry Cream)

  • 250 ml milk

  • 2 egg yolks

  • 50 g sugar

  • 20 g cornstarch

  • 1 teaspoon vanilla extract

Filling & Finish

  • ½ cup mini chocolate chips

  • 1 egg, lightly beaten (for brushing the tops)


Step-by-Step Instructions

1. Prepare the Dough

Activate the Yeast

In a large mixing bowl, combine the warm milk, sugar, and yeast. Stir gently.

Let the mixture rest for 5–10 minutes, until the surface looks foamy and slightly bubbly. This indicates the yeast is active.

Mix the Dough

Add the egg and salt to the yeast mixture. Stir well.

Gradually add the flour, mixing until a soft dough begins to form.

Knead

Add the softened butter to the dough.

Knead by hand for about 10 minutes, or in a stand mixer for 5–7 minutes, until the dough becomes smooth, stretchy, and easy to handle.

The dough should feel soft and slightly elastic, not dry.

First Rise

Place the dough in a lightly greased bowl. Cover with a clean cloth.

Let it rest in a warm place for about 1 hour, or until it has noticeably increased in size.


2. Make the Custard Filling

Mix

In a small saucepan (off the heat), whisk together the egg yolks, sugar, and cornstarch until smooth.

Slowly pour in the milk while whisking, ensuring there are no lumps.

Cook

Place the saucepan over medium heat. Stir continuously with a whisk or spatula.

As the mixture warms, it will gradually thicken into a smooth, creamy texture similar to thick pudding.

Cool

Remove from heat and stir in the vanilla extract.

Transfer the custard to a bowl. Cover the surface directly with plastic wrap to keep it smooth.

Allow it to cool completely before using.


3. Shape the Spirals

Lightly press the risen dough to release excess air.

On a floured surface, roll the dough into a large rectangle, about ¼ inch (½ cm) thick.

Spread the cooled custard evenly over the dough, leaving a small border along one long edge.

Sprinkle the mini chocolate chips evenly over the custard.

Starting from the opposite edge, roll the dough gently but firmly into a long log.

Using a sharp knife or plain dental floss, slice into 12–15 equal spirals.


4. Second Rise & Baking

Place the spirals on a baking tray lined with parchment paper, leaving space between each piece.

Cover lightly and let them rest for 30 minutes, allowing them to puff up slightly.

Brush the tops gently with the beaten egg for a golden finish.

Bake in a preheated oven at 180°C (350°F) for 20–25 minutes, until the spirals are evenly golden and baked through.


Helpful Tips for Best Results

  • Custard Temperature: Ensure the custard is fully cooled before spreading to keep the dough easy to roll.

  • Neat Spirals: If the dough feels very soft, chill the rolled log for 10 minutes before slicing.

  • Even Baking: Rotate the tray halfway through baking if your oven heats unevenly.

  • Storage: Store in a sealed container at room temperature for up to 2 days. Warm briefly before serving to refresh the softness.

Pan-Cooked Cheese and Potato Bread

Pan-Cooked Cheese and Potato Bread

Soft flatbread filled with creamy potato and melted cheese, cooked gently in a frying pan

This cheese and potato bread is made with a simple milk-based dough and cooked slowly in a frying pan until soft inside and lightly golden outside. The filling is smooth, comforting, and stretchy, making this bread perfect for breakfast, snacks, or a light meal.


Ingredients

For the Soft Bread Dough

  • Strong (bread) flour – 90 g
    Gives the bread structure while keeping it tender.

  • Milk – 55 g (about 4 tablespoons)
    Adds moisture and softness.

  • Unsalted butter – 10 g, melted
    Adds richness and flavor.

  • Salt – a small pinch
    Balances the taste.


For the Filling

  • Boiled potato – 1 medium, mashed until smooth
    Creates a soft, creamy center.

  • Shredded cheese – 80–100 g
    Mozzarella, mild cheddar, or a melting cheese works best.

  • Salt – a small pinch (optional)

  • Black pepper – optional, to taste


Equipment Needed

  • Mixing bowl

  • Spoon or spatula

  • Rolling pin or bottle

  • Non-stick frying pan with lid


Step-by-Step Instructions


1. Prepare the Dough

  1. In a bowl, add the flour and salt.

  2. Pour in the milk and melted butter.

  3. Mix with a spoon until a soft dough forms.

  4. Transfer to a clean surface and knead gently for 2–3 minutes until smooth.

The dough should feel soft, pliable, and not sticky.


2. Rest the Dough

  • Cover the dough and let it rest for 10 minutes.

  • This relaxes the dough and makes it easier to roll.


3. Prepare the Filling

  1. Mash the boiled potato until completely smooth.

  2. Add the shredded cheese and mix gently.

  3. Season lightly with salt and pepper if desired.

The filling should be thick and creamy, not runny.


4. Shape the Bread

  1. Roll the dough into a thin circle (about 18–20 cm wide).

  2. Spread the potato and cheese mixture evenly over the surface.

  3. Fold the dough inward from the edges to enclose the filling, forming a flat round shape.

  4. Gently flatten with your hands.


5. Cook in the Frying Pan

  1. Heat a non-stick frying pan over low to medium heat.

  2. Place the filled bread into the pan.

  3. Cover with a lid and cook for 4–5 minutes until the bottom is lightly golden.

  4. Flip carefully, cover again, and cook the other side for another 4–5 minutes.

Cooking slowly allows the cheese to melt fully and the bread to cook evenly.


6. Serve

  • Remove from the pan and let rest for 1–2 minutes.

  • Cut into wedges and serve warm.


Serving Ideas

  • Enjoy plain as a comforting snack

  • Serve with yogurt, sour cream, or a fresh salad

  • Pair with soup or tea for a simple meal


Storage Tips

  • Best enjoyed fresh and warm

  • Can be refrigerated for 1 day

  • Reheat gently in a frying pan for best texture

Crispy Potato and Tuna Tortilla Pockets

Crispy Potato and Tuna Tortilla Pockets

Warm, comforting tortilla pockets with a creamy filling and golden exterior

These tortilla pockets are filled with a smooth potato and tuna mixture, folded with melted cheese, and cooked until lightly golden on the outside. They are easy to prepare, satisfying, and perfect for lunch, snacks, or a simple dinner. The filling is soft and flavorful, while the tortillas provide a pleasant contrast in texture.


Ingredients

For the Filling

  • 1 large potato, boiled and mashed until smooth
    Forms the soft, comforting base of the filling.

  • Cream cheese – 1 tablespoon
    Adds creaminess and helps the filling blend smoothly.

  • Canned tuna – 1 can, well drained
    Provides protein and mild flavor.

  • Hard-boiled egg – 1, finely chopped
    Adds richness and texture.

  • Canned corn – 2 to 3 tablespoons, drained
    Brings gentle sweetness and color.

  • Fresh parsley – 2 tablespoons, chopped
    Adds freshness and aroma.

  • Chopped olives and gherkins (pickles) – a small handful
    Give balance and mild tang.

  • Salt and black pepper – optional, to taste


For Assembly and Cooking

  • Small tortillas – 4 to 6 (flour or corn)
    Soft tortillas work best for folding.

  • Shredded cheese – 1 cup (mozzarella or cheddar)
    Melts smoothly and adds richness.

  • Melted butter or olive oil – 2 tablespoons
    Helps the tortillas turn golden when cooked.

  • Optional seasoning:
    A small pinch of paprika or garlic powder for added flavor.


Equipment Needed

  • Mixing bowl

  • Spoon or spatula

  • Skillet, oven, or air fryer

  • Pastry brush (or spoon)


Step-by-Step Instructions


1. Prepare the Filling

  • While the potato is still warm, place it in a medium bowl.

  • Add the cream cheese and mix until completely smooth and well combined.

  • Add the tuna, chopped egg, corn, parsley, olives, and gherkins.

  • Stir gently until everything is evenly mixed.

  • Season lightly with salt and black pepper if desired.

The filling should be creamy, soft, and easy to spread.


2. Assemble the Tortilla Pockets

  • Place a tortilla flat on a clean surface.

  • Spoon 2–3 tablespoons of the filling onto one half of the tortilla.

  • Sprinkle a generous layer of shredded cheese over the filling.


3. Fold the Tortillas

  • Fold the tortilla over to form a half-moon shape.

  • Press gently along the edges to help it stay closed during cooking.

  • Repeat with the remaining tortillas.


4. Prepare the Exterior

  • In a small bowl, mix the melted butter or olive oil with the optional paprika or garlic powder.

  • Lightly brush both sides of each folded tortilla.

  • This helps the outside cook evenly and develop a light golden color.


5. Cook the Tortilla Pockets

Stovetop Method

  • Heat a dry skillet over medium heat.

  • Place the tortillas in the pan and cook for 2–3 minutes per side, until the cheese has melted and the outside is lightly golden.

Oven or Air Fryer Method

  • Preheat oven or air fryer to 400°F (200°C).

  • Arrange tortillas in a single layer.

  • Air fry for 5–7 minutes or bake for 10 minutes, turning once halfway through.


6. Serve

  • Remove from heat and let rest for a minute before serving.

  • Serve warm with sour cream, yogurt, salsa, or a fresh green salad on the side.


Storage and Reheating Tips

  • Best enjoyed fresh and warm

  • Refrigerate leftovers in a covered container for up to 2 days

  • Reheat in a skillet or air fryer to restore texture

MELT IN YOUR MOUTH CHICKEN

Melt in your mouth Chicken

This is one of those recipes I make over and over again. On those days when I get home late to start dinner, this is my go-to recipe. Melt in your mouth chicken is just that. It melts in your mouth.

Melt in Your Mouth Chicken is a classic recipe that’s been around for ages. Its origins are unclear, but I’m glad whoever came up with it did.

The idea of topping chicken breast with mayo and Parmesan is pure genius! The mixture turns beautifully golden post-baking, and it smells phenomenal, too.

The flavor is so rich, so creamy, and so addictive!

More importantly… OMG… the chicken is insanely tender and moist! That’s something that’s hard to come by with baked chicken breast.

Best of all, this recipe is impossible to mess up. Even if you’re a newbie in the kitchen, you can easily pull it off.

If you’re looking for a dish to shock and impress your family and friends, this is the one.

Prep time: 15-20 minutes
Cook time: 20-25 minutes
 Total time: 35-45 minutes

Ingredients:

Table of Contents

4 boneless, skinless chicken breasts

1 Cup mayonnaise

1/2 Cup Shredded Parmesan cheese

1 tsp salt

1/2 tsp black pepper

1 tsp minced garlic

1 tsp garlic powder

How To Make Melt in your mouth Chicken:

Preheat the oven to 375 degrees.

In a small bowl, add the mayonnaise, Parmesan cheese, and seasonings.

Mix to combine.

Place the chicken in a baking dish, sprayed with a non-sticking baking spray.

Spread the mixture on top of the chicken breasts.

See also  The Frittata: Your Weeknight Dinnertime Hero (Made 3 Times a Week for a Reason!)

Bake the chicken for 45 minutes, or until cooked through.

Serve warm!

Tips for Achieving Melt-in-Your-Mouth Chicken:

1. Marinate: Marinate the chicken in a mixture of acid (such as lemon juice or vinegar) and oil to help break down the proteins and tenderize the meat.
2. Pound: Pound the chicken to an even thickness to ensure it cooks evenly and prevents it from becoming tough.
3. Don’t Overcook: Cook the chicken until it reaches the recommended internal temperature, but avoid overcooking it, as this can make it dry and tough.
4. Rest: Let the chicken rest for a few minutes before serving to allow the juices to redistribute and the meat to relax.
5. Use a Meat Thermometer: Use a meat thermometer to ensure the chicken has reached a safe internal temperature.

Nutrition Information

Calories: 140-160

Protein: 25-30 grams

Fat: 3-4 grams

Saturated Fat: 1-2 grams

Cholesterol: 60-80 milligrams

Sodium: 200-250 milligrams

Carbohydrates: 0-5 grams

Fiber: 0-1 gram

Sugar: 0-1 gram

Enjoy !

Cheesy Baked Potato Casserole

Cheesy Baked Potato Casserole

Creamy • Comforting • Oven-Baked

Servings: 6–8
Prep Time: 15 minutes
Bake Time: 25–30 minutes

Ingredients

Potatoes

  • 2 lbs (about 1 kg) Yukon Gold or Russet potatoes

  • Peeled and sliced into rounds or cut into cubes

Cream Sauce

  • 1½ cups heavy cream

  • 2 garlic cloves, finely minced

  • 1 teaspoon salt

  • ½ teaspoon black pepper

Cheese

  • 2 cups shredded cheddar or mozzarella cheese

Topping

  • ½ cup cooked and crumbled bacon

  • ¼ cup freshly chopped dill or chives


Instructions

1. Boil the Potatoes

  1. Place the sliced or cubed potatoes into a large pot.

  2. Cover with salted water.

  3. Bring to a boil and cook for 8–10 minutes, just until slightly tender.

  4. Drain well and set aside.


2. Prepare the Baking Dish

  1. Preheat oven to 375°F (190°C).

  2. Lightly grease a baking dish.


3. Layer the Casserole

  1. Arrange half of the potatoes evenly in the baking dish.

  2. Sprinkle with half of the cheese and half of the bacon.

  3. Add the remaining potatoes on top.


4. Add the Cream Sauce

  1. In a bowl, whisk together the cream, garlic, salt, and black pepper.

  2. Pour evenly over the layered potatoes.


5. Bake

  1. Sprinkle the remaining cheese over the top.

  2. Bake uncovered for 25–30 minutes, until the sauce is bubbling and the top is golden.


6. Garnish and Serve

  • Sprinkle with fresh dill or chives before serving.

  • Serve warm as a side dish or main course.

Homemade Flaky Green Onion & Spinach Flatbread

Homemade Flaky Green Onion & Spinach Flatbread

This recipe creates a beautiful, multi-layered bread similar to a scallion pancake or paratha.

Ingredients

  • Dough:

    • 550g (4 1/5 cups) Flour

    • 300ml (1 1/2 cups) Warm water

    • 1 Egg

    • 1 tsp (7g) Salt

  • Filling:

    • 40g Green onions, chopped

    • 50g Fresh spinach, chopped

    • 1/2 tsp Salt

    • 1/2 tsp Red pepper flakes

    • Oil or melted butter (for brushing between layers)

Instructions

  1. Make the Dough: In a large bowl, whisk the egg into the warm water and salt. Gradually add the flour and knead until a smooth, soft dough forms. Cover and let it rest for 20 minutes to relax the gluten.

  2. Prepare Filling: Mix the chopped onions, spinach, salt, and red pepper in a small bowl.

  3. Shape & Layer: Divide the dough into equal portions. Roll one piece out into a very thin rectangle. Brush the surface lightly with oil or butter and sprinkle a generous amount of the green filling over it.

  4. Create Flakiness: Roll the dough up tightly into a long rope, then coil that rope into a spiral (like a snail shell). Flatten the spiral gently with your hand or a rolling pin. This creates the “swirled” layers seen in the photo.

  5. Cook: Heat a lightly oiled skillet over medium heat. Fry each flatbread for 3–4 minutes per side until golden brown and crispy on the outside.


Lemon, Ginger & Turmeric Immune Tonic

A refreshing and simple infusion to support your daily hydration.

Ingredients

  • 3 slices Fresh lemon

  • 2–3 slices Raw ginger

  • 1 pinch Ground turmeric or fresh root

  • 1 dash Black pepper (optional, helps with turmeric absorption)

  • Warm water

Instructions

  1. Place the lemon, ginger, and turmeric into a mug.

  2. Pour warm water over the ingredients.

  3. Let steep for 5 minutes and sip slowly.


Simple Clove Water

Ingredients

  • 3–5 Whole cloves

  • 1 cup Water

Instructions

  1. Cold Method: Place cloves in water and let sit overnight in the fridge.

  2. Hot Method: Steep cloves in hot water for 10 minutes, then remove the cloves before drinking.

4-Ingredient Homemade Crusty Bread

4-Ingredient Homemade Crusty Bread

Simple • Beginner-Friendly • Oven-Baked

Servings: 1 round loaf
Prep Time: 10 minutes
Rest Time: 1–2 hours
Bake Time: 40–45 minutes

This is a classic rustic bread with a crisp golden crust and soft, airy inside—made using just four basic ingredients.


Ingredients

  • 1½ cups warm water (370 ml)
    (Warm, not hot — about body temperature)

  • 2 teaspoons active dry yeast

  • 4 cups all-purpose flour (about 500 g)

  • 1 teaspoon salt


Step-by-Step Instructions

1. Activate the Yeast

  1. Pour the warm water into a large mixing bowl.

  2. Sprinkle the yeast over the water.

  3. Stir gently and let it sit for 5–10 minutes until slightly foamy.

This shows the yeast is ready.


2. Add Flour and Salt

  1. Add the flour and salt to the yeast mixture.

  2. Mix with a spoon or spatula until a soft, sticky dough forms.

No kneading is required.


3. First Rest (Rising Time)

  1. Cover the bowl with a clean kitchen towel or plastic wrap.

  2. Let the dough rest in a warm place for 1–2 hours, until doubled in size and bubbly.


4. Prepare for Baking

  1. Preheat your oven to 450°F (230°C).

  2. Place a heavy oven-safe pot with a lid (Dutch oven or deep casserole) inside the oven to heat for 30 minutes.


5. Shape the Dough

  1. Lightly flour your hands and work surface.

  2. Gently turn out the dough and shape it into a round loaf.

  3. Do not press out the air—handle gently.


6. Bake the Bread

  1. Carefully remove the hot pot from the oven.

  2. Place the dough inside the pot (you may line with parchment paper).

  3. Cover with the lid and bake for 30 minutes.

  4. Remove the lid and bake for an additional 10–15 minutes, until golden brown.


7. Cool Before Slicing

  1. Remove the bread from the pot.

  2. Let it cool on a wire rack for at least 20 minutes before cutting.


Helpful Tips

  • Crispy crust: Baking covered first traps steam, giving the bread its crisp exterior.

  • Soft inside: Do not cut while hot; cooling helps set the crumb.

  • Flavor options: You may add herbs, garlic powder, or seeds if desired.


Storage

  • Store at room temperature, wrapped in a clean cloth, for up to 2 days.

  • For longer storage, slice and freeze.

Crispy Air Fryer Roast Potatoes

Crispy Air Fryer Roast Potatoes

Servings: 4 | Prep Time: 10 minutes | Cook Time: 25 minutes


Ingredients

  • 1.5 lbs (≈700g) potatoes – Use a starchy variety like Russet or Yukon Gold for fluffy interiors.

  • 2–3 tbsp vegetable oil or olive oil – Helps achieve a golden, crispy exterior.

  • 1 tsp salt – Enhances flavor and helps draw out moisture for crispiness.

  • ½ tsp garlic powder – Adds a gentle, savory flavor.

  • ½ tsp dried rosemary or thyme – Aromatic herbs that complement roasted potatoes.

  • ¼ tsp black pepper – Adds a mild, warming spice.


Instructions

1. Prepare the Potatoes

  1. Peel the potatoes.

  2. Cut them into uniform 1–2 inch chunks. Uniform size ensures even cooking.

2. Parboil the Potatoes (Optional but Recommended)

  1. Place the potato chunks in a pot of salted water.

  2. Bring the water to a gentle boil.

  3. Cook for 5–8 minutes, until the edges start to soften but the centers are still firm.

  4. Drain the water thoroughly. Let the potatoes sit for 1–2 minutes to allow excess moisture to evaporate.

Tip: This step ensures the inside stays fluffy while the outside crisps beautifully.

3. Roughen the Edges

  1. Return the drained potatoes to the pot.

  2. Cover with the lid and gently shake the pot for 10–15 seconds.

  3. This creates small rough edges on the potatoes, which will become extra-crispy when cooked.

4. Season the Potatoes

  1. Transfer the potatoes to a large mixing bowl.

  2. Add the oil, salt, garlic powder, herbs, and black pepper.

  3. Toss gently but thoroughly to coat every piece evenly.

5. Preheat the Air Fryer

  1. Set the air fryer to 400°F (200°C).

  2. Allow it to preheat for 3–5 minutes.

6. Air Fry the Potatoes

  1. Place the seasoned potatoes in the air fryer basket in a single layer. Avoid overcrowding for maximum crispiness.

  2. Air fry for 20–25 minutes.

  3. Shake the basket every 10 minutes to ensure even browning.

7. Check for Doneness

  • The potatoes should be deep golden brown.

  • Tap a piece lightly; it should sound “hollow” when done.

8. Serve

  • Serve immediately while hot for the best texture.

  • These potatoes pair well with roasted meats, salads, or as a snack with a dipping sauce.


Pro Tips for Perfect Crispiness

  1. Ensure dryness: After parboiling, remove as much surface moisture as possible before tossing with oil.

  2. Cook in batches: Avoid overcrowding the air fryer basket. Air circulation is key to crisp edges.

  3. Adjust seasoning: Feel free to add paprika or onion powder for extra flavor.

Crispy Stuffed Potato Omelette

Crispy Stuffed Potato Omelette

Ingredients
5 medium potatoes, peeled and grated
2 large eggs
30 g (2 tablespoons) all-purpose flour
3 slices cooked ham
3 slices cheese (mozzarella, Swiss, or provolone)
Salt and black pepper, to taste
2 tablespoons olive oil or butter, for cooking
Optional: freshly chopped chives or parsley, for garnish

Instructions

Prepare the Potatoes
Grate the peeled potatoes using the coarse side of a box grater. Place the grated potatoes in a bowl of cold water and gently swirl them to release excess starch. Drain well. Transfer the potatoes to a clean kitchen towel or cheesecloth and squeeze firmly to remove as much moisture as possible. Well-dried potatoes help create a crisp outer texture.

Make the Potato Mixture
In a large bowl, whisk the eggs with salt, black pepper, and the flour until smooth. Add the grated, dried potatoes and mix thoroughly so every strand is evenly coated.

Cook the First Layer
Heat 1 tablespoon of olive oil or butter in a wide non-stick skillet over medium to medium-low heat. Add half of the potato mixture to the pan. Press it down gently with a spatula to form an even, round layer.

Add the Filling
When the bottom layer begins to set and hold together, arrange the ham slices over the center. Place the cheese slices on top of the ham, leaving a small border around the edges.

Seal the Omelette
Carefully spread the remaining potato mixture over the filling. Use the spatula to smooth the surface and gently seal the edges so the filling stays enclosed.

Turn and Finish Cooking
Cook slowly for about 8–10 minutes until the underside develops a rich golden color and feels firm. Place a large plate over the skillet, turn the omelette out onto the plate, then slide it back into the skillet. Add the remaining tablespoon of oil or butter if needed. Cook the second side for another 8–10 minutes until evenly golden and the cheese inside is fully melted.

Serve
Transfer the omelette to a cutting board and let it rest for about 2 minutes. Slice into wedges and serve warm. Garnish with fresh chives or parsley if desired.

Helpful Tips

Heat Control
Keep the heat moderate and steady. Gentle cooking allows the potatoes to become tender inside while developing a crisp exterior.

Variations
You can replace the ham with cooked mushrooms, sautéed onions, or fresh spinach for a meat-free option. Adding herbs such as thyme or oregano to the potato mixture also adds extra flavor.

Garlic and Herb Three-Cheese Puff Pastry Flatbread

Garlic and Herb Three-Cheese Puff Pastry Flatbread

This crispy, golden flatbread is made with flaky puff pastry and a rich blend of three cheeses, finished with fragrant garlic and fresh herbs. It’s quick to prepare and perfect as a snack, appetizer, or light meal.


Ingredients

• 1 sheet puff pastry, fully thawed
• ½ cup cream cheese, softened
• ¼ cup shredded mozzarella or cheddar
• 1 tablespoon grated Parmesan cheese
• 1 garlic clove, finely minced (or ½ teaspoon garlic powder)
• 1 tablespoon butter, melted
• 1 teaspoon fresh parsley, finely chopped
• A small pinch of salt
• A small pinch of black pepper

Optional
• 1 egg, beaten (for brushing the edges for extra shine)


Instructions

1. Oven and Tray Preparation
Preheat your oven to 400°F (200°C). Line a large baking tray with parchment paper so the pastry lifts easily after baking.

2. Prepare the Puff Pastry
Place the puff pastry onto the lined tray. Gently score a 1-inch border around the edges without cutting all the way through.
Lightly prick the center area with a fork so it stays flat while baking.

3. Make the Cream Cheese Layer
In a small bowl, mix the softened cream cheese with garlic, salt, and black pepper until smooth.
Spread evenly over the center of the pastry, staying inside the border.

4. Add the Cheese Topping
Sprinkle the shredded mozzarella evenly over the cream cheese. Finish with Parmesan for extra flavor.

5. Optional Egg Wash
Brush the outer edges with beaten egg to achieve a deeper golden color.

6. Bake
Bake for 15–20 minutes, until the edges are puffed and golden and the cheese is melted.

7. Garlic Herb Finish
Mix melted butter with chopped parsley.
Brush over the warm flatbread immediately after baking for added aroma and shine.

8. Rest and Serve
Let rest for 5 minutes. Slice into squares or triangles and serve warm.


Serving Ideas

• Pair with a fresh salad
• Add tomato slices or spinach before baking
• Serve as a snack, appetizer, or light meal


Storage Tip

Store leftovers in an airtight container in the refrigerator for up to 2 days. Reheat in the oven or air fryer for best texture.

Tomato Basil Garlic Bread

Tomato Basil Garlic Bread

Ingredients

  • Bread: 1 large baguette or Italian loaf

  • Tomatoes: 3 ripe tomatoes, finely diced

  • Garlic: 4 cloves, minced

  • Fresh Basil: 1/4 cup leaves, chopped

  • Cheese: 1/4 cup grated Parmesan (optional) or sliced fresh Mozzarella

  • Oil: 1/4 cup olive oil

  • Vinegar: 1 tablespoon balsamic vinegar

  • Seasoning: Salt and freshly cracked black pepper to taste


Instructions

1. Prepare the Topping

  • In a medium bowl, combine the diced tomatoes, minced garlic, chopped basil, olive oil, and balsamic vinegar.

  • Season with salt and pepper. Let this mixture sit for at least 15 minutes at room temperature; this allows the tomatoes to release their juices and the garlic flavor to mellow.

2. Prepare the Bread

  • Preheat your oven to 400°F (200°C).

  • Slice the baguette or Italian loaf in half lengthwise, or cut it into thick individual slices.

  • Place the bread on a baking sheet. For extra flavor, you can lightly brush the cut side of the bread with a little extra olive oil or butter.

3. Assemble

  • Using a slotted spoon (to avoid too much liquid soaking the bread), distribute the tomato mixture evenly over the bread.

  • Top with the grated Parmesan or slices of Mozzarella cheese.

4. Bake and Broil

  • Bake for 8 to 10 minutes, or until the bread is toasted and the cheese is melted.

  • For a golden, bubbly finish (as seen in the image), turn the oven to Broil for the last 1–2 minutes. Watch closely to prevent burning!

5. Garnish and Serve

  • Remove from the oven and top with an additional sprinkle of fresh basil if desired. Serve warm while the bread is at its crunchiest.


Chef’s Tips

  • Avoid Soggy Bread: If your tomatoes are very juicy, seed them before dicing. This keeps the topping flavorful without making the bread soft.

  • The Bread Choice: A sturdier Italian loaf or sourdough works better than a soft sandwich loaf because it holds up under the weight of the tomatoes.

  • Rub with Garlic: For an even deeper garlic flavor, rub a raw, halved garlic clove directly onto the toasted bread before adding the tomato topping.

Mediterranean Baked Cheesy Garlic Chicken Wraps

These cheesy garlic chicken wraps are a warm, comforting Mediterranean-inspired meal with golden, melty cheese and savory chicken. The combination of shredded chicken, mozzarella, Parmesan, and garlic with a touch of marinara sauce makes them taste like a cozy fusion of pizza and a hearty chicken wrap. Perfect for a quick dinner, meal prep, or a family-friendly dish, they’re baked until crisp on the outside and gooey on the inside.

Time

Prep time: 15 minutes

Cook time: 15–20 minutes

Total time: 30–35 minutes

Servings: 4 wraps

Ingredients

1 lb (450g) cooked chicken breast, shredded

4 large tortillas or wraps

2 cups shredded mozzarella cheese

½ cup grated Parmesan cheese

3 cloves garlic, minced

½ cup marinara or tomato sauce

2 tbsp olive oil

1 tsp dried oregano

Salt & black pepper, to taste

Fresh parsley, chopped, for garnish

Instructions

Preheat oven:

Preheat oven to 375°F (190°C). Line a baking sheet with parchment paper.

Prepare garlic oil:

In a small pan, warm olive oil over medium heat. Add minced garlic and sauté for 1–2 minutes until fragrant (don’t let it burn). Remove from heat.

Assemble wraps:

Lay tortillas flat. Spread a spoonful of marinara sauce in the center.

Add shredded chicken, mozzarella, Parmesan, oregano, and season with salt and pepper.

Drizzle lightly with garlic oil.

Wrap & bake:

Fold tortillas tightly into wraps and place seam-side down on the baking sheet.

Brush tops with remaining garlic oil for extra flavor.

See also  Pineapple and Coconut Crab Cake Cheese Ball

Bake:

Bake for 15–20 minutes, or until golden and crisp on the outside and the cheese is melted inside.

Serve:

Garnish with fresh parsley and serve warm with extra marinara for dipping.

Tips & Variations

Cheese Options—Swap mozzarella with provolone, Gouda, or even crumbled feta for a sharper Mediterranean flavor.

Sauce Upgrade—Try roasted red pepper sauce, pesto, or sun-dried tomato spread instead of marinara for a different twist.

Make it Spicy—Add red pepper flakes, chili oil, or a drizzle of hot sauce inside the wrap.

Veggie Boost—Layer in sautéed spinach, mushrooms, roasted peppers, or zucchini to make it more hearty.

Crispier Finish—Brush the tops with garlic butter instead of olive oil before baking.

Grilled Version—Instead of baking, grill the wraps on a skillet or panini press for a quicker, crispier result.

Low-Carb Swap—Use low-carb tortillas or wrap the filling in collard greens for a lighter version.

Protein Twist—Replace chicken with cooked turkey, shredded beef, or grilled shrimp.

Make-Ahead Friendly—Assemble wraps in advance, refrigerate, and bake just before serving.

Q&A

Q: Can I use rotisserie chicken instead of cooking chicken breast?
A: Yes, rotisserie chicken is a great shortcut and adds extra flavor. Just shred it and mix it with the garlic oil and cheese.

Q: Can I make these wraps ahead of time?
A: You can assemble the wraps a day in advance and refrigerate them. Bake just before serving for the best texture.

Q: What can I serve with these wraps?
A: They pair well with a side salad, roasted vegetables, or a small bowl of Greek yogurt dip.

See also  Potato Classic Recipe

Q: Can I freeze these wraps?
A: Yes, wrap them tightly in foil or plastic wrap before baking. Freeze for up to 2 months. Bake straight from frozen, adding 5–10 minutes to cooking time.

Q: How can I make them more Mediterranean-style?
A: Swap marinara for roasted red pepper spread, add Kalamata olives, or mix in crumbled feta cheese with the chicken.

Nutrition

(per wrap, approx.)

Calories: 480–520

Protein: 38g

Carbohydrates: 32g

Fat: 23g

Fiber: 3 g

Sugar: 3 g

(Values will vary depending on tortilla size, type of cheese, and sauce used.)

Conclusion

These Mediterranean Baked Cheesy Garlic Chicken Wraps are warm, melty, and full of flavor. With cheesy chicken, garlicky olive oil, and a touch of marinara, they’re hearty enough for dinner but simple enough for weeknights. They’re also versatile—you can swap in your favorite cheeses, sauces, or proteins for endless variations. Whether you enjoy them fresh out of the oven or prep ahead for a quick meal, these wraps are a comforting Mediterranean-inspired dish that everyone will love.

Green Olive Dip – Creamy, Tangy & Flavorful

A smooth and savory dip made with tangy green olives, creamy cheese, and fresh lemon juice. Perfect for parties, game nights, or as a quick appetizer.

Ingredients:

  • 1 cup pitted green olives (Castelvetrano, Manzanilla, or Kalamata green)
  • 8 oz (225g) cream cheese, softened
  • 1/2 cup sour cream or Greek yogurt
  • 1/4 cup mayonnaise
  • 2 cloves garlic, finely minced
  • 2 tbsp fresh lemon juice
  • Optional garnish: chopped parsley, chives, or a pinch of red pepper flakes

Instructions:

  1. Mix the base: In a medium bowl, beat the softened cream cheese, sour cream, and mayonnaise until smooth and creamy.
  2. Add flavor: Stir in the garlic and lemon juice.
  3. Fold in olives: Roughly chop the green olives and mix them into the creamy base.
  4. Customize: Add herbs (parsley, chives) or a little red pepper flakes if you want extra flavor.
  5. Chill & serve: Cover and refrigerate for at least 30 minutes before serving for best flavor.
  6. Enjoy: Serve with crackers, toasted crostini, pita chips, or fresh veggies.

 Q&A Section

Q1: Can I make this dip ahead of time?
👉 Yes! It tastes even better if made a few hours or a day before, since the flavors develop while chilling.

Q2: What type of olives works best?
👉 Castelvetrano olives are buttery and mild, while Manzanilla olives are briny. You can even mix different olives for a unique taste.

Q3: Can I make it healthier?
👉 Replace cream cheese with light cream cheese and mayonnaise with extra Greek yogurt.

See also  10-Minute No-Bake Chocolate Cheesecake

Q4: How long does it last in the fridge?
👉 Store in an airtight container for up to 3–4 days. Stir before serving.

Q5: Can I make it spicy?
👉 Yes! Add a dash of cayenne, red pepper flakes, or even a little jalapeño for a kick.

Q6: What pairs well with this dip?
👉 Crackers, sliced baguette, celery sticks, cucumber, carrot sticks, or pita bread.

Crispy Parmesan Garlic Roasted Potatoes

Crispy Parmesan Garlic Roasted Potatoes

The ultimate “hero” side dish: golden-brown and crispy on the outside and buttery-soft on the inside.

  • Prep time: 10 minutes

  • Cook time: 30 minutes

  • Total time: 40 minutes

  • Servings: 6-8

Ingredients

  • 3 lbs small red-skinned potatoes, halved (keep the skins on!)

  • 2 tbsp refined olive oil

  • 5 cloves fresh garlic, finely crushed

  • 1 tsp dried thyme

  • ½ tsp dried oregano

  • ½ tsp dried basil

  • ⅓ cup finely shredded or grated aged Parmesan cheese

  • To taste: Coarse sea salt and freshly ground black pepper

  • 2 tsp unsalted butter, melted (for the finish)

  • 2 tsp fresh parsley, finely chopped (for garnish)

Instructions

  1. Preheat & Prep: Preheat your oven to 400°F (200°C). Lightly coat a large baking sheet with cooking spray or a thin layer of oil.

  2. Season the Potatoes: In a large mixing bowl, combine the halved potatoes, olive oil, crushed garlic, thyme, oregano, basil, and Parmesan cheese.

  3. Toss: Add a generous pinch of coarse salt and black pepper. Toss vigorously until every potato is evenly coated in the oil, herbs, and cheese.

  4. Arrange: Spread the potatoes onto the prepared sheet pan in a single layer. For the best results, try to place as many as possible cut-side down—this creates that “gourmet” crispy crust.

  5. Roast: Bake for a total of 30 minutes.

  6. Flip: At the 15-minute mark, use a spatula to flip the potatoes. This ensures they get golden-brown on all sides and prevents the garlic from burning.

  7. Final Touch: Once the potatoes are tender and crispy, remove them from the oven. Immediately drizzle with the melted butter and sprinkle with fresh parsley.

  8. Serve: Best enjoyed hot right off the pan!


Pro-Tips for Success

  • The Dry Secret: If you wash your potatoes right before cooking, pat them completely dry with a towel. Moisture creates steam, which leads to soggy potatoes rather than crispy ones.

  • Sheet Pan Space: Don’t crowd the pan! If the potatoes are piled on top of each other, they will steam. Use two pans if necessary to keep them in a single layer.

  • Leftovers: These stay good in the fridge for up to 5 days. To bring back the crunch, pop them in an air fryer at 350°F for 3–5 minutes.

Air Fryer Garlic Parmesan Potato Rounds

Air Fryer Garlic Parmesan Potato Rounds

Crisp on the outside, tender on the inside, with garlic and cheese flavor

These air fryer potato rounds are evenly sliced, lightly seasoned, and cooked until golden and crisp. Garlic and Parmesan add depth of flavor, while the air fryer method uses a modest amount of oil to achieve a satisfying texture. This recipe works well as a side dish, snack, or appetizer.


Recipe Overview

  • Prep Time: 15 minutes

  • Soaking Time: 20 minutes

  • Cook Time: 16–18 minutes

  • Total Time: About 55 minutes

  • Servings: 4


Ingredients

For the Potatoes

  • 4 medium potatoes, scrubbed clean and sliced into ½ cm (¼-inch) rounds

  • 2 tablespoons olive oil or avocado oil

  • 3 cloves garlic, finely minced

  • 1 teaspoon sea salt

  • ½ teaspoon freshly ground black pepper

  • ½ teaspoon smoked paprika (optional)

For Finishing

  • ⅓ cup freshly grated Parmesan cheese

  • 1 tablespoon fresh parsley, finely chopped

  • A small pinch of red pepper flakes (optional)


Step-by-Step Instructions

1. Prepare the Potatoes

  • Wash and scrub the potatoes thoroughly.

  • Leave the skins on for texture and flavor.

  • Slice evenly into ½ cm (¼-inch) rounds using a sharp knife or mandoline for uniform thickness.


2. Soak for Better Texture

  • Place the sliced potatoes in a large bowl.

  • Cover with cold water and add 1 teaspoon salt.

  • Let soak for 20 minutes to remove excess surface starch, which helps with even browning.


3. Drain and Dry

  • Drain the potatoes completely.

  • Pat them very dry with a clean kitchen towel or paper towels.

  • Removing surface moisture helps the potatoes cook evenly.


4. Season the Potatoes

  • Transfer the dried potato slices to a large mixing bowl.

  • Add olive oil, minced garlic, salt, black pepper, and smoked paprika (if using).

  • Toss gently until every slice is evenly coated.


5. Air Fry

  • Preheat the air fryer to 200°C (390°F) for 3 minutes.

  • Arrange the potato slices in a single layer in the basket.

  • Cook in batches if needed to avoid overlapping.

  • Air fry for 10 minutes, then flip each slice.

  • Continue cooking for 6–8 minutes, until golden and lightly crisp at the edges.


6. Finish and Serve

  • Transfer the hot potato rounds to a serving bowl or platter.

  • Immediately sprinkle with Parmesan cheese and chopped parsley.

  • Add a small pinch of red pepper flakes if desired.

  • Serve warm.


Helpful Tips & Variations

  • Even cooking: Uniform slices ensure consistent texture.

  • Cheese options: Pecorino Romano can be used for a sharper flavor.

  • Batch cooking: Avoid stacking slices for best results.

  • Serving time: These are best enjoyed shortly after cooking.

  • Flavor additions: Try dried herbs or a squeeze of lemon before serving.


Serving Suggestions

  • Serve with yogurt-based sauce, garlic dip, or ranch-style dressing

  • Pair with grilled vegetables, chicken, or fish

  • Add to salads for added texture


Approximate Nutrition (Per Serving)

  • Calories: ~180

  • Protein: 4 g

  • Carbohydrates: 26 g

  • Fat: 7 g

  • Fiber: 3 g