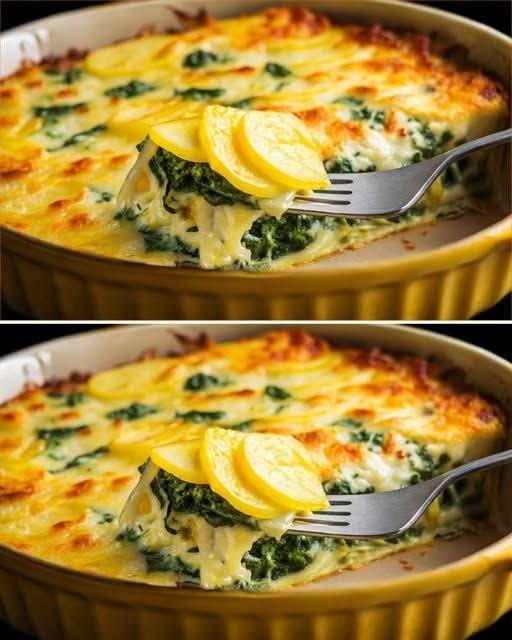
Baked Potatoes with Creamy Spinach and Cheese
If you’re craving a comforting dish that’s as satisfying as it is delicious, this Easy Baked Potatoes with Creamy Spinach and Cheese recipe is here to save the day. Imagine perfectly baked potatoes layered with a rich and velvety creamy spinach and cheese sauce. Each bite is a delightful blend of soft potatoes and gooey cheese, topped off with a crispy golden layer. It’s a dish that’s sure to impress both family and friends, perfect for any gathering or cozy night in.
Recipe Summary
Prep Time: 20 minutes
Cook Time: 25 minutes
Total Time: 45 minutes
Servings: 4
Estimated Calories: 450 per serving
Ingredients
500 g (about 1 lb) potatoes, sliced
Salt, to taste
1 onion, sliced into half rings
Olive oil, as needed
1 carrot, grated
2 garlic cloves, chopped
30 g (about 2 tablespoons) butter
Black pepper, to taste
40 g (about 1/3 cup) flour
400 ml (about 1 ¾ cups) milk
200 g (about 7 oz) spinach
70 g (about ½ cup) Parmigiano Reggiano, grated
100 g (about 1 cup) mozzarella, grated
Instructions
Place the sliced potatoes in a pot and cover them with hot salted water. Cook until just al dente. Then, drain the potatoes.
In a pan, heat some olive oil over medium heat. Add the sliced onion and cook until soft.
Add the grated carrot and chopped garlic to the pan. Sauté briefly until fragrant.
Add the butter to the pan and let it melt. Season with salt and pepper.
Stir in the flour and cook for 1 minute to remove the raw flavor.
Gradually add the milk while stirring continuously to form a smooth sauce.
Add the spinach to the sauce and cook until wilted and thickened.
Stir in the grated Parmigiano Reggiano and remove the pan from heat.
Grease a baking dish with olive oil. Spread a layer of the cooked potatoes, followed by a layer of the spinach cream. Repeat the layers if desired.
Finish with a generous topping of grated mozzarella.
Bake in a preheated oven at 200°C (about 392°F) for 15 minutes until bubbly and lightly golden.
Remove from the oven and serve hot.
Why This Recipe Is Popular
This Easy Baked Potatoes with Creamy Spinach and Cheese recipe strikes a perfect balance between comfort and flavor. It evokes a sense of nostalgia for many home cooks while also being easy enough for weeknight dinners. Plus, the combination of creamy spinach and melted cheese is simply irresistible, making it a popular go
-to for gatherings and family meals.
Serving Suggestions
These baked potatoes make a fantastic main course all on their own but pair wonderfully with a fresh side salad or roasted vegetables. They’re perfect for a cozy dinner or as a warm addition to a potluck.
Tips and Variations
Storage: Leftovers can be stored in an airtight container in the fridge for up to 3 days. Reheat in the oven for best results.
Texture: For extra crispy edges, place under the broiler for a minute or two after baking.
Flavor Variations: Feel free to add cooked chicken or bacon to the layers for added protein and flavor.
Spinach Swap: If you don’t have fresh spinach, frozen spinach can be used. Just ensure it’s thoroughly drained before adding.
Herb Boost: Add a pinch of nutmeg or some fresh herbs like thyme or basil for extra depth of flavor.
FAQ
Can I use other cheeses?
Yes, feel free to substitute other cheeses like cheddar or gouda based on your preference.
How do I make this recipe vegetarian?
This recipe is already vegetarian. Just ensure any broth or seasonings used are also vegetarian-friendly.
Can I prepare this ahead of time?
Yes, you can prepare it up to the baking step and store it in the fridge until you’re ready to bake.
What dishes accompany baked potatoes?
These baked potatoes pair well with grilled meats, lemon chicken, or even a light tomato salad.
If you’re ready for a dish that’s both comforting and easy to make, give this Easy Baked Potatoes with Creamy Spinach and Cheese recipe a try. You’ll love how simple and delicious it is! [Link to similar recipe] [Link to baking/cooking tips guide] [Link to related dessert or dish

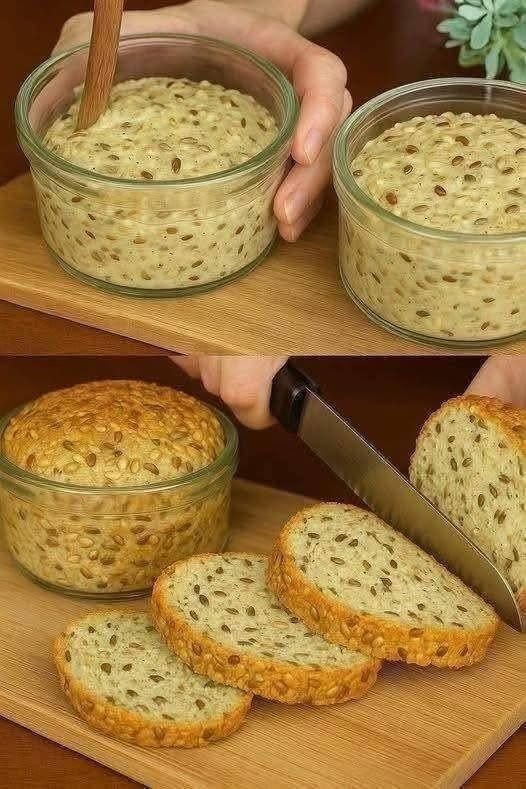
 Bread in a Jar (1–2 Servings)
 Ingredients
 Instructions
 Oven Option (Better Texture)
 Tips
Tips Important Notes