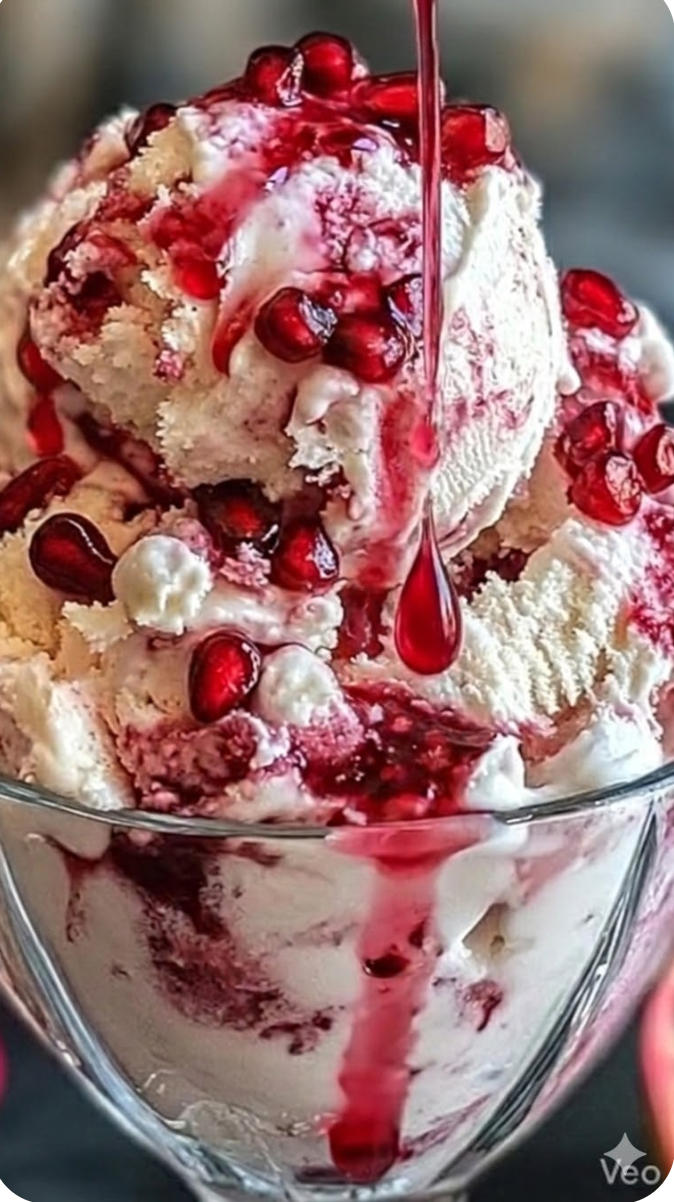
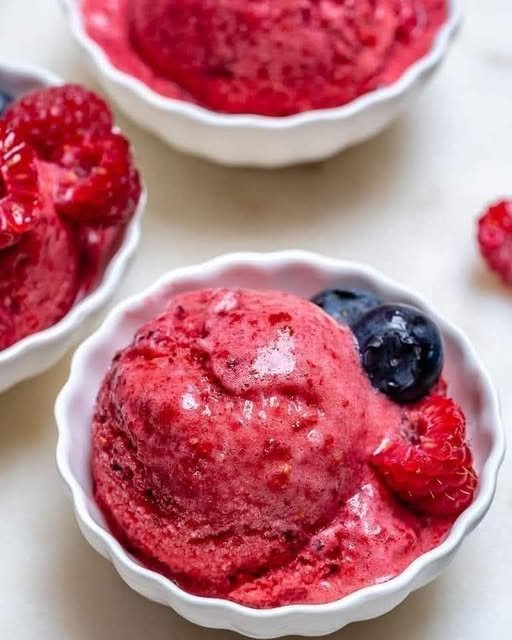
HasselBack Scalloped Potatoes Recipe

An easy and delicious recipe for cheesy, garlicky, crazy-delicious Hasselback Scalloped Potatoes. They are the perfect side dish for a family dinner!

 Prep Time: 10minutes

 Cook Time: 1hour

 Total Time: 1hour 10minutes

 Servings8 servings

Ingredients:

For the potatoes
  • 2 pounds Yukon gold potatoes
  • 2 tablespoons butter melted
  • 2 tablespoons olive oil
  • 1/4 teaspoon salt
  • 1/4 teaspoon black pepper ground
For the sauce
  • 3 tablespoons butter
  • 3 tablespoons all-purpose flour
  • 3 cups milk
  • 2 medium garlic cloves minced
  • 1/2 teaspoon salt adjust to your tastes
  • 1/2 teaspoon black pepper ground
  • 2 cups cheddar and Colby cheese grated

Instructions:

For the potatoes
  1. Place a potato between the handles of 2 wooden spoons or 2 chopsticks.
  2. Slice the potato into thin slices, leaving 1/4 inch at the bottom unsliced. (The spoon handles will prevent you from slicing the potato all the way through.)
  3. Cut all the potatoes this way and place in a 7×11-inch casserole dish, skillet, or another oven-safe dish.
For the sauce
  1. Combine melted butter, oil, salt, and pepper and brush or pour over the potatoes.
  2. Bake in a 425-degree oven for 40 to 50 minutes. Baking time will depend on how large your potatoes are.
  3. Meanwhile, in a medium saucepan on medium heat melt 3 tablespoons butter.
  4. Add the flour and minced garlic and cook, stirring for 1 minute.
  5. Add the milk, whisking while you slowly add it. Bring to a boil and simmer until the sauce is thick.
  6. Remove the sauce from the heat and stir in 1 cup of the cheese, salt, and pepper. Stir until the cheese is melted.
  7. When potatoes are fork tender, remove them from the oven and pour the sauce over the potatoes.
  8. Sprinkle the remaining cheese on top of the potatoes and return to the oven at 350 degrees for 15 to 20 minutes.
  9. Cool 10 minutes before serving.
NUTRITIONAL INFO:

Calories: 330kcal | Carbohydrates: 30.2g | Protein: 10.1g | Fat: 18.2g | Saturated Fat: 8.9g | Sodium: 200mg | Fiber: 2.3g | Sugar: 1.1g

Garlic Chicken Stir Fry Recipe

This garlic chicken stir fry is a quick and easy dinner that’s perfect for those busy weeknights. Cubes of chicken are cooked with colorful veggies and tossed in a flavorful garlic sauce for a meal that’s way better than take out!

Stir fry is almost a complete meal by itself. Just add some Egg Rolls, a Fruit Salad and some Cream Cheese Wontons for a complete meal!

When I am looking for a speedy dinner, I often turn to stir fry. It’s so easy to make and super versatile. It is fast and easy and curbs that temptation to hit the drive-thru. Stir fry is also a guarantee that I can get my kids to eat their vegetables. They love the combination of chicken and sauce. It is always a meal I can count on to feed the masses and they will leave the table with full bellies and smiles.

This garlic chicken stir fry is a quick and easy dinner that’s perfect for those busy weeknights! Cubes of chicken are cooked with colorful veggies and tossed in a flavorful garlic sauce for a meal that’s way better than take out!

PREP TIME: 5MINS

COOK TIME: 15MINS

TOTAL TIME: 20MINS

SERVINGS: 4 PEOPLE

Ingredients:

  • 1 lb. Boneless skinless chicken breast cut into cubes
  • 1 tbsp + 1 tsp Olive oil divided
  • 1 Yellow bell pepper sliced
  • 1 c Sliced mushrooms
  • 2-3 c Broccoli Florets
  • 4 Cloves garlic minced
  • Salt and pepper to taste
  • 1 tbsp Soy sauce
  • ¾ c. Chicken broth
  • 1 ½ tsp Sugar
  • 2 tsp Sesame oil
  • 2 tsp Cornstarch
How To Make Garlic Chicken Stir Fry
  1. Heat 1 tbsp of olive oil in a skillet over medium-high heat.
  2. Add the broccoli, sliced mushrooms and yellow bell pepper to the heated skillet, and cook for 5-6 minutes until the vegetables begin to become tender. Remove the vegetables, cover them and set aside for later.
  3. Place one teaspoon of olive oil in the heated skillet, and add the chicken breast pieces. Cook until the chicken is no longer pink in the center and cooked through. Add salt and pepper to taste.
  4. Mix the vegetables back into the skillet.
  5. In a separate bowl, combine the soy sauce, sugar, chicken broth, sesame oil and cornstarch, and mix well.
  6. Pour the sauce over the chicken and vegetables in the skillet, and stir to coat. Cook for 2-3 minutes until everything is coated well and the sauce has thickened.
  7. Serve over white rice if you desire.
NUTRITIONAL INFO:

Serves: 4

Calories183kcal (9%)

Carbohydrates 7g (2%)

Protein 26g (52%)

Fat 5g (8%)

Saturated Fat1g (5%)

Cholesterol 73mg (24%)

Sodium554mg (23%)

Potassium676mg (19%)

Fiber 1g (4%)

Sugar 2g (2%)

Vitamin A235IU (5%)

Vitamin C79.9mg (97%)

Calcium 22mg (2%)

Iron 1mg (6%)

Creamy Mashed Potato Salad Recipe

Creamy Mashed Potato Salad is a deliciously different way to enjoy leftover Mashed Potatoes!

Need a last-minute salad but all you have are leftovers? This take on a favorite Potato Salad uses up your leftovers and a handful of ingredients you likely have on hand.

Recipe Tips:
  • No leftover mashed potatoes? Use leftover roasted potatoes and give them a little squish with a masher.
  • Make hard-boiled eggs the day before and keep them in the refrigerator until they are ready to use (the air fryer is the easiest way to do this). This will help keep the salad cold!
  • Make an extra batch of the dressing, it’s great on macaroni salad too!
  • The dressing will keep in the refrigerator for up to 2 weeks in a salad dressing cruet or mason jar


PREP TIME: 15minutes

COOK TIME: 9minutes

TOTAL TIME: 24minutes

SERVINGS: 6

This flavorful Mashed Potato Salad is the perfect way to use up leftover mashed potatoes. Sour cream & vinegar, plus mayo give it a delicious creamy tang!

INGREDIENTS:

  • 3-4 cups prepared mashed potatoes leftover
  • 4 hard-boiled eggs chopped (optional)
  • 1 cup celery diced
  • 3 green onions sliced
  • ¼ teaspoon paprika for garnish, optional

Dressing

  • ½ cup mayonnaise
  • ¼ cup sour cream
  • ¼ cup relish (sweet or dill pickle)
  • 2 tablespoons cider vinegar
  • 1 ½ tablespoons yellow mustard or dijon
  • 1 teaspoon sugar
  • ½ teaspoon salt or to taste
  • ½ teaspoon pepper or to taste
  • ¼ teaspoon garlic powder

INSTRUCTIONS:

  1. Mix all dressing ingredients in a bowl.
  2. Combine mashed potatoes with dressing & remaining ingredients. Mix well.
  3. Refrigerate at least one hour before serving.

Notes:

This recipe is intended to be made with leftover mashed potatoes which have a creamy consistency from the addition of butter & milk with seasonings.

If you are making mashed potatoes for this recipe specifically, cook about 1 ½ to 2 pounds potatoes. Peel & boil 15 minutes or until tender. Add butter, milk, seasonings & mash. Cool completely in the fridge before using in this recipe.

NUTRITIONAL INFO:

Calories: 324, Carbohydrates: 30g, Protein: 8g, Fat: 20g, Saturated Fat: 4g, Trans Fat: 1g, Cholesterol: 137mg, Sodium: 561mg, Potassium: 471mg, Fiber: 3g, Sugar: 3g, Vitamin A: 445IU, Vitamin C: 26mg, Calcium: 52mg, Iron: 1mg

Cucumber Bites Recipe

Quick, easy, and fresh, these cucumber bites are the perfect cold appetizer with a dill cream cheese mixture piped on top of cucumber slices and topped with juicy tomatoes.

Prep Time: 15mins

Cook Time: 0mins

Total Time: 15mins

Servings: 24 

INGREDIENTS:

  • 2 cucumbers
  • 4 ounces cream cheese, softened
  • 1 tablespoon mayonnaise
  • 3 tablespoons Ranch dressing
  • 1 tablespoon fresh dill, minced fine
  • ¼ teaspoon garlic salt
  • ¼ teaspoon Italian seasoning
  • 12 cherry or grape tomatoes
  • Black pepper, for garnish

INSTRUCTIONS:

  1. Wash, peel, and slice the cucumbers into half-inch slices discarding the ends.
  2. Remove a little of the center of the cucumber with a small measuring spoon making a divot in the cucumber.
  3. Mix together the cream cheese, mayonnaise, and ranch dressing until smooth and creamy.
  4. Add dill, garlic salt, and Italian seasoning and mix until combined.
  5. Place the filling into a piping bag with a star tip and pipe about 1 tablespoon of filling onto each cucumber.
  6. Slice the tomatoes in half and place a piece onto each cucumber filling.
  7. Sprinkle with black pepper and serve.

Notes: 

A small melon baller would also work to make the divots in the center of the cucumbers.

Make sure your cream cheese is at room temperature so that it blends well with the rest of the ingredients and doesn’t leave lumps.

No piping or pastry bag? Fill a sandwich baggie and clip the corner off.

SUBSTITUTIONS AND ADDITIONS:

MAYONNAISE: You could also substitute the mayonnaise for plain Greek yogurt or sour cream in this easy recipe if you’d like.

TOMATOES: You could also top them with red bell peppers.

CREAM CHEESE: If you want to change up the flavor of the cream cheese mixture on top or to save time and eliminate the fresh herbs and spices (you’ll still need to add the ranch dressing and mayo to thin it out), there are plenty of herbed cream cheese flavors available that would be delicious

GARNISH: You could top these bites with sesame seeds, poppy seeds, or chives as well. If you like a little kick, you could add finely chopped jalapeno or crushed red pepper flakes.

VARIATIONS: Cucumbers are the perfect base for lots of yummy toppings. You could also top them with buffalo chicken dip, smoked salmon, hummus, egg salad, or tuna salad.

NUTRITIONAL INFO:

Calories: 33.79kcal | Carbohydrates: 1.21g | Protein: 0.53g | Fat: 3.08g | Saturated Fat: 1.14g | Cholesterol: 6.06mg | Sodium: 64.55mg | Potassium: 60.67mg | Fiber: 0.29g | Sugar: 0.78g | Vitamin A: 152.26IU | Vitamin C: 2.03mg | Calcium: 9.56mg | Iron: 0.12mg

Prime Rib Recipe

The only prime rib recipe you’ll ever need. Follow our step-by-step instructions for a prime rib roast that’s cooked to perfection. It’s a must for holidays and special gatherings!

PREP TIME: 5 mins

COOK TIME: 2 hrs 30 mins

BRING TO ROOM TEMP: 3 hrs

TOTAL TIME: 5 hrs 35 mins

SERVINGS: 10 servings

YIELD: 1 (10-pound) rib roast

Older cookbooks will sometimes instruct you to remove excess fat from the roast. “Excess” fat is any fat more than an inch thick on the roast. Fat is what you need to give the roast flavor and to make it juicy and tender. Prime rib is expensive and you are paying good money for that fat, so leave it on. Your butcher should have removed any excess fat already.

The most important piece of advice I can give you regarding cooking a prime rib roast is to use a good meat thermometer! With a remote thermometer, you can tell exactly what the temperature of the meat is without having to open the oven door.

Ingredients:

For the prime rib roast
  • 1 (10-pound) standing rib roast, 3 to 7 ribs (estimate serving 2-3 people per rib), bones cut away from the roast and tied back to the roast with kitchen string (ask your butcher to prepare the roast this way)
  • Salt
  • Freshly ground black pepper
For the gravy
  • 1/4 cup fat and drippings from the pan
  • 1/4 cup all-purpose flour
  • 3 to 4 cups water, milk, stock, or beer
  • Salt, to taste
  • Freshly ground black pepper, to taste

Method:

Salt the roast and let sit at room temp:

Remove the beef roast from the refrigerator 3 hours before you start to cook it. Sprinkle it with salt all over and let it sit, loosely wrapped in butcher paper. Roasts should be brought close to room temperature before they go into the oven to ensure more even cooking.

Tie with kitchen string:

If your butcher hasn’t already done so, cut the bones away from the roast and tie them back on to the roast with kitchen string. This will make it much easier to carve the roast, while still allowing you to stand the roast on the rib bones while cooking.

Preheat the oven and season the roast:

Preheat your oven to 500°F (or the highest temp your oven reaches, if it’s less than 500°F). Pat the roast dry with paper towels (pre-salting should have made the roast release some moisture), and sprinkle the roast all over with salt and pepper.

Place the roast fat-side-up in a roasting pan:

Insert an ovenproof meat thermometer into the thickest part of the roast, making sure that the thermometer isn’t touching a bone.

There are so many variables involved that affect cooking time, this is why you should use a meat thermometer. A prime rib roast is too expensive to “wing it”. Err on the rare side, you can always put the roast back in the oven to cook it a bit longer, if it’s too rare for your tastes.

Brown the roast at high temperature:

Brown the roast at 500°F (or as high as your oven will go) for 15 minutes.

Lower the oven to 325°F to finish roasting:

Reduce the oven temperature to 325°F. Roast in the oven until the thermometer registers 115°F for rare or 120° for medium rare, and 130°F for medium.

To estimate the total cooking time, allow about 11 to 12 minutes per pound for rare and 13 to 15 minutes per pound for medium rare. The actual cooking time will depend on the shape of the roast, how chilled your roast still is when it goes into the oven, and your particular oven. A flatter roast will cook more quickly than a thicker one. A chilled roast will take more time than one closer to room temp.

Check the temperature of the roast using a meat thermometer an hour before you expect the roast to be done. For example, with a 10 pound roast, you would expect 2 hours of total cooking time for rare (15 minutes at 500° and 1 3/4 hours at 325°). In this case, check after 1 hour 15 minutes of total cooking time, or 1 hour after you lowered the oven temp to 325°. (A benefit of using a remote thermometer is that you don’t have to keep checking the roast, you’ll be able to see exactly what the temperature is by looking at the thermometer outside of the oven.)

Simple Tip!

If the roast is cooking too quickly, lower the oven temperature to 200°F.

Let the roast rest:

Once the roast has reached the temperature you want, remove it from the oven and place it on a carving board. Cover it with foil and let it rest for 15 to 30 minutes before carving. The internal temperature of the roast will continue to rise while the roast is resting.

Slice the roast:

Cut away the strings that were used to hold the roast to the rack of rib bones. Remove the bones (you can save them to make stock for soup later.)

Then, using a sharp carving knife, slice meat across the grain for serving, making the slices about 1/2-inch to 3/4-inch thick.

Make the gravy:

To make the gravy, remove the roast from the pan. Remove excess fat, leaving 1/4 cup of fat plus the browned drippings and meat juices in the roasting pan.

Place the roasting pan on the stovetop on medium high heat. Use a metal spatula to scrape up drippings that might be sticking to the pan.

When the fat is bubbly, sprinkle 1/4 cup of flour over the fat and drippings in the pan.

Stir with a wire whisk to incorporate the flour into the fat. Let the flour brown (more flavor that way and you don’t have the taste of raw flour in your gravy.)

Slowly add 3 to 4 cups of water, milk, stock, or beer to the gravy. Continue to cook slowly and whisk constantly, breaking up any flour lumps.

The gravy will simmer and thicken, resulting in about 2 cups of gravy.

Season the gravy with salt and pepper and herbs to taste.

Nutrition Facts (per serving)

|677|CALORIES|54g|FAT|0gCARBS|0g|PROTEIN|45g|

Cranberry Salad Recipe

This creamy cranberry salad is a blend of fresh cranberries, pineapple, marshmallows, pecans, coconut and apples, all tossed in a creamy dressing. A unique and colorful salad that’s perfect for the holidays!

I’m always looking for fun ways to serve cranberries other than your standard cranberry sauce. This cranberry salad is perfectly sweet and full of different flavors and textures. If you are a cranberry fan, make sure to also bake up a loaf of fresh cranberry bread to celebrate the season!

HOW DO YOU MAKE CRANBERRY SALAD?

This recipe starts with a bag of fresh cranberries. The cranberries are chopped, then mixed with sugar. The cranberries need to sit in the sugar for at least 3 hours to temper some of the natural tart flavor of the berries.

Cranberry salad garnished with cranberries, marshmallows, pecans and apples.

This creamy cranberry salad is a blend of fresh cranberries, pineapple, marshmallows, pecans, coconut and apples, all tossed in a creamy dressing. A unique and colorful salad that’s perfect for the holidays!

Prep Time: 10mins

Cook Time: 1mins

Chill Time: 3hrs

Total Time: 11mins

Servings: 10

Ingredients:

  • 12 ounces fresh cranberries chopped
  • 2/3 cup granulated sugar
  • 1 cup chopped apple I use Granny Smith
  • 1 cup chopped pineapple fresh or canned
  • 1 cup miniature marshmallows
  • 1/2 cup chopped pecans
  • 1/4 cup shredded coconut
  • 8 ounces frozen whipped topping thawed
  • fresh cranberries, apples and marshmallows for garnish optional

Instructions:

  1. Place the cranberries and sugar in a glass or plastic bowl (do not use metal). Stir to combine.
  2. Cover the bowl and chill for at least 3 hours.
  3. Add the apple, pineapple, marshmallows, pecans and coconut to the bowl.
  4. Add the whipped topping to the bowl and fold gently to combine all the ingredients. Garnish with additional cranberries, apples and marshmallows if desired, then serve.

Nutritional Info:

Calories: 178kcal | Carbohydrates: 27g | Protein: 1g | Fat: 7g | Saturated Fat: 3g | Sodium: 27mg | Potassium: 99mg | Fiber: 2g | Sugar: 22g | Vitamin A: 45IU | Vitamin C: 12.4mg | Calcium: 25mg | Iron: 0.3mg

Chicken Fitters Recipe

If you’re looking for some delicious chicken snacks, these Chicken Fritters are perfect for you! They’re fried chicken patties that are crispy on the outside, and soft, juicy, and tender on the inside with a hint of garlic! You’re going to instantly fall in love with them as soon as you have a bite!

This chicken fritters recipe is special because it combines the classic flavors of fried chicken with a unique twist. The fritters are made with a combination of chicken breasts, garlic, onion, and seasonings that give them an amazing flavor.

These Chicken Fritters are quick and easy to make and are crispy on the outside, and soft, juicy, and tender on the inside with a hint of Garlic

Ingredients:

  • 5 lbs. – chicken breast
  • 2 large – eggs
  • 1 small – yellow onion
  • 2 large – garlic cloves
  • ¼ cup – mayonnaise
  • 1 tsp. – Mrs. Dash seasoning
  • 1 tsp. – salt (or to taste)
  • ¼ tsp. – black ground pepper (or to taste)
  • ½ cup – flour
  • Olive oil for sautéing

Instructions:

How to Prep Chicken for Chicken Fritters
  1. Start by soaking clean chicken breasts in cold water for a couple of hours, and changing the water periodically. This is certainly optional, but it’s my preferred way to cook meat while ensuring that it’s thoroughly clean.
  2. Cut all fat off the chicken breasts and rinse well, again. Place clean beasts into a strainer for excess water to drain.
  3. Then cut the chicken into tiny cubes, about ¼”. Place chicken cubes into a large mixing bowl for easier mixing.
How to Make Chicken Mixture for Chicken Fritters
  1. Next, add eggs, shredded yellow onion, crushed garlic, mayonnaise, Mrs. Dash seasoning, salt, and black ground pepper to the chicken.
  2. Stir everything together, then add flour and mix it again. The mixture should thicken a little after adding the flour.
How to Cook Chicken Fritters
  1. Now heat a large non-stick skillet or large frying pan over medium-low heat. That will be 3.5 if your stove is digital.
  2. Add 2-3 tablespoons of olive oil to the pan. When oil gets hot, place one large ice cream scoop of chicken mix onto the pan and pat down to flatten into a fritter.
  3. I like to cover the pan with a Frying Pan Splatter Screen Guard as the fritters splatter during sautéing, the guard contains most of the splatter. A regular lid traps the steam while a screen guard releases the steam but contains the splattering.
  4. This is an optional step but I love the results with it; I’ve noticed that covering with a pan lid causes the fritters to water, release their juice, then later become too dry.
  5. Sauté fritters for 5 minutes on each side. I prefer sautéing a tad longer on a lower temp to ensure the meat is well done. Then flip the fritters over and sauté for 5 more minutes.
  6. Once done, place sautéed fritters onto a plate or cutting board lined with paper towels to soak in excess oil, then place the fritters onto a serving dish of your choice before transferring another set of sautéed fritters to the lined paper towel surface.
  7. You may need to replace the paper towels every couple of batches as they get oily fast.

Banana Bread Recipe

PREP TIME: 10 mins

COOK TIME: 60 mins

TOTAL TIME: 70 mins

SERVINGS: 8 to 10 servings

YIELD: 1 loaf

No need for a mixer for this recipe! Clean-up is easy, too. If you want, you can mix everything in one bowl.

This recipe calls for an 8- x 4-inch loaf pan. If you are baking in an 8 1/2- x 4 1/2-inch pan, bake for 47 to 57 minutes. If baking in a 9- x 5-inch pan, bake for 45 to 55 minutes. Note that the larger pan size will produce a flatter loaf.

The best bananas to use for banana bread are those that are over-ripe. The yellow peels should be at least half browned, and the bananas inside squishy and browning.

Ingredients:

  • 2 to 3 medium (7″ to 7-7/8″ long) very ripe bananas, peeled (about 1 1/4 to 1 1/2 cups mashed)
  • 1/3 cup (76g) butter, unsalted or salted, melted
  • 1/2 teaspoon baking soda (not baking powder)
  • 1 pinch salt
  • 3/4 cup (150g) sugar (1/2 cup if you would like it less sweet, 1 cup if more sweet)
  • 1 large egg, beaten
  • 1 teaspoon vanilla extract
  • 1 1/2 cups (205g) all-purpose flour

Method:

Preheat the oven and prepare the pan:

Preheat the oven to 350°F (175°C), and butter an 8 x 4-inch loaf pan.

Mash the bananas and add the butter:

In a mixing bowl, mash the ripe bananas with a fork until completely smooth. Stir the melted butter into the mashed bananas.

Mix in the remaining ingredients:

Mix in the baking soda and salt. Stir in the sugar, beaten egg, and vanilla extract. Mix in the flour.

Bake the bread:

Pour the batter into your prepared loaf pan.

Bake for 55 to 65 minutes at 350°F (175°C), or until a toothpick or wooden skewer inserted into the center comes out clean. A few dry crumbs are okay; streaks of wet batter are not. If the outside of the loaf is browned but the center is still wet, loosely tent the loaf with foil and continue baking until the loaf is fully baked.

Cool and serve:

Remove from oven and let cool in the pan for a few minutes. Then remove the banana bread from the pan and let cool completely before serving. Slice and serve. (A bread knife helps to make slices that aren’t crumbly.)

Wrapped well, the banana bread will keep at room temperature for 4 days. For longer storage, refrigerate the loaf up to 5 days, or freeze it.

Nutritional Info:

220/CALORIES/7g/FAT/37g/CARBS/3g/PROTEIN

Mexican Ground Beef Casserole with Rice

No more boring beef mince recipes….. Kick off the week with THIS flavour packed Mexican Ground Beef Casserole!! With corn, capsicum/bell peppers and black beans, this rice casserole is juicy, cheesy, and packed with big Mexican flavours.

One pot, quick dinner idea that’s on the table in 30 minutes! 

 Big juicy pot of beef and rice loaded with Mexican flavours! The rice is tender and perfectly cooked, and the tomato sauce is generously flavoured with a Mexican Spice mix. A quick dinner made in one pot with not much prep!

Prep Time: 10mins

Cook Time: 20mins

Total Time: 30mins

Servings: 5 

Ingredients:

  • 2 tbsp olive oil
  • 1 onion , finely chopped
  • 3 garlic cloves , minced
  • 500g (1 lb) ground beef (mince), lean
  • 1/3 cup tomato paste
  • 1 1/4 cup long grain white rice , uncooked (Note 1)
  • 2.5 cups (625 ml) chicken broth/stock , low sodium
  • 400g (14oz) can corn kernels , drained (Note 2)
  • 400g (14oz) can black beans , drained (or other beans)
  • 1 capsicum/bell pepper , diced
  • 1 cup green onions/shallots
  • 2 cups (200g) cheese , shredded (anything that melts! Note 3)

MEXICAN SPICES:

  • 0.5 tsp cayenne pepper (Note 4)
  • 1.5 tbsp dried oregano
  • 3 tsp cumin
  • 3 tsp coriander
  • 3 tsp onion powder
  • 2 tsp paprika
  • 1.5 tsp salt

Instructions:

  1. Heat oil in a large pot over high heat. Add garlic and onion, cook 1 1/2 minutes until onion is translucent.
  2. Add beef and cook, breaking it up as you go, until you no longer see raw meat (about 2 minutes).
  3. Add Mexican Spices and cook for 30 seconds.
  4. Add capsicum and cook for 1 minute.
  5. Add tomato paste and broth, stir to mix in.
  6. Add rice, corn and black beans.
  7. Stir, bring to simmer then cover and lower heat to medium low (simmering gently). Cook 15 minutes.
  8. Remove lid, quickly stir through green onion and HALF the cheese.
  9. Smooth top then sprinkle on remaining cheese. Cover and leave for 1 minute just to melt cheese.
  10. Remove from stove and serve immediately, garnished with more green onion if desired.

Notes:

1. Rice – recipe works best with long grain white rice. Will also work with medium or short white rice grain, “standard” (unspecified) white rice, jasmine* or basmati rice*. Recipe as written won’t work with: brown rice, wild rice, risotto, paella rice, quinoa.

2. Corn – can also use frozen, 1 3/4 cups.

3. Cheese – use anything that melts! Cheddar, mozzarella, tasty, Monterey Jack, Colby.

4. Cayenne adds spiciness, this amount across a vast volume of rice is barely noticeable. Increase or eliminate if desired.

5. Leftovers will keep for 3 days in the fridge, reheat in microwave. I haven’t tried freezing but I don’t see why it wouldn’t freeze ok!

6. Nutrition per serving, this is quite a generous serving (about 2 packed cups, and it’s dense so very filling!). Every cup of cheese adds 100 calories per serving, so if you want to cut back on calories, halve the cheese (don’t skip completely!).

Nutritional Info:

Calories: 715cal | Carbohydrates: 73g | Protein: 45g | Fat: 28g | Saturated Fat: 13g | Cholesterol: 109mg | Sodium: 2039mg | Potassium: 1258mg | Fiber: 10g | Sugar: 7g | Vitamin A: 2254IU | Vitamin C: 54mg | Calcium: 437mg | Iron: 7mg


Italian Bomboloni Recipe

These Italian Donuts better known as a Bomboloni are made with a soft yeast dough, fried, rolled in sugar then filled with your favourite pastry cream filling. Served for breakfast and snack or just about anytime you want.

What is the Difference Between Doughnuts and Bomboloni?

Though bomboloni can is a type of doughnut, they’re a little different because they use fresher ingredients. They’re also a bit thicker and deep-fried rather than baked.

How to Serve Italian Bomboloni?

Try to serve bomboloni as a dessert or a snack when your kids are good. They go well with milk and other refreshing drinks, so try to mix them up a little in this way.

Italian Bomboloni Cooking Tips:
  • Make sure you brown each side before flipping
  • Add the Nutella slowly to avoid overstuffing
  • Plan for at least three bomboloni per family member
Variations of Italian Bomboloni:
  • Add a chocolate cream instead of Nutella
  • Top with a whipped cream for more flavor
  • Let the dough rise longer to produce thicker doughnuts

Prep Time: 1hr 30min

Cook Time: 1hr 7min

Total Time: 2hrs 37mins

Servings: 12 Donuts

Looking for a delicious dessert that goes above and beyond your traditional doughnut? You need to try out this Italian bomboloni recipe. Decided to blend well with fantastic pasta dishes and other Italian favorites, it’s a relatively simple and tasty dessert your family will adore.

Ingredients:

  • 3 c Flour
  • 2 ¼ tsp Dry Yeast
  • 2 tsp Salt
  • ¼ c Sugar
  • 1 lemon zested
  • 2 eggs
  • ¾ c Milk
  • 4 tbsp Butter
  • 1 tsp Vanilla
  • Nutella

Instructions:

  1. In a mixer combine the flour, yeast, salt, sugar, and lemon zest.
  2. Add in eggs one at a time, then the milk, butter, and vanilla and knead for 2 minutes.
  3. Put dough on a floured bench and knead until a bit sticky, yet smooth and stretchy. About 5 minutes.
  4. Place dough in a greased bowl and cover. Let rise for an 1hr until doubled in size.
  5. Roll out the dough to ¾ thick and use a cup sized cutter to cut them into circles.
  6. Cover on a baking sheet and let rise for another hour.
  7. Heat oil in a deep pan until 175 degrees C and fry in batches until golden brown. Flipping halfway.
  8. Remove and place on paper towels to remove excess oil.
  9. Use a piping bag to fill each with Nutella then top with icing sugar.
  10. Serve and enjoy!

Nutritional Info:

Serving: 1g | Calories: 204kcal | Carbohydrates: 31g | Protein: 5g | Fat: 6g | Saturated Fat: 4g | Polyunsaturated Fat: 2g | Cholesterol: 42mg | Sodium: 440mg | Fiber: 1g | Sugar: 6g

Apple Dumplings Recipe

Is there anything better than warm Homemade Apple Dumplings? Not today there isn’t! I am obsessed with this apple dumplings recipe! I was management in a family style restaurant in the town I lived in many years ago. I worked 5 days a week. During the Fall I would take one of my days off and go to the restaurant and make triple batches of these apple dumplings.

These apple dumplings are delicious and so easy to make. The homemade dough is easy to make, the recipe comes together fast, the results are wonderful.

Prep Time: 20mins

Cook Time: 35mins

Total Time: 55mins

Servings: 6

Ingredients

Sauce Ingredients

  • 1 cup sugar
  • 1 cup water
  • 1 tsp cinnamon
  • 2 Tbls butter

Dough Ingredients

  1. 2 cups all flour
  2. 2 tsps baking powder
  3. 1 tsp salt
  4. 2/3 cup Crisco shortening
  5. 1/2 cup milk
  6. 6 small Macintosh or Gala Apples about 3 inches in diameter Peeled and cored. Do not cut in half I used Gala, leave them whole.

Instructions:

  1. Make the sauce first so it has time to cool down.
  2. Make the dough and refrigerate it until you have peeled and cored your apples.

Sauce Directions

  1. I put all the sauce ingredients together in a medium saucepan. When it comes to a boil, I let it boil a minute or two to thicken a little bit.

For the dough

  1. Place the flour, baking powder and salt into a large bowl. Cut the shortening into the flour mixture with a pastry blender. Add milk all at once.
  2. Stir with a fork until the dough just forms a ball. Place in the refrigerator until you have peeled and cored the apples.
  3. Peel and core the apples. You can keep the apples from turning brown by placing them in cold water while you work.
  4. I divide the dough into six equal portions and roll them out on a lightly floured surface individually.
  5. You can also roll the dough out on a lightly floured surface long enough to fit 6 apples on it and cut the dough into six squares.
  6. Place the apples on a dough square, fill the center with butter, sprinkle sugar over top then sprinkle cinnamon over top.
  7. Mold the dough around the apple, making sure there are no opening for the filling to escape from.
  8. Place the apples in a 13×9 inch baking pan. Spacing them about an inch apart.
  9. Pour the sauce over the dumplings , then sprinkle with sugar. Bake in a preheated 375 degree oven for 35 minutes.
  10. Spoon the sauce on the bottom of the pan over the apple dumplings after they come out of the oven.
Nutritional Info:

Calories: 121kcal, Carbohydrates: 26g, Fat: 2g, Saturated Fat: 1g, Polyunsaturated Fat: 1g, Cholesterol: 6mg, Sodium: 18mg, Fiber: 1g, Sugar: 23g

Baked Barbeque Back Ribs Recipe

Fall-off-the-bone, tender bbq back ribs made with a flavorful homemade dry rub and baked in the oven to juicy perfection.

PREP TIME: 20mins

COOK TIME: 3 hrs

TOTAL TIME: 3 hrs 20mins

SERVINGS: 4 servings

INGREDIENTS:

Dry Rub
  • 2 tablespoons brown sugar
  • 2 tablespoons smoked paprika
  • 2 tablespoons garlic powder
  • 1 tablespoon onion powder
  • 1 tablespoon cumin
  • 1 tablespoon kosher salt
  • 1 teaspoon black pepper
  • 1 teaspoon cayenne powder
Baby Back Ribs
  • 2 1/2 lbs baby back ribs thawed
  • 1 tablespoon liquid smoke
  • 2 tablespoons apple cider vinegar

INSTRUCTIONS:

  1. Preheat oven to 300 degrees F. Place a wire rack inside a large baking sheet. Set aside.
  2. Gently remove the thin membrane from the back of the rack of ribs with a knife or your hands. It should pull right off.
  3. In a bowl, mix together all your dry rub ingredients.
  4. Generously season your ribs with the dry rub on both sides making sure to coat every inch of the rack.
  5. Place the ribs on a large piece of aluminum foil, top side down, then splash them with the apple cider vinegar and liquid smoke.
  6. Fold the aluminum foil all around the ribs, sealing it entirely and securely, so no liquid leaks out.
  7. Place in the oven and bake for 3 hours or until very tender. Remove them from the oven.
  8. Remove the aluminum foil from the ribs and generously brush them with bbq sauce.
  9. Place the ribs back in the oven and broil them for 5 minutes until caramelized. Serve and enjoy!

NUTRITIONAL INFO:

Serving: 1 serving

Calories: 462 kcal/Carbohydrates: 13 g/Protein: 36 g/Fat: 30 g/Saturated Fat: 10 g/Cholesterol: 123 mg/Sodium: 1919 mg/Potassium: 623 mg/Fiber: 2 g/Sugar: 7 g/Vitamin A: 1990 IU/Vitamin C: 1 mg/Calcium: 92 mg/Iron: 3 mg

Did You Make This?


Japanese Cheesecake Recipe

Light, jiggly, and fluffy, Japanese Cheesecake (Soufflé Cheesecake) is seriously the most delicious treat to serve for a crowd. It has the melt-in-your-mouth combination of creamy cheesecake and airy soufflé. A second (or more) serving is a guarantee!

Japanese cheesecake (also goes by soufflé cheesecake) is a glorious dessert known for its ultra-creamy, super luxurious, slightly tangy flavor and airy, soufflé-like character. It has swept the food world by storm and almost every dessert fanatic goes wild for it.

Why is it so popular? What’s the difference between Japanese cheesecake and regular cheesecake? For a start, I think it has the ideal texture that appeals to everyone. With elements of both a rich velvety custard and a cottony sponge cake, the dessert simply hits all the right notes. It is not heavy and a lot less sweet than typical Western-style cheesecakes. Even those who are not into cheesecake will fall head over heels for this delicious treat.

What is Japanese Cheesecake?

This particular Japanese cheesecake recipe is a soufflé-style cheesecake that incorporates whipped egg whites in the cake mixture and is baked in a bain-marie (water bath), which results in its characteristically light and fluffy texture. Yes, it is basically the cheesecake version of the Japanese soufflé pancakes!

As there are a few varieties of cheesecakes in Japan, we call this cheese soufflé or soufflé cheesecake. Outside of Japan, however, it becomes synonymous with the generic “Japanese cheesecake”. Because of its unique texture, it is also called jiggly cake or Japanese cotton cheesecake. I agree, that’s a lot of names for a cheesecake!

Light, jiggly, and fluffy, Japanese Cheesecake is seriously the most delicious treat to serve for a crowd. 

Prep Time: 25mins

Cook Time: 1hr 25mins

Chilling Time: 2hrs

Total Time: 1hr 50mins

 Servings: 1 9-inch (23-cm) cake

Ingredients:

  • 1 Tbsp unsalted butter (for greasing the pan and parchment paper)
  • 6 large eggs (50 g each w/o shell) (10.6 oz, 300 g without shell)
  • 10.6 oz cream cheese
  • 4 Tbsp unsalted butter
  • ¾ cup heavy (whipping) cream (¾ cup + 4 tsp, to be precise)
  • 4½ Tbsp sugar (for the cream cheese mixture)
  • ⅔ cup cake flour (weigh your flour or use the “fluff and sprinkle“ method and level it off; you can make your own Homemade Cake Flour)
  • ½ lemon (for the zest)
  • 2 Tbsp lemon juice (from ½ large lemon)
  • ½ cup sugar (for beating the egg whites)
  • 2 Tbsp apricot jam (for the glaze)
  • 2 tsp hot water (for the glaze)

Instructions:

Before You Start

I highly encourage you to weigh your ingredients in metric using a kitchen scale for this recipe. Click on the “Metric” button at the top of the recipe to convert the ingredient measurements to metric. If you‘re using a cup measurement, please follow the “fluff and sprinkle“ method: Fluff your flour with a spoon, sprinkle the flour into your measuring cup, and level it off. Otherwise, you may scoop more flour than you need. Please read the blog post for more detailed information that I shared about this recipe.

To Prepare the Cake Pan

Use a 9-inch (23-cm) cake pan that is 4 inches (10 cm) high. Cut parchment paper to line the bottom and sides of the cake pan. Cut one circle 9 inches (23 cm) in diameter for the bottom and one rectangular strip 4 x 30 inches (10 x 76 cm) for the sides of the cake pan. In addition, cut two strips of paper 2 x 30 inches (5 x 76 cm) each. We will use these as “straps” to lift the baked cake from the pan.

With 1 Tbsp unsalted butter, grease the cake pan and the parchment paper (for the bottom and the sides only; grease the paper on one side). You don‘t need to use all the butter.

Place the two parchment paper “straps” crisscross on the bottom of the cake pan so they form an “X.” Allow the excess paper to hang over the sides. Then, line the bottom and sides with the greased parchment paper. The greased side of the paper circle should face up, and the greased side of the rectangular strip should face in toward the center of the pan.

To Preheat the Oven and Prepare a Double Boiler

Preheat the oven to 350ºF (180ºC). For a convection oven, reduce the cooking temperature by 25ºF (15ºC). Note: You will be baking at 320ºF (160ºC). However, when you open the oven to place the cheesecake, you’ll lose some heat, so we’ll start off a bit higher.

Prepare a double boiler: Set a medium saucepan filled with 2 inches (5 cm) of water over high heat and bring to a simmer. Once simmering, cover and reduce the heat to maintain a steady simmer.

To Gather the Ingredients

Gather all the ingredients. Please note that it is very important to measure all your ingredients before starting. Separate 6 large eggs (50 g each w/o shell) into yolks and whites. Refrigerate the egg whites.

To Make the Cake Batter

In a large bowl, add 10.6 oz cream cheese, 4 Tbsp unsalted butter, ¾ cup heavy (whipping) cream, and 4½ Tbsp sugar. Rest the bowl on the saucepan above the simmering water.

Using a silicone spatula, mash the cream cheese and butter. Once they are melted, use a whisk to blend everything together. Remove from the heat.

While whisking, add the egg yolks into the warm cream cheese mixture, one at a time. Make sure each yolk is blended well with the cream cheese mixture before adding the next one.

Using a fine-mesh strainer, sift ⅔ cup cake flour into the batter. Whisk and blend together.

Then, pass the batter through the same fine-mesh strainer into a clean large bowl. This creates a silky texture for the batter.

Add the zest of ½ lemon into the batter. Make sure you only zest the flavorful yellow part and not the bitter white pith. Into a separate small bowl, squeeze the juice from the lemon. Measure 2 Tbsp lemon juice and add it to the batter. Whisk well to blend and set aside.

To Set Up the Bain-Marie

Put the baking sheet inside the preheating oven and pour in hot water until it is halfway up the sides or ½ inch deep. Close the oven door.

To Beat and Incorporate the Egg Whites

Add the cold egg whites into the dry, clean mixing bowl of a stand mixer. Make sure there is no oil or water in the bowl. If you have space in your refrigerator, I highly recommend keeping the mixing bowl cold until you’re ready to use it. Start whisking on medium speed (Speed 4) until the egg whites become opaque, foamy, and bubbly, about 2 minutes. Then, slowly add ½ cup sugar, one-third of it at a time, while the mixer runs.

Once you’ve added all the sugar, increase the mixer speed to high (Speed 8–9) and beat the egg whites until you have firm peaks. When you lift the whisk and turn it upside down, the egg whites should still cling to the whisk and hold their shape fairly well, but the tip of the peak folds back on itself.

Using a hand whisk, mix one-third of the egg whites into the cream cheese mixture until incorporated. Then, gently fold another one-third into the mixture.

Lastly, pour the mixture back into the mixer bowl (with the last one-third of the egg whites still in it) and fold very gently until just combined.

Pour the mixture into the cake pan all at once, avoiding air pockets while pouring. Tap the cake pan a few times on the kitchen counter to release any air pockets in the batter.

To Bake the Cheesecake

Open the oven and place the cake pan onto the baking sheet with the bain-marie. Reduce the oven temperature to 320ºF (160ºC)—25ºF (15ºC) lower for a convection oven—and bake for 70–75 minutes. Then, reduce the oven temperature to 300ºF (150ºC) and bake for another 10 minutes, or until the top is golden brown. To test if the cake is done, open the oven door slightly and insert a skewer into the cake. If it comes out without a wet liquid batter, it‘s done.

To Cool

Turn off the oven and leave the oven door slightly ajar for 15–20 minutes with the cake inside. If you take the cake out immediately to the kitchen counter, the sudden change in temperature could cause the cake to collapse. You want the cake to slowly shrink down to half the height, roughly from 4 inches to 2 inches high. After 15–20 minutes, remove the pan from the oven. Gently pull out the cake from the cake pan using the two parchment paper straps (with help from another set of hands).

Place the cake on a plate. Remove the parchment paper around the sides of the cake (but leave the bottom paper). Combine 2 Tbsp apricot jam and 2 tsp hot water in a small bowl. Brush the apricot mixture over the top of the cheesecake. Let cool to room temperature.

To Serve

You can serve the cake at room temperature (fluffiest!) or chill the cake for 1–2 hours before serving.

To Store

You can store the cake in the refrigerator for up to 3–4 days or in the freezer for 3–4 weeks. Defrost the cake overnight in the refrigerator. The cold cheesecake is dense, so leave it on the counter until just chilled or at room temperature before serving.

Notes:

All-Purpose Flour vs. Cake Flour:

All-purpose flour and cake flour do not perform the same. Cake flour is more delicate, and if you use all-purpose flour instead of cake flour, the texture will be dense and tough. If you can’t find cake flour, use this substitutions

To Make Cake Flour:

Take one level cup of all-purpose flour, remove 2 Tbsp, and then add 2 Tbsp of corn starch back in. (1 cup of AP flour – 2 Tbsp of AP flour + 2 Tbsp of cornstarch = 1 cup of cake flour).

Be sure to sift the flour 3–4 times to distribute the cornstarch well.

Tips for Beating Egg Whites:

Make sure your beaters and mixing bowl are clean and dry. A speck of oil, water, or egg yolk on either one can minimize the volume of the beaten egg whites.

Avoid plastic bowls—even clean ones may hold oily residue that can affect the successful whipping of the egg whites.

Use a bowl that’s wide enough to keep the beaters from being buried in the egg whites.

Nutritional Info:

Serving: 9 inch cake · Calories: 3560 kcal · Carbohydrates: 266 g · Protein: 70 g · Fat: 252 g · Saturated Fat: 142 g · Trans Fat: 2 g · Cholesterol: 1838 mg · Sodium: 1488 mg · Potassium: 1137 mg · Fiber: 3 g · Sugar: 189 g · Vitamin A: 10053 IU · Vitamin C: 21 mg · Calcium: 631 mg · Iron: 8 mg

Cheesy Chicken Pasta Bake

Chicken Pasta Bake – Pasta, chicken and a variety of veggies baked in a creamy tomato sauce with a tasty cheesy topping.

WHY CHICKEN PASTA BAKE IS A FAMILY-FRIENDLY DISH

Make-Ahead: This dish can be prepared the night before or earlier in the day to make dinner time a breeze!

5 Different Veggies: Although it may not appear to have a lot of veggies, it does actually contain quite a few (onion, bell pepper (capsicum), spinach, tomatoes and peas) Serve with a side of vegetables for an extra nutritional boost!

Easy to Adapt: This recipe is pretty flexible. Mix up the veggies and miss out the chicken, depending on what you have available or to suit your family’s tastes.

Prep Time: 20mins

Cook Time: 40mins

Total Time: 1 hr

 Servings: 6

Ingredients:

  • 400g (14 oz) Dried Rigatoni Pasta
  • 1 tablespoon Olive Oil
  • 1 Onion, finely chopped
  • 1 teaspoon Garlic, minced
  • 1 Red Capsicum (Bell Pepper), finely chopped
  • 2 tablespoon Tomato Paste (Puree)
  • 1 teaspoon Dried Oregano
  • 400g (14oz) Canned Chopped Tomatoes
  • 250ml (1 cup) Chicken Stock
  • 125ml (½ cup) Double Cream (thickened cream)
  • 120g (4.2 oz) Spinach Leaves
  • 380g (3 cups) Cooked Shredded Chicken *See notes if you would prefer measurements and cooking instructions for using raw chicken.
  • 75g (½ cup) Peas
  • 80g (½ cup) Mozzarella, grated
  • 80g (½ cup) Cheddar, grated
Instructions:

  1. Pre-heat oven to 190C/ 375F
  2. Bring a large pot of water to the boil. Add pasta and cook per packet directions MINUS 1 minute, drain.
  3. In a large frying pan, or saucepan, heat the oil over medium heat. Add the onion and cook for 2 minutes.
  4. Then add the garlic and capsicum (bell pepper) and gently saute until onion is translucent (around 3 mins.)
  5. Add the tomato paste and dried oregano and stir for a further minute.
  6. Add the chopped tomatoes and chicken stock and bring to a gentle bubble.
  7. Then stir in the double cream. Add the spinach and continue to stir until the spinach has wilted.
  8. Taste and season accordingly. (do not season for babies and young children)
  9. Add the chicken, cooked pasta and peas.
  10. Gently stir to combine and then transfer to a large baking dish.
  11. Top with the grated mozzarella and cheddar. Place in the oven for 20-25 minutes.
  12. The dish should be hot throughout and the cheese golden and bubbly.

Notes:

PASTA: Rigatoni is used but you can substitute with most pasta shapes (e.g penne, fusilli, shells etc)

CHICKEN: This recipe uses cooked shredded chicken. If you prefer the texture of chicken pieces or only have raw chicken available then chop two large (or 3 smaller) raw chicken breasts into bite sized pieces. Before cooking the sauce, saute the chicken pieces in a little olive oil over medium heat until sealed, around 5 mins. Remove from the pan and add back into the dish at the same point you add the pasta.

STOCK: I used chicken stock but you can also use vegetable stock. If serving a baby make sure to use homemade stock to reduce sodium levels. Alternatively you can replace with a second can of chopped tomatoes.

CHEESE: A mix of mozzarella and mature cheddar is used for the topping. Mozarella melts really well and has that nice stretch, and isn’t as oily. You can replace the cheddar with other cheeses such as Gruyere, Monterey Jack, Colby, Provolone & Tasty. A little grated parmesan will also add good flavour. Bee mindful of sodium content when cooking for babies / young children. You may wish to reduce the cheese or serve a portion with less cheese topping.

Refrigeration: This chicken pasta bake can be stored, covered, in the refrigerator for 2-3 days.

Freezing: Assemble and allow to cool. Do not bake, just cover and freeze it.

Nutritional Information is a ROUGH guide only, calculated using an online nutrition calculator.

Nutritional Info:

Calories: 592kcal | Carbohydrates: 61g | Protein: 35g | Fat: 23g | Saturated Fat: 11g | Cholesterol: 101mg | Sodium: 394mg | Potassium: 758mg | Fiber: 5g | Sugar: 7g | Vitamin A: 3307IU | Vitamin C: 45mg | Calcium: 254mg | Iron: 4mg

Spanakopita Triangles Recipe

These delicious Spanakopita Triangles are fabulous as an appetiser or on-the-go snack. Super yummy crispy phyllo pastry filled with spinach, feta and lots of herbs.

Spanakopitakia Spinach and Feta Triangles / mini spinach pies) are the cute offspring of Greek spinach pie! Just as delicious, portable and with even more crispy phyllo to filling ratio 🙂

I love making these spanakopita triangles as an appetizer – hugely popular with vegetarians and meat eaters alike. But I also love them for lunch with a side serving of Greek Salad! 

Using good quality barrel aged Greek feta makes all the difference in terms of flavor. But you can also use feta and ricotta or cream cheese if you like.

TIPS FOR MAKING THIS RECIPE

The filling can be prepared up to three days in advance – useful if you are making these for a party! 

Keep your phyllo covered with a very slightly damp cloth so that it doesn’t dry out while you assemble the spinach pies.

Always worth having some extra pastry to hand, in case any sheets tear or you have filling left over!

You can use fresh instead of frozen spinach if you prefer. Rinse the spinach and wild in pan before draining and using.

Taste the filling before adding the eggs. Feta cheese can be quite salty but you still need to add salt, to taste.

These delicious Spanakopita Triangles are fabulous as an appetiser or on-the-go snack. Super yummy crispy phyllo pastry filled with spinach, feta and lots of herbs.

Prep Time: 20mins

Cook Time: 35 mins

Total Time: 1hr

Servings: 50 triangles

Ingredients:

  • 500 g (17 ½ oz ) frozen spinach (or fresh, chopped)
  • 2 tbsp olive oil or as needed
  • 8 spring onions (scallions) finely chopped
  • 2 leeks white part only, finely chopped
  • 1 tsp salt or more, as needed
  • 100 g (about ½ cup) fresh parsley chopped
  • 100 g (about ½ cup) fresh dill chopped
  • 2 large eggs
  • 200 g (7oz) feta cheese crumbled
  • 200 g (7oz) cream cheese / ricotta or more feta cheese
  • 1 lemon zest only
  • 25 sheets of phyllo pastry thawed if frozen (note: you might need extra!)
  • 80 ml (⅓ cup) light olive oil or as needed
  • 2 tbsp sesame seeds optional

Instructions

Make the filling

  1. Thaw the spinach and squeeze most of the moisture out.
  2. If using fresh spinach you will need to wilt it in a pan before using and then strain to remove the juices.
  3. Sauté the green onions and leeks in a pan with a splash of olive oil.
  4. Add the salt and herbs and cook for a couple more minutes, or until softened.
  5. Stir in the spinach and leave to cool before adding the feta and eggs.
  6. Mix in the crumbled feta / cream cheese and have a taste, adding more salt if needed.
  7. Add the eggs and lemon zest, mix well to combine and set aside.

Assemble the pies

  1. Preheat the oven to 180C (350F) and place a tray on the middle shelf.
  2. Open up your pastry and use a sharp knife to cut through the phyllo vertically so you have 40 long strips.
  3. Brush one phyllo with olive oil and put a second strip of pastry on top.
  4. Doubling up the pastry will create crispy spinach hand pies and keep the filling from bursting out.
  5. Place a tablespoon (or just over) of the filling at the end of the strip. Don’t be tempted to over fill!
  6. Fold the end of your strip with the filling over to encase the filling and form a triangle.
  7. Continue folding the pastry, brushing sparingly with olive oil, until you have a tightly packed triangle.
  8. Brush with oil and sprinkle with sesame seeds (optional).

Bake

  1. Put the spanakopita triangles onto a lined baking sheet, spaced slightly apart.
  2. Bake in a preheated oven until golden brown and transfer to a wire rack to cool.
  3. Don’t stack them as the steam with soften the pastry.

Notes

TIPS FOR MAKING THIS RECIPE

Keep your phyllo covered with a very slightly damp cloth so that it doesn’t dry out while you assemble the spinach pies.

You can use fresh instead of frozen spinach if you prefer. Rinse the spinach and wild in pan before draining and using.

Nutritional Info 

Calories: 478kcal | Carbohydrates: 76g | Protein: 12g | Fat: 13g | Saturated Fat: 4g | Trans Fat: 1g | Cholesterol: 15mg | Sodium: 801mg | Potassium: 192mg | Fiber: 3g | Sugar: 1g | Vitamin A: 1655IU | Vitamin C: 7mg | Calcium: 67mg | Iron: 5mg

Easy Tiramisu Cake Recipe

Tiramisu is a classic Italian no-bake dessert made with layers of coffee-soaked ladyfingers and incredible mascarpone cream. The custard-like cream is excellent and contains no raw egg. This easy recipe is truly the best homemade tiramisu and always gets rave reviews.

We love classic Italian desserts like Panna Cotta, Affogato, and of course Berry Tiramisu. Classic Tiramisu is probably the most iconic Italian treat and this one does not disappoint!

What is Tiramisu?

The word Tiramisu (tirami su in Italian) means “cheer me up” or “pull me up,” which is very appropriate because one bite will put you in a good mood! An authentic Tiramisu dessert that has 2 main layers: sponge cake ladyfingers soaked in coffee and liqueur and the mascarpone cream layer. This classic dessert often contains raw egg yolks, but we use a different process to create a custard-like cream with amazing texture and flavor.

Can I Substitute the Rum?

We used golden rum but you can use dark rum. You can also substitute the rum with a little Grand Marnier, or amaretto. If you prefer to omit it completely, you can just leave out the rum or add a little bit of vanilla extract to taste.

What are LadyFingers?

Lady Fingers are essentially sponge cake batter piped into strips then baked and dried into biscuits. They are known “savoiardi” in Italian and are perfect for tiramisu because they absorb the syrup well without getting soggy. Ladyfingers are great in other no-bake desserts such as the incredible Charlotte Cake, these individual Mousse Cups, and even a trifle.

Tips for the Best Tiramisu:
  • Quick Dip – Dip ladyfingers one or two at a time. A quick dip on each side is enough. There will be some syrup left behind.
  • Do not over-soak the ladyfingers or the layers may collapse.
  • Water Bath – When whisking yolks and sugar over steam, make sure the bowl is not touching the water beneath it.
  • Allow the yolk mixture to cool until it’s just slightly warm – whisking off the heat will help cool it down faster.
  • Use cold HEAVY whipping cream and beat until stiff peaks form – whip slowly over time for the cream to remain more stable (don’t under beat or overbeat)
  • Do not over-mix – When folding cream into Mascarpone, do not overmix the cream or it may turn grainy.
  • Chill the cake at least 6 hours in the refrigerator or overnight and it will be very easy to slice.
  • Tiramisu keeps well so you can make it a day or two ahead.
  • Leftovers are good refrigerated up to 5 days because there are no raw eggs in the cake.
Can I Substitute the Coffee?

Traditionally, coffee or espresso is used in Tiramisu. If you are concerned about caffeine, you can use decaf coffee so you can still enjoy the same classic flavor. If you prefer a different flavor profile, you can turn this into a Berry Tiramisu and omit the cocoa powder.


Prep Time: 30 minutes

Cook Time: 10 minutes

Resting/Chilling Time: 6hours 

Total Time: 6 hours 25 minutes

Servings: 12 slices of cake

Ingredients:


  • 1 1/2 cups espresso , (or strong coffee), room temperature
  • 6 Tbsp golden rum, divided
  • 40 ladyfingers
  • 6 egg yolks, (large)
  • 3/4 cup granulated sugar
  • 16 oz mascarpone, cold
  • 2 cups heavy whipping cream, cold*
  • 2-3 Tbsp unsweetened cocoa powder, to dust the top
Instructions:
  1. In a bowl, stir together 1 1/2 cups espresso and 3 Tbsp rum.
  2. Quickly dip half of the ladyfingers, one at a time and arrange in a single layer in the bottom of a 9×13 casserole dish.
  3. Dip once on each side so they are moist but do not soak ladyfingers or the cake will collapse.
  4. In a separate rimmed* medium glass bowl, whisk together yolks and sugar.
  5. Place over steam (on a saucepan with simmering water) and whisk 10 minutes on low heat until the mixture is lighter in color, slightly thickened and not grainy when you rub between your fingers.
  6. Remove from heat and whisk for a few minutes off the heat to help it cool down then set aside to cool while doing step 3.
  7. Beat together 16 oz mascarpone and 3 Tbsp rum.
  8. Use an electric hand mixer to beat in the warm yolk mixture until well incorporated.
  9. In a separate bowl, beat cold heavy whipping cream until stiff peaks form*.
  10. Use a spatula to gently fold half of the whipped cream into mascarpone cream then blend in remaining whipped cream, just until incorporated.
  11. Do not overfold or it will become grainy.
  12. Spread half of the cream over the first layer of ladyfingers.
  13. Dip and arrange remaining ladyfingers. Spread remaining cream. Refrigerate overnight.
  14. Dust with cocoa powder before serving. It is ok to dust with cocoa ahead of time – it will just darken it in color from the moisture.
Recipe Notes:

*Be sure to use very cold HEAVY whipping cream and not light cream.

**A mixing bowl with a little rim around the edge helps to keep the steam and condensation out of the bowl.

***Beating heavy cream slowly will help the cream remain more stable without turning watery. Start on low speed then increase to medium speed over the next 5 minutes or until thick and stiff peaks form.

Notes:

Alcohol: Tiramisu can be made with or without alcohol. This recipe calls for coffee flavored liqueur because I like that it enhances the coffee flavor, but other options are marsala wine or brandy.

Make Ahead Instructions: Tiramisu is even better when made in advance, allowing the flavors to blend! It will keep in the refrigerator for 2 to 3 days.

Freezing Instructions: Make completely, but don’t dust with cocoa powder. Cover tightly with plastic wrap and then tinfoil and freeze for up to 3 months. Thaw in the refrigerator overnight and dust with cocoa powder a few hours before serving.

Nutritional Info:

Calories297kcalCarbohydrates26gProtein5gFat18gSaturatedFat11gPolyunsaturatedFat1gMonounsaturatedFat2gCholesterol88mgSodium:77mgPotassium: 124mgFiber: 1gSugar: 11gVitamin A: 618IUVitamin C: 1mgCalcium: 90mgIron: 1mg

Ground Beef Casserole Recipe

Ground beef pasta is a favorite family meal and is easy to make in just a few steps. You can’t go wrong with meat, sauce, pasta, and cheese!

This Ground Beef Casserole has everything you want in a baked pasta dish – savory browned beef, pasta, marinara sauce, and a cheesy layer of mozzarella for an easy weeknight dinner. Toss everything together and bake until the cheese is golden and bubbly, or freeze for a quick meal that’s ready to heat up on busy nights.

Casseroles are a lifesaver, especially for busy families, and with this hamburger casserole, you can bring it all together quickly and let it finish in the oven. Trying to get dinner to the table even quicker? Skip the oven and serve this ground beef pasta recipe straight from the stovetop by adding the cooked pasta to the sauce, sprinkling with mozzarella, and then adding a lid to allow the heat to melt the cheese.

Casseroles are a lifesaver, especially for busy families, and with this hamburger casserole, you can bring it all together quickly and let it finish in the oven. Trying to get dinner to the table even quicker? Skip the oven and serve this ground beef pasta recipe straight from the stovetop by adding the cooked pasta to the sauce, sprinkling with mozzarella, and then adding a lid to allow the heat to melt the cheese.

WHY YOU’LL LOVE THIS GROUND BEEF CASSEROLE WITH PASTA

Perfect comfort food. This pasta bake hits the spot for a comforting dish with layers of tomato sauce, penne pasta, ground beef, and melty cheese in every bite. Warm up those cold nights with a home-cooked meal that warms your soul – you can’t go wrong with beef casseroles!

Very kid-friendly. Give the kids what they want, and you’re sure they’ll eat! It’s like spaghetti but with different pasta and everything tossed together into an oven-baked casserole.

Freezer-friendly. I love family-sized freezer-friendly dinners! You can freeze the sauce to add to freshly cooked pasta before baking or assemble the ground beef casserole with noodles in a baking pan, cover it with foil, and freeze it as a whole meal ready to bake.

Well-balanced meal. A complete meal to fill you up and keep you full of good carbs, protein, and veggies. Swap out the pasta for whole wheat or gluten-free pasta for a healthier alternative. Toss in some diced eggplant, zucchini, or spinach to add another layer of veggies with the tomatoes and onions.

POPULAR SUBSTITUTIONS & ADDITIONS

Add vegetables. You can easily up the nutritional value of ground beef pasta casserole by adding chopped vegetables when cooking the onions and beef mixture: Sauté zucchini, eggplant, spinach, kale, or even diced carrots to the sauce base. The smaller the dice, the less likely picky eaters will notice the addition.

Use ground turkey. If you’re looking for a lighter pasta casserole, then ground turkey makes an excellent substitution for ground beef. Check out my ground turkey casserole for the full recipe!

Make it Vegetarian! Want to enjoy a hearty casserole but avoid meat? It’s super easy to do by swapping out the ground beef for either lentils or chickpeas. With either of these options, you still get a full meal with all the benefits of meat, like protein. You could also load the sauce with vegetables instead of beef for a wholesome meal.

Add some heat. Want to kick your pasta sauce up a notch with some fiery spices? Add some red pepper flakes or cayenne pepper to the sauce when adding the seasonings.

HOW TO STORE & REHEAT GROUND BEEF CASSEROLE

Store leftover beef casserole with pasta in an airtight container in the fridge.

Reheat in the microwave or preheated oven until heated through.

HOW LONG WILL BEEF PASTA CASSEROLE LAST IN THE FRIDGE?

When stored properly, leftovers will keep in an airtight container in the fridge for 3 to 4 days.

CAN I FREEZE BEEF CASSEROLES?

Yes! To freeze, prepare the casserole in a baking dish and cover with a layer of foil followed by plastic wrap to securely cover the dish. You can freeze ground beef casserole with pasta up to 3 months and bake straight from frozen by simply adding an additional 20 minutes or so to the cook time.

Ground beef pasta is a favorite family meal and is easy to make in just a few steps. You can’t go wrong with meat, sauce, pasta, and cheese!

 Prep Time: 15mins

 Cook Time: 25mins

 Total Time: 40mins

 Servings: 8 servings

 Calories: 411kcal

Ingredients:
  • 16 ounces penne pasta
  • 1 tablespoon olive oil
  • 1 pound lean ground beef
  • 1 large onion diced
  • 2 teaspoons Italian seasoning
  • ½ teaspoon salt
  • ½ teaspoon pepper
  • 2 garlic cloves minced
  • 1 25-ounce jar marinara sauce store-bought or homemade
  • ¼ cup Fresh basil torn, plus more for garnishing
  • 1 ½ cups shredded mozzarella cheese
Instructions:
  1. Preheat the oven to 375°F. Bring a large pot of salted water to a boil. Add pasta and cook al dente according to package instructions.
  2. Drain, reserve ½ cup pasta water, and transfer the pasta to a 9×13 baking dish.
  3. In a large deep skillet over medium-high, heat the olive oil. Add the ground beef and onions and season with Italian seasoning, salt and pepper.
  4. Cook the ground beef and onions, breaking up the beef into smaller pieces with the back of a wooden spoon until browned, about 10 minutes.
  5. Add the garlic and cook until fragrant, 1 more minute.
  6. Stir in the marinara and basil, then transfer the sauce on top of the pasta in the baking dish and toss gently to combine.
  7. Add as much of the reserved pasta water as desired until the sauce looks glossy.
  8. Sprinkle the shredded mozzarella cheese on top and bake in the preheated oven until the cheese is lightly golden, about 15 minutes.
  9. Garnish with fresh basil and serve immediately.
Notes:

Leftovers will keep in an airtight container in the fridge for 3 to 4 days, and you can reheat it in the oven or microwave. Freeze up to 3 months and bake from frozen by adding an additional 20 minutes to the cook time.

Nutritional Info:

Calories: 411kcal | Carbohydrates: 50g | Protein: 25g | Fat: 12g | Saturated Fat: 5g | Polyunsaturated Fat: 1g | Monounsaturated Fat: 5g | Trans Fat: 0.4g | Cholesterol: 50mg | Sodium: 738mg | Potassium: 630mg | Fiber: 4g | Sugar: 6g | Vitamin A: 535IU | Vitamin C: 8mg | Calcium: 212mg | Iron: 3mg

Apple Fitters Recipe

Craving something sweet and delicious? Look no further than this amazing air fryer apple fritters recipe! Deliciously golden and crisp on the outside, with a soft and sweet center filled with tender apples, these apple fritters are sure to become a family favorite.

Apple Fritters are luscious deep fried donuts filled with apples, and cinnamon and drizzled with an easy three-ingredient glaze. You can have these scrumptious warn apple fritters in your hands in less than thirty minutes. Make sure you stash a couple for yourself, or you might blink your eyes, and they will be gone. These are one of my darling daughter’s favorite goodies. She can not get enough of them!

WHY THIS RECIPE WORKS!
  • Homemade warm sweet apple fritters that are better than your local bakery.
  • Only wholesome natural ingredients with no artificial colors or preservatives.
  • Easy and quick to mix and fry.
  • The fritters can be fried up in a fryer, Dutch oven, or heavy stock pot.
HOW TO MAKE APPLE FRITTERS?

First peel, core and dice a couple of Granny Smith or Honey Crisp apples. I like to dice them somewhere between 1/4-1/2 inch. That way you get a good taste of that sweet apple. Now grab a large bowl and add the flour, sugar, baking powder, salt and cinnamon. Whisk it around and get it all mixed together. Make a well in the middle and add the milk, egg and applesauce. Now stir the mixture just until it is combined.

Fill a dutch oven or large heavy stock pot with about 1 1/2 inches of canola oil. Use a candy thermometer and bring the oil to 375 degrees. Carefully drop about 1/4 cup of batter per fritter into the hot oil. I like to spread the batter a little while I am pouring it so that the fritter does not end up too fat and so it cooks all the way through. Cook each side until golden brown. It takes about 2 minutes per side. Remove to paper towels to drain.

Once they have cooled whisk together the milk, powdered sugar and vanilla. Finally dunk the fritters in the glaze turning over to make sure each side is coated. Place on wire racks to air dry and drip.

CAN YOU BAKE THESE FRITTERS?

This is a question that I am asked quite frequently. Yes I am sure there are lots of great recipes out there for baked apple fritters however this particular recipe really needs to be fried. Do your best to keep the oil at 375 degrees so the fritter absorbs less of the oil.

RECIPE NOTES AND HELPFUL TIPS
  • Don’t over-mix the batter as it may make the fritters tough.
  • Don’t overcrowd the pan when frying so the donuts cook better and the oil temperature is easier to maintain.
  • Use a candy thermometer to track the temperature of the oil.
  • A dutch oven or heavy pot helps the oil hold its temperature.
  • Try to maintain a constant temperature of 375 degrees. When you add the batter the temperature will drop so you must increase the heat a tad. Likewise when you remove the fritters from the oil the temperature will increase so you need to turn the heat down a tad.
  • Remove the fried fritters to paper towels to drain.
  • Store the cooled cooked fritters wrapped loosely in paper towels in a brown paper bag.

These Apple Fritter Donuts are as scrumptious as the ones at your neighborhood bakery at a fraction of the cost. Make a batch for your family today and get ready to enjoy all the complements.

 Prep Time: 10min

Cook Time: 10min

Total Time: 20mins

Yield: 10 fritters 

INGREDIENTS:
APPLE FRITTERS
  • 1 1/2 cups all purpose flour
  • 1/4 cup sugar
  • 2 teaspoons baking powder
  • 1/2 teaspoon salt
  • 1 1/2 teaspoons cinnamon
  • 1/3 cup milk
  • 2 eggs
  • 3 tablespoons applesauce
  • 2 large Granny Smith apples or Honey Crisp apples peeled, cored and diced
  • canola oil or vegetable oil for frying
GLAZE
  • 2 cups powdered sugar
  • 1/4 cup milk
  • 1/2 teaspoon vanilla extract
INSTRUCTIONS:
  1. Whisk together flour, sugar, baking powder, salt, and cinnamon in medium bowl.
  2. Make a well in the center and add 1/3 cup milk, eggs and applesauce. Stir just to combine. Fold in apples.
  3. Heat 1 1/2 inches of oil in heavy skillet, dutch oven or deep fryer to 375 degrees.
  4. Drop about 1/4 cup of batter per fritter into hot oil; spreading it out as you drop.
  5. Cook each side until golden brown; approximately 2 minutes per side.
  6. Use a slotted spoon to remove to paper towels to drain.
  7. Whisk together 1/4 cup milk, powdered sugar and vanilla.
  8. Dunk each fritters in the glaze turning over to make sure both sides coated.
  9. Place on wire racks to air dry and drip.
NOTES:
  • Don’t over-mix the batter as it may make the fritters tough.
  • Don’t overcrowd the pan when frying so the donuts cook better and the oil temperature is easier to maintain.
  • Use a candy thermometer to track the temperature of the oil.
  • A dutch oven or heavy pot helps the oil hold its temperature.
  • Try to maintain a constant temperature of 375 degrees. When you add the batter the temperature will drop so you must increase the heat a tad. Likewise when you remove the fritters from the oil the temperature will increase so you need to turn the heat down a tad.
  • Remove the fried fritters to paper towels to drain.
  • Store the cooled cooked fritters wrapped loosely in paper towels in a brown paper bag.
Nutritional Info:

Serving Size: 1 fritter

Serves: 10

Calories 286%Total Fat 10.3g 13%Cholesterol 39.3mg 13%Sodium 143.5mg 6%Total Carbohydrate 46g 17%Sugars 28.8g Protein 4g 8%

Cranberry Orange Bread Recipe

Cranberry Bread made with fresh, juicy cranberries and orange is the perfect treat to bake during the Holiday season. This festive and pretty quick bread recipe is super moist and bursting with flavor. You can whip it up quickly and it keeps fresh for days!

Combining cranberries with orange juice and freshly grated zest elevates its flavor and results in a perfectly balanced sweet and tart flavor. This moist cranberry orange bread makes a delicious breakfast or afternoon snack and is the perfect way to use up leftover cranberries from Thanksgiving! 

Expert Tips
  • Always measure your flour correctly! Don’t scoop the flour! Spoon flour into your measuring cup and level it off with the back of a knife. Too much flour can make the bread dense and dry.
  • This recipe works best with fresh or frozen cranberries
  • Instead of fresh or frozen cranberries, you can also use 1 cup of dried cranberries
  • Don’t overmix the batter! Mix just until the dry ingredients are moistened, about 15 light strokes with a spatula. It’s ok if there are some small lumps. Overmixing can cause the bread to be tough and bake unevenly.
  • Always test with a skewer for doneness! Every oven is different, to get the best results, start checking the bread for doneness five minutes before the time is up. A wooden skewer works best!
  • If you want you can add a glaze on top after the bread has cooled completely. Mix 1 cup powdered sugar and 1 1/2 Tbsp orange juice together and drizzle over the cooled bread
Storage:

This moist bread stays fresh and moist for days if you store it the right way. I wrap it in plastic wrap and store it at room temperature for up to 4 days. You can also store it in the fridge but it might taste drier because of the lower temperature.

Freezing:

Yes, you can freeze this Cranberry Bread. Let it cool completely then wrap it tightly in plastic wrap and freeze it for up to 3 months. To defrost take it out of the freezer and let it defrost at room temperature overnight. You can also freeze individual slices to make them defrost quicker – perfect for a quick breakfast!

How to make Cranberry Nut Bread

This recipe can be easily transformed into Cranberry Nut Bread! Just add 1/2 cup (or more) roughly chopped walnuts to the batter together with the cranberries to make a Cranberry Walnut Bread.

Can I use dried cranberries?

Yes, you can use 1 cup of dried cranberries instead of fresh or frozen cranberries. The baking time will be a little bit shorter because dried fruits are less moist.

When using dried cranberries, we recommend soaking them in orange or cranberry juice first. Heat up the juice, add cranberries, and let sit for 10-15 minutes. Strain before adding them to the batter.

Do I have to thaw frozen cranberries?

When using frozen cranberries thaw them until they can be chopped safely. They do not have to be completely thawed.

Cranberry Orange Bread is easy and quick to make from scratch and keeps fresh for days! This moist cranberry bread is perfect for the holidays.

Prep Time: 15mins

Cook Time: 1hr

Total Time: 1hr 15 mins

 Servings: 10 

Ingredients:
  • 2 cups all-purpose flour
  • 1 1/2 tsp baking powder
  • 1/2 tsp baking soda
  • 3/4 tsp salt
  • 1 tsp ground cinnamon
  • 1 Tbsp orange zest freshly grated
  • 1/2 cup granulated sugar
  • 1/2 cup brown sugar
  • 1/4 cup butter room temperature
  • 1 large egg room temperature
  • 1 cup orange juice
  • 1 1/2 cups chopped fresh cranberries
Instructions:
  1. Preheat oven to 350°F (175°C) and grease and flour a 9×5-inch loaf pan.
  2. In a medium bowl combine flour, baking powder, baking soda, salt, cinnamon, and orange zest. Set aside.
  3. In the bowl of a stand mixer or using a hand mixer and a large bowl, cream together sugars, butter, and egg until smooth. Add orange juice and slowly mix until combined.
  4. Add flour mixture to the butter mixture and beat until just combined and all the dry ingredients are just moistened. Fold in cranberries. Pour into prepared pan.
  5. Bake for about 60 minutes until a toothpick inserted into the center comes out clean. Cool in the pan for 10 minutes, then turn out onto a wire rack to cool.
Notes:
  • Always measure your flour correctly! Don’t scoop the flour! Spoon flour into your measuring cup and level it off with the back of a knife. Too much flour can make the bread dense and dry.
  • This recipe works best with fresh or frozen cranberries
  • Instead of fresh or frozen cranberries, you can also use 1 cup of dried cranberries
  • Don’t overmix the batter! Mix just until the dry ingredients are moistened, about 15 light strokes with a spatula. It’s ok if there are some small lumps. Overmixing can cause the bread to be tough and bake unevenly.
  • Always test with a skewer for doneness! Every oven is different, to get the best results, start checking the bread for doneness five minutes before the time is up. A wooden skewer works best!
  • If you want you can add a glaze on top after the bread has cooled completely. Mix 1 cup powdered sugar and 1 1/2 Tbsp orange juice together and drizzle over the cooled bread
Nutritional Info:

Calories: 238kcal | Carbohydrates: 45g | Protein: 3g | Fat: 5g | Saturated Fat: 3g | Cholesterol: 28mg | Sodium: 289mg | Potassium: 185mg | Fiber: 1g | Sugar: 23g | Vitamin A: 225IU | Vitamin C: 15.2mg | Calcium: 56mg | Iron: 1.5mg

Bread And Butter Pudding Recipe

Bread and Butter Pudding is surely the ultimate use of leftover bread!! While wonderful made with pre-sliced bread, it’s company-worthy made with chunks of bread, whether it’s a leftover loaf, dinner rolls or even hot dog buns.A classic comfort dessert, custardy on the inside, golden and buttery on top.

Best Bread to Make this Recipe 

As for what type of bread, it’s best to use a soft plain or sweet bread:

Plain white bread – sliced, unsliced, loaf, block, rolls, hot dog or hamburger buns

Raisin bread or other similar flavoured bread that will suit a sweet dessert

Buttery breads – like brioche and challah

Stale plain cake – I personally am not the type to leave leftover cake lying around until it becomes stale, but if you happen to, then by all means use it. Just be a bit more gentle when tossing in egg mixture

Breads that are not recommend.  “UNUSUAL” RESULTS…..

Bread that is TOO stale – slightly stale bread is ideal (see recipe notes), but bread that’s so gone dry it crumbles into breadcrumbs when you crush it, or if it’s rock hard and you can’t tear it by hand, or so solid you can grate it into bread crumbs, it is no good. This is because once soaked in the egg mixture, it will disintegrate into breadcrumbs;

Very crusty and chewy artisan bread (like sourdough) – while it will work just fine, it will not be as soft and custardy. Mind you, the sourdough sold at grocery stores and everyday bakeries are not that crusty so will work fine, I am mostly referring to the more expensive (proper) sourdough;

Seeded and savoury flavoured breads – I’m not here to tell you how you should or should not flavour your bread and butter pudding, but I will say that using Cheese and Bacon Rolls might yield a somewhat odd result…😂

Heavy breads – Pumpernickel, dense ryes and the like …. obviously.

Toppings for Bread and Butter Pudding
  • I intentionally make my Bread and Butter Pudding less sweet than most – I only use 1/2 cup of sugar compared to around 1 1/2 – 2 cups for the same quantity of bread in some versions – because my base assumption is that there WILL be toppings.
  • There’s plenty of options, and here are just a few ideas:
  • Ice cream – the contrast between creamy and cold against hot/crusty/custardy is just a match made in heaven;
  • Custard – rich and silky, I prefer using the pouring kind but the dolloping kind would be terrific too!
  • Cream or mascarpone
  • Strawberries and cream (YES!)
  • Maple syrup, golden syrup, honey
  • Chocolate sauce, strawberry, salted caramel or other sweet sauces

A quintessential British dessert and a firm favourite world-wide, this is custardy on the inside, and golden and buttery on the surface! While pre-sliced bread works a treat, it’s dinner party-worthy when made with bread that can be cut or torn into cubes. Crunchier surface, and better custardy texture inside!

Prep Time: 10 mins

Cook Time: 25 mins

Total Time: 35 mins

Servings: 6 – 8 

Ingredients:

  • 8 heaped cups white bread, preferably slightly stale, cut into 2.5 cm / 1″ cubes (see Note 1 if for pre-sliced bread)
  • 1 cup sultanas or raisins (or more!)
Egg Mixture:
  • 3 eggs
  • 1 1/2 cups milk (low or full fat, not zero fat)
  • 1 cup heavy / thickened cream (or any other cream, Note 2 for more milk option)
  • 3 tbsp / 40g unsalted butter, melted and cooled
  • 1/2 cup white sugar
  • 1 tsp cinnamon powder
  • 1 tsp vanilla extract
Finishes / Serving
  • 30g / 2 tbsp unsalted butter, melted – for top pre baking
  • 20g / 1 1/2 tbsp unsalted butter, melted – for brushing post baking (optional)
Icing sugar / powdered sugar, for dusting
  • Ice cream, cream, custard, chocolate sauce, caramel sauce, etc
Instructions:

  1. Preheat oven to 180°C/350°F (all oven types)
  2. Egg Mixture: Place eggs in a large bowl, whisk briefly. Add remaining Egg Mixture ingredients and whisk.
  3. Soak Bread: Add bread and sultanas, briefly mix, then set aside for 3 minutes to allow egg mixture to soak through the bread.
  4. Transfer to baking dish: Pour into a baking dish (10 cup / 2.5 litre / 2.5 quart). If you have lots of sultanas on the surface, poke them below the surface (Note 3).
  5. Drizzle then bake: Drizzle over melted butter, then bake for 25 – 30 minutes or until golden on top and the inside is set but still slightly wobbly (poke to check).
  6. Brush with remaining 1 1/2 tbsp melted butter (optional), then dust with icing sugar.
  7. Serve – rest for a few minutes, then serve immediately, with toppings of choice! My favourites are ice cream, custard and cream.
Notes:

1. Bread – Though the classic version is made with plain white bread, you can make this with any bread of choice – like raisin bread, hot cross buns, brioche, anything!

Artisan bread with very thick chewy crusts – eg. some types of sourdough: these can be used if they are fresh or a bit stale. Do not use if they are super stale and dried out – they will be rock hard (ie you can’t even tear them, you have saw through them with a serrated knife) so not suitable for this recipe.

Rye, seeded breads – they will work fine, I just don’t recommend using anything with too strong a flavour that might be at odds with the sweet vanilla flavour of this dish!

Gluten free – absolutely works, it just comes down to how good the GF bread is

Measuring bread – Basically stack bread in a cup so it’s heaped – imagine if you pressed down lightly, it would level the cup. Can’t provide a weight as breads differ in density. Don’t get hung up on exact measurement – you’ll easily be able to tell when you mix the bread and egg, should be soaked through, still some egg mixture pooling (slightly). The worst is using way too much bread that doesn’t get soaked through = dry pudding!

Pre-sliced bread: Also terrific made with PRE SLICED sandwich bread slices! Use 12 slices (thick cut) or 14 slices (normal thickness), cut in half into triangles then layer in the baking dish slightly overlapping (so surface isn’t flat), scatter each layer with sultanas, and pour egg mixture over the whole thing.

Slightly stale bread works a bit better because it doesn’t soak through instantly and turn into mush. If using super fresh bread, just be a bit more gentle when tossing into Egg Mixture (I use fresh regularly).

2. Cream – The basic Bread & Butter Pudding recipe is made with only milk. I like using cream to give this a bit of richness.

Just milk option: Add an extra egg (so 4 eggs in total) then use milk instead of cream (so 2 1/2 cups milk in total). You need the extra egg to ensure this sets because milk is not as thick as cream.

3. Sultanas have a tendency to brown a bit too much in this bake time. So while some on the surface is fine, you don’t want too many. So if lots end up on the surface, poke them in a bit!

4. WHAT I DO DIFFERENTLY (and why): Most classic recipes butter the bread slices before cutting / tearing and soaking. I prefer to add melted butter into the mixture for more even distribution and it’s just easier, and I like to brush the top with butter before and after baking, just for that extra buttery goodness! (Plus it makes it really nice and golden on top).

Also, while delicious made with sliced bread, I think it’s even better made with cut/torn loaf or rolls because you get a WAY better crunchy surface and the texture of the inside is better – more custardy (due to larger bread pieces), fluffier and can be cut with straight sides and stacked on plates so it sits tall and impressively (pictured in post).

5. Leftovers will keep in the fridge for 4 to 5 days. If made using chunks of bread as per recipe, it will even keep the crunchy topping even if reheated in the microwave!

I haven’t tried freezing but I see no reason why it wouldn’t work given I freeze Cheese and Bacon Breakfast Strata (which is a savoury bread pudding).

Nutritional Info:

Calories: 426cal | Carbohydrates: 50g | Protein: 9g | Fat: 22g | Saturated Fat: 10g | Cholesterol: 106mg | Sodium: 358mg | Potassium: 291mg | Fiber: 2g | Sugar: 17g | Vitamin A: 885IU | Vitamin C: 1mg | Calcium: 205mg | Iron: 2mg


Grilled Crab Legs Recipe

Looking for a special appetizer or dinner idea? How about this Grilled King Crab Legs recipe, drenched in beautiful garlic butter? What could be better?

These are such a treat and are perfect for Christmas, New Year’s Eve, or anytime when you feel like spoiling yourself. The best part is they are so easy to prepare and the flavor, well, delicious! 

HOW TO GRILL CRABS LEGS

The easiest thing to do is thaw them overnight in your refrigerator. Place them in a large roasting pan. This will save you some clean up time! The crab legs will release quite a bit of water as they thaw. The roasting pan is much easier to clean than your fridge!

Melt the butter in a small saucepan and add the garlic. Cook until fragrant, but do not let it brown; set aside. Using a good pair of kitchen scissors, cut each side of the crab legs, so you have 2 halves. The meat should still be in both halves of the shells.

You will want your grill to be hot (450 degrees F.) before you put the crab legs on. It helps if you rub oil on your grill, this will prevent the meat from sticking to the grill. Grill the crab legs until you have light grill marks on the crab meat. Carefully turn the legs over using a combination of a spatula and tongs, keeping the meat in the shells.

Generously brush the crab legs with the garlic butter and continue to cook the crab legs until the butter is just bubbling in the shell. Remove from the grill and serve immediately.

ARE CRAB LEGS COOKED WHEN I BUY THEM?

I have had this question come up a few times. The answer is yes, absolutely your crabs’ legs are cooked when you buy them frozen.

The crab is cooked very shortly after it is caught either on the boat or as soon as it is taken off the boat at the docks. It is then flash-frozen to preserve its freshness.

WHAT IS THE DIFFERENCE BETWEEN SNOW CRAB LEGS AND KING CRAB LEGS?

The difference between king crab legs and snow crab legs is the size. King crab legs are actually shorter than snow crab legs but have a much thicker shell and are generally meatier. Snow crab legs are longer but thinner; the shell is also much thinner as well.

I like to grill the king crab legs as they are sturdy and have a lot of meat per leg. The shells can be tough to cut, and they are a little spiny but definitely worth the effort!

It is nice to have them cut ahead of time so your guests or family can just dig right in without all the fuss.

YIELD: 2 SERVINGS

PREP TIME: 20 minutes

COOK TIME: 20 minutes

TOTAL TIME: 40 minutes

Ingredients
  • 2 lbs king crab legs
  • 1/3 cup butter
  • 1 Tbsp garlic, minced
  • 1/2 shredded cheese
  • cilantro leaves to garnish
Instructions:
  1. Thaw the crab legs in the refrigerator overnight.
  2. Keep them in a large roasting pan as there will be quite a bit of water come out of the crab’s legs as they thaw.
  3. If you are in a hurry, you can thaw them by running them under cold water for 20 minutes or until they are thawed.
  4. This method will impart some water into the crab legs, so be careful when you are cutting them open you will have crab water everywhere!
  5. Melt the butter in a small saucepan, add the garlic and cook until fragment. Remove from the heat but keep warm.
  6. Using a good pair of kitchen scissors, cut each side of the crab legs shell.
  7. With the shell still together, using a sharp knife cut the meat so that you have meat in both halves of the shell.
  8. Heat your grill to hot (450 degrees F.)
  9. Rub the grill with oil before putting the crab legs on. This will help to keep them from sticking to the grill.
  10. Carefully place the crab legs meat side down on the grill and cook until you have light grill marks on the crab meat.
  11. Carefully turn the crab legs over using a combination of a spatula and tongs, keeping the meat in the shell.
  12. Brush each crab leg half generously with the garlic butter and continue to cook until the butter is just bubbling in the shell.
  13. Remove from the grill and serve immediately.
Nutritional Info:

YIELD: 2 SERVING SIZE: 1

Amount Per Serving: CALORIES: 715TOTAL FAT: 37gSATURATED FAT: 20gTRANS FAT: 1gUNSATURATED FAT: 12gCHOLESTEROL: 321mgSODIUM: 5104mgCARBOHYDRATES: 1gFIBER: 0gSUGAR: 0gPROTEIN: 88g

Chess Pie Recipe

Chess Pie is a delicious classic that’s perfect for a celebration or holiday gathering. Its multi-layer decadence, luscious texture and sweet, rich flavor is simply sublime!

What is Chess Pie?

Chess pie is a popular dessert in the American South that originated from England. It is a custard style pie with a crisp browned topping.

It is generally made up of a traditional pie crust while the filling consists of eggs, milk or buttermilk, flour, sugar and often vinegar or lemon.

You’ll love this pie not only for it’s irresistible sweet flavor but also because it’s one of the easier pies to make.

No peeling and chopping loads of fruit or making a tricky curd or meringue. Rather here you just blend some standard baking ingredients and pour into a pie crust and bake.

Why is it called chess pie?

There are actually several beliefs as to where the name originally came from. You can read about three of them here.

What makes this the best chess pie?

I like this version best because of the browned butter. This secret ingredient is the ultimate upgrade to chess pie.

It adds a slightly caramel-like, even nutty flavor to the pie.

And once you try it this way I have the feeling it’s the only way you’ll make it from here on out!

Variations:

Lemon Chess Pie: Use 3 Tbsp lemon juice in place of vinegar. Add 2 Tbsp lemon zest along with liquids. Butter does not need to be browned.

Chocolate Chess Pie: These ratios are quite a bit different, follow a recipe like this one.

Coconut Chess Pie: After adding eggs stir in 1 1/2 cups shredded coconut and 1 tsp coconut extract. Browning butter is optional for this version.

Buttermilk Chess Pie: Replace milk with 1/2 cup buttermilk.

Honey Chess Pie: Replace 1 1/4 cups sugar with 1 cup honey.

Optional garnishing variation: Dust pie with a little cinnamon or powdered sugar.

A rich, sweet and decadent Southern pie made with simple ingredients. This variation includes browning the butter to really upgrade the flavor of the pie.

Servings: 8

Prep Time: 30minutes

Cook Time: 50minutes

Rest Time: 1hour 50min

Ready in: 3hours 10min

Ingredients:
  • 1 prepared pie crust (homemade* or store-bought, unbaked)
  • 1/2 cup (113g) salted butter, diced into 1-Tbsp pieces
  • 1 1/4 cup (250g) granulated sugar
  • 2 Tbsp (22g) cornmeal
  • 1 Tbsp (10g) all-purpose flour
  • 1/4 tsp salt
  • 1/3 cup whole milk
  • 1 Tbsp white vinegar
  • 1 tsp vanilla extract
  • 4 large eggs
Instructions:
  1. Roll pie crust out about 12-inches then roll up around rolling pin and transfer to a standard pie plate.
  2. Unroll and shape into pie plate and decorate edges as desired.
  3. Chill until crust is firm, at least 1 hour.
  4. Melt butter in a medium, light-colored skillet. Let cook, stirring frequently until it has a nutty aroma and has browned (careful not to burn it, it should be an amber brown).
  5. Pour into a dish and let cool 1 hour.
  6. Place a baking sheet in oven and preheat oven to 350 degrees.
  7. In a mixing bowl beat eggs lightly to blend.
  8. In a separate mixing bowl whisk together granulated sugar, cornmeal, flour and salt.
  9. Pour in browned butter, milk, vinegar and vanilla to sugar mixture and blend.
  10. Add eggs and mix until well combined.
  11. Pour into prepared crust and bake on baking sheet in preheated oven until edges are set but center just wiggles slightly, about 45 – 55 minutes.
  12. Transfer to a wire rack to cool 30 minutes before slicing and serving. Store pie in refrigerator.
Notes:

*My favorite pie crust recipe is the one I’ve used here, omitting the sugar (since this pie is already plenty sweet). Prepare through step 2 as directed then follow recipe here as directed.

Nutritional Info:

Servings Per Recipe 8

Calories 460%Total Fat 22g28%Saturated Fat 10g 52%Cholesterol 126mg 42%Sodium 242mg 11%Total Carbohydrate 62g 23%Dietary Fiber 1g 3%Total Sugars 51gProtein 5gVitamin C 0mg 1%Calcium 40mg 3%Iron 1mg 6%Potassium 80mg 2%

Basbousa Recipe

Basbousa is a dessert made from coarse sweet semolina, and translates as small kiss in Arabic.

Also known as Hareeseh, as well as Nammoura, it is a very easy dish to make.

WHAT IS BASBOUSA?

This cake is one of the most popular in the Middle East and North Africa, in some Balkan countries such as Greece, Bulgaria, Albania and Turkey or in Armenia, located in Western Asia. It can be found everywhere, in restaurants, in bakeries, and there will always be someone to offer a piece.

Semolina is the key ingredient of the basbousa recipe and, depending on the country, it can also contain almond or pistachio powder, as well as grated coconut.

In Egypt, for example, it can be found prepared with almond powder, and generously topped with hazelnuts on top; in Lebanon and Syria, with pistachio powder or crushed pistachios, with coconut or candied orange peel.

As soon as it comes out of the oven, basbousa is generously soaked with a cold sugar syrup, which can sometimes contain lemon or orange juice (or zest), or orange blossom water or rose water, as well as spices such as cloves or cinnamon.

WHAT IS THE ORIGIN OF BASBOUSA?

The origin of basbousa goes back to the revani of Turkish cuisine, a classic cake from the time of the Ottoman Empire.

Indeed, revani was baked for the first time by Ottoman pastry chefs to celebrate the conquest of Armenia in the sixteenth century. The battle of Revan, capital of the country, today called Yerevan, gave its name to this famous dessert.

As time passed, the revani started to delight many tables during the Ottoman period and its name was changed to revan-i meaning “precious” in the Ottoman language.

But the name of revani could also have been taken from the poet Revani who lived in Turkey between the fifteenth and sixteenth century.

Basbousa is a pastry typical of the Middle East, North Africa and the Balkans made from semolina and ground almonds, that is soaked in flavored syrup.

Prep Time: 20mins

Cook Time: 45mins

Total Time: 1hr 5mins

 Servings: 8 people

INGREDIENTS:
For the cake
  • 3 cups fine durum wheat semolina
  • 1 cup ground almonds
  • ⅓ cup caster sugar
  • ½ cup cooled oil (or melted butter)
  • 12 oz. plain yogurt
  • 2 tablespoons baking powder
  • 1 pinch salt
For the garnish
  • 4 oz. roasted and crushed pistachios
For the syrup
  • 1 cup caster sugar
  • 1 cup water
  • 2 tablespoons rose water (or orange blossom water)
  • 2 tablespoons freshly squeezed lemon juice
For the mold
  • 2 tablespoons butter
  • 1 tablespoon flour
INSTRUCTIONS:

Start by preparing the syrup as it will need to be completely chilled to soak the hot cake.

Syrup

Pour the water, sugar and lemon juice into a saucepan over high heat.

Bring to a boil.

Reduce the heat and cook the syrup over low to medium heat for up to 10 minutes.

When the syrup is completely cold, add rose water (or orange blossom water) and mix well.

Cake

In a large bowl, combine the semolina, ground almonds, caster sugar, salt and baking powder. Add oil, yogurt, and mix.

Grease a baking dish and dust with flour before pouring the preparation.

Pack the preparation well and smooth it out to the corners with a spatula. Using a knife, pre-cut 2-inch (5 cm) squares.

Allow the preparation to rest in the refrigerator for 15 minutes. Preheat the oven to 400 F (200°C ) while the dough is resting.

Bake for 25 to 30 minutes, until the cake is golden brown.

Soaking and garnishing

As soon as the cake comes out of the oven, pour the cooled syrup over it, leaving the cake inside the mold and spreading the syrup evenly.

Sprinkle generously with crushed pistachios. Allow to cool completely before cutting the pieces along the pre-cut marks.

NUTRITIONAL INFO:

Calories: 266kcal | Carbohydrates: 46g | Protein: 3g | Fat: 8g | Saturated Fat: 5g | Cholesterol: 17mg | Sodium: 139mg | Potassium: 80mg | Fiber: 1g | Sugar: 30g | Vitamin A: 192IU | Vitamin C: 1mg | Calcium: 25mg | Iron: 1mg

Philly Cheese Steak Egg Rolls Recipe

These Philly cheesesteak egg rolls are made with rib eye steak, onions, peppers and provolone cheese, all wrapped up and fried to crispy perfection. The ultimate appetizer or game day snack!

I love a good Philly cheesesteak sandwich, and these egg rolls have the same delicious and savory flavors inside a crispy wrapper.

Raise your hand if you love Philly cheesesteak! I just can’t get enough of that steak, pepper and cheese combination. These Philly cheesesteak egg rolls are a super fun appetizer, I always get so many compliments when I serve them at parties.

HOW DO YOU MAKE PHILLY CHEESESTEAK EGG ROLLS?

The first step is to cook up your filling. The filling for these egg rolls is died rib eye steak, green bell pepper and onion which are cooked in a little bit of butter.

You want to make sure your meat is diced fairly small to make it easier to bite into the egg rolls. You can also add some diced mushrooms if you’re a mushroom lover.

WHAT KIND OF MEAT DO YOU USE FOR PHILLY CHEESESTEAK?

Traditionally, thinly sliced rib eye is used for Philly cheesesteak sandwiches which is what we’re using in these egg rolls. If you don’t want to use rib eye, you could try sirloin or flank steak, or even ground beef for a different take on this dish.

The meat mixture is spooned into egg roll wrappers along with some provolone cheese. The egg rolls are then folded up and are ready to be fried.

HOW DO YOU BAKE EGG ROLLS?

You can bake these egg rolls, although you won’t get quite the same crispy crust as you would from frying. Simply coat the tops of your egg rolls with cooking spray and bake at 425 degrees F for 15-20 minutes, or until browned and crispy.

You can serve your egg rolls as is, or with a creamy dipping sauce such as ranch or a horseradish sauce. They’re great either way!

These Philly cheesesteak egg rolls will be the first snack to disappear at your next gathering. No one can resist that meat and cheese combo, and when you put it all into a crispy wrapper it tastes even better.

Prep Time: 20min

Cook Time: 15min

Total Time: 35min

SERVES: 12

INGREDIENTS:
  • 1 1/2 tablespoons butter
  • 1 green bell pepper chopped
  • 1/2 cup onion chopped
  • 1 pound boneless rib eye steak sliced or coarsely chopped
  • salt and pepper to taste
  • 6 slices provolone cheese
  • 12 egg roll wrappers
  • oil for frying
  • ranch for dipping optional
INSTRUCTIONS:
  1. Melt half of the butter in a large pan over medium high heat. Add the peppers and onion and cook 3-4 minutes or until softened.
  2. Remove the vegetables from the pan and cover to keep warm.
  3. Melt the other half of the butter and add the rib eye to the pan. Season with salt and pepper to taste.
  4. Cook the steak for 3-4 minutes or until browned and just cooked through.
  5. Place the peppers and onions back into the pan with the steak.
  6. Lay out an egg roll wrapper and place 1/2 of a slice of cheese in the center.
  7. Spoon approximately 2-3 tablespoons of steak filling onto each egg roll wrapper and fold according to package directions, using water to seal the edges of the wrappers as you go.
  8. Pour 2-3 inches of oil into a deep pan. Heat the oil to 350 degrees.
  9.  Fry 3-4 egg rolls at a time, turning occasionally, until browned all over, approximately 3-5 minutes.
  10. Drain on paper towels, then serve with dipping sauce of your choice.
NOTES:
If you prefer to bake your egg rolls, you can coat them with cooking spray and bake at 425 degrees F for 15-20 minutes or until browned and crispy.
NUTRITIONAL INFO:

Calories: 182kcal | Carbohydrates: 8g | Protein: 12g | Fat: 10g | Saturated Fat: 5g | Cholesterol: 37mg | Sodium: 229mg | Potassium: 158mg | Vitamin A: 210IU | Vitamin C: 8.5mg | Calcium: 117mg | Iron: 1.2mg

Grandma’s Country-Side White Bread Recipe

Bread, a food item that is served with many dishes, can be a meal by itself, will hold your favorite lunch meat or cheeses, and can even hold hot dogs, bratwurst, hamburgers and numerous other foods. Breads have become the scourge of the dietary world for many people. However, I am not one of them!

I love making homemade bread. I love the aroma of the house when bread is being made. It makes me feel warm inside.

Making bread is not as difficult as you think it is. After all, people have been making bread for many years. It is called Carb heaven due to the amount of carbohydrates in the bread. But, homemade bread should not count in that should It?

This bread recipe is perfect for those just beginning to make their own bread, and yet so simple that those with experience can put the ingredients together super fast and it will still be the perfect recipe for them too!

WHAT MAKES THIS A GREAT RECIPE?

The bread comes out perfectly soft on the inside and slightly crusty on the outside. The recipe is super easy to follow and does not take a lot of ingredients or time.

WHAT TYPE OF YEAST DO I NEED TO USE?

There are a couple different types of yeast. Each yeast is best for different types of bakery goods. For this recipe, we want to use a quick rising yeast. Quick Rising yeast gives you the volume in a short amount of time.

YIELD: 8

PREP TIME: 10 min

COOK TIME: 30 min

TOTAL TIME: 40 min

Ingredients:
  • 1 cup warm water
  • 1 pkg Dry Active Yeast
  • 1 tsp Salt
  • 1 egg, large
  • ¼ cup Sugar
  • 3 tbsp Oil
  • 3 ½ to 4 cups Flour, all purpose is good to use
Instructions:
  1.  In a large bowl add the yeast to the warm water and allow it to sit for a 10 minutes
  2. After 10 minutes, add the egg, salt, sugar, oil and 2 cups of the flour to the bowl with the yeast mixture
  3.  Blend on high until well combined
  4. Add 1 more cup of flour and blend until the dough is smooth
  5. If needed, add more flour ¼ cup at a time, blending after each addition, Continue until the dough slips off the mixing handle easily
  6.  Grease a large bowl generously and place the ball of dough in the bowl
  7.  Turn the ball a few times so that it is covered and will not stick
  8. Cover lightly with a clean towel or cloth, and place in a warm area for one hour to rise. The dough should at least double in size.
  9. Punch the dough down and knead a few times with your hands and then place into a well greased loaf pan
  10.  Cover lightly with a cloth and place in a warm area to rise for one hour
  11. When the hour is done, Bake in a preheated oven at 375* for 25 to 30 minutes, until browned and cooked through.
Nutritional Info:

Yield: 8

Serving Size: 1

Amount Per Serving

Calories877TotalFat8gSaturatedFat1gTransFat0gUnsaturatedFat6gCholesterol23mgSodium305mgCarbohydrates173gFiber6gSugar7gProtein24g