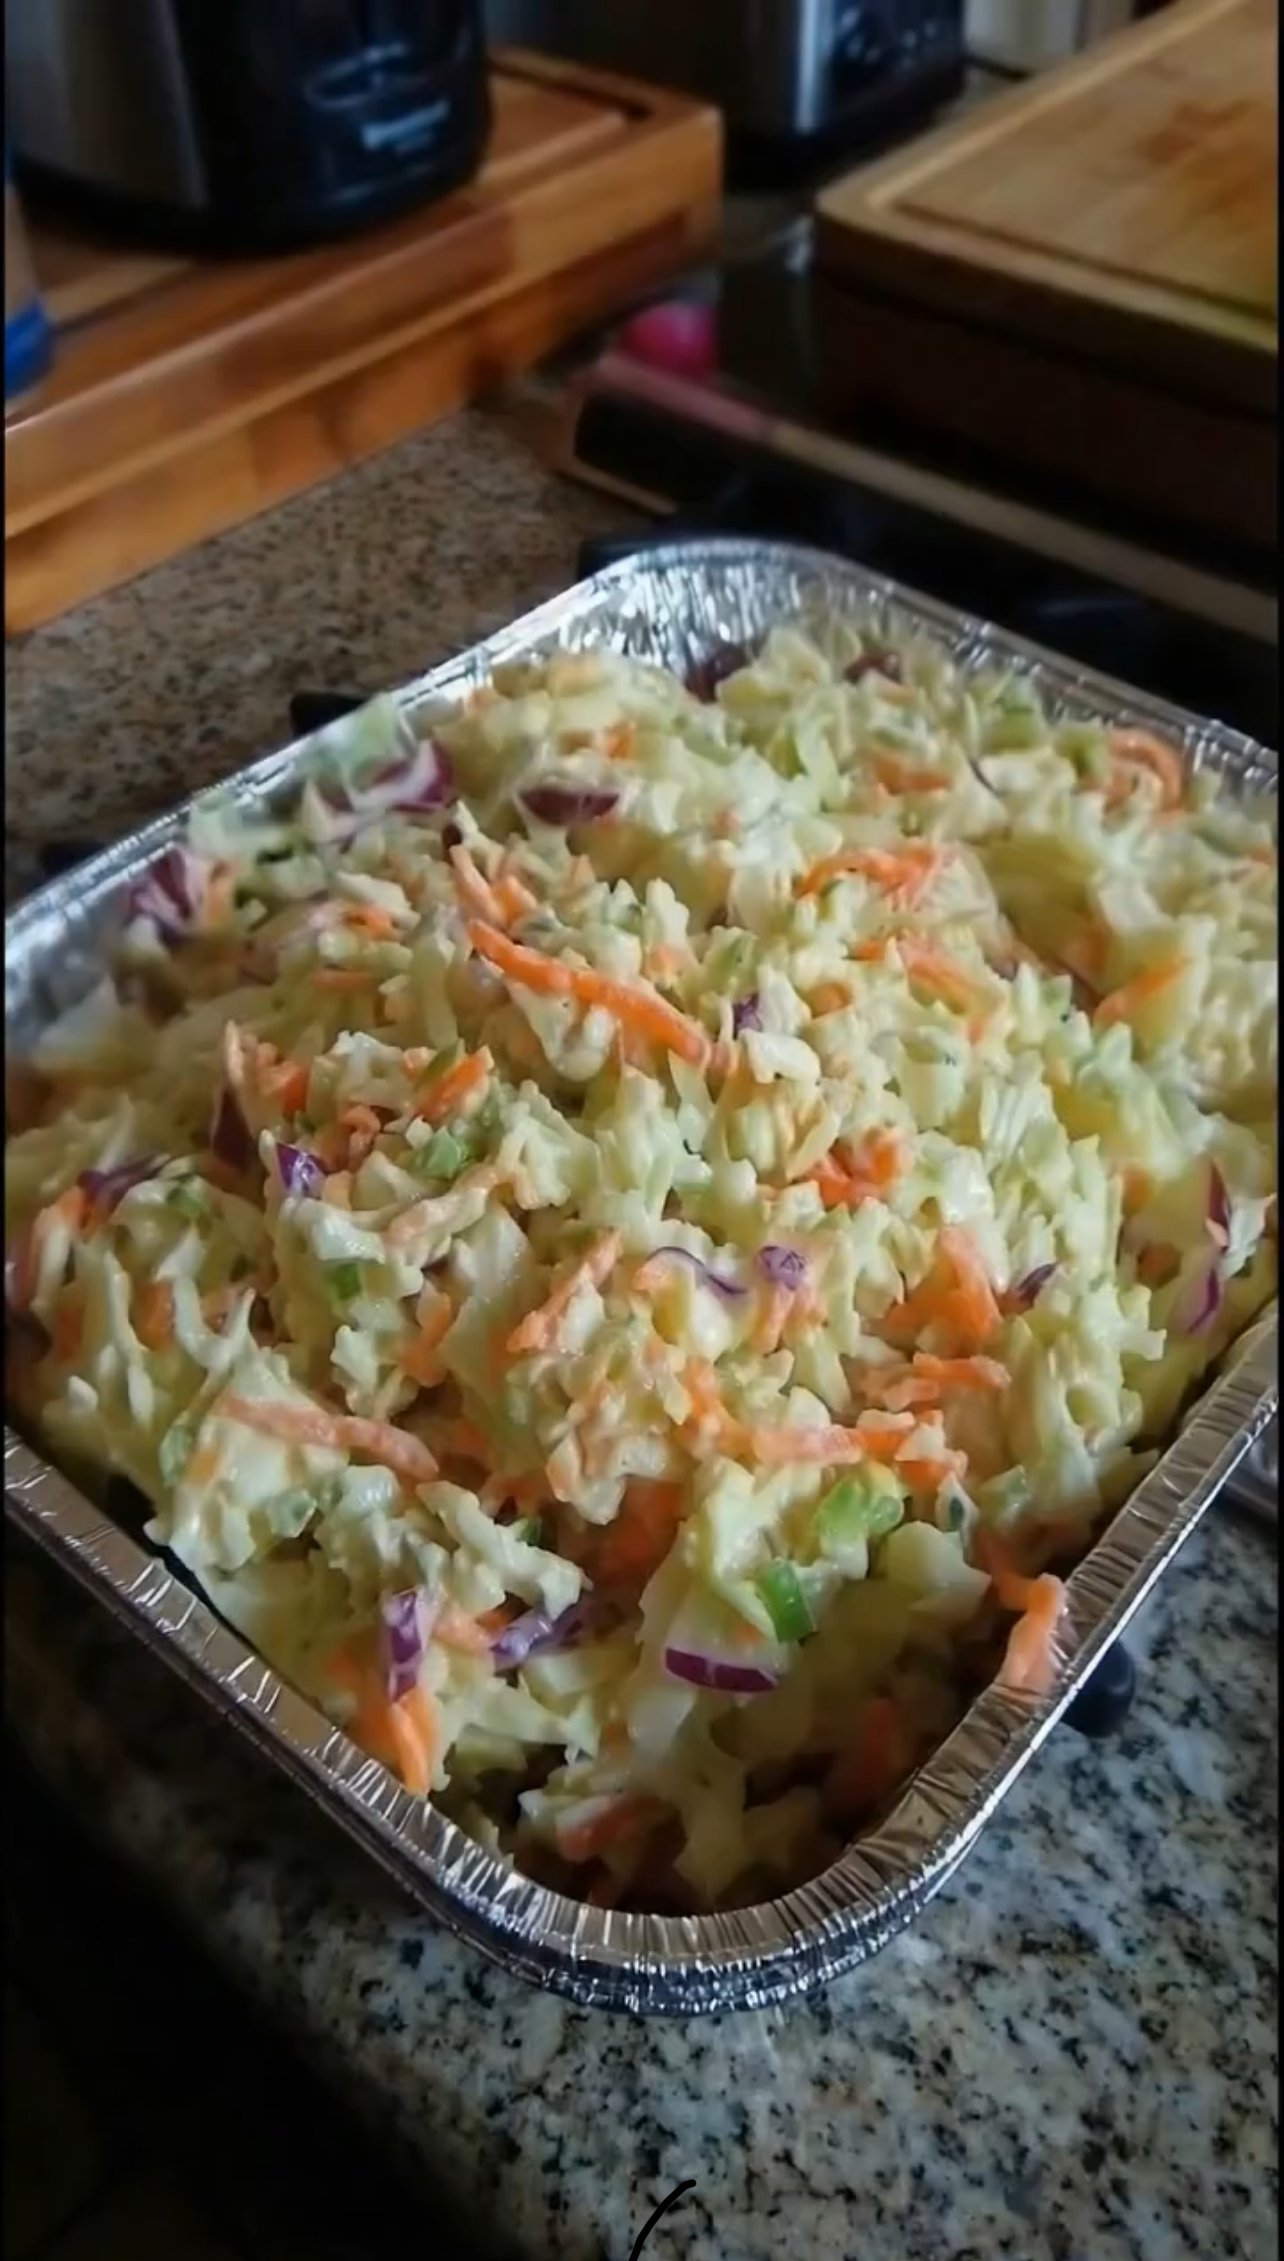
Chicken Bacon Ranch Lasagna Soup
Ingredients
2 cups Cooked Chicken
3 cups Cheddar Cheese shredded
7 Lasagna Sheets broken
1 cup Carrots diced
1 cups Yellow Onion diced
1 cups Celery diced
3 cups Whole Milk
3 cups Chicken Broth
5 tablespoon Butter
1 teaspoon Olive Oil
¼ cups All Purpose Flour
1 cup Bacon Bits
2 tablespoons Ranch Seasoning
1 teaspoon Chicken Bouillon Powder
Instructions
Heat a large pot over medium heat and add the butter and olive oil. Once the butter has melted, stir in the diced onions, carrots, and celery. Cook the vegetables for 7–8 minutes, stirring occasionally, until they start to become tender.
Sprinkle the flour over the softened vegetables and stir to coat everything evenly. Reduce the heat to low and continue cooking for 2–3 minutes, stirring frequently to prevent sticking.
Pour in the whole milk and chicken broth, then add the ranch seasoning, chicken bouillon powder, cooked chicken, and bacon crumbles. Stir well to combine and bring the mixture to a gentle simmer, stirring occasionally as it heats.
Once the soup reaches a simmer, add the broken lasagna sheets. Let the soup cook for about 15 minutes, or until the lasagna sheets are cooked to al dente. When the noodles are done, turn off the heat.
Let the soup cool for 2–3 minutes to prevent the cheese from breaking. Stir in the shredded cheese in small handfuls, mixing after each addition until the cheese is fully melted and incorporated. Serve and enjoy
HealthyDiet RecipeWorld
Italian Wraps
Italian Wraps
Ingredients
Method
-
Heat a pan over medium heat. Add the minced meat and cook until it’s browned, breaking it up well while it cooks.
-
Stir in the tomato paste, 30 ml of tomato sauce, cream cheese, oregano, garlic powder, and salt. Let this simmer gently while stirring, until the mixture is thick, creamy, and well combined.
-
Spread a thin layer of tomato sauce over each tortilla.
-
Evenly distribute the meat mixture on top of the tortillas, then sprinkle with shredded mozzarella.
-
Roll the tortillas tightly and place them seam side down in the air fryer basket.
-
Brush or spoon remaining tomato sauce over the rolls and sprinkle with more mozzarella.
-
Air-fry at 190°C (375°F) for 10–15 minutes until the wraps are golden, bubbly, and slightly crisp on the outside.
-
Let them rest for 2 minutes before serving hot.
Notes
FRESH CUCUMBER LEMONADE
Cream Cheese Pound Cake with Frosting
. Cream Cheese Pound Cake with Frosting
This recipe produces a dense, velvety crumb that is richer than a standard sponge cake.
Ingredients
-
For the Cake:
-
1 ½ cups unsalted butter (softened)
-
8 oz (225g) cream cheese (softened)
-
3 cups granulated sugar
-
6 large eggs (room temperature)
-
3 cups all-purpose flour
-
1 tsp salt
-
2 tsp vanilla extract
-
-
For the Frosting:
-
4 oz cream cheese (softened)
-
¼ cup butter (softened)
-
2 cups powdered sugar
-
1 tsp vanilla extract
-
Step-by-Step Instructions
-
Preheat and Prep: Preheat your oven to 160°C (325°F). Grease and flour a large loaf pan or bundt pan.
-
Cream Butter and Cheese: In a large bowl, beat the softened butter and 8 oz of cream cheese together until smooth and creamy.
-
Add Sugar: Gradually add the granulated sugar, beating on medium-high speed for about 5 minutes until the mixture is light and fluffy.
-
Incorporate Eggs: Add the eggs one at a time, beating well after each addition. Stir in the vanilla extract.
-
Add Dry Ingredients: Gently fold in the flour and salt. Mix just until combined; do not overmix, or the cake will be tough.
-
Bake: Pour the batter into the pan. Bake for 1 hour to 1 hour 15 minutes, or until a toothpick comes out clean. Let it cool completely.
-
Frost: Beat the frosting ingredients together until smooth. Use a piping bag with a star tip to create the decorative peaks shown in the video.
2. Golden Yogurt Fritters (Frittelle)
These are the light, airy doughnut bites from your photos.
Ingredients
-
1 Egg
-
100g Sugar
-
1 cup (250g) Plain Yogurt
-
½ cup (120ml) Milk
-
2 ½ cups All-purpose flour
-
1 tbsp Baking powder
-
Oil for frying
-
Extra sugar for coating
Step-by-Step Instructions
-
Make the Batter: Whisk the egg and sugar in a bowl. Stir in the yogurt and milk.
-
Combine: Sift in the flour and baking powder. Mix until you have a thick, sticky batter that holds its shape on a spoon.
-
Heat Oil: Heat 2 inches of oil in a pan over medium heat.
-
Fry: Using two spoons, scoop a small amount of batter and drop it into the oil. Fry for 2–3 minutes until golden brown all over.
-
Coat: Remove with a slotted spoon and immediately toss in a bowl of sugar while still hot.
🧀 Baked Chicken & Rice Casserole
A creamy, cheesy comfort-food casserole that’s quick, filling, and perfect for busy nights.
⭐ Why You’ll Love It
✔ Comfort food classic
✔ Easy prep
✔ Kid-friendly
✔ Freezer-friendly
✔ Super cheesy
🛒 Ingredients
-
1 box Rice-A-Roni (Chicken flavor)
-
4 cups cooked shredded chicken
-
1 can cream of onion soup (or cream of mushroom/chicken)
-
1 cup sour cream
-
2 cups shredded cheddar cheese
-
French fried onions (optional topping)
👩🍳 Instructions
-
Preheat oven to 350°F (180°C).
-
Cook Rice-A-Roni according to package directions.
-
Stir in:
-
Cream of onion soup
-
Sour cream
-
-
Add shredded chicken and mix well.
-
Spread mixture into a greased 9×13 baking dish.
-
Sprinkle cheddar cheese evenly on top.
-
Bake for 40 minutes, until hot and bubbly.
-
Let cool 5 minutes.
-
Top with French fried onions (optional) and serve.
💡 Tips & Variations
-
Use turkey instead of chicken if needed.
-
Add peas, mushrooms, or onions for extra nutrition.
-
For extra creaminess: add ¼ cup milk or cream.
-
Use low-fat sour cream & low-sodium soup for a lighter version.
🧊 Storage
-
Fridge: 3–4 days in airtight container
-
Freezer: up to 3 months
-
Thaw overnight and reheat in oven or microwave
Guava Leaf Tea
Description
Guava leaf tea is a herbal drink rich in antioxidants and plant compounds. Research suggests it may help improve insulin sensitivity and reduce blood sugar spikes after meals.
Ingredients
-
8–10 fresh guava leaves (or 1 tablespoon dried leaves)
-
2 cups water
-
Optional: ½ teaspoon cinnamon
-
Optional: ½ teaspoon lemon juice
Instructions
-
Wash the leaves thoroughly.
-
Bring water to a boil.
-
Add guava leaves and simmer on low heat for 10–15 minutes.
-
Strain the tea.
-
Drink warm or slightly cooled.
Serving Size
-
1 cup, 1–2 times daily
-
Best time: After meals
Approximate Nutritional Information (per cup)
-
Calories: 2–5 kcal
-
Carbohydrates: 0 g
-
Fat: 0 g
-
Contains: Antioxidants, flavonoids, trace vitamin C
Potential Benefits
May help manage blood sugar
May improve cholesterol levels
May support weight management
May promote gut health
Important Notes
-
If you are taking insulin or diabetes medication, consult your doctor before use.
-
Do not exceed 2 cups per day.
-
Pregnant women and kidney patients should consult a healthcare professional first.
Tips
-
Fresh leaves may be more effective than dried ones.
-
Use regularly for 4–6 weeks, then monitor blood sugar levels.
-
Works best alongside a healthy diet and regular exercise.
Q & A
Q: Does it cure diabetes?
No. It may help manage blood sugar but is not a cure.
Q: How long before seeing results?
Mild improvements may be noticed within 2–4 weeks.
Q: Can it be consumed daily?
Yes, in moderation (1–2 cups per day).
Q: Does it melt fat?
It does not directly burn fat but may support metabolism.
Healthy Oatmeal Fruit Cake
Recipe: The “Glow-Up” Oatmeal Fruit Cake
Prep time: 15 minutes
Bake time: 45–50 minutes
Servings: 8–10 slices
Ingredients
The Base:
3 cups Old-fashioned rolled oats (divided: 2 cups blended into flour, 1 cup left whole)
1 ½ tsp Baking powder
1 tsp Ground cinnamon
½ tsp Ground ginger
¼ tsp Sea salt
The Wet Ingredients:
2 Large eggs (or flax eggs for vegan)
1 ½ cups Unsweetened applesauce
1/3 cup Pure maple syrup or honey
1 tsp Vanilla extract
½ cup Milk of choice (almond, oat, or dairy)
The Fruit & Nut Mix:
1 ½ cups Mixed dried fruit (raisins, cranberries, chopped apricots, or dates)
½ cup Chopped walnuts or pecans
Instructions
Prep: Preheat your oven to 180°C (350°F). Grease a 9×5 inch loaf pan or line it with parchment paper.
Make Oat Flour: Place 2 cups of the oats in a blender and pulse until they reach a fine, flour-like consistency.
Mix Dry: In a large bowl, whisk the oat flour, the remaining 1 cup of whole oats, baking powder, cinnamon, ginger, and salt.
Mix Wet: In a separate bowl, whisk the eggs, applesauce, maple syrup, vanilla, and milk until smooth.
Combine: Pour the wet ingredients into the dry. Stir until just combined, then fold in your dried fruit and nuts.
Rest: Let the batter sit for 5 minutes. This allows the oats to hydrate, resulting in a better texture.
Bake: Pour into the pan and bake for 45–50 minutes, or until a toothpick comes out clean.
Cool: Let it cool in the pan for at least 20 minutes before slicing. This cake “sets” as it cools!
💡 Notes & Pro-Tips
The Texture: Expect a dense, moist, “baked oatmeal” texture rather than a fluffy sponge cake.
Fruit Hydration: If your dried fruit is very hard, soak it in warm water (or orange juice!) for 10 minutes before adding to the batter for extra juiciness.
Storage: Store in an airtight container in the fridge for up to 5 days, or freeze individual slices for a quick “grab-and-go” breakfast.
🥗 Nutritional Info & Benefits
Nutrient Per Serving (1 slice)
Calories 240 kcal
Fiber 5g
Protein 6g
Sugar 14g (Natural)
Why it’s good for you:
Sustained Energy: High in complex carbohydrates from oats, which have a low glycemic index.
Heart Healthy: Oats contain beta-glucan, a soluble fiber known to help lower cholesterol.
No Refined Sugar: Relies on the natural sweetness of applesauce and dried fruit.
❓ Q&A
Q: Can I make this gluten-free?
A: Absolutely. Just ensure your oats are certified gluten-free to avoid cross-contamination.
Q: It feels a bit wet in the middle, did I undercook it?
A: Because of the applesauce and oats, it is naturally very moist. However, if it feels “gummy,” let it cool completely; the structure firms up significantly at room temperature.
Q: Can I use fresh fruit instead of dried?
A: You can! Fresh blueberries or diced apples work well, but keep in mind they release more moisture, so you may need to bake it for an extra 5–10 minutes.
🍌 Mango Banana Smoothie Recipe
Prep time: 5 minutes | Servings: 1 large or 2 small
Ingredients
Instructions
-
Prep: If you are using fresh fruit instead of frozen, add ½ cup of ice to ensure the smoothie is cold and thick.
-
Layer: Add the liquid to your blender first (this helps the blades move freely), followed by the yogurt, then the frozen mango and banana.
-
Blend: Start on the lowest setting and quickly increase to high. Blend for 45–60 seconds until the mixture is completely smooth with no visible fruit chunks.
-
Check: If the smoothie is too thick to pour, add another splash of milk and pulse.
-
Serve: Pour into a glass jar. To match the photo, serve it with a gold or metal straw and place a few fresh banana slices and mango cubes on the side.
Quick Customizations
-
Tropical Twist: Swap the milk for pineapple juice or coconut water.
-
Protein Boost: Add a scoop of vanilla protein powder (you may need an extra ¼ cup of liquid if you do this).
-
Green Version: Toss in a handful of fresh baby spinach; the mango and banana are sweet enough to hide the taste completely!
🥭 Mango Coconut Smoothie Recipe
Prep time: 5 minutes | Servings: 1
Ingredients
Instructions
-
Combine: Add the frozen mango, coconut milk, yogurt, and sweetener into a high-speed blender.
-
Blend: Start on a low speed and gradually increase to high. Blend until the mixture is completely smooth and thick.
-
Tip: If it’s too thick, add a splash more coconut milk. If too thin, add more frozen mango.
-
-
Taste: Give it a quick taste. Add a little more lime juice if you want more tang, or honey if you prefer it sweeter.
-
Assemble: Pour the smoothie into a tall glass.
-
Garnish: Top with a few fresh mango cubes and a sprinkle of coconut flakes to match the picture. Add a glass straw and enjoy!
Pro-Tips for the Best Texture
-
Frozen is better: Using frozen mango instead of fresh gives you that thick, “soft-serve” consistency without needing to add ice, which can water down the flavor.
-
Toast the coconut: Quickly toast your coconut flakes in a dry pan over medium heat for 1–2 minutes until golden for an extra crunch.
Avocado Mango Smoothie.
Ingredients
Yields: 1 serving | Prep time: 5 minutes
| Item | Quantity | Note |
| Ripe Mango | 1 cup | Fresh or frozen chunks |
| Ripe Avocado | 1/2 medium | Pitted and peeled |
| Milk of choice | 1 cup | Almond, oat, or dairy work great |
| Greek Yogurt | 1/4 cup | For extra protein and tang |
| Honey or Maple Syrup | 1-2 tsp | Optional (mango is usually sweet enough) |
| Lime Juice | 1 squeeze | Brightens the flavor significantly |
| Ice Cubes | 1/2 cup | Skip if using frozen mango |
Instructions
-
Prep the fruit: If using fresh mango, dice it into small cubes. Scoop the avocado flesh out of the skin.
-
Layer the blender: Add the liquid (milk) first to help the blades spin freely. Follow with the avocado, mango, yogurt, and sweeteners.
-
Blend: Start on a low speed and gradually increase to high. Blend for about 45–60 seconds until the mixture is completely smooth and “velvety.”
-
Adjust: If it’s too thick, add a splash more milk. If you want it colder, add a few more ice cubes and pulse.
-
Serve: Pour into a tall glass and enjoy immediately.
Pro-Tips for Success
-
The “Ripeness” Rule: Make sure your avocado is soft to the touch. An underripe avocado will make the smoothie taste “grassy” rather than creamy.
-
The Lime Secret: Don’t skip the lime juice! It prevents the avocado from oxidizing (turning brown) and cuts through the richness of the fats.
-
Boost It: Add a tablespoon of chia seeds or hemp hearts for extra fiber and a little texture.
How to Make 3 kg of Homemade Cheese with 2 Liters of Milk in a Blender
Hello, everyone! Welcome back to our cooking blog, where we share delicious recipes every week. Today, we’re preparing a homemade cheese. So, grab your pen and paper to jot down the ingredients and let’s dive into this easy, step-by-step recipe that’s perfect for breakfast, appetizers or even to accompany fresh salads!
Classic Easy Crêpes
Classic Easy Crêpes
Thin, tender crêpes suitable for both sweet and savory fillings
Yield
Makes approximately 10–12 crêpes (22–24 cm / 9–10 inch)
Cooking Temperature
Medium heat
Ingredients
-
1 cup (125 g) all-purpose flour
-
2 large eggs, at room temperature
-
½ cup (120 ml) whole milk
-
½ cup (120 ml) water
-
2 tablespoons unsalted butter, melted and cooled
-
¼ teaspoon salt
Optional (for sweet crêpes)
-
1 tablespoon granulated sugar
-
1 teaspoon vanilla extract
Instructions
1. Prepare the Batter
-
Place the flour into a large mixing bowl.
-
Add the eggs and whisk until a thick, smooth mixture forms. This step helps prevent lumps later.
-
Gradually pour in the milk and water while whisking continuously. Continue mixing until the batter becomes smooth and fluid.
-
Add the salt and melted butter. If preparing sweet crêpes, also add the sugar and vanilla extract. Whisk until fully combined.
-
The finished batter should have the consistency of light cream and pour easily.
-
Cover the bowl and allow the batter to rest in the refrigerator for 30 minutes. This resting period improves texture and results in softer crêpes.
2. Cook the Crêpes
-
Heat a non-stick pan or crêpe pan over medium heat.
-
Lightly coat the surface with a small amount of butter or neutral oil, wiping away any excess.
-
Pour approximately ¼ cup of batter into the center of the pan.
-
Immediately lift and rotate the pan so the batter spreads evenly into a thin layer covering the entire surface.
-
Cook for 1–2 minutes, until the underside is lightly golden and the edges begin to loosen from the pan.
-
Gently turn the crêpe using a spatula and cook the second side for 30–45 seconds, just until set.
-
Transfer the cooked crêpe to a plate and repeat with the remaining batter, lightly greasing the pan as needed.
3. Serving Suggestions
Sweet Fillings
-
Fresh berries or sliced fruit
-
Chocolate or hazelnut spread
-
Lemon juice with a light sprinkle of sugar
-
Whipped cream or custard
Savory Fillings
-
Ham and cheese
-
Sautéed mushrooms
-
Spinach with cream or cheese
-
Eggs and herbs
Finishing
-
Dust lightly with powdered sugar
-
Serve with honey, syrup, or fruit sauce
Storage
-
Cooked crêpes can be stacked, covered, and refrigerated for up to 2 days
-
Reheat gently in a dry pan before serving
Melt in your mouth Chicken
This is one of those recipes I make over and over again. On those days when I get home late to start dinner, this is my go-to recipe. Melt in your mouth chicken is just that. It melts in your mouth.
Melt in Your Mouth Chicken is a classic recipe that’s been around for ages. Its origins are unclear, but I’m glad whoever came up with it did.
The idea of topping chicken breast with mayo and parmesan is pure genius! The mixture turns beautifully golden post-baking, and it smells phenomenal, too.
The flavor is so rich, so creamy, and so addictive!
More importantly… OMG… the chicken is insanely tender and moist! That’s something that’s hard to come by with baked chicken breast.
Best of all, this recipe is impossible to mess up. Even if you’re a newbie in the kitchen, you can easily pull it off.
If you’re looking for a dish to shock and impress your family and friends, this is the one.
Ingredients:
- 4 boneless, skinless chicken breasts
- 1 Cup mayonnaise
- 1/2 Cup Shredded Parmesan cheese
- 1 tsp salt
- 1/2 tsp black pepper
- 1 tsp minced garlic
- 1 tsp garlic powder
How To Make Melt in your mouth Chicken:
- Preheat the oven to 375 degrees.
- In a small bowl, add the mayonnaise, parmesan cheese, and seasonings.
- Mix to combine.
- Place the chicken in a baking dish, sprayed with a non-sticking baking spray.
- Spread the mixture on top of the chicken breasts.
- Bake the chicken for 45 minutes, or until cooked through.
- Serve warm!
No-Beat German Apple Pie
Prep time: 15 minutes | Bake time: 35–40 minutes
Detailed Ingredients
-
The Fruit Base: * 3 large apples (peeled and cut into small bite-sized pieces)
-
½ cup (75g) raisins
-
2 teaspoons cinnamon powder
-
-
The Dry Mix:
-
1 cup (130g) wheat flour
-
½ cup (100g) granulated sugar
-
1 teaspoon baking powder
-
-
The Liquid Binder:
-
3 large eggs
-
1 tablespoon extra sugar (for the eggs)
-
100g butter (melted and slightly cooled)
-
-
Optional Garnish: * Icing sugar for dusting
-
Flaked almonds (optional)
-
-
Step-by-Step Instructions
1. Prepare the Fruit
In a large mixing bowl, combine your chopped apples, raisins, and cinnamon. Toss them thoroughly until every piece of apple is coated in cinnamon. This ensures the flavor is distributed throughout the pie.
2. Prep the Baking Mold
Grease a 9-inch (23cm) springform pan or glass baking dish with butter. For easier removal, you can line the bottom with parchment paper. Spread the cinnamon-apple and raisin mixture evenly across the bottom of the pan.
3. Create the Dry Layer
In a separate medium bowl, whisk together the wheat flour, ½ cup sugar, and baking powder until well combined. The Secret Step: Sprinkle this dry flour mixture directly and evenly over the raw apples in the pan. Do not stir it in. You want a flat layer of dry ingredients sitting on top of the fruit.
4. Prepare the Liquid Layer
In another bowl, crack the 3 eggs and add the 1 tablespoon of extra sugar. Whisk vigorously (by hand or with a fork) for about 1-2 minutes until the eggs are pale and very frothy.
5. Assemble the “No-Beat” Layers
-
Slowly pour the frothy egg mixture over the dry flour layer in the pan.
-
Immediately follow by drizzling the 100g of melted butter evenly over the entire surface.
-
Important: Use a spoon to gently spread the liquid to any “dry spots” where you can still see white flour. The liquids will seep down through the flour and fruit during baking to create the dough.
6. Bake to Perfection
Place the pan in a preheated oven at 180°C (350°F). Bake for 35–40 minutes. The pie is done when the top is a deep golden brown and a toothpick inserted into the center comes out clean (though it will feel moist due to the apples).
7. Cool and Serve
Allow the pie to cool in the mold for at least 15 minutes. This is critical as it allows the “custard” formed by the eggs and butter to set. Dust generously with icing sugar before slicing.
-
Blueberry Cream Cheese Crumb Cake
Description
A luscious, bakery-style treat featuring a soft, buttery cake base layered with tangy cream cheese, juicy blueberries, and a sweet crumbly streusel topping. This cake is perfect for brunch, tea time, or dessert, offering richness and fruitiness in every bite.
Ingredients
For the Cake Batter:
- 1/2 cup (1 stick) unsalted butter, softened
- 3/4 cup granulated sugar
- 2 large eggs
- 1 tsp vanilla extract
- 1 1/2 cups all-purpose flour
- 1 1/2 tsp baking powder
- 1/4 tsp salt
- 1/2 cup whole milk
For the Cream Cheese Layer:
- 8 oz cream cheese, softened
- 1/4 cup granulated sugar
- 1 egg yolk
- 1/2 tsp vanilla extract
For the Blueberry Layer:
- 1 1/2 cups fresh or frozen blueberries
- 1 tbsp all-purpose flour (optional, to coat berries and prevent sinking)
For the Crumb Topping:
- 1/2 cup all-purpose flour
- 1/4 cup brown sugar
- 1/4 cup granulated sugar
- 1/2 tsp ground cinnamon
- 1/4 cup unsalted butter, melted
Instructions
- Preheat Oven:
Preheat your oven to 350°F (175°C). Grease and flour a 9-inch springform or square baking pan. - Prepare Cake Batter:
- In a bowl, cream the softened butter and sugar together until light and fluffy.
- Beat in the eggs, one at a time, then add vanilla.
- In a separate bowl, whisk together flour, baking powder, and salt.
- Alternate adding the dry ingredients and milk into the butter mixture, mixing just until combined.
- Spread the batter evenly into the prepared pan.
- Cream Cheese Layer:
- In a bowl, beat the cream cheese, sugar, egg yolk, and vanilla extract until smooth.
- Gently spread this mixture over the cake batter in the pan.
- Blueberry Layer:
- Toss blueberries with 1 tbsp flour (optional).
- Evenly distribute the blueberries over the cream cheese layer.
- Crumb Topping:
- In a bowl, combine flour, brown sugar, granulated sugar, cinnamon, and melted butter. Mix until crumbly.
- Sprinkle over the top of the blueberry layer.
- Bake:
- Bake for 45–55 minutes, or until the top is golden and a toothpick inserted in the center comes out mostly clean (it’s okay if a little cream cheese clings).
- Let the cake cool in the pan for 10 minutes, then remove to a wire rack to cool completely.
Notes
- Frozen blueberries? Don’t thaw before using—just coat in flour to prevent sinking.
- For a lemon twist: Add 1 tsp lemon zest to the cream cheese mixture.
- Storage: Store leftovers in the fridge for up to 4 days because of the cream cheese layer.
Tips
- Don’t overmix the cake batter—this keeps it soft and tender.
- Use a springform pan for easy removal and a clean presentation.
- Serve slightly warm or at room temperature for best flavor.
Servings
Makes 8–10 generous slices.
Nutritional Information (Per serving, approx.):
- Calories: 370
- Protein: 5g
- Fat: 20g
- Carbohydrates: 42g
- Sugar: 24g
- Fiber: 2g
- Calcium: 6% DV
(Values may vary depending on specific ingredients.)
Benefits
- Rich flavor with creamy, fruity, and crumbly textures.
- Great make-ahead dessert—tastes even better the next day!
- Blueberries provide antioxidants and vitamin C.
- Versatile—works as a dessert, breakfast, or tea-time treat.
Q&A Section
Q: Can I use other berries instead of blueberries?
A: Yes! You can use raspberries, blackberries, or chopped strawberries. Keep the total berry amount to about 1 1/2 cups for best texture.
Q: Can I freeze this cake?
A: Absolutely. Slice the cake, wrap tightly in plastic wrap and foil, and freeze for up to 2 months. Thaw overnight in the fridge or microwave for a quick treat.
Q: Can I make this gluten-free?
A: Yes. Use a 1:1 gluten-free flour blend in place of the all-purpose flour for all components of the cake.
Q: What’s the best way to serve it?
A: Slightly warm, dusted with powdered sugar or topped with whipped cream.
Creamy High-Protein Herb Dip Fresh, flavorful, and packed with lean protein in every scoop.
Servings: 6
Total Time: 10 minutes
Difficulty: Easy
Calories per Serving: ~95
Macros (per serving): 12g Protein / 3g Net Carbs / 4g Fat / 1g Fiber
This Creamy High-Protein Herb Dip is the kind of snack that feels indulgent but fits perfectly into a keto, low-carb, and Weight Watchers–friendly lifestyle. It’s thick, cool, and packed with fresh herbs—like a cross between ranch dip and whipped Greek yogurt—yet made with clean, macro-balanced ingredients.
If you’re trying to stay low carb while keeping your protein intake high, this dip is a game changer. It pairs beautifully with crisp veggies, high-protein crackers, or grilled meats, making it a go-to for meal prep, parties, or everyday snacking.
The best part? It takes just 10 minutes to make and stays unbelievably creamy for days.
Look at the Recipe
• Thick, smooth, ultra-creamy texture that holds up on any veggie or cracker
• Fresh herb flavor with garlic, lemon, and cooling yogurt notes
• High-protein, low-carb ingredients that boost fullness and support clean eating goals
Ingredients Needed
Base
1 ½ cups plain nonfat Greek yogurt
½ cup low-fat cottage cheese
1 scoop unflavored or savory whey protein powder
Herbs & Seasoning
2 tbsp fresh parsley, finely chopped
1 tbsp fresh dill, finely chopped
1 tbsp fresh chives, minced
1 clove garlic, grated
1 tsp lemon zest
1 tbsp lemon juice
½ tsp onion powder
½ tsp salt (adjust to taste)
¼ tsp black pepper
Optional Add-Ins
1–2 tsp olive oil for richness (optional for keto; skip for very low WW points)
Red pepper flakes for a little heat
Extra herbs for garnish
How to Make Our Creamy High-Protein Herb Dip
Blend the base. Add Greek yogurt, cottage cheese, and protein powder to a blender or food processor. Blend until silky smooth and thick.
Fold in flavor. Transfer the blended mixture to a bowl. Stir in the parsley, dill, chives, garlic, lemon zest, and lemon juice until evenly combined.
Season to taste. Add salt, pepper, and onion powder. Mix well and adjust lemon or herbs if needed.
Chill before serving. Let the dip rest for at least 20 minutes in the fridge so the flavors can bloom and the texture can firm up.
Serve and enjoy. Pair with cucumbers, bell peppers, celery, or keto crackers for a high-protein, low-carb snack that satisfies every craving.
Storage & Serving Suggestions
Refrigeration: Keeps well for 3–4 days in an airtight container.
Meal Prep: Portion into small containers for easy grab-and-go protein snacks.
Freezing: Not ideal—dairy separates after thawing.
Serving Pairings: Veggie sticks, grilled chicken skewers, salmon bites, keto almond crackers.
Tips & FAQs
Can I use only yogurt (no cottage cheese)?
Yes, but cottage cheese adds thickness and extra protein. If skipping it, use a bit more protein powder.Groceries
Can this be made dairy-free?
Use a dairy-free Greek-style yogurt and a plant-based protein powder. Texture will be slightly looser.
What herbs work best?
Parsley, dill, and chives are classic, but basil or cilantro work too.
How do I make it richer for keto?
Add 1–2 teaspoons of olive oil or a spoonful of cream cheese.
Is this Weight Watchers friendly?
Absolutely—use nonfat Greek yogurt and skip added oil for minimal points.
Creamy Dessert with 3 Ingredients: Simple Recipe to Make-No Cooking Needed, Just Chill and Enjoy
Hi, everyone, today we’re going to learn how to make Dessert with 3 Ingredients using simple ingredients. So grab your pen and paper to jot down the ingredients, then follow the complete preparation method.
Homemade Classic Bagels Recipe
Soft, chewy, golden, and irresistible – these homemade bagels are bakery-quality right from your kitchen. Perfect for breakfast or anytime snacking.
Recipe Card
Servings: 8 bagels
Prep Time: 20 minutes
Resting Time: 1 hour
Cook Time: 25 minutes
Total Time: 1 hour 45 minutes
Dietary Info: Vegetarian | Nut-Free
Ingredients
- Warm water (110°F / 43°C)
- Active dry yeast
- Granulated sugar
- Bread flour
- Salt
- Vegetable oil (or melted butter)
- Egg (for egg wash)
- Optional toppings (sesame seeds, poppy seeds, coarse salt)
Instructions
- Activate the yeast:
Combine 1 ½ cups warm water, 2 tsp sugar, and 2 ¼ tsp (one packet) active dry yeast in a large bowl. Let sit for 5–10 minutes until frothy. - Make the dough:
Add 4 cups bread flour and 1 ½ tsp salt to the yeast mixture. Mix with a spoon until a shaggy dough forms. Knead on a floured surface for 8–10 minutes until smooth and elastic. - First rise:
Place the dough in a lightly oiled bowl, cover, and let rise in a warm spot for 1 hour or until doubled. - Shape bagels:
Punch down the dough and divide into 8 equal pieces. Shape each into a ball, poke a hole through the center with your finger, and stretch gently to form a ring. - Boil the bagels:
Bring a large pot of water to a gentle boil. Add 1 tbsp sugar. Boil each bagel for 45 seconds per side, then place on parchment-lined baking sheet. - Brush and bake:
Brush with beaten egg and add toppings if desired. Bake in a preheated oven at 400°F (200°C) for 20–25 minutes until golden brown. - Cool and serve:
Let cool on a wire rack for 10–15 minutes before slicing or serving.
Notes
- For best flavor, use bread flour – it gives that chewy texture.
- Use instant yeast if preferred; skip activation step.
- The bagels can be made plain or topped with sesame, onion flakes, or even cheese.
Introduction
I’ve always loved the aroma of freshly baked bagels wafting through a bakery. This recipe recreates that experience at home with simple pantry ingredients and a few easy steps. These homemade bagels are soft on the inside, beautifully golden outside, and incredibly satisfying to make from scratch.
Step-by-Step Cooking Guide
1. Activating Yeast:
Ensure the water is just warm to the touch – too hot will kill the yeast. After 5–10 minutes, you should see foam forming on top.
2. Kneading the Dough:
The dough should be firm but pliable. If sticky, add a tablespoon of flour at a time until it smooths out.
3. Shaping:
After dividing the dough, roll each piece into a smooth ball. Press your thumb through the center and gently rotate to widen the hole to about 1½ inches – it will shrink slightly during baking.
4. Boiling:
This is the key step for that authentic chewy crust. Use a large pot so bagels don’t crowd each other. Boil no more than 3–4 at a time.
5. Baking:
The egg wash gives them that glossy golden finish. For extra shine, brush twice – once before baking and again halfway through.
Ingredient Details and Substitution Tips
- Bread flour: High-protein flour gives structure and chew. You can use all-purpose flour, but texture will be softer.
- Sugar: Feeds the yeast and adds mild sweetness. Substitute honey for a richer flavor.
- Active dry yeast: If using instant yeast, skip proofing and mix directly with dry ingredients.
- Egg wash: For vegan bagels, brush with oat milk mixed with a touch of oil.
- Optional toppings: Sesame, everything seasoning, dried onion, or cheese all work well.
Recipe Variations and Serving Suggestions
Flavor Variations:
- Cinnamon Raisin: Add 1 tsp cinnamon and ⅓ cup raisins during kneading.
- Everything Bagel: Top with a mix of sesame, poppy, onion, and garlic flakes.
- Cheese Bagel: Add shredded cheddar before baking.
Dietary Variations:
- Vegan: Replace egg wash with non-dairy milk and use oil instead of butter.
- Whole Wheat: Substitute half the flour with whole wheat flour and add 1 tbsp extra water.
Serving Ideas:
Serve warm with cream cheese, butter, or jam. For savory options, make breakfast sandwiches with eggs and cheese or smoked salmon and cream cheese.
Storage and Make-Ahead Information
- Room Temperature: Store in an airtight container up to 2 days.
- Refrigerator: Keeps fresh for up to 5 days; toast before serving.
- Freezing: Freeze up to 2 months in a sealed bag. Slice before freezing for easy toasting.
- Reheating: Toast or warm in a 350°F (175°C) oven for 5 minutes.
Make-Ahead Tip: You can refrigerate shaped bagels overnight before boiling for better flavor and texture.
Nutrition (Per Bagel)
Calories: 260 kcal | Carbs: 52g | Protein: 9g | Fat: 2g | Fiber: 2g
Dietary Info: Vegetarian | Nut-Free
FAQs
Q: Can I make these without boiling?
A: You can, but boiling gives the signature chewy crust. Without it, they’ll taste more like bread rolls.
Q: Can I use whole wheat flour only?
A: Yes, but bagels will be denser. Mix half whole wheat, half bread flour for balance.
Q: How do I know when they’re done baking?
A: The tops should be deep golden brown and sound hollow when tapped underneath.
Optional Personal Story
I started baking bagels at home during a time when I missed my favorite café breakfasts. The first batch was uneven, but with small tweaks, I discovered the magic of boiling before baking – the step that transforms dough into bagels. Now, I make them almost weekly, freezing extras for busy mornings.
Call-to-Action
Give these homemade bagels a try and enjoy bakery-quality results in your own kitchen. Don’t forget to share your results or your favorite topping combinations in the comments below!
Deviled Ham Salad
Deviled Ham Salad
Let’s face it – the tastiest dishes are not always the prettiest ones and that’s definitely the case with Deviled Ham Salad. It’s a little much to look at but it’s SO good. If you haven’t had it before – just think egg salad or tuna salad, but with ham. See? Not so weird. It’s just chopped ham that’s folded into a creamy and flavorful base that makes for one delicious sweet and savory mixture. It makes an incredible sandwich, but it works just as well as a dip or a cracker spread too. And it’s super easy to make.
INGREDIENTS
4 cups diced ham
1/2 cup mayonnaise
1 tablespoon Worcestershire
2 teaspoons Dijon mustard
1/2 teaspoon apple cider vinegar
1/4 teaspoon hot sauce
Kosher salt and freshly ground black pepper, to taste
How to Make Deviled Ham Salad
In the bowl of a food processor, pulse ham until finely chopped.
In a large bowl, stir together mayonnaise, Worcestershire, mustard, vinegar, and hot sauce. Add ham and stir to combine.
Taste and adjust seasoning. Chill until ready to serve. Enjoy!
🍎 Apple-Banana Oat Weight Loss Bars
Apple-Banana Oat Weight Loss Bars
These bars are chewy, naturally sweet, and perfect for meal prepping. Since they use whole ingredients, they keep you full for longer, helping to curb those mid-day cravings.
Ingredients
-
1 cup Rolled oats (oatmeal)
-
1 large Apple, peeled and finely chopped (or grated)
-
1 large Banana, ripe and mashed
-
1 tsp Cinnamon
-
2 tbsp Coconut oil, melted
-
40g Walnuts, roughly chopped
-
Optional: A pinch of salt to enhance the flavor.
Instructions
-
Prep the Oven: Preheat your oven to 180°C (350°F) and line a small baking dish with parchment paper.
-
Combine the Wet Ingredients: In a large mixing bowl, mash the banana until smooth. Stir in the melted coconut oil and the finely chopped (or grated) apple.
-
Add the Dry Ingredients: Add the oats and cinnamon to the fruit mixture. Stir well until the oats are completely coated and the mixture is sticky.
-
Layer and Topping: Transfer the mixture into your prepared baking dish. Use a spatula to press it down firmly into an even layer (about 1–2 cm thick). Sprinkle the chopped walnuts over the top and press them down slightly so they stick.
-
Bake: Place in the oven and bake for 20–25 minutes until the edges are golden brown and the center feels firm.
-
Cool and Slice: Allow the bars to cool completely in the pan before lifting them out. This is crucial—if you cut them while hot, they may crumble. Slice into rectangles or squares.
Creamy Slaw Bowl with Tender Shredded Chicken & Sesame Topping
This comforting and flavorful bowl combines soft, well-seasoned shredded chicken with a creamy vegetable slaw. It is satisfying, balanced, and perfect for lunch or dinner. The contrast between the warm chicken and the cool, creamy slaw makes every bite enjoyable. This recipe is easy to prepare at home using simple ingredients and gentle cooking methods.
Ingredients
For the Shredded Chicken
500 grams boneless chicken
1 tablespoon cooking oil
1 small onion, thinly sliced
2 cloves garlic, finely chopped
1 teaspoon paprika
½ teaspoon black pepper
½ teaspoon salt (adjust to taste)
2 tablespoons soy sauce
1 tablespoon vinegar or lemon juice
½ cup water
1 tablespoon sesame seeds (for topping)
For the Creamy Vegetable Slaw
2 cups shredded cabbage (green or mixed)
½ cup shredded carrot
2 tablespoons finely chopped onion
2 tablespoons chopped fresh coriander
½ cup mayonnaise
2 tablespoons fresh cream or yogurt
½ teaspoon black pepper
Salt to taste
1 teaspoon lemon juice
Preparation Method
Start by preparing the chicken. Heat oil in a pan over medium heat. Add sliced onion and cook until soft and lightly golden. Add garlic and stir gently until fragrant. Place the chicken into the pan and sprinkle with paprika, black pepper, and salt. Stir well so the seasoning coats the chicken evenly.
Add soy sauce, vinegar or lemon juice, and water. Cover the pan and allow the chicken to cook gently until it becomes tender and easy to pull apart. Once cooked, remove the chicken and shred it using two forks. Return the shredded chicken to the pan and cook uncovered for a few minutes so the flavors blend nicely and the texture becomes soft yet rich.
While the chicken is resting, prepare the slaw. In a bowl, combine cabbage, carrot, onion, and coriander. In a separate bowl, mix mayonnaise, cream or yogurt, black pepper, salt, and lemon juice until smooth. Pour this dressing over the vegetables and mix gently until everything is well coated. Chill for a few minutes for best texture.
To assemble, spread the creamy slaw evenly in a serving bowl. Spoon the warm shredded chicken on top and finish with a sprinkle of sesame seeds for a light nutty touch.
Serving Suggestions
This dish can be enjoyed on its own or paired with flatbread, soft rolls, or plain rice. It works well for family meals, gatherings, or meal prep, as the flavors remain pleasant even after resting.
Enjoy this wholesome, comforting recipe made with care and simple ingredients.
The vegetable that eats all the sugar in the body. It’s the formidable enemy of diabetes.
Full recipe>>>While no single vegetable literally “eats” sugar, butternut squash is often hailed as a formidable ally for those managing diabetes. It is a nutrient-dense winter squash that helps balance blood sugar by slowing carbohydrate absorption through its high fiber content.
Diabetes-Friendly Roasted Butternut Squash
A simple, savory dish that highlights the natural sweetness of squash without the sugar spikes.
Yields & Timing
Prep time: 10 minutes
Cook time: 30 minutes
Servings: 4–6
Ingredients
1 medium butternut squash (approx. 2 lbs), peeled, seeded, and cut into 1-inch cubes.
2–3 tbsp olive oil (supports heart health).
1 tsp garlic powder or 2–3 cloves of fresh minced garlic.
1/2 tsp kosher salt and 1/2 tsp black pepper (adjust to taste).
Optional: 1 tsp dried thyme or rosemary for an earthy flavor.
Instructions
Preheat: Set your oven to 425°F (220°C) and line a large baking sheet with parchment paper.
Toss: In a large bowl, combine the squash cubes with olive oil, garlic, salt, and pepper. Toss until every piece is well-coated.
Spread: Arrange the squash in a single layer on the baking sheet. Overcrowding will cause them to steam instead of roast.
Roast: Bake for 25–30 minutes. Halfway through, gently stir the cubes to ensure even browning.
Serve: Roast until the edges are caramelized and the center is fork-tender.
Crock Pot Chicken and Dumplings (Easy & Creamy)
Ingredients
-
1 medium yellow onion, finely diced
-
1 (10 oz) can cream of mushroom soup
-
1 (10 oz) can cheddar cheese soup
-
2 teaspoons dried thyme
-
½ teaspoon garlic powder
-
¼ teaspoon black pepper
-
3 pounds boneless, skinless chicken thighs (or breasts), cut into 1-inch pieces
-
3 cups chicken broth
-
1 (16 oz) bag frozen mixed vegetables, thawed
-
1 (10 oz) tube refrigerated flaky biscuits
Optional garnish: chopped parsley
Instructions
-
Prepare the slow cooker
Lightly grease a 6-quart slow cooker. Add the diced onion, then spread the chicken pieces evenly on top. -
Make the sauce
In a bowl, mix together:-
Cream of mushroom soup
-
Cheddar cheese soup
-
Thyme
-
Garlic powder
-
Black pepper
Pour this mixture over the chicken. Add the chicken broth.
-
-
Cook
Cover and cook:-
On HIGH for 4 hours, or
-
On LOW for 6–7 hours
-
-
Add vegetables
Stir in the thawed mixed vegetables. -
Prepare dumplings
Roll each biscuit flat to about ¼-inch thickness.
Cut each biscuit into 6 small pieces. -
Cook dumplings
Place biscuit pieces gently on top of the mixture.
Cover and cook on HIGH for 45–60 minutes, until dumplings are fully cooked and soft. -
Shred chicken
Remove chicken with a slotted spoon and shred with two forks.
Return chicken to the slow cooker and gently stir. Some dumplings may break apart—this thickens the broth. -
Serve
Spoon into bowls and garnish with parsley if desired. Serve warm.
Optional Add-Ins
You can customize with:
-
Diced carrots
-
Celery
-
Corn
-
Peas
-
Potatoes
Tips for Best Results
-
Use thawed vegetables to avoid cooling the crockpot.
-
Avoid lifting the lid while dumplings cook.
-
Chicken thighs give richer flavor, but breasts work too.
-
If broth is too thick, stir in a little warm chicken broth before serving.
3-Ingredient Breakfast Soufflé Bake
Ingredients
-
6 Large Eggs
-
1 cup Greek Yogurt (Plain, full-fat or non-fat both work well)
-
1 cup Shredded Cheese (Cheddar, Mozzarella, or Gruyère)
-
A pinch of salt and pepper for seasoning.
Instructions
-
Preparation: Preheat your oven to 375°F (190°C). Lightly grease a glass baking dish (approx. 8×8 inch or a similar small casserole dish) with butter or a light coating of oil.
-
Separate and Whip: Separate the egg whites from the yolks. Place the whites in a large, very clean glass or metal bowl. Use a hand mixer to beat the whites until they form stiff peaks (this is the secret to the height seen in the photo).
-
Mix the Base: In a separate bowl, whisk together the egg yolks, Greek yogurt, and half of the shredded cheese until smooth. Add your salt and pepper here.
-
The Fold: Gently add about a third of the whipped egg whites into the yolk mixture and stir to lighten it up. Then, very carefully fold the rest of the egg whites into the mixture using a spatula. Do not stir fast, or you will lose the air that makes it “poof.”
-
Bake: Pour the mixture into your prepared dish and sprinkle the remaining cheese over the top. Bake for 20–25 minutes until the top is a deep golden brown and the center has risen significantly.
-
Serve Immediately: Like any soufflé-style dish, it will be at its tallest right out of the oven! Serve it immediately while it’s hot and fluffy.
Why it Works
-
The Yogurt: It provides a slight tang and a creamy density that keeps the eggs from becoming rubbery.
-
The Cheese: Placing half of the cheese on top creates that beautiful, browned “crust” you see in the image.
Cheesy Egg Flatbreads
Cheesy Egg Flatbreads (Low-Carb / Keto Style)
Description
These soft, flexible flatbreads are made with just eggs and cheese. They cook up golden, slightly crisp on the outside, tender inside, and roll beautifully. Perfect as wraps, breakfast crepes, or bread replacements when you’re cutting carbs.
Ingredients
2 large eggs
1 cup shredded mozzarella cheese
(or mozzarella + cheddar blend)
Optional: pinch of salt or garlic powder
Instructions
Mix
In a bowl, whisk eggs until smooth. Stir in shredded cheese.
Cook
Heat a non-stick skillet over medium-low heat.
Lightly grease if needed.
Pour & Spread
Pour a thin layer of batter into the pan, spreading gently into a circle.
Flip
Cook 1–2 minutes until set and lightly golden.
Flip carefully and cook another 30–60 seconds.
Repeat
Continue until all batter is used. Stack or roll while warm.
Tips for Best Results
Low heat = flexible wraps
Use fine-shredded cheese for smoother texture
Let rest 1 minute before rolling to prevent tearing
Store stacked with parchment between layers
Servings
Makes 4–6 flatbreads, depending on size
Nutritional Info (Approximate, per flatbread)
Calories: ~90–110
Protein: 6–7g
Fat: 7–8g
Carbs: ~1g
Net carbs: ~0.5–1g
(Exact values depend on cheese brand)
Benefits
✔ Very low carb
✔ High protein & fat (keeps you full)
✔ Gluten-free
✔ Quick & budget-friendly
✔ Great bread replacement for keto
“Helps you dry out” = mostly water-weight loss from reduced carbs, not fat loss by itself.
Q & A
Q: Is it really zero carb?
A: No—close, but not zero. Cheese and eggs have trace carbs.
Q: Can I freeze them?
A: Yes! Cool completely, stack with parchment, freeze up to 2 months.
Q: Can I make them crispy?
A: Cook slightly longer on medium heat or add a little butter to the pan.
Q: Best fillings?
A: Eggs, chicken, avocado, bacon, cream cheese, or sugar-free spreads.