Fresh Garden Vegetable Casserole
Prep time: 15 minutes
Baking time: 25–30 minutes
Servings: 6
Ingredients
The Base:
-
1 small head Cauliflower (cut into florets)
-
1 small head Broccoli (cut into florets)
-
1 cup Mushrooms (sliced)
-
1 Bell Pepper (yellow or red, sliced)
-
1 cup Cherry Tomatoes (halved)
-
1 small Onion (diced)
The Creamy Sauce:
-
3 Large Eggs
-
1 cup Greek Yogurt (plain, unsweetened)
-
2 tablespoons Olive Oil
-
2 cloves Garlic (minced)
-
1 teaspoon Salt & ½ teaspoon Black Pepper
-
1 tablespoon Fresh Parsley (chopped)
The Topping:
-
1 ½ cups Shredded Cheese (Mozzarella or white cheddar)
Detailed Step-by-Step Instructions
-
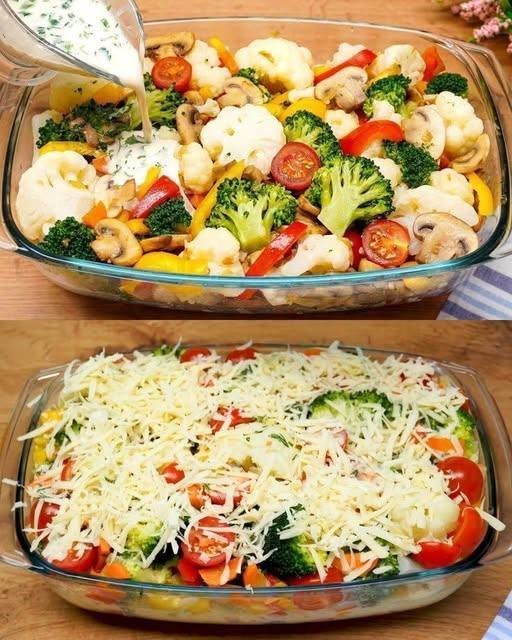
Prepare the Vegetables: Pre-boil or steam the cauliflower and broccoli florets for about 3–5 minutes until they are slightly tender but still firm (“al dente”). Drain well.
-
Assemble the Dish: In a large baking dish (approx. 9×13 inch), arrange the steamed cauliflower, broccoli, sliced mushrooms, bell peppers, and cherry tomatoes. Toss them gently so the colors are evenly distributed.
-
Whisk the Sauce: In a medium bowl, whisk together the eggs, Greek yogurt, olive oil, minced garlic, salt, pepper, and fresh parsley until smooth.
-
Pour and Coat: Pour the yogurt mixture evenly over the vegetables in the baking dish. You can use a fork to gently move the veggies around, ensuring the sauce seeps down to the bottom.
-
Add Cheese: Generously sprinkle the shredded cheese over the top of the entire casserole.
-
Bake: Place in a preheated oven at 180°C (350°F) and bake for 25–30 minutes. The casserole is ready when the vegetables are tender and the cheese topping is melted and golden brown.
-
Serve: Let it sit for 5 minutes before slicing. This allows the sauce to set slightly, making it easier to serve.
Chef’s Tip
If you want to add an extra layer of flavor, try roasting the mushrooms and onions in a pan for 5 minutes before adding them to the dish. This deepens the savory “umami” taste of the casserole!


 High in fiber (helps regulate blood sugar)
 Blood Sugar Support
 Hair & Skin Support
 Digestive Health
 Immune Boost

 No. No food can cure diabetes.