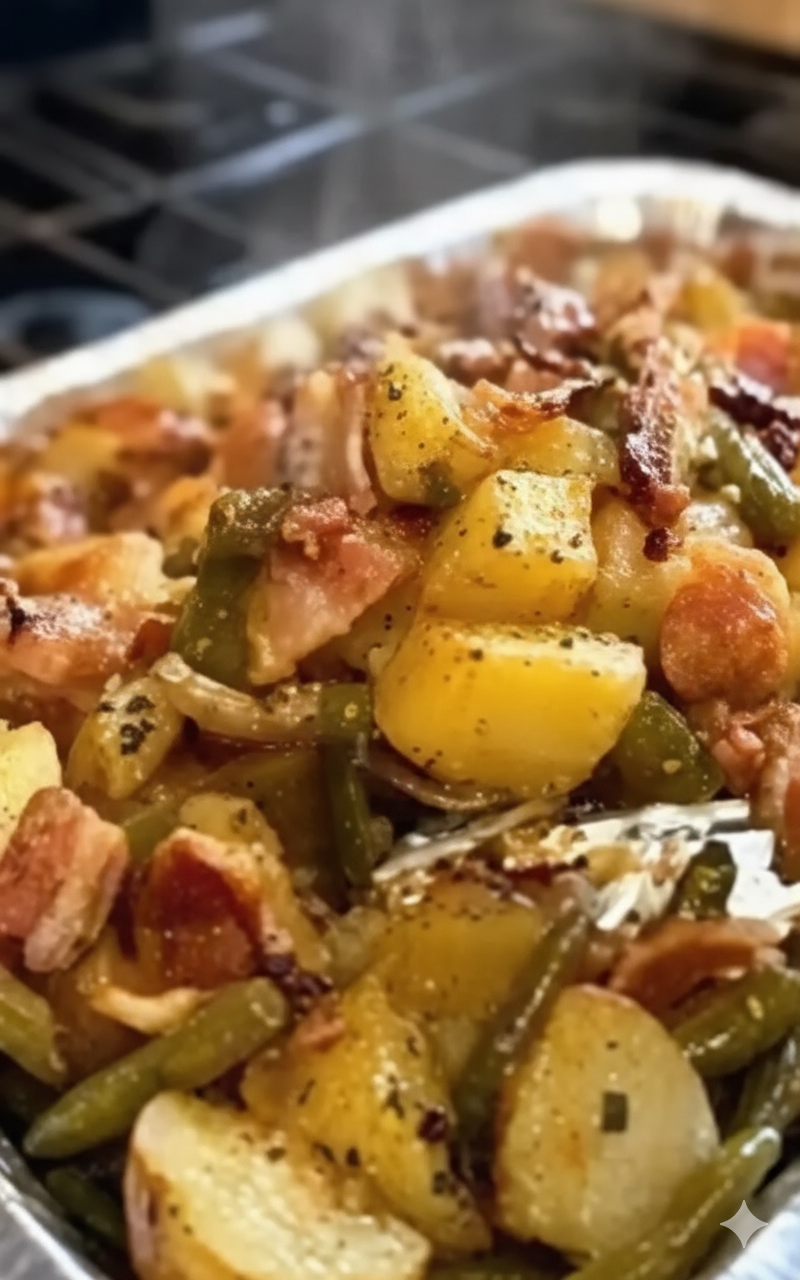
Sheet Pan Citrus and Sage Chicken with Roasted Broccoli and Potatoes

Sheet Pan Citrus and Sage Chicken with Roasted Broccoli and Potatoes is a delicious and easy one-pan meal that’s perfect for a family dinner. Here’s a recipe for you: Ingredients: For the Chicken: 4 boneless, skinless chicken breasts 2 tablespoons olive oil 2 cloves garlic, minced Zest and juice of 1 lemon Zest and juice … Read more

Quick n Easy Crispy Chicken Strips

Quick n Easy Crispy Chicken Strips  An easy oven baked breaded chicken strip recipe that’s great for the whole family.These chicken strips are my kids’ favorite, and the greatest part is that they are Slimming World compatible.These are wonderful since they have chicken, handmade breadcrumbs, and just the appropriate amount of flavor. The chicken is … Read more

Cheesy Chicken Fajita Pasta Recipe

Fajita chicken pasta has tender pasta, strips of chicken, charred onions and peppers, and plenty of fajita seasoning and cheese to bring it all together. This delicious family dinner is ready in just 25 minutes!

PREP TIME: 10 minutes

COOK TIME: 15 minutes

TOTAL TIME: 25 minutes

INGREDIENTS:

8 oz. penne pasta

1 tablespoon extra-virgin olive oil, divided

1 medium onion, sliced

2 bell peppers (mixed colors), sliced

4 tablespoons fajita seasoning, divided

1 1/2 lbs. chicken breasts

2 cups shredded Mexican blend cheese (or cheddar)

Optional toppings:

Diced avocado or guac, extra shredded cheese, sour cream or Greek yogurt, pickled jalapeños, fresh chopped cilantro, lime wedges, hot sauce, etc.

INSTRUCTIONS:

Cook pasta according to package directions. Reserve at least 1/2 cup of the cooking liquid when draining the pasta.

Meanwhile, heat 1 1/2 teaspoons of the olive oil in a large, deep skillet over medium high heat. Add the onion and peppers and season with 1 tablespoon of the fajita seasoning. Cook, stirring occasionally, until slightly charred and tender, about 5-6 minutes. Remove the onion and peppers to a bowl.

Add the remaining 1 1/2 teaspoons of olive oil to the same skillet. Season the chicken with 2 tablespoons of the fajita seasoning and add to the pan. Cook, stirring occasionally, until cooked through, about 5-6 minutes.

Return the onion and peppers to the pan. Add the cooked pasta, 1 1/2 cups of shredded cheese and the remaining tablespoon of fajita seasoning to the pan. Add 1/4 cup of the pasta cooking liquid and stir well to combine everything and melt the cheese. Add extra pasta cooking liquid if needed to get everything to come together.

Serve the fajita chicken pasta with the remaining cheese sprinkled on top, and any other desired toppings. Enjoy!

NOTES:

Chicken: Be sure to slice your chicken thin enough. You’ll want them to be small and easy to bite into so you can get some along with the pasta and veggies.

Onions and peppers: Similarly, make sure your onions and peppers are about the same size so they cook evenly. I cut long strips in half so they aren’t so huge to get a fork around.

Pepper colors: Using a variety of different colored bell peppers adds some great flavor and color interest. When possible, it’s nice to have some green, yellow, red and orange in there, but you only need two bell peppers worth for the recipe. So it’s definitely OK to buy one red and one yellow, for instance, and stop there. (Or get a bag of the mini sweet peppers and use some of those.)

Pasta: I love using whole wheat penne for some whole grain goodness, but regular penne is fine. You could also substitute a different pasta shape, like medium shells, if you prefer. Be sure to reserve some of the pasta cooking liquid though when you go to drain the pasta cause we’re using it to tie everything together.

Fajita seasoning: We love homemade fajita seasoning, which is so very easy to mix up yourself, but you can certainly use a store-bought mix. You do need a lot though – 4 tablespoons. I’ve tried it with less and it just didn’t have enough fajita flavor.

Cheese: The bagged shredded Mexican blend cheese is great here for some extra flavor and oomph. However, you could use cheddar cheese or Monterey Jack cheese if you’d like.

Leftovers: The leftover fajita chicken pasta can be stored, once cooled, in a covered container in the refrigerator for up to 5 days. Reheat in the microwave or in a skillet to warm it back up. Or freeze the leftovers, once cooled, in a freezer-safe ziptop bag or container for up to 6 months. Thaw in the refrigerator overnight and then reheat.

NUTRITIONAL INFO:

YIELD: 6 SERVING SIZE: 1

Amount Per Serving: CALORIES: 436TOTAL FAT: 17gSATURATED FAT: 8gTRANS FAT: 0gUNSATURATED FAT: 8gCHOLESTEROL: 132mgSODIUM: 622mgCARBOHYDRATES: 20gFIBER: 2gSUGAR: 3gPROTEIN: 47g

Easy Peanut Butter Cookies Recipe

These ULTRA-easy, melt-in-your-mouth peanut butter cookies with just the right balance of salty and sweet are a sure to please treat.

Course: Dessert

Cuisine: American

Prep Time: 1minute

Cook Time: 10minutes

Total Time: 15minutes

Servings: 18 cookies

INGREDIENTS:

1 1/2 cup all-purpose flour 180g

1/2 cup butter unsalted, room temp 113g

1 cup peanut butter 250g

1/2 cup brown sugar 100g, lightly packed

1/2 cup sugar 100g

1 tsp vanilla extract 5mL

1 egg large, room temp

3/4 tsp baking powder 3g

INSTRUCTIONS:

Preheat over to 350F

Sift flour and baking powder together then whisk to combine.

Cream butter and sugars in a stand mixer fitted with a paddle attachment. You can add an optional 1/4-1/2 tsp sea salt.

Add peanut butter and mix until incorporated.

Mix in egg and vanilla extract then add flour mixture and beat until incorporated.

Roll dough into one inch balls and place on baking sheet lined with parchment paper.

Flatten cookies with a fork in a criss-cross pattern.

Bake cookies for about 10 minutes.

Allow cookies to cool completely on baking sheet, they need to set up before being transferred.

NOTES:

You will bake the cookies until almost done. They will set up and continue baking with the residual internal heat after they’re pulled out of the oven.

They will be VERY soft just out of the oven so let them rest for a while; when cooled they will be firm enough to handle and quite delicious.

If your peanut butter is not on the salty side add 1/4-1/2 tsp salt to the batter.

NUTRITIONAL INFO:

Serving: 105g | Calories: 193kcal | Carbohydrates: 16g | Protein: 5g | Fat: 13g | Saturated Fat: 5g | Cholesterol: 23mg | Sodium: 115mg | Potassium: 129mg | Fiber: 1g | Sugar: 7g | Vitamin A: 170IU | Calcium: 20mg | Iron: 0.8mg

Delicious Beetroot and Lemon Juice

Delicious Beetroot and Lemon Juice Cleans Colon Waste and Loses Weight

In today’s fast-paced world, maintaining a healthy lifestyle is more crucial than ever. Our bodies can accumulate toxins over time, and one effective way to detoxify and support weight loss is through a natural colon cleanse. A beetroot and lemon juice cleanse is a delicious and nutritious option that not only flushes out colon waste but can also aid in shedding those extra pounds.

The Power of Beetroot and Lemon:

Beetroot: Often hailed as a superfood, beetroot is rich in essential nutrients, including fiber, vitamins (like vitamin C and B-complex), minerals, and antioxidants. The fiber content in beetroot supports digestive health and helps in moving waste through the colon efficiently.

Lemon: Lemons are packed with vitamin C, which boosts the immune system and aids digestion. They also have a mild diuretic effect, promoting the removal of toxins from the body. The citric acid in lemons supports the production of digestive enzymes, further enhancing digestion.

Preparing Your Beetroot and Lemon Cleanse:

Ingredients:

  • 2 medium-sized beetroots
  • 1 lemon
  • Water

Method:

  1. Wash and Peel the Beetroots: Start by washing and peeling the beetroots to remove any dirt or debris. Cut them into small, manageable pieces.
  2. Prepare the Lemon: Roll the lemon on a hard surface, applying slight pressure. This will make it easier to extract the juice. Cut the lemon in half and remove the seeds.
  3. Blend It All: Place the beetroot pieces and lemon halves (without seeds) in a blender. Add a cup of water to facilitate blending.
  4. Blend Until Smooth: Blend the ingredients until you achieve a smooth, vibrant-colored juice. If the consistency is too thick, you can add more water.
  5. Strain (Optional): If you prefer a clearer juice, strain the mixture through a fine sieve or cheesecloth.

How to Incorporate the Cleanse:

  • Timing: It’s generally recommended to consume this cleanse in the morning on an empty stomach or at least 30 minutes before a meal.
  • Frequency: You can enjoy this cleanse 2-3 times a week or as desired. It’s essential to listen to your body and not overdo it.

Benefits of the Beetroot and Lemon Cleanse:

  1. Colon Cleansing: Both beetroot and lemon have natural cleansing properties that help flush toxins and waste from the colon, promoting digestive health.
  2. Weight Loss Aid: The fiber in beetroot promotes a feeling of fullness, reducing overall calorie intake. Lemon’s diuretic effect can help shed excess water weight.
  3. Nutrient Boost: This cleanse is rich in vitamins and antioxidants, providing essential nutrients for overall health.
  4. Improved Digestion: The combination of these ingredients supports better digestion by stimulating the production of digestive enzymes.
  5. Enhanced Immunity: The vitamin C content in lemon strengthens the immune system, helping your body fight off illnesses.

Important Considerations:

  • Allergies: Be mindful of any allergies you may have to beetroot or lemon.
  • Stomach Sensitivity: Some individuals may experience stomach discomfort if they consume beetroot juice on an empty stomach. If this happens, try diluting the juice with more water.
  • Hydration: Ensure you stay adequately hydrated throughout the day, as both beetroot and lemon can have mild diuretic effects.

In Conclusion:

The beetroot and lemon juice cleanse is a delightful and refreshing way to support your colon health and aid in weight loss. It’s important to remember that while this cleanse can be a valuable addition to your routine, it should complement a balanced diet and overall healthy lifestyle. As always, it’s advisable to consult with a healthcare professional, especially if you have underlying health conditions or concerns. Enjoy this vibrant juice and embark on your journey towards a healthier you!

Beef Liver and Onions Recipe

This beef liver and onions is packed with nutrients and flavor! The beef is tenderized and cooked to savory perfection. The onions add even more flavor. This quick and easy recipe for how to cook beef liver is super healthy and incredibly delicious!

WHY YOU’LL LOVE THIS RECIPE

Beef liver and onions is filled with nutrients and protein.

Liver is one of the healthiest foods.

This quick and easy recipe takes 10 minutes after the meat soaks.

Soaking the beef liver takes out the strong flavor.

In addition, this tenderizes the meat.

This recipe is gluten free, nut free, sugar free, high in protein, low in carbs, and high in vitamins.

For Paleo and Whole30, use unsweetened dairy free milk.

WHAT IS BEEF LIVER?

Beef liver is an organ meat. It comes from cows.

This cut of meat is considered a nutritional superfood. It is high in protein, high in vitamins, and low in carbs.

This meat is not popular with everyone. It is known to have a strong meat flavor and can be tough.

To combat this, soak the meat in buttermilk or milk. This neutralizes some of the meaty flavor. In addition, soaking the liver makes it more tender.

BEEF LIVER HEALTH BENEFITS

Beef liver is loaded with health benefits! It is very healthy and very high in many nutrients.

Liver is high in Vitamin A, riboflavin, Vitamin B12, and copper.

Additionally, liver is high in protein and low in carbs.

Compared to other superfoods, beef liver contains more nutrients. Even kale, spinach and blueberries pale in comparison to liver.

A serving of 100 grams contains only 4 carbs and more than 20 grams of protein. In addition, it contains over 3 grams of healthy fats.

TASTE & TEXTURE

This beef liver recipe is hearty and savory. The onions add a great flavor.

The longer the meat soaks, the more tender it becomes. Do not over cook liver. Overcooking leads to dry gritty meat.

EXPERT TIPS & TRICKS

Thinly slice liver into strips.

If using frozen, thaw completely beforehand.

Soak meat in buttermilk or milk for at least 1 hour. The longer it soaks, the more neutralized the flavor and tenderized it will become.

This beef liver and onions recipe is quick, easy and incredibly flavorful! The beef liver becomes tender and the onions add so much flavor. This protein packed meal is easy, healthy and delicious!

INGREDIENTS:

▢12 ounces beef liver, sliced

▢1 cup buttermilk

▢1 yellow onion, thinly sliced

▢2 tbsp olive oil, divided

▢½ tsp garlic powder

▢½ tsp black pepper

▢½ tsp sea salt

INSTRUCTIONS:

First, add sliced beef liver to a bowl. Pour buttermilk on top. Soak in the refrigerator for at least 1 hour up to overnight.

Once beef has soaked, remove from buttermilk. Pat dry with paper towels. Season on both sides with garlic powder, pepper and sea salt. Discard buttermilk.

In a large skillet, add 1 tablespoon olive oil over medium heat. Add in sliced onions.

Cook onions until tender. Stir occasionally to prevent burning. Remove onions from skillet.

Add remaining 1 tablespoon olive oil to skillet. Add seasoned beef liver to the pan.

Sear on both sides for about 2 to 3 minutes, until internal temperature reaches 160 degrees Fahrenheit. Add onions back to pan for 1 minute to heat up.

Finally, serve beef liver and onions.

NOTES:

Soaking the beef liver in buttermilk helps remove the strong flavor and helps make it more tender. Do not skip this step.

Feel free to soak it in milk or cream if you do not have buttermilk.

Organ meat is considered safe to eat at 160 degrees Fahrenheit.

Use a meat thermometer for accurate results.

Store in the fridge for up to 3 days.

Meat may become tough when reheated. Slowly reheat in the microwave or in a skillet.

Do not freeze.

Nutritional Info:

calories: 190kcal, carbohydrates: 6g, protein: 18g, fat: 10g, saturated fat: 2g, polyunsaturated fat: 1g, monounsaturated fat: 6g, trans fat: 0.1g, cholesterol: 234mg, sodium: 351mg, potassium: 314mg, fiber: 1g, sugar: 1g, vitamin a: 14373IU, vitamin c: 3mg, calcium: 12mg, iron: 4mg

Apple Upside Down Cake Recipe

This caramel apple upside down cake is a fall must-make. Combining a soft cinnamon-spiced cake with buttery caramelized apples, we’re essentially getting two desserts in one. After inverting, the topping’s juices seep down into the cake and add unbeatable flavor and moisture. What you’ll love most, besides the flavors, is that there’s no fancy decoration required—the lovely garnish is literally baked into the cake!

Prep Time: 25 minutes

Cook Time: 45 minutes

Total Time: 1 hour, 30 minutes

Yield: serves 8-10

This stunning apple upside down cake combines a soft cinnamon-spiced cake with a delicious buttery caramel topping. Pack those apples into the pan—this cake can hold a lot and you won’t regret those extra slices!

INGREDIENTS:

TOPPING

6 Tablespoons (85g) unsalted butter

1/2 cup (100g) packed light or dark brown sugar

1/4 teaspoon ground cinnamon

1/4 teaspoon pure vanilla extract

2 medium apples, peeled and sliced into 1/4-inch slices (1.5–2 cups, or 188–250g, apple slices)*

CAKE

1 and 1/2 cups (188g) all-purpose flour (spooned & leveled)

1 and 1/2 teaspoons baking powder

1 and 1/2 teaspoons ground cinnamon

1/4 teaspoon ground nutmeg

1/2 teaspoon salt

1/2 cup (8 Tbsp; 113g) unsalted butter, softened to room temperature

1/2 cup (100g) granulated sugar

1/2 cup (100g) packed light or dark brown sugar

2 large eggs, at room temperature

1 teaspoon pure vanilla extract

6 Tablespoons (90ml) whole milk, at room temperature*

INSTRUCTIONS:

Preheat oven to 350°F (177°C).

Prepare topping first: Combine butter and brown sugar together in a small saucepan over medium heat. Whisk occasionally until butter has melted. Cook, whisking constantly, for 1 minute as mixture thickens. Remove from heat and whisk in the cinnamon and vanilla extract. Pour into an ungreased 9×2 inch pie dish or round cake pan. (Make sure the pan is 2 inches deep. I recommend this pie dish, which is 1.8 inches deep but I never have an overflow issue.) Arrange the apple slices neatly on top, overlapping where necessary. See photo above. Place pan in the refrigerator for a few minutes as you prepare the cake batter. This helps solidify or “set” the topping’s arrangement.

Make the cake batter: Whisk the flour, baking powder, cinnamon, nutmeg, and salt together. Set aside.

Using a handheld or stand mixer fitted with a paddle or whisk attachment, beat the butter on high speed until smooth and creamy, about 1 minute. Add both sugars and beat on high speed until creamed together, about 1 minute. Scrape down the sides and up the bottom of the bowl with a rubber spatula as needed. On high speed, beat in the eggs and vanilla extract until combined. Scrape down the sides and up the bottom of the bowl as needed. Pour the dry ingredients into the wet ingredients. Turn the mixer onto low speed and as the mixer runs, slowly pour in the milk. Beat on low speed just until all of the ingredients are combined. Do not over-mix. You may need to whisk it all by hand to make sure there are no lumps at the bottom of the bowl. The batter will be slightly thick.

Remove topping from the refrigerator. Pour and spread cake batter evenly over topping.

Bake for 40-46 minutes, tenting foil on top of the cake halfway through bake time to prevent the top from over-browning before the center has a chance to fully cook. The cake is done when a toothpick inserted into the center of the cake comes out mostly clean—a couple moist crumbs are OK. Don’t be alarmed if your cake takes longer or if the cake rises up and sticks to the foil. (We serve the cake upside down anyway!)

Remove cake from the oven and cool on a wire rack for just 15 minutes. Invert the slightly cooled cake onto a cake stand or serving plate. Some of the juices from the topping will seep over the sides—that’s ok. You can slice and serve the cake warm, but the slices will be messy. I find it’s best to cool the cake completely at room temperature before slicing and serving. Do not refrigerate the cake to speed up the cooling process because it could end up tasting overly dense.

Cover leftover slices and store for up to 3 days in the refrigerator or 3 months in the freezer. Thaw at room temperature. I don’t recommend freezing the cake as a whole because the topping arrangement doesn’t thaw very nicely. See make ahead instructions below.

NOTES:

Make Ahead Instructions: You can refrigerate the topping in step 2 for up to 1 day. If refrigerating for longer than 1 hour, cover it tightly. Other than that, this isn’t the best cake to make ahead of time or freeze because the apples will settle down into the cake—while still tasty, the presentation won’t be as pleasing. You can, however, prepare the cake batter’s wet ingredients (cover and refrigerate) and dry ingredients (cover at room temperature) separately up to 1 day ahead of time, then continue with the recipe the next day. Let the wet ingredients come to room temperature before mixing.

Special Tools (affiliate links): Saucepan | Whisk | 9-inch Pie Dish | Glass Mixing Bowl | Electric Mixer (Handheld or Stand) | Cooling Rack

Old Recipe:  If you loved the old cake recipe,  increase the topping’s butter to 1/2 cup (1 stick; 115g) and add 1/4 teaspoon each of ground cloves and ground nutmeg when you stir in the cinnamon. Sprinkle 1/4 cup of walnuts on top of the apples before pouring/spreading on the cake batter. In the cake batter, reduce the milk to 1/4 cup (60ml).

Apples: Use your favorite variety of apple. I typically use Granny Smith, Fuji, or Honey crisp. Here’s more on the best apples to use for baking.

Milk: Whole milk is best, but you can use lower fat or nondairy milk if needed.

Why is everything at room temperature? All refrigerated items should be at room temperature so the batter mixes together easily and evenly. Read more about the importance of room temperature ingredients.

MAXICAN BEEF AND CHEESE SANCHILADAS RECIPE

We go to a special little Mexican and Tex-Mex taco joint that serves sanchiladas and it’s my absolute favorite dish on their menu. It recently dawned on me that I needed to figure out how to make sanchiladas at home…..so I did.

My recipe isn’t exactly how my little taco joint makes their sanchiladas, but it’s close, and my boys are super excited to get to eat this Mexican dish as any meal.

I get excited because it’s basic, cheesy, and fast Mexican food!

SANCHO VS BURRITO VS SANCHILADA

A sancho is a beef burrito with cheese and lettuce smothered in cheese sauce.

A burrito is a popular Mexican dish that typically consists of a tortilla wrapped around various fillings. A beef and cheese version of this is part of a Sancho.

A sanchilada is part beef and cheese burrito with all the extra saucy love of enchiladas, including the enchilada sauce!

WHY THIS RECIPE IS A KEEPER

Sanchiladas are very basic beef and cheese Mexican fare. If you’ve got picky eaters in your family, not to worry! All of my picky eaters devour these sanchiladas.

You can dress up these sanchiladas any way you’d like.

My family prefers just beef, cheese, and the sour cream topping. I love to add cilantro, scallions, tomatoes, and fresh pico de gallo on top.

These Maxican Beef and Cheese Sanchiladas are a tasty Mexican favorite that crosses between a sancho and a beef enchilada.

Prep Time: 20minutes

Cook Time: 10minutes

Total Time: 30minutes

Servings: 4 sanchiladas 

INGREDIENTS:

1 lb. lean ground beef

1/2 tsp. granulated onion

1/2 tsp. granulated garlic

2 – 10 oz. cans mild red enchilada sauce

shredded cheddar cheese

chopped lettuce

1 cup sour cream

4 8-inch flour tortillas, warmed

tortilla chips, for serving alongside the sanchiladas

chopped cilantro and scallions, for garnishing, if desired

INSTRUCTIONS:

In a heavy-bottomed skillet over medium high heat, brown the ground beef with the spices until cooked throughout and no pink remains (160-165 degrees F.); drain any fats that accumulate as the beef cooks.

Stir one can of the enchilada sauce into the ground beef, continuing to cook over medium heat until the sanchilada mixture is hot throughout; remove from the heat.

Place a warm tortilla onto a work surface; place one-fourth of the prepared beef mixture across the center of the tortilla in a 2-inch strip; top with cheese and lettuce, as desired.

In a small bowl, combine the sour cream with 1/4 cup of red enchilada sauce, stirring to combine. Place the prepared sour cream mixture into a sandwich bag, snipping away the corner of the bag.

Press the sour cream mixture through the hole in the corner of the bag, onto the beef mixture over the top of the cheese and the lettuce, making two strips of sour cream the length of the beef mixture, or as desired.

Roll the flour tortilla around the beef filling, placing the sanchilada into a greased elongated and shallow glass baking dish for one, or create all four sanchiladas, placing them side-by-side into a larger baking dish.

Pour enchilada sauce, as desired, over the top of the sanchiladas, then top with more shredded cheese; garnish with scallions or cilantro.

Heat the prepared sanchilada for a few seconds in the microwave until heated throughout; stack tortilla chips alongside the sanchilada and serve at once.

NOTES:

Tips for Making the Best Beef and Cheese Mexican Sanchiladas

Warming the tortillas in the microwave before you roll them around the filling makes them much easier to work with.

We prefer beef for sanchiladas, but you could actually use any ground meat, such as ground turkey, ground pork, or even ground venison.

If you prefer, you can substitute green enchilada sauce for the red enchilada sauce for a new twist on your sanchiladas.

We use mild red enchilada sauce but if you prefer a more spicy sauce and experience, opt for the hot red enchilada sauce, or stir a bit of red pepper flakes into the mild enchilada sauce.

NUTRITIONAL INFO:

Calories: 424kcal | Carbohydrates: 29g | Protein: 30g | Fat: 20g | Saturated Fat: 10g | Cholesterol: 100mg | Sodium: 476mg | Potassium: 551mg | Fiber: 1g | Sugar: 4g | Vitamin A: 358IU | Vitamin C: 1mg | Calcium: 128mg | Iron: 4mg

Carrot Cake Smoothie Recipe

Oh yes! I’m soooo into carrot cake everything mood lately. Because carrot cake symbolizes Spring and Spring means happiness. Carrot cake means happiness too. Does that make any sense? … Anyway, now that Spring has finally shown up in all its beauty … the weather is beautiful, birds are singing, and I’m blooming like flowers in my backyard … all I can think of is carrots and sweet carrot cake.

Carrots are sweet little veggies. Colorful and so HEALTHY. Honestly, I feel no guilt (nor shame) about having Carrot Cake Overnight Oats for breakfast and then later nibbling these amazing orange flavored Carrot Oatmeal Cookies. Nope. Both of these beauties are the healthiest + delicious thing EVER. And having this knowing I’m doing something good for my body is liberating.

This carrot smoothie recipe is super healthy, guilt-free and really incredible too. It’s loaded with nutrients and bursting with carrot cake flavor. It feels like a slice of carrot cake in a drinking form. I like that! Especially in the morning. It’s one really tasty breakfast option if you ask me. Sweet, creamy, thick and just beautiful.

This rich, sweet and creamy carrot cake smoothie is like dream come true, really. A nourishing blend of whole foods that tastes just like a slice of carrot cake. Yum! It’s very nutritious, loaded with proteins and healthy fats, and fibers good for digestion but without excess calories, WITHOUT ADDED SUGARS. It’s perfect healthy breakfast option. + It’s super easy to whip up! Trust me, you don’t want to miss this beauty. 

Thick, creamy and delicious, this Carrot Cake Smoothie is perfect nutritious and healthy breakfast. It’s packed with amazing flavors and SUPER FOODS, and completely added-sugar-free.

PREP TIME: 5mins

TOTAL TIME: 5 mins

COURSE: Breakfast

CUISINE: American

SERVINGS: 1 cup

INGREDIENTS:

1 ripe banana

1 cup carrots chopped (about 1 large)

1 cup almond milk

½ cup soya probiotic yogurt

¼ cup walnuts

1 teaspoon Ceylon cinnamon

1 teaspoon vanilla extract

¼ teaspoon freshly grated ginger

Dash of nutmeg

INSTRUCTIONS:

Add all the ingredients into your blender and process until smooth.

Pour in glass and add toppings. Drink immediately.

NOTES:

As a measure, I used UScup(240ml).

NUTRITIONAL INFO:

Calories: 436kcal | Carbohydrates: 50g | Protein: 10g | Fat: 24g | Saturated Fat: 2g | Sodium: 383mg | Potassium: 746mg | Fiber: 9g | Sugar: 24g | Vitamin A: 10265IU | Vitamin C: 28.9mg | Calcium: 519mg | Iron: 1.4mg Smoothies

 Super Green Spirulina Smoothie Recipe

A nutritious and vibrant green smoothie with 5 ingredients: banana, cucumber, coconut milk, spirulina, and spinach! The perfect plant-based breakfast or snack.

PREP TIME: 5minutes 

TOTAL TIME: 5minutes

Servings: 1

Course: Beverage, Breakfast

Cuisine: Gluten-Free, Vegan

Freezer Friendly: 1 Week

INGREDIENTS:

1 medium ripe banana (previously peeled and frozen // ~1 cup as original recipe is written)

1/2 cup sliced cucumber (organic when possible // skin on)

3/4 – 1 cup light coconut milk (or other non-dairy milk // less for thicker smoothie, more for thinner smoothie)

1 cup spinach or chopped kale (organic when possible // I like to freeze mine)

1 tsp spirulina powder*

1 Tbsp hemp seed (optional // or sub chia seeds or vegan protein powder)

FOR SERVING optional

1/4 cup frozen or fresh blueberries (organic when possible)

1/4 cup granola (store-bought or homemade*)

INSTRUCTIONS:

To a blender*, add frozen banana, cucumber, coconut milk, spinach, spirulina, and hemp seed (optional). Blend until creamy and smooth, scraping down sides (or using smoothie wand) as needed.

If too thick, thin with water or more coconut milk. If too thin, thicken with ice or more frozen banana. Taste and adjust flavor as needed, adding more banana for sweetness, cucumber for freshness, or greens or spirulina for green color. See note about spirulina (brands + how much to add).

Serve immediately as is or in my preferred: top with blueberries, granola, and more hemp seeds. Best when fresh, though leftovers will keep covered in the refrigerator up to 2 days or the freezer for 1 week. Thaw to enjoy from freezer.

Notes

*When adding spirulina to smoothies, start with 1 tsp and add more as desired, but this is the max for me without tasting it. Otherwise, it can start tasting a little seaweedy.

*Granola recipes: Peanut Butter Chocolate Chip Granola, Banana Bread Granola, Simple Quinoa Granola, or Nut ‘n’ Honey Granola (the one I used in photos).

*Spirulina also works extremely well when added in the same quantity to my Ginger Colada Green Smoothie!

Nutritional Info: (1 of 1 servings)

Serving: 1 smoothie

Calories: 225

Carbohydrates: 36.8 g

Protein: 5.8 g

Fat: 9.7 g

Saturated Fat: 8.7 g

Trans Fat: 0 g

Cholesterol: 0 mg

Sodium: 72 mg

Fiber: 4 g

Sugar: 15.4 g

Did you make this recipe?

Lemon Meringue Pie Recipe

The best homemade lemon meringue pie with homemade lemon curd filling and a mountain of fluffy meringue!

Prep Time: 1hr

COOK Time: 45min

Chilling Time: 6hr

Servings: 10 servings

INGREDIENT’S:

For Pie Crust:

¾ cup unsalted butter, extra cold

1 ¾ cup all-purpose flour

¼ tsp salt

¼ cup cold water

For Lemon Curd:

1 1/3 cup freshly squeezed lemon juice

4 eggs

8 egg yolks

2 cups white granulated sugar

1 cup unsalted butter

2 tsp vanilla

For Meringue:

6 large egg whites

2 cups white granulated sugar

½ cup water

1 tsp cream of tartar

1 tbsp lemon juice

1 tsp vanilla extract

INSTRUCTIONS:

For the Pie Crust:

Prepare the all-butter pie crust first. Cut the cold butter into small cubes and drop it into a food processor along with the flour and salt. Pulse the butter and flour together for a few minutes, until fine crumbs form. Slowly start adding the water with the food processor running, until a dough ball forms. Remove the dough from the processor and shape it into a disk. Wrap it well with plastic wrap and refrigerate for a minimum of 1 hour or make it the day before and chill overnight.

Preheat the oven to 425F/218C. Once the dough is chilled, roll it out on a lightly floured work surface until it’s a few inches larger than your pie or tart tin. Gently transfer the dough into the pie tin and press the dough very gently into the bottom and sides, removing the excess dough. Watch my video to see how it’s done. Line the crust with parchment paper, then fill the pie with pie weights or dried beans. Blind bake the crust for about 30 minutes, or until it’s golden brown.

For the Lemon Curd:

While the pie crust is baking, prepare the lemon curd filling. This can also be done the day before. Place the eggs, egg yolks and sugar into a large mixing bowl. Whisk vigorously for 4 to 5 minutes, until the mixture is thick, pale and ribbons off the whisk. Pour this egg mixture into a medium-sized, stainless-steel saucepan and add the lemon juice. Cook the lemon curd over medium heat, stirring constantly with a rubber spatula for about 5 minutes, until the lemon curd thickens. Remove it from the heat and add the butter and vanilla, whisking until the butter is completely melted. Allow the lemon curd to cool down for at least 20 minutes before using.

Reduce the oven temperature down to 375F/190C. Pour the prepared lemon curd into the baked pie crust, spreading it evenly to the edges. Bake the pie for another 15 minutes, then remove from the oven and chill it for at least 2 hours in the refrigerator.

For the Meringue:

For the Meringue Topping: place the egg whites into a mixer bowl and whisk on high speed for a few minutes, until soft peaks form. Into a small saucepan, add the sugar and water and attach a candy thermometer to the side. Cook the sugar over medium heat, without stirring, until it reaches 240F/115C. This usually takes about 5 to 6 minutes from the time it starts to boil. Immediately, pour the hot sugar syrup in a slow and steady stream into the egg whites, with the mixer running on medium speed; avoid the whisk attachment! Watch my video recipe to see how it’s done!

Once all the sugar syrup has been added, add the cream of tartar, lemon juice and vanilla. Continue whisking the meringue on high speed for 8 to 10 minutes, until it’s cooled to room temperature and glossy peaks form. Using a spatula, add the meringue in large dollops onto the chilled lemon pie. Use a spoon to shape the meringue into a tall mountain. If desired, use a kitchen torch to caramelize/burn the meringue.

For best results, refrigerate the lemon meringue pie overnight. This will allow the lemon curd and meringue to thicken and it will be easier to serve. Use an extra-long knife for slicing.

Nutritional Info:

Calories: 767kcal | Carbohydrates: 100g | Protein: 9g | Fat: 38g | Saturated Fat: 22g | Polyunsaturated Fat: 2g | Monounsaturated Fat: 11g | Trans Fat: 1g | Cholesterol: 307mg | Sodium: 127mg | Potassium: 190mg | Fiber: 1g | Sugar: 81g | Vitamin A: 1297IU | Vitamin C: 13mg | Calcium: 46mg | Iron: 2mg

No more rotten bananas after a few days: With this method they will last for a long time

Bananas are a popular and healthy fruit, but they can quickly become overripe and develop a rotten, black appearance after just a few days of sitting on the kitchen counter. However, with a simple method, you can extend their shelf life and prevent them from spoiling too quickly. In this article, we will explore a technique that will help you keep your bananas fresh for a longer time.

The Problem with Rotten Bananas

Bananas are climacteric fruits, which means they continue to ripen even after they are harvested. As they ripen, bananas produce ethylene gas, a natural plant hormone that speeds up the ripening process. This is why bananas can go from green to yellow to brown and black in just a few days, especially in warm temperatures.

When bananas become overripe, their texture changes, becoming mushy and soft. The skin may turn brown or black, and the fruit inside may have a fermented smell and taste. This can be unappealing to eat, and many people end up discarding overripe bananas, resulting in food waste.

The Method to Extend Banana Shelf Life

To extend the shelf life of your bananas and prevent them from becoming rotten and black too quickly, you can use a simple method involving plastic wrap. Here’s how you can do it:

Step 1: Separate the Bananas:

If you have a bunch of bananas, gently separate them from each other. This will help to slow down the ripening process as it prevents the bananas from releasing excessive ethylene gas, which can accelerate ripening.

Step 2: Wrap the Stems:

Take a small piece of plastic wrap and tightly cover the stems of each banana. The plastic wrap will help to block the release of ethylene gas from the stems, which will slow down the ripening process.

Step 3: Store at Room Temperature:

Once you have wrapped the stems of all the bananas, place them back on the counter or in a fruit bowl at room temperature. Avoid placing them in the refrigerator, as bananas are sensitive to cold temperatures and can turn brown or black when refrigerated.

Step 4: Check Regularly:

Check the bananas regularly for ripeness. When they have reached the desired ripeness, you can remove the plastic wrap and enjoy them. If you prefer slightly greener bananas, you can leave the plastic wrap on for longer to slow down the ripening process.

Why Does This Method Work?

The plastic wrap method works by reducing the exposure of bananas to ethylene gas, which is produced by the bananas themselves and speeds up the ripening process. By blocking the release of ethylene gas from the stems, the bananas ripen at a slower rate and stay fresher for a longer time.

This method is also effective because it allows you to separate the bananas, preventing them from ripening too quickly in a bunch. When bananas are kept together in a bunch, they release more ethylene gas, which can accelerate the ripening process and result in faster spoilage.

To maximize the freshness and shelf life of bananas, it’s recommended to store them in a cool, dry place and consume them within a reasonable timeframe. If you have bananas that you won’t be able to consume before they start to spoil, consider using them for baking, freezing them for later use in smoothies or recipes, or donating them to reduce food waste.

Greek Chicken Marinade Recipe

This garlic, lemon, and oregano Greek marinade can be used for chicken that’s grilled, baked or pan-fried and is great any which way you choose.

Course: Main Course

Cuisine: Greek

Prep Time: 5minutes

Cook Time: 15minutes

Marinate the chicken: 30minutes

Total Time: 50minutes

Servings: 4

INGREDIENTS:

1 pound boneless , skinless chicken breasts (about 2 large breasts)

⅓ cup plain Greek yogurt

¼ cup olive oil

4 lemons

4-5 cloves garlic , pressed or minced

2 tablespoons dried oregano

1 teaspoon kosher salt

½ teaspoon freshly ground black pepper

INSTRUCTIONS:

Place the chicken pieces in a freezer bag or a bowl and set aside.

Add the Greek yogurt and olive oil to a medium size bowl. Zest one of the lemons and add to the bowl. Juice that lemon into the bowl with the zest. Slice the other three lemons and set aside. Add the minced garlic, oregano, kosher salt and black pepper to the lemon juice and zest and stir. Pour half of the marinade into the freezer bag or the bowl with the chicken pieces and reserve the other half of the marinade for basting. Marinate the chicken for 30 minutes or up to 3 hours in the refrigerator.

When ready to grill, prepare the grill by lightly oiling the grate with vegetable oil or cooking spray and set to medium high heat.

Grill the chicken, basting with the reserved marinade and turning often so each side browns and has light grill marks, until cooked through, about 15-20 minutes or until the chicken juices run clear. During the last 5 minutes of cooking add the 3 sliced lemons to the grill, turning once or twice. Allow the chicken to rest for 5 minutes before slicing and serve with the grilled lemons. Refrigerate leftovers for up to 3 days.

Nutritional Info:

Calories: 307kcal | Carbohydrates: 14g | Protein: 25g | Fat: 19g | Saturated Fat: 3g | Cholesterol: 109mg | Sodium: 692mg | Potassium: 494mg | Fiber: 4g | Sugar: 3g | Vitamin A: 94IU | Vitamin C: 58mg | Calcium: 102mg | Iron: 3mg

Creamy Peach Smoothie Recipe

Creamy and delicious peach smoothie made with 5 simple ingredients for a refreshing, filling breakfast or snack! This easy peach smoothie recipe gets a boost of protein from greek yogurt and has the perfect amount of sweetness from ripe peaches and berries. Enjoy as is or add your fav nutritional boosters!

I call this my “pretty in pink” because it has the most beautiful color and incredible flavor from the addition of raspberries or strawberries. I love that they don’t overpower the peach flavor, but just add subtle hints of sweetness and berry flavor. This peach smoothie is ultra creamy and packed with protein thanks to greek yogurt (feel free to use dairy free!) and you seriously only need 5 total ingredients to make it. This one’s a must before summer ends!

5-ingredient peach smoothie recipe

This healthy peach smoothie with yogurt has simple ingredients but an incredible, creamy peach flavor! Here’s what you’ll need to make it:

Peaches: you’ll need frozen peach slices, of course, for that delicious peach flavor.

Berries: I like to add frozen raspberries or strawberries for additional fruit sweetness and a pretty pink color.

Yogurt: get that peaches and cream flavor and a boost of protein with vanilla greek yogurt.

Milk: to help the smoothie blend up you’ll add your favorite dairy free milk.

Vanilla extract: a little vanilla brings out all of the natural sweetness. Learn how to make your own at home with this tutorial!

This easy peach smoothie recipe is great for customizing with your fav smoothie ingredients, toppings, and more. Here’s what I can recommend:

Make it vegan/dairy free: simply use your favorite dairy free yogurt and dairy free milk to keep the peach smoothie both dairy free and vegan. I think a coconut-based yogurt would be delicious!

Choose your extra fruit: I love the flavor and color that raspberries and strawberries add to this peach smoothie, but it would also be delicious with blueberries or even banana.

Have fun with toppings: try adding my homemade granola on top, plus some extra fresh fruit slices for the ultimate treat!

ingredients for a peach smoothie with yogurt in a blender

Looking for more sweetness?

Because this peach smoothie is made without banana, the sweetness depends on the ripeness and/or seasonality of your frozen fruit. To make it sweeter you can add 1 pitted date or a little bit of honey/pure maple syrup and blend again until it’s sweet to your liking.

Try these easy nutritional boosters

Looking for another boost of nutrition in this creamy peach smoothie? Try adding any of the following, and remember to blend in a little more milk along with any of these additions.

Nut butter: for an additional boost of healthy fats feel free to blend in 1 tablespoon of your fav nut butter. I think almond butter would be perfect in this peach smoothie!

Flaxseed meal: this is one of my favorite ingredients to add to smoothies for a boost of fiber and minerals, and is especially great for nursing mamas as flaxseed can help increase milk supply. Here’s a brand I love.

Chia seeds: try adding in a tablespoon of chia seeds for a boost of healthy fats and fiber.

Hemp seeds: feel free to throw in some hemp seeds for another boost of healthy fats, omegas and minerals.

Avocado: add healthy fats and extra creaminess by adding ripe avocado. Usually, 1/4 or 1/2 of an avocado will be sufficient and also help to keep you satisfied thanks to those healthy fats.

Protein: Easily add more protein to this turmeric smoothie by adding 1 scoop of your favorite protein powder (vanilla would be delicious!) I recommend Vital Protein collagen peptides or Four Sigmatic Plant-Based Protein Powder.

Tips and Tricks 💫 

Use frozen fruit. This will help keep the smoothie cold and thick. Sometimes ice doesn’t blend as well, so it’s best to skip it unless absolutely necessary. If you only have fresh fruit, try adding 1 cup of frozen cauliflower.

Add liquid. Don’t be afraid to add more liquid if your smoothie is too thick or won’t fully blend. High powered blenders tend to blend frozen fruit much better, so if you have a regular or personal size blender, you may need to add more coconut milk.

Start low, go high. Start the blender on low speed, then gradually increase to high to help blend all ingredients. Finally, end with the blender on low speed.

top-down view of peach smoothies in glasses topped with granola and raspberries

Make it ahead of time

Yes, you can even make this easy peach smoothie ahead of time! Make it as-is or even double it and then try one of my three amazing ways to prep and store smoothies right in your freezer.

Pretty in Pink Peach Smoothie

Prep Time: 5minutes

TOTAL TIME: 5minutes 

Serves: 1

Creamy and delicious peach smoothie made with 5 simple ingredients for a refreshing, filling breakfast or snack! This easy peach smoothie recipe gets a boost of protein from greek yogurt and has the perfect amount of sweetness from ripe peaches and berries. Enjoy as is or add your fav nutritional boosters!

INGREDIENTS:

For the smoothie:

1 heaping cup frozen peach slices

1 cup frozen raspberries or strawberries

½ cup vanilla greek yogurt (or sub dairy free yogurt of choice)

1 cup unsweetened dairy free milk of choice (i use almond milk but coconut milk would be YUM)

1 teaspoon pure vanilla extract

To garnish:

Granola and fresh raspberries/peach slices

INSTRUCTIONS:

Add all ingredients to a high powered blender: frozen peaches, frozen raspberries, yogurt, milk and vanilla extract. Feel free to add any optional add-ins to your smoothie if you’d like. Blend until smooth, adding more milk to thin, if necessary. Taste and add honey to sweeten as necessary then blend again; this is totally optional but some might prefer a sweeter smoothie. Pour into a glass and enjoy! Serves 1. Feel free to double the recipe to serve 2.

Recipe Notes

Feel free to add 1 tablespoon almond butter for a boost of healthy fats. I also love to add a tablespoon or two of hemp seeds but it’s up to you.

If the smoothie isn’t sweet enough, which typically depends on the ripeness/seasonality of your frozen fruit, you can add 1 pitted date or a little bit of honey/pure maple syrup and blend again until it’s sweet to your liking.

If you want a boost of greens, add in 1-2 cups of spinach; the color will change but the flavor will not.

Get all of my smoothie-making tips and tricks within the blog post!

Nutritional Info:

Serving: 1smoothie (without granola topping)

Calories: 336cal

Carbohydrates: 43g

Protein: 16.2g

Fat: 11.7g

Saturated Fat: 4.6g

Fiber: 10.9g

Sugar: 29.6g

How to make sweet zobo drink

This super drink Zobo, is very tasty, colourful and highly medicinal. This plant is believed to have originated from the West Africa before spreading to other parts of the the world and different people uses the roselle (hibiscus sabdariffa) for different purposes.

Zobo is an annual or perennial herb that is botanically known as Roselle (Hibiscus sabdariffa). The drink is known as zobo or zoborodo drink by Nigerians and in some west African countries (Ghana) is it know as Sobolo Drink. Also other parts of the world have different names (like bissap) for this drink, kindly comment below and let us know what it is called in your part of the plant

Different countries call this plant by different names such as; rosela by Indonesians, sobolo by Ghananians, zoborodo by Nigerians, Telugu people call it Gongura, roselle is called belchanda in Nepal, 洛神花 (Luo Shen Hua) in Chinese, Chukor in Bengali, Pulicha Keerai in Tamil, krajiab priaw in Thailand, bissap in Senegalese, wonjo by Gambians, karkanji by Chads, foléré by Cameroonians, sorrel by the Caribbeans and quiabo-roxo by Brazilians.

The Hibiscus sabdariffa fruit takes approximately six months to mature and the fruits can be infused for medicinal purposes or prepared for drinks. Some studies reveal that the roselle fruit has a characteristics medicinal properties, which makes it viable for treating loss of appetite and fever. Due to its diuretic properties, rosells can also be used for treating kidney diseases. It’s anti-hypertensive properties make this plant very ideal for reducing high blood pressure. Roselle drink is an excellent source of iron, riboflavin, flavonoid, vitamin C, niacin, calcium, glycosides, carotene and water-soluble antioxidants.

The zobo drink is very natural and contains more nutrients than those made with artificial ingredients and preservatives hence nutritionists recommend people to stick to natural drinks of which zobo drink is part of. Nutritionists reveal that taking at least a glass of zobo drink after eating food is capable of reducing the absorption of dietary carbohydrates thereby maintaining a healthy body weight.

Before preparing the sorrel drink, I usually peel the pineapple and slice it into tiny bits. Although some people use the pineapple peels during preparation but I have doubts if the peels will be thoroughly clean enough for use. The zobo drink is one of the easiest drink to prepare as all you need is to wash the zobo leaves, add in a cooking pot, add the peeled pineapples and garlic and the drink is just as good as ready. So I bet you will enjoy this drink if you give it a try.

Ingredients:

1) Zobo leaves

2) Sugar(Optional)

3) Pineapples and cucumbers

4) Ginger

5) Any flavour of your choice

Method

1) Set your big pot on fire and pour enough quantity of water.

2) Wash your zobo leaves in a cold water to remove dirt (don’t leave it in the water for long, just put it in the water and quickly use your hand to shake it and remove it from the water).

3) Pour the zobo leaves in your pot. Add your sliced pineapple, ginger, sliced cucumbers and cover it till it has boiled very well and the water has changed to a red wine colour.

4) Remove the pot from the fire and separate the zobo liquid from the leaves. put the zobo liquid aside cover it and leave it to cool.

5) After it has cooled, add your sugar and flavour in the desired quantity but don’t let the sugar and flavour to be too much in the zobo.

6) Package it in your bottles and put in it the fridge.

Serve chilled 🍹

Note: You should wash and peel the back of the pineapple if you want but if you don’t want you can just wash the back very well, sliced it , and add it to the zobo like that ( it depends on how you want it).

Making of zobo for selling is very lucrative because people like it very well and some prefer It to other drinks. You may decide to start your own zobo business you can sell it together with either doughnuts, chin chin, mini cakes etc and make your money.

All you need is to learn how to do it very well and how to market it. If your zobo is sweet and tastes better than that of others it will stand out and before you know it people will begin to patronize you.

Rainbow Smoothie Recipe

Making smoothies is always a good idea. And making a fruit smoothie with rainbow colors is fun and healthy! Smoothies are a quick and easy way to get your daily dose of fruits, vegetables and proteins. Perfect for breakfast or as a healthy snack in between.

You can vary endlessly with different fruits and vegetables. We make a blueberry smoothie, spinach smoothie, pineapple smoothie, mango smoothie and strawberry smoothie in one, so that we get the colors of the rainbow. We pour these ‘mini’ smoothies over 2 different glasses.

This rainbow smoothie is packed with fruit and a vegetable (spinach). And this smoothie not only looks fantastic, it is also tasty and the smoothie has great different flavors.

Rainbow smoothie ingredients

In this recipe we make 5 small smoothies, so we make the colors purple, green, yellow, orange and red. Blend all ingredients of 1 color in a blender. Then stack the fruit smoothies together in a glass, so you get a rainbow smoothie. Place the glasses in the freezer in between, so that the layers become nice and straight.

The base of every smoothie is frozen banana. Frozen banana makes a smoothie deliciously thick and creamy, almost milkshake-like!

Do you want to make a real milkshake? Then replace the frozen banana with vanilla ice cream!

Rainbow fruit smoothie

BLUEBERRY SMOOTHIE

For the purple layer of the smoothie, we make a blueberry smoothie. Put ½ frozen banana and 2 tablespoon of blueberries in the blender and blend! Pour the smoothie into 2 long drinking glasses and put in the freezer, while making the next color.

Is your smoothie too thick? Add a little water or pineapple juice (if you use canned pineapple).

SPINACH SMOOTHIE

What ingredients do you need for the green layer? ½ frozen banana, 2 hands of spinach, 50 grams of pineapple and 1 peeled apple. Blend the ingredients together and pour the smoothie onto the blueberry smoothie.

PINEAPPLE SMOOTHIE

Blend 1/2 frozen banana, 75 grams of pineapple and 1 peach for a delicious pineapple smoothie. Then pour on the blueberry smoothie and spinach smoothie. Don’t forget to put the smoothie back in the freezer after each layer!

strawberry smoothie mango smoothie pineapple smoothie spinach smoothie

MANGO SMOOTHIE

Second to last smoothie: a mango smoothie! This is the orange layer of this rainbow smoothie. Blend ½ frozen banana, 5 frozen mango pieces, 1 peach and 1 raspberry together.

STRAWBERRY SMOOTHIE

I love strawberries, raspberries and banana. Strawberry smoothies are my favorite! This is the red part of the rainbow fruit smoothie. Blend ½ frozen banana, 7 strawberries and 10 raspberries, then pour the smoothie into the glasses on top of the other layers.

Got leftover strawberrieway.

Oven-Baked Meatball Sandwiches Recipe

These Oven-Baked Meatball Sandwiches are so incredibly easy to make. Loaded with melted cheese & marinara making these perfect for your game day crowd.

Course: dinner

Cuisine: Italian

Keyword: meatballs, sandwich

Prep Time: 10minutes

Cook Time: 47minutes

Servings: 6 sandwiches

INGREDIENTS:

1-2 pkg Carando Abruzzese Fresh Italian Meatballs

4-6 hoagie rolls

4-6 slices provolone cheese

12 ounces marinara sauce

6 cups mozzarella cheese

Parmesan cheese & parsley for garnish – opt

INSTRUCTIONS:

Preheat oven to 375 degrees Fahrenheit.

Line a large baking sheet with foil & then place the raw meatballs on it about 1″ apart.

Bake the meatballs for 15 minutes.

Remove the baking sheet, turn the meatballs over & return to the oven to bake an additional 14-17 minutes or until internal temperature reaches 185 degrees F.

While the meatballs are baking, spray your casserole dish with oil or cooking spray.

Place the buns in the prepared dish & line the inside of each bun with a slice of provolone cheese.

Once the meatballs are cooked, place several in each bun in between the cheese. (*note- do not turn off your oven after baking the meatballs)

Spoon the marinara sauce over the meatballs & then top each sandwich with a handful of mozzarella cheese.

Bake in the 375-degree F oven for 10-15 minutes or until the cheese is melted.

*Opt – broil for 2-5 minutes to brown the cheese before serving.

Sprinkle with Parmesan cheese & parsley prior to serving.

Notes

To make these in the air fryer – cook the meatballs at 390 for 15 minutes. Assemble the sandwiches, then coo for another 3-5 minutes or until cheese is melted.

Why choose Carando Fresh Italian Meatballs?

I love Carando Fresh Italian Meatballs because not only are they juicy & delicious but the high quality, robust flavors of Carando Meatballs allow me to create authentic Italian-style meals in less time than cooking from scratch.

What kind of rolls work best?

I like to use a stadium roll vs a softer bun like you would use for a hot dog. This helps keep the bread from soaking in too much of the marinara sauce & from the sandwich from falling apart.

What toppings do you put on a meatball sandwich?

Personally, I usually prefer a classic meatball sub with just meatballs, sauce, and cheese. But I know many who like to add onions- grilled or raw, fried peppers, mushrooms, olives & so much more!

The easiest, neatest way to make bacon

Are you a bacon lover looking for the easiest and neatest way to prepare this crispy delight? Look no further! In this article, we’ll guide you through a simple yet delicious bacon-making process that will leave your taste buds craving for more.

Preparing Your Bacon

To begin, follow these steps:

Cut the Bacon in Half: Start by taking a package of bacon (you can even do four packages from Costco at once) and cut it in half. This step will make it easier to handle and cook evenly.

Separate the Slices: Once you’ve halved the bacon, gently pull the slices apart. This will prevent them from sticking together during cooking and ensure that each piece gets crispy.

Cooking to Perfection

Now, let’s move on to the cooking process:

Place in a Pot: Take a suitable pot and place the separated bacon slices into it. Make sure the pot is large enough to accommodate all the bacon comfortably.

Heat on High: Turn up the heat to high and start cooking the bacon. Be prepared to give it some attention, stirring occasionally to ensure even cooking.

The Magic of Bacon Fat

Here’s where the magic happens:

As the bacon cooks, the fat within it begins to melt and collect in the pot. This is what sets this method apart – the bacon essentially deep-fries in its own delicious fat.

Enjoy the Results

The final result is a batch of bacon that’s not only perfectly crispy but also incredibly flavorful. What’s more, this method eliminates those annoying spatters you often get when frying bacon in a pan.