Easy Corn Arepas Recipe

For many, corn arepas are the favorite of the immense variety of arepas that we have in Colombia, due to the ideal contrast between sweet and salty in its composition. Just out of the fire they are a delight for the diner and combine perfectly with the scrambled eggs for breakfast, although I dare to assure you that they are enjoyed very well alone and at any time of the day.

The preparation of corn arepas dates back to before the time of the conquest, when the Indians kneaded the tender grains of the ears, which they later put on the fire. Currently, this kind of arepas is part of the diet of the inhabitants of the Antioquia and Cundiboyacense regions

Like all the typical mixes from my land, pre-cooked flours are already available on the market that facilitate the preparation of these delicacies. However, and as always, I share the traditional recipe. Of course, the quantities of the ingredients vary according to the taste of the diner. For a softer dough, a greater quantity of milk or butter can be added, the same happens when graduating the taste of sweet and salt.

Servings: 5

Prep Time: 15min

Cook Time: 10min

Total Time: 25min

INGREDIENTS:

  • 2 cups of corn kernels
  • ½ cup of milk
  • 1 cup of cornmeal (the one used to make arepas)
  • 2 butter spoons
  • ¼ cup grated brown sugar (or brown sugar)
  • Salt to taste (optional)
  • White cheese (In the USA I use Cotija cheese or fresh cheese)

INSTRUCTIONS:

  1. In the blender, mix the corn kernels and milk.
  2. Transfer the mixture to a container and add the flour, panela and salt to taste.
  3. Knead and check the seasoning.
  4. Make balls and flatten them to form the arepas.
  5. Heat them in a non-stick frying pan and let them cook until golden brown on both sides.
  6. A little before removing them from the heat, cover them with slices of white cheese and let it melt.

Moist Lemon Loaf Recipe

This moist Lemon Cake Recipe is fluffy, tangy and so easy to make from scratch! Every bite of this supremely moist pound cake is bursting with fresh lemon flavor and the easy lemon glaze on top will have you hooked after just one bite.

This homemade lemon pound cake tastes even better than the Starbucks Lemon Loaf!

If you like the Starbucks Lemon Loaf then you’ll love this delicious, moist lemon cake recipe that’s made completely from scratch in less than 10 minutes. It’s one of my favorite afternoon or breakfast treats and it always gets rave reviews, everyone loves it! It’s gone in minutes whenever I make it.

This batter is made with freshly grated lemon zest and fresh lemon juice. When it the cake comes out of the oven it is infused with a homemade lemon syrup to give it an extra lemon kick, and then after cooling down the pound cake is topped with the most delicious lemon glaze.

This easy lemon cake is not dry and not fudgy, it’s perfectly moist while still being fluffy and it keeps fresh for a few days! A perfect cake for every occasion. If you like lemon desserts, you have got to give this cake a try!

Tips and Tricks for Making This Easy Lemon Cake Recipe

You can also make this recipe in a bundt pan. It looks prettier than in a loaf pan but make sure to grease your bundt pan generously so that your cake will come out of the pan.

Don’t leave out the lemon zest, that is what gives it the wonderful lemony flavor! I always use organic lemons and my favorite grater that I’ll like below.

For the best flavor use freshly squeezed lemon juice! Don’t use the bottled stuff, trust me fresh lemon juice tastes so much better.

When you make the lemon glaze for this pound cake don’t add too much liquid. You want the glaze to be nice and thick not runny. Start with 1 tbsp lemon juice and 1 tbsp milk and add the remaining 1/2 tbsp as needed.

This cake keeps well covered at room temperature for up to 4 days.

This moist Lemon Cake Recipe is fluffy, tangy and so easy to make from scratch! Every bite of this supremely moist pound cake is bursting with lemon flavor. If you like the Starbucks Lemon Loaf then you’ll love this homemade lemon pound cake!

Prep Time: 15minutes

Cook Time: 45minutes

Total Time: 1hour 

INGREDIENTS:

For the lemon pound cake:
  • 1 1/2 cups all-purpose flour
  • 1 1/2 tsp baking powder
  • 1 Tbsp lemon zest
  • 1/2 tsp salt
  • 1/2 cup unsalted butter room temperature
  • 1 cup granulated sugar
  • 2 large eggs room temperature
  • 1 tsp vanilla extract
  • 2 Tbsp lemon juice about 1/2 lemon
  • 1/2 cup buttermilk see below for substitution
For the lemon syrup:
  • 1/4 cup lemon juice about 1 lemon
  • 3 Tbsp powdered sugar
For the lemon icing:
  • 1 cup powdered sugar sifted
  • 1.5 Tbsp lemon juice
  • 1 Tbsp milk

INSTRUCTIONS:

  1. Preheat oven to 350°F (177°C). Grease a 9×5-inch (or 8×4-inch) loaf pan (see note).
  2. In a medium bowl combine the flour, baking powder, lemon zest, and salt. Set aside.
  3. In the bowl of a stand mixer fitted with the paddle attachment (or using an electric mixer), cream the butter and sugar together at medium-high speed until pale and fluffy, about 4-6 minutes. Scrape the sides of the bowl as needed.
  4. With the mixer running on low-speed, add the eggs one at a time, then beat in the vanilla extract and lemon juice. Beat on medium-high speed until combined.
  5. With the mixer on low, add about one-third of the flour mixture and mix until almost combined, then add half the buttermilk and mix until just combined. Repeat with another third of flour mixture and then the last half of the buttermilk, ending with the last third of the flour. Beat until just incorporated.
  6. Scrape the batter into the prepared loaf pan and bake for 45-55 minutes until the cake is golden brown and a toothpick comes out mostly clean with only a couple moist crumbs. Baking times vary, so keep an eye on yours.
  7. Let the cake cool for about 15 minutes in the pan. Stir together the lemon juice and confectioners’ sugar for the lemon syrup. Carefully invert the loaf pan, and transfer the cake to a cooling rack, then brush the syrup on the cake while it’s still warm. Allow cake to cool completely.
  8. When the cake is cooled, combine all the icing ingredients, start with 1 tbsp lemon juice and milk and add the remaining lemon juice as needed. The icing should be thick and not runny. Pour icing over cake and let dry before serving.

NOTES:

If you don’t have buttermilk, you can make your own by combining 1/2 cup of milk with 1.5 tsp lemon juice or white vinegar. Let the mixture sit for a few minutes until it starts to curdle.

The longer you beat the sugar and butter, the better the result will be because this process incorporates air into the batter and makes the cake fluffy and tender

I recommend using fresh lemon juice but you can also bottled lemon juice

This cake would also taste great with lime juice or orange juice

NUTRITIONAL INFO:

Calories: 306kcal | Carbohydrates: 49g | Protein: 3g | Fat: 10g | Saturated Fat: 6g | Cholesterol: 58mg | Sodium: 144mg | Potassium: 98mg | Sugar: 34g | Vitamin A: 350IU | Vitamin C: 0.9mg | Calcium: 48mg | Iron: 1.1mg

Easy Layered Taco Bake Recipe

This layered Taco Bake is a simple and quick weeknight meal with layers of tortillas, ground beef and salsa con queso!

One food item I always seem to have in my pantry or in my fridge are flour tortillas. They are good for so many things. Tortillas can be made into so many different types of snacks for kids (and grownups). You can cut them up and fry them or bake them. You can make cinnamon chips, quesadillas, tortilla pizzas. The possibilities are endless and easy on the wallet too.

TIPS FOR MAKING LAYERED TACO BAKE:

Flour tortillas work best in this but if you absolutely must have corn tortillas, then you can certainly switch it out.

Ground turkey and chicken can be substituted for the ground beef.

Try making your own Taco Seasoning for this recipe!

If you like this recipe, you should give these Navajo Tacos a try!

A springform pan makes this easy to remove but an 8-inch round baking pan will work as well.

This meal is delicious served with Spanish style rice

If you are very sensitive to spices, you can certainly use a regular cheese dip instead of the salsa con queso.

Prep Time: 15minutes 

Cook Time: 30minutes 

Total Time: 45minutes

Servings: 6

Ingredients:

  • 1 pound ground beef
  • 1 packet taco seasoning
  • water as called for on back of seasoning packet (usually 3/4 cup water)
  • 1/2 cup salsa con queso
  • 3 (8-inch) flour tortillas (soft taco size)
  • 2 cups shredded Mexican cheese blend (divided use)

Instructions:

  1. Brown and crumble 1 pound ground beef. Drain excess grease.
  2. Add in 1 packet taco seasoning and water as called for on back of seasoning packet (usually 3/4 cup) following directions on back of seasoning packet.
  3. Once the taco meat is ready, turn off heat and add in 1/2 cup salsa con queso. Give it a good stir until thoroughly combined.
  4. Preheat oven to 350F degrees. Spray an 8-inch round baking pan with nonstick cooking spray.
  5. Layer the bottom of the pan with one of the 3 (8-inch) flour tortillas.
  6. Now add about 1/3 of the ground beef taco filling on the the first layer.
  7. Then add 1/3 of the 2 cups shredded Mexican cheese blend.
  8. Continue until you are done with all the layers: another tortilla, more taco mixture, more cheese.
  9. Bake at 350F degrees for about 15-20 minutes until cheese is melted and edges are slightly golden brown.
  10. Allow to cool for a couple of minutes. Slice and serve. Top with desired toppings.

Southern Fried Chicken Recipe

Southern Fried Chicken – One bite of this chicken’s crunchy, spicy outer layer followed by the tender, juicy meat inside, and you’ll understand why this is a true-blue Southern classic. Infused with spices for intense flavor and soaked in buttermilk tender juiciness, this is the perfect addition to your collection of chicken recipes!

Honestly, this is one of those recipes that is just plain irresistible. I never have leftovers, and everyone always goes back for seconds. Give this fried chicken a try, and you’ll understand what all the fuss is about. 😋

Besides being utterly tantalizing, this Southern-fried chick recipe is super affordable. Marinate simple chicken cuts in buttermilk, then coat them with seasoned flour, and voila!

Prep Time: 4hours 10minutes

Cook Time: 20minutes

Cooling Time: 10minutes

Total Time: 4hours 40minutes

Servings: 10

INGREDIENTS:

  • 1 whole chicken, cut into 10 pieces
  • 1½-2 teaspoons salt, adjust to preference
  • ½ -1 tablespoon hot sauce
  • 3-4 cloves garlic, crushed
  • 2-3 teaspoons Creole seasoning
  • 4 cups buttermilk (for both marinating and coating)
Chicken Coating
  • 3 cups all-purpose flour
  • 1 cup cornstarch
  • 2 teaspoons baking powder
  • 1 tablespoon paprika
  • 2 tablespoon garlic powder
  • 2 tablespoon onion powder
  • 1-1½ tablespoon dried herbs (thyme, oregano, parsley, etc.)
  • 1 teaspoon cayenne pepper
  • 1 teaspoon white pepper
  • 1 teaspoon salt, adjust to taste

INSTRUCTIONS:

Prepping the Chicken and Coating
  1. Place the chicken pieces in a large bowl. Then season it with salt, crushed garlic, hot sauce, and Creole seasoning.
  2. Pour some of the buttermilk over the marinated chicken, transfer the chicken to a gallon-sized zipper-lock freezer bag, and refrigerate for at least 4 hours (or overnight).
  3. Whisk together the flour, cornstarch, baking powder, paprika, garlic powder, onion powder, herbs, cayenne pepper, white pepper, and salt in a large bowl.
  4. Remove the marinated chicken from the buttermilk. Then dredge it in the flour mixture, shaking off any excess flour. You could use a Ziploc bag for this process, too.
  5. Double dip the chicken in the remaining buttermilk (add fresh buttermilk as needed), followed by the flour mixture – shake off any excess flour. Let the chicken rest for 10-15 minutes while preparing the oil. That will help the coating to stay on better.
Frying the Chicken
  1. Heat oil in a deep fryer or cast iron skillet to 375℉/190℃. The temperature will drop once you add chicken.
  2. Slowly and carefully place the chicken in the hot oil using a tong. Work in batches, and don’t overcrowd the skillet.
  3. Fry the chicken until golden brown, turning once every 10-15 minutes – depending on the size of the pieces. Chicken is done when it is no longer pink inside and its juices run clear, or your instant-read thermometer reads 165℉/75℃. You may do a test by piercing the chicken with a fork.
  4. Drain the chicken on paper towels and then transfer them to a wire rack.
  5. Repeat with remaining chicken pieces. Let them cool for at least 10 minutes before serving.

NOTES:

  • After you coat the chicken with the flour mixture and dip your chicken in buttermilk, let it rest first before frying it. That will allow your chicken to form a crust and warm to room temperature, which will help it cook evenly.
  • When frying, ensure your oil is at the right preheated temperature. If it’s too hot, the outside of your chicken will get burned; if it’s cold, the chicken will get soggy and greasy.
  • Don’t ever use extra virgin olive oil on fried chicken because it’ll result in bitter-tasting meat. Go for a neutral-tasting oil like canola, vegetable, or, preferably, peanut oil.
  • Don’t overcrowd your pan with chicken because it will lower the oil’s temperature and slow the cooking time (soggy chicken isn’t good). Do it in small batches instead.
  • A cast-iron pan is a must for a perfectly cooked fried chicken because it holds the temperature better and heats evenly, resulting in perfectly cooked chicken.
  • Rather than deep frying or submerging your chicken entirely into the pan or deep fryer, only ¾ of the chicken should be covered in hot oil. The weight of the chicken will cause it to sit just almost above the oil’s surface, creating a crispy crust without burning.
  • Don’t let anything fried sit on a paper towel too long because it’ll start to steam. Then your chicken might get soggy and stick to the paper towel. Instead, drain your chicken using a wire rack over a baking sheet, and they’ll cool crispy and dry all at once easily.
  • Please remember that the nutritional information is a rough estimate and can vary significantly based on the products used in the recipe.

NUTRITIONAL INFO:

Serving: 1piece | Calories: 242kcal | Carbohydrates: 49g | Protein: 8g | Fat: 2g | Saturated Fat: 1g | Polyunsaturated Fat: 0.3g | Monounsaturated Fat: 0.3g | Cholesterol: 4mg | Sodium: 764mg | Potassium: 338mg | Fiber: 2g | Sugar: 5g | Vitamin A: 665IU | Vitamin C: 3mg | Calcium: 175mg | Iron: 3mg

Peach Cobbler Recipe

Mouth watering and easy, simple peach cobbler with self rising flour, sugar, butter and peaches.

Strike up the cobbler, because it’s fresh peach season. I have been waiting for July 1, so I can fresh peach bake, especially peach cobbler bake.

Best Peach Cobbler Recipe Baking Tips

Use ripe, fresh peaches for this easy cobbler recipe. Ripe peaches will deliver a sweet, juicy flavorful peach cobbler. See below for tips on how to ripen peaches more quickly.

I used around 5 cups of peaches for my four ingredient peach cobbler. That was 8 medium peaches.

Cut peaches in bite size pieces and all around the same size. Cutting your peaches all around the same size will allow even cooking and optimal texture in every bite.

Start checking your peach cobbler after it’s been in the over around 40 minutes. I have had it take up to an hour to cook. Make sure it is golden brown when you remove it from the oven.

You can substitute frozen peaches for fresh peaches. You will probably need 2.5 to 3.5 pounds of frozen peaches. See below for using frozen peaches in peach cobbler.

You can substitute canned peaches for fresh peaches. You will probably need 2.5 to 3 cans of canned peaches. See below for details.

This easy 4 ingredient peach cobbler is ridiculously delicious by itself, but friends you can always elevate your peach cobbler experience with a scoop of vanilla ice cream. Your taste buds will love that delicious, delightful dynamic duo.

Easy, tangy and delicious and only 4 ingredients.

Prep Time: 15mins

Cook Time: 45mins

Total Time: 1hr 

Servings: 16 servings 

Equipments

  • 9×13 baking dish
  • Dry Measuring Cups
  • Large Mixing Bowl
  • Spatula

INGREDIENTS:

  • 1¼ cups sugar
  • 1¼ cups butter
  • 1½ cups plus 2 TBS self rising flour
  • 4¼ to 5½ cups peaches cut in bite size pieces. I used around 5 cups (8 medium peaches).

INSTRUCTIONS:

  1. Preheat oven to 350°
  2. Place peaches, that have been cut into bite sized pieces, in 13×9 baking pan that has been greased or sprayed with baking spray. Set aside.
  3. 4¼ to 5½ cups peaches
  4. In large mixing bowl combine sugar, butter and self rising flour until crumbly.
  5. 1¼ cups sugar,1¼ cups butter,1½ cups plus 2 TBS self rising flour
  6. Sprinkle over peaches.
  7. Bake at 350° for 45 – 60 minutes or until golden brown.
  8. No need to cool. Eat up right away if you like.

Notes

  • Use ripe, fresh peaches for this easy cobbler recipe. Ripe peaches will deliver a sweet, juicy flavorful peach cobbler. See below for tips on how to ripen peaches more quickly.
  • Cut peaches in bite size pieces and all around the same size. Cutting your peaches all around the same size will allow even cooking and optimal texture in every bite.
  • Start checking your peach cobbler after it’s been in the over around 40 minutes. I have had it take up to an hour to cook. Make sure it is golden brown when you remove it from the oven.
  • You can substitute frozen peaches for fresh peaches. You will probably need 2.5 to 3.5 pounds of frozen peaches. See below on using frozen peaches in peach cobbler.
  • You can substitute canned peaches for fresh peaches. You will probably need 1.5 to 2 cans of canned peaches. See below for details.
  • This easy 4 ingredient peach cobbler is ridiculously delicious by itself, but friends you can always elevate your peach cobbler experience with a scoop of vanilla ice cream. Your taste buds will love that delicious, delightful dynamic duo.
Nutritional Info:

Calories: 252kcal

Stuffed Cabbage Rolls Recipe

This cabbage rolls recipe is super easy to prep with cabbage leaves, ground beef, rice, and condensed tomato soup. I have been using this recipe for well over 20 years and still love it! To speed things up the rolls are cooked in a skillet on the stovetop but this recipe also works well in a slow cooker.

Prep Time: 15 mins

Cook Time: 1 hr

Total Time: 1 hr 15 mins

INGREDIENTS:

  • ⅔ cup water
  • ⅓ cup uncooked white rice
  • 8 cabbage leaves
  • 1 pound lean ground beef
  • ¼ cup chopped onion
  • 1 egg, slightly beaten
  • 1 (10.5 ounce) can condensed tomato soup, divided
  • 1 teaspoon salt
  • ¼ teaspoon ground black pepper

INSTRUCTIONS:

  1. Bring water and rice to a boil in a saucepan. Reduce heat to low, cover, and simmer until rice is tender and liquid has been absorbed, about 20 minutes.
  2. Meanwhile, bring a large, wide saucepan of lightly salted water to a boil. Add cabbage leaves and cook for 2 to 4 minutes or until softened; drain.
  3. Combine ground beef, 1 cup of cooked rice, onion, egg, 2 tablespoons of tomato soup, salt, and pepper in a large bowl; mix thoroughly.
  4. Spoon about 2 tablespoons of beef mixture onto each cabbage leaf; bring one end of the cabbage leaf over the mixture, rolling and tucking in the ends to prevent the filling from falling out.
  5. Place cabbage rolls in a large skillet over medium heat; pour remaining tomato soup on top. Cover and bring to a boil; reduce heat to low and simmer for about 40 minutes, stirring and basting with the liquid often.

NUTRITIONAL INFO:

CALORIES 223 Total Fat 13g Saturated Fat 5g Cholesterol 66mg Sodium 657mg Total Carbohydrates 13g Dietary Fiber 1g Total Sugars 3g Protein 13g Vitamin C 25mg Calcium 33mg Iron 2mg Potassium 338mg

Creamy Carrot Cake Recipe

This is the best carrot cake recipe I’ve ever used. We prefer to use a hand grater when preparing the carrots since it creates delicate carrot shreds that melt into the cake batter. Pre-shredded bags or shredding carrots using a food processor are also options, but the carrot shreds will be larger.

This recipe is forgiving. You can make this with or without the nuts or raisins. We love the combination of granulated and brown sugar, but if you only have one of them, use it, and the cake will still be delicious.

Frosting: Our creamy frosting recipe shared below is not a traditional cream cheese frosting. Thanks to whipped cream, it’s creamier and has soft peaks (you can see it in our video). We love it, but if you prefer a more traditional frosting, see the tips section below the recipe. We have provided instructions for a classic cream cheese frosting that works nicely with this cake.

PREP Time: 20 min

COOK TIME: 45 min

TOTAL TIME:  1hrs 5min

Makes 1 (9-inch) double layer cake (16 thin slices) or 22 to 24 cupcakes

INGREDIENTS:

FOR CARROT CAKE
  • 2 cups (260 grams) all-purpose flour
  • 2 teaspoons baking soda
  • 1/2 teaspoon fine sea salt
  • 1 ½ teaspoons ground cinnamon
  • 1 ¼ cups (295 ml) canola or other vegetable oil
  • 1 cup (200 grams) granulated sugar
  • 1 cup (190 grams) lightly packed brown sugar
  • 1 teaspoon vanilla extract
  • 4 large eggs, at room temperature
  • 3 cups (300 grams) grated peeled carrots, 5 to 6 medium carrots
  • 1 cup (100 grams) coarsely chopped pecans
  • 1/2 cup (65 grams) raisins
FOR CREAMY FROSTING
  • 8 ounces (225 grams) cream cheese, at room temperature
  • 1 ¼ cups (140 grams) powdered sugar
  • 1/3 cup (80 ml) cold heavy whipping cream
  • 1/2 cup (50 grams) coarsely chopped pecans, for topping cake

DIRECTIONS:

MAKE THE BATTER

  1. Position a rack in the middle of the oven. Grease two 9-inch round cake pans, line the bottom with parchment paper and then grease the top. Or grease and flour the bottom and sides of both pans.
  2. Heat the oven to 350 degrees Fahrenheit (176C).
  3. Whisk flour, baking soda, salt, and cinnamon in a medium bowl until very well blended.
  4. In a separate bowl, whisk the oil, granulated sugar, brown sugar, and vanilla.
  5. Add the eggs, one at a time, whisking after each one.
  6. Switch to a large rubber spatula. Scrape the sides and bottom of the bowl, then add the dry ingredients in three parts, gently stirring until they disappear and the batter is smooth.
  7. Stir in the carrots, nuts, and raisins.

BAKE CAKE

  1. Divide the cake batter between the prepared cake pans.
  2. Bake until the tops of the cake layers are springy when touched and when a toothpick inserted into the center of the cake comes out clean, 35 to 45 minutes.
  3. Cool cakes in the pans for 15 minutes, then carefully turn the cake layers out onto cooling racks. Remove the parchment paper and cool completely.
  4. If you find that a cake layer is sticking to the bottom of the pan, leave the cake pan upside down and allow gravity to do its thing.

TO FINISH

  1. In a large bowl, beat the cream cheese with a handheld mixer on medium speed until creamy, about 1 minute.
  2. Beat in the powdered sugar, a 1/4 cup at a time, until fluffy.
  3. Pour in the whipping cream. Beat on medium speed for 2 to 3 minutes, or until the frosting is whipped and creamy. This frosting resembles the texture of whipped cream. Chill covered until ready to frost the cake.
  4. When the cake layers are completely cool, frost the top of one cake layer, and place the second cake layer on top.
  5. Add the remaining frosting to the top of the carrot cake and use a butter knife or small spatula to swirl the frosting around. Leave the sides of the cake unfrosted. Finish with a handful of nuts on top.

Frosting SubstituteTraditional Cream Cheese Frosting: In a large bowl, beat 16 ounces of cream cheese and 1/2 cup of softened butter together for a minute or two until smooth. Add 4 1/2 cups of powdered sugar, 1 1/4 teaspoons of vanilla extract, and a pinch of salt. Beat for 2 to 3 minutes until extra creamy. If it is too thick, add 1 tablespoon of cream or milk.

How to Make Carrot Cake Cupcakes: For cupcakes, we’d recommend baking for 14 to 18 minutes (or until a tester inserted into the center of one comes out clean). Then let them cool for a few minutes in the cupcake pan before transferring them to a cooling rack. The recipe should make 22 to 24 cupcakes.

Using a bundt pan: We have never done this in our kitchen, but a 10-cup or 12-cup Bundt pan should be fine for this recipe. You will likely need to increase the baking time by about 30% in the 10-cup pan, somewhat less in the 12-cup.

Using a 9-inch by 13-inch pan rectangular pan: Simply add all the batter to the rectangular pan and bake. Bake time may be slightly longer.

NUTRITION PER SERVING:

Serving Size 1 slice (1 of 16) / Calories 535 / Total Fat 33.4g / Saturated Fat 6.9g / Cholesterol 69.3mg / Sodium 315.9mg / Carbohydrate 56.4g / Dietary Fiber 2.4g / Total Sugars 40.5g / Protein 5.6g

Weight Watchers Chocolate Lava Cake Recipe

This Slow Cooker Skinny Chocolate Lava Cake is every chocolate lovers dream-made with three chocolate layers! A decadent dessert everyone will love-perfect for potlucks, weekend brunch, or any family gathering!

Summer vacation is coming to an end-school is starting for my three kiddos. It’s definitely bitter sweet-so we are ending this amazing summer by making my Slow Cooker Skinny Chocolate Lava Cake!

PREP TIME: 10 minutes

COOK TIME: 2 hours 30 minutes

ADDITIONAL TIME: 30 minutes

TOTAL TIME: 3 hours 10 minutes

INGREDIENTS:

  • 1 package Pillsbury Moist Supreme Sugar Free Devil’s Food Cake Mix
  • 3 eggs or 3/4 cup liquid eggs
  • 1/2 cup unsweetened applesauce sauce
  • 1 1/4 cup water
  • 1 (1 oz.) sugar free chocolate fudge Jell-O instant pudding mix
  • 1 (11 oz.) carton premier protein shake (any flavor) or 11 oz. skim milk for an additional point per serving (I use 11 oz. Caramel or Chocolate Flavor Premier Protein)
  • 5 oz. sugar free chocolate chips ( I recommend Lily’s no sugar added milk or dark chocolate chips or Lakanto Monkfruit sugar free Chocolate Chips)

INSTRUCTIONS:

  1. Spray a 4- quart slow cooker with nonstick cooking spray
  2. In a large mixing bowl combine, cake mix, unsweetened applesauce sauce, water and eggs.
  3. Mix until well combined. Pour cake batter into prepared slow cooker.
  4. In a separate small bowl combine pudding mix and premier protein. Whisk for 2 minutes. Let it sit until pudding sets. ( about 2 minutes)
  5. Pour pudding mix over the cake mix batter.
  6. Cook on low for 2 1/2 to 3 hours or until toothpick inserted in the cake portion comes out with clean.
  7. Using a food scale or a measuring cup-measure out 5 oz. or 1/3 cup no sugar chocolate chips.
  8. Sprinkle the top of the warm cake with chocolate chips. Turn off slow cooker.
  9. Remove the slow cooker ceramic insert. Let it sit uncovered for 10-15 minutes or until chocolate chips are soft.
  10. Serve warm with fat free Reddi Whip or with some light vanilla ice cream.

Notes:

Store leftovers in an airtight container in the refrigerator for up to week. Reheat in the microwave.

Smartpoints: GREEN: 3 Smartpoints without chocolate chips or 4 SmartPoints per serving with chocolate chip if using 3/4 cup liquid egg substitute or 5 SmartPoints per serving with chocolate chips if using 3 whole eggs BLUE/PURPLE: 3 Smartpoints without chocolate chips or 4 SmartPoints per serving with chocolate chips

NUTRITIONAL INFO:

YIELD: 16 SERVING SIZE: 1

Amount Per Serving: CALORIES: 155TOTAL FAT: 5gSATURATED FAT: 2gTRANS FAT: 0gUNSATURATED FAT: 2gCHOLESTEROL: 36mgSODIUM: 333mgCARBOHYDRATES: 36gNET CARBOHYDRATES: 34gFIBER: 2gSUGAR: 0gPROTEIN: 8g

Beef and Chicken Chimichangas

Beef and cheese chimichangas are large tortillas filled with savory beef, beans, and cheese, then fried to a golden perfection. The perfect quick and easy dinner solution, and even great to make ahead and freeze.

While you are here, you gotta check out these Cheesy Bacon Loaded Breakfast Burritos. Also, be sure to drizzle them with some of this Creamy Jalapeno Salsa, or this amazing Chipotle Salsa.

WHAT IS A CHIMICHANGA?

A chimichanga is a large tortillas, stuffed with various proteins and starches, and deep fried until they are golden brown. You will usually find them in the “Tex-mex” style dishes versus traditional Mexican food dishes.

WHAT IS THE DIFFERENCE BETWEEN A BURRITO AND A CHIMICHANGA?

In essence, both of these are made the same. Use a large tortilla, and roll different fillings inside of it. The biggest difference however, is that the chimichanga is fried! Even more, often times a burrito will be served wrapped in foil or parchment paper, and eaten by hand.

YIELD: 6 CHIMICHANGAS

Beef and cheese chimichangas are made with large tortillas, and filled with savory beef, beans, and cheese, then fried to a golden perfection. The perfect quick and easy dinner solution, and even great to make ahead and freeze.

PREP TIME: 10 minutes

COOK TIME: 20 minutes

TOTAL TIME: 30 minutes

INGREDIENTS:

  • 6 large Flour tortillas
  • 1 pound Ground beef
  • 1 cup Water (to add to cooked and seasoned beef)
  • 2 cups Cheese, shredded
  • 1 can Refried pinto beans
  • 2 cups Vegetable oil (to fry chimichangas)
  • Seasoning for ground beef
  • 1 tablespoon Chili powder
  • 1/2 tablespoon Seasoned salt
  • 1/2 tablespoon Ground cumin
  • 1 teaspoon Black pepper
  • 1 teaspoon Garlic salt (or garlic powder)
  • 1/2 teaspoon dried Oregano
  • 1/2-1 cup Water
Topping Ideas
  • Sour cream
  • Shredded lettuce
  • Salsa
  • Chopped tomatoes

INSTRUCTIONS:

  1. Brown the ground beef in a skillet over medium heat. The meat is fully cooked when there is no longer any pink visible. Use a strainer to drain any excess grease from the skillet.
  2. Put the meat back into the skillet over medium heat. Add all of the seasonings, and water and mix it together thoroughly. Continue to simmer until the water is absorbed.
  3. Heat the vegetable oil in a separate skillet over medium heat. While the oil is heating up, begin assembling the burritos.
  4. Place about one tablespoon of beans on one side of the tortilla and smear it across, somewhat close to the edge. Next place one to two tablespoons of the meat mixture, then a sprinkle of cheese (a generous sprinkle)!
  5. Begin to roll the tortilla up over the mixture, once half way rolled, fold in the sides towards the middle, then continue rolling all the way until it is closed. Roll as tight as possible so that the mixture does not ooze out.
  6. Continue rolling until all of the burritos are made or you run out of mixture.
  7. Place the burritos into the hot oil SEAM SIDE DOWN. Fry on each side for one to two minutes, or until they turn golden brown. Be sure to flip, and fry the sides of the burritos as well,
  8. Remove from the oil and drain on a baking sheet or a bed of paper towels. Top with your favorite garnishes and salsas. Enjoy!

NUTRITION INFO:

YIELD: 6 SERVING SIZE: 1

Amount Per Serving: CALORIES: 419TOTAL FAT: 53gSATURATED FAT: 9gTRANS FAT: 3gUNSATURATED FAT: 37gCHOLESTEROL: 86mgSODIUM: 379mgCARBOHYDRATES: 29gFIBER: 5gSUGAR: 1gPROTEIN: 37g

Maxican Chicken Doritos Casserole Recipe

A chicken casserole makes for a convenient dish. Chicken is a great base for every meal and its neutral taste means it works well with a variety of flavorings.

With a casserole, home cooks can get creative adding any ingredients that may be lying around the kitchen.

If you like your chicken casserole with a kick, read on to find out more about our Mexican chicken casserole and other variations you can make for your family.

Mexican Chicken with Doritos and Velveeta

When we think of Mexican food, we think of ingredients like salsa, beans, and guacamole. This dish takes Mexican in a slightly different direction with the addition of Doritos and Velveeta. This makes for a meal that is a well-deserved guilty pleasure for your hard-working family

Total Time: 50 minutes

Get Mexican flair on the table with this easy Mexican Chicken Casserole. With only 6 ingredients, it comes together in no time. Filled with creamy cheese and layered with Doritos, this will easily satisfy even picky eaters.

INGREDIENTS:

  • 6 chicken breasts, boneless
  • 10 oz. Velveeta cheese
  • 1 can cream of mushroom soup mixed with 1 cup milk
  • 1 can Rotel tomatoes
  • 1 bag Doritos tortilla chips

INSTRUCTIONS:

  1. Boil chicken until cooked throught.Cut into bite sized pieces.
  2. Combine Velveeta, soup mixture and tomatoes; bring to a boil.
  3. Add chicken and simmer 5-10 minutes, stirring often.
  4. Place a layer of Doritos in long casserole dish, then add a layer of the chicken mixture.
  5. Add another layer of chips, another layer of the chicken mixture, ending with chips on top.
  6. Bake at 350 degrees F for 30 minutes.

Puff Pastry Recipe

Leave those frozen sheets on the store shelf! This is the best-tasting, easiest homemade puff pastry recipe ever! Plus, it comes together in just 15 minutes.

Puff pastry: It’s the kind of thing that makes things feel like a special occasion. All those light, flaky layers and that rich buttery flavor!

Prep Time: 15mins

Cook Time: 25mins

Chill Time: 3hrs

Total Time: 3 hrs 40mins

Course: Breakfast, Brunch, Dessert Cuisine: American

Keyword: Homemade Puff Pastry, puff pastry, puff pastry desserts, puff pastry recipe easy, puff pastry recipes, puff pastry sheets

Servings: 8 

Ingredients:

  • 2 cups all-purpose flour
  • 1 teaspoon salt
  • 1 1/4 cups unsalted butter (2 1/2 sticks), cold
  • 1/2 cup cold water

Instructions:

  1. Place the flour and salt in a large bowl and whisk to combine.
  2. Cut the cold butter into 1/4-inch slices and add to the flour mixture, tossing to coat.
  3. Stir in the cold water until a thick dough forms.
  4. Gather the dough into a ball, flatten it into a disk-shape, and wrap in plastic wrap.
  5. Chill for 1 hour in the fridge, or 20 to 30 minutes in the freezer.
  6. Unwrap the dough, dust the work surface with flour, and roll the dough into a rough rectangle shape.
  7. Fold the dough in thirds, like a letter.
  8. Turn 90 degrees, roll and fold again.
  9. Repeat about 2 to 4 times, wrap the dough in plastic wrap, and chill for 2 hours or overnight.*

Notes:

Tips for Making Homemade Puff Pastry

Brush the pastry with an egg beaten with a couple of teaspoons of water before baking for a beautiful sheen.

When you’re ready to bake the pastry, make sure it is COLD and the oven is HOT.

Bake times will vary based on exactly what you are making, so follow your recipe!

The dough can also be frozen. It will keep for several weeks in the freezer, tightly wrapped. Thaw in the refrigerator.

This recipe makes approximately 24 ounces, or 685 grams, of dough.

Nutritional Info:

Serving: 1pastry | Calories: 418kcal | Carbohydrates: 23g | Protein: 3g | Fat: 34g | Saturated Fat: 21g | Cholesterol: 91mg | Sodium: 296mg | Potassium: 43mg | Vitamin A: 1065IU | Calcium: 15mg | Iron: 1.5mg

Potato Bread In Sarten

This Potato Bread recipe combines the best of pizza, flatbread, and calzones into one. The secret to the soft and fluffy bread is the potato. Adding potato to bread is a trick that artisan bread bakers have used for many years. It increases the dough’s starch content which helps with moisture retention. The result? Fluffy bread that doesn’t dry out easily. The bread is filled with typical pizza ingredients like salami and cheese, and then fried in a pan—no oven necessary! It will be a hit among the pickiest of eaters, and you can serve it as a light lunch or as a main meal with a side of fries.

What is Potato Bread

Adding potato to bread might sound strange, but it’s an age-old trick used by artisan bakers—a secret to light and fluffy bread.

Because of its ability to hold water, potato starches help to increase the moisture content in baked goods. It also prevents too much gluten formation, which means bread (and even pastries) is lighter and fluffier!

Potato Bread Ingredients

Potato – choose a high-starch potato (like the Russet variety)

Egg – the egg adds richness to the dough

Parsley – use fresh herbs for the best flavor

Cheese – for more flavor, use mature cheddar cheese

Salami – use a high-quality salami that is not too fatty

For added crunch, brush the bread with melted and sprinkle with sesame seeds, freshly ground salt, or everything bagel seasoning before serving.

Don’t like salami? Feel free to add other meats like crispy bacon, chopped ham, smoked chicken, or even smoked salmon.

You can also add other ingredients (the same as you would add on pizzas): olives, jalapenos, sun-dried tomatoes, or sauteed mushrooms will all work well. Be careful not to overfill, otherwise, the filling will spill out during baking.

You can add herbs like oregano, thyme, or basil.

Use cheddar cheese, mozzarella, cheese, or Swiss cheese.

How to Store Potato Bread

Leftovers can be stored in the fridge for up to 3 days. Reheat in the oven or Airfryer to make the surface crispy again. Microwaving it will make the bread soggy.

Can I Make Potato Bread in the Airfryer?

Yes, you can! Simply brush the bread with melted butter and air-fry for 15 minutes at 180°C/360°F, turning halfway.

Can I Make It Ahead of Time?

The dough can be made a day ahead and kept in the fridge. Roll out, fill, and cook the potato bread before serving.

Prep Time: 25min

Cook Time:20min

Total Time: 45min

Ingredients:

  • 1 egg
  • 500ml (2 cups) water
  • 800g (6 3/8 cups) flour
  • 2 tbsp olive oil
  • 1kg (2 lbs) boiled potatoes
  • 50g (4 tbsp) butter
  • 1/2 tsp salt
  • 1/2 tsp black pepper
  • 250g (2 heaped cups) cheese
  • 140g (5 oz) salami slice

Instructions:

  1. In a large mixing bowl, mix together the olive oil, water, and salt.
  2. Sift in the flour and mix gently with a spatula.
  3. Knead the dough until smooth and elastic. Let the dough rest for 10 minutes.
  4. In another bowl mix together boiled potatoes with butter, salt, and pepper.
  5. Divide the dough into four pieces.
  6. Flatten the dough slightly with your hands.
  7. Then roll out with a wooden rolling pin.
  8. Brush the flattened dough with oil.
  9. Fold the dough into thirds.
  10. Then fold the longer sides toward the center.
  11. Spread the mashed potato onto the folded dough.
  12. Place the salami on top of the mashed potato.
  13. Top with grated cheese.
  14. Bring the corners toward the center.
  15. Fry in the pan from both sides until golden brown, about 4-6 minutes.
  16. Enjoy!

Pineapple Cream-Cheese Pound Cake Recipe

This pineapple pound cake is elevated with sweet tropical flavor, just enough to complement the richly dense pound cake base. Top with a delicate pineapple-vanilla glaze to take it even further.

Deliciously moist and dense pineapple pound cake is dressed with a sweet pineapple vanilla glaze. This supple pineapple cake has the perfect crumb and is great for breakfast, dessert, or as a snack.

Why this recipe works

This pineapple pound cake is elevated with sweet tropical flavor, just enough to complement the richly dense pound cake base. The texture of a good pound cake should be dense, moist, soft and tender – and that’s exactly what you’ll get with this recipe! Top with a delicate pineapple-vanilla glaze to take it even further.

Pound cakes are often made in bundt pans, after all, almost any kind of cake can be made in a bundt pan. Baking this pineapple quick bread in a bundt pan will yield an overall prettier presentation compared to a basic loaf. Let’s get started!


Prep Time: 20mins

Cook Time: 1hr 15mins

Total Time: 1hr 35mins

 Servings: 10 servings

Equipment
  • Stand mixer or hand mixer
  • Mixing bowls
  • 9 inch bundt pan
  • Whisk
  • Wire cooling rack

INGREDIENTS:

Cake
  • 3 cups all-purpose flour
  • 1 teaspoon baking powder
  • 1 cup unsalted Cream Cheese softened
  • 1/2 cup shortening
  • 2 3/4 cups granulated sugar
  • 4 eggs at room temperature*
  • 1/2 cup buttermilk at room temperature*
  • 1 cup crushed pineapple 1 – 8 ounce can drained, juices reserved
  • 1 teaspoon vanilla extract

Glaze

4 Tablespoons cream cheese

2 cups powdered sugar

1/2 teaspoon vanilla extract

1/4 cup reserved pineapple juice

INSTRUCTIONS:

  1. Preheat oven to 325°F. Spray a 9-inch bundt cake pan with nonstick baking spray (the kind with flour) and set aside.
  2. *We recommend a nonstick cooking spray with flour rather than greasing and flouring the bundt pan, but you can grease it well with butter or shortening and then lightly flour the pan.
  3. In a medium-sized bowl, combine the flour and the baking powder. Set aside.
  4. Cream together cream cheese, shortening, and sugar in the bowl of a standing mixer or large mixing bowl.
  5. Add eggs one at a time, beating on high speed for 30 seconds after each addition.
  6. Do not overbeat the eggs, this can cause the cake to be crumbly.
  7. Rotate between adding the flour mixture and the buttermilk, mixing only a little between each addition.
  8. Add in the pineapple and vanilla extract and beat just until the pineapple is evenly distributed.
  9. Pour batter into the prepared bundt pan and bake for 75-85 minutes, until a toothpick inserted in the center comes out with a few moist crumbs. Cool for 30 minutes, then turn out onto a wire rack to cool completely.
  10. Whisk together the glaze ingredients until smooth. Drizzle over the top of the cooled cake.

Notes:

  • Be sure to measure your flour using the scoop and sweep method. You never want to pack flour into a measuring cup. If you add too much flour, you’ll end up with a dry, crumbly cake.
  • The moisture comes from the buttermilk and the pineapple. Drain the pineapple before adding it to the cake batter, but it’s not necessary to really strain it; some of the juices can be added in. Because this cake is so dense and moist, it takes at least 75 minutes to cook. Test the center with a toothpick to make sure there is not still wet batter before removing from the oven.
  • Shortening has a higher melting point than butter, which provides and fluffier and moister cake. You can substitute a third stick of butter for the shortening if you wish.
  • Be sure the eggs and buttermilk are a room temperature and that you beat them well when adding to the batter – this is going to give you more volume in your bundt cake. Room temperature eggs hold more volume than cold eggs.
  • I recommend a nonstick cooking spray with flour rather than greasing and flouring the bundt pan, but you can grease it well with butter or shortening and then lightly flour the pan.
  • For removing the cake from the pan: Uneven baking temperatures in ovens can cause the cake to rise on one side more. If your cake is uneven, you can cut a thin layer off the bottom of the cake so it sits properly when turned out of the bundt pan. Uneven distribution of weight can cause pressure points which in turn can cause crumbling on the bottom in the areas that aren’t supported by an equal weight of cake.
NUTRITIONAL INFO:

Serving: 1slice | Calories: 767cal | Carbohydrates: 113g | Protein: 7g | Fat: 34g | Saturated Fat: 17g | Polyunsaturated Fat: 4g | Monounsaturated Fat: 10g | Trans Fat: 2g | Cholesterol: 122mg | Sodium: 43mg | Potassium: 167mg | Fiber: 1g | Sugar: 83g | Vitamin A: 764IU | Vitamin C: 3mg | Calcium: 58mg | Iron: 2mg

Farmer’s Casserole Recipe

This farmer’s casserole recipe is loaded with deliciousness. It has crispy hash brown potatoes, bacon, fluffy eggs, and a flavorful, creamy sauce with melted shredded cheese. Each bite is unforgettable, and this is a breakfast egg casserole even the picky eaters will love!

This farmers breakfast casserole is a hearty, comforting, and satisfying breakfast you won’t be able to get enough of.

Every bite is filled with a combination of flavors and textures that you just can’t get in any other breakfast casserole. From the crispy hash browns, salty bacon, melted cheddar cheese, and creamy egg mixture, there’s a whole lot to love about this casserole. 

It’s the perfect recipe to make if you need a delicious Christmas morning breakfast, weekend brunch, or even a nutritious dinner. You can serve it with something like these Bisquick pancake recipe or Krusteaz waffles for a breakfast-style spread everyone won’t be able to stop talking about!

TIPS TO MAKE THE BEST RECIPE
  • Substitute bacon for breakfast sausage, cooked diced ham, or Canadian bacon.
  • Use a blend of monterey jack cheese, pepper jack cheese, mozzarella cheese, or any shredded cheese you want.
  • Add a teaspoon of onion powder to the egg mixture for a savory flavor.

PREP TIME: 10 minutes

COOK TIME: 45 minutes

TOTAL TIME: 55 minutes

INGREDIENTS:

  • 6 cups shredded hash brown potatoes
  • 2 cups cheddar cheese
  • 2 cups bacon, diced
  • ¼ cup green onion, sliced
  • 4 eggs
  • ¾ cup milk
  • 2 Tablespoons Dijon mustard
  • Salt and pepper, to taste
  • ½ cup sour cream

INSTRUCTIONS:

  1. Preheat the oven to 350°F (180°C). Grease a 3-quart baking dish with nonstick cooking spray. Arrange potatoes evenly in the bottom of the dish.
  2. Sprinkle with the bacon, 1 cup of cheddar cheese, and green onions.
  3. In the bowl, whisk eggs, salt and pepper, milk, sour cream, and Dijon mustard.
  4. Pour egg mixture over the hash browns.
  5. Sprinkle with remaining shredded cheese and bake uncovered for 40-45 minutes or until a knife inserted near the center comes out clean.
  6. Remove from the oven and let rest for 10 minutes before serving.

NUTRITION INFORMATION:

SERVING SIZE: 1 cup

Amount Per Serving: CALORIES: 592TOTAL FAT: 38gSATURATED FAT: 0gTRANS FAT: 0gUNSATURATED FAT: 0gCHOLESTEROL: 0mgSODIUM: 0mgCARBOHYDRATES: 31gFIBER: 3gSUGAR: 0gPROTEIN: 32g

Garlic Butter Steak and Potato Foil Packets

These Garlic Butter Steak and Potato Foil Packets are an easy family dinner recipe for summer. They turn out so delicious with plenty of buttery and garlicky flavor.

Cook them on the grill/campfire or in the oven for a simple dinner at home or on the road!

These Garlic Butter Steak and Potato Foil Packets are an easy family dinner recipe for summer. Cook them on the grill/campfire or in the oven!

Prep Time: 15 mins

Cook Time: 25 mins

Total Time: 40 mins

INGREDIENTS:

  • 1 ½ pounds steak sirloin is my favorite cut here
  • 1 pound baby potatoes cut into ½ inch pieces (halving or quartering usually does it for me)
  • 1 onion peeled, halved and then thinly sliced
  • 1 tablespoon olive oil
  • 2 tablespoons chopped fresh parsley
  • 1 tablespoon minced garlic or more to taste
  • 1 tablespoon Italian seasoning
  • salt and pepper to taste
  • 2 tablespoons butter cubed

INSTRUCTIONS:

Par-boil the potatoes (highly recommended):

Place the sliced potatoes in a pot of boiling, salted water and cook for 5 minutes. Drain immediately and place in a large bowl. Allow to sit until cool enough to handle, about 10 minutes.

Make the foil packets:

Prep the steak: Cut the steak into pieces (2.5 – 3 inches for well done, 3 – 4 inches for medium, 5 inches for rarer steak). Marinate it if you like.

Combine ingredients: Place the steak, potatoes, onion, olive oil, parsley, garlic, Italian seasoning, salt and pepper in a large bowl and toss well.

Assemble foil packets: Set out 4 pieces of aluminum foil, at least 12×12 inches. Evenly divide the steak and potatoes between the middles of the foil sheets. Top with butter cubes, then fold the foil over the steak and potatoes and seal well.

Cook the foil packets:

  1. On the grill/fire: On a HOT grill, cook the foil packets for 8-10 minutes per side, or until the potatoes are tender (exact grilling time can vary depending on type of foil used, exact oven temperature, size of steak, etc.! I recommend an oven thermometer to check on the steak after about 10 minutes to gauge how much longer it will need!)
  2. If you’re cooking the packets on a fire without a grilling rack, place them on a 2-inch bed of coal.
  3. In the oven: Bake the steak foil packets at 425°F for around 20 minutes, or until done to your liking (exact baking time can vary depending on type of foil used, exact oven temperature, size of steak, etc.! I recommend an oven thermometer to check on the steak after about 15 minutes to gauge how much longer it will need!). If you want a char on the steaks, open the packets and broil for 1-2 minutes at the end.
  4. Careful when opening the packets – hot steam and juices ahead!

Notes:

Steak: It’s important to use a cut that stays tender when cooked this way. Top sirloin is definitely my preferred cut for foil packets – and what I usually use when I make these.

Potatoes: I use fingerling or baby potatoes, or smaller Yukon Golds. I prefer these over others, because they don’t need to be peeled and are quicker/easier to prep.

Olive oil: This is my preferred oil for this recipe, but feel free to use a different vegetable oil you use in your kitchen.

Garlic: For a more intense garlic flavor (my amount is on the kid-friendly side ?), double the amount of garlic used.

More flavor: If you want to make the potatoes more decadent, mix some chopped bacon and/or shredded cheddar cheese into them before sealing the packets.

Vegetables? If you want to cook some vegetables right along the steak and potatoes in the foil packets, green peppers, asparagus or green beans can be added.

Best steak cuts

It’s important to use a cut that stays tender when cooked this way.

Top sirloin is definitely my preferred cut for foil packets – and what I usually use when I make them. But cuts like ribeye or porterhouse work great, too. They are less lean though!

Recipe tips

  • Careful when opening the foil packets! There are a lot of juices in the packets, and there will be steam escaping from them when you open them up. Make sure you place each on a plate and open them on a table surface, or place them all on a sheet pan to open. Never open/eat foil packets holding them in your lap, not even when camping!
  • I highly recommend pre-boiling the potatoes. It’s an extra step, but it’s worth it to avoid ending up with overcooked steak and/or raw potatoes.
  • Please be aware that this is meant to be used as a quick/easy dinner or to make when camping, not as a way to cook the perfect steak. The perfect steak, I believe, is only achieved when you cook a steak by itself and can solely focus on getting the perfect doneness on your meat. I still love this recipe for its ease and simplicity, but again, it’s not a recipe for perfectly cooked steak.
If your potatoes aren’t cooked through
  • If your steak is done way ahead of your potatoes (this can happen due to several factors; happens less if you parboil the potatoes), carefully remove the steak from the foil packets and place it on a plate and cover with a fresh piece of foil to rest. Continue cooking the potatoes until they’re done.

Make ahead tips

  • You can make these ahead, but not too long because the potatoes tend to start oxidizing.
  • I would only recommend making them ahead a few hours before you’re planning to cook them.
  • They’re great to assemble at home and then transport in your cooler to eat when you arrive at your campsite!
About the foil

Foil packets are definitely one of my favorite easy summer meals, even though I mostly avoid using foil in my kitchen otherwise. I do buy recycled aluminum foil from If You Care.

Nutritional Info:

Serving: 1foil packet | Calories: 402kcal | Carbohydrates: 24g | Protein: 41g | Fat: 15g | Saturated Fat: 6g | Cholesterol: 115mg | Sodium: 155mg | Potassium: 1152mg | Fiber: 4g | Sugar: 2g | Vitamin A: 365IU | Vitamin C: 28mg | Calcium: 84mg | Iron: 4mg

Creamy Potato Soup Recipe

An easy and delicious creamy potato soup recipe that can be made in just one pot! Loaded with bacon and creamy potato goodness, this is a favorite comfort food in my household. Tips for Perfect Creamy Potato Soup Cut your potatoes into pieces no larger than ¾″ and try to keep them around the same … Read more

HasselBack Scalloped Potatoes Recipe

An easy and delicious recipe for cheesy, garlicky, crazy-delicious Hasselback Scalloped Potatoes. They are the perfect side dish for a family dinner!

 Prep Time: 10minutes

 Cook Time: 1hour

 Total Time: 1hour 10minutes

 Servings8 servings

Ingredients:

For the potatoes
  • 2 pounds Yukon gold potatoes
  • 2 tablespoons butter melted
  • 2 tablespoons olive oil
  • 1/4 teaspoon salt
  • 1/4 teaspoon black pepper ground
For the sauce
  • 3 tablespoons butter
  • 3 tablespoons all-purpose flour
  • 3 cups milk
  • 2 medium garlic cloves minced
  • 1/2 teaspoon salt adjust to your tastes
  • 1/2 teaspoon black pepper ground
  • 2 cups cheddar and Colby cheese grated

Instructions:

For the potatoes
  1. Place a potato between the handles of 2 wooden spoons or 2 chopsticks.
  2. Slice the potato into thin slices, leaving 1/4 inch at the bottom unsliced. (The spoon handles will prevent you from slicing the potato all the way through.)
  3. Cut all the potatoes this way and place in a 7×11-inch casserole dish, skillet, or another oven-safe dish.
For the sauce
  1. Combine melted butter, oil, salt, and pepper and brush or pour over the potatoes.
  2. Bake in a 425-degree oven for 40 to 50 minutes. Baking time will depend on how large your potatoes are.
  3. Meanwhile, in a medium saucepan on medium heat melt 3 tablespoons butter.
  4. Add the flour and minced garlic and cook, stirring for 1 minute.
  5. Add the milk, whisking while you slowly add it. Bring to a boil and simmer until the sauce is thick.
  6. Remove the sauce from the heat and stir in 1 cup of the cheese, salt, and pepper. Stir until the cheese is melted.
  7. When potatoes are fork tender, remove them from the oven and pour the sauce over the potatoes.
  8. Sprinkle the remaining cheese on top of the potatoes and return to the oven at 350 degrees for 15 to 20 minutes.
  9. Cool 10 minutes before serving.
NUTRITIONAL INFO:

Calories: 330kcal | Carbohydrates: 30.2g | Protein: 10.1g | Fat: 18.2g | Saturated Fat: 8.9g | Sodium: 200mg | Fiber: 2.3g | Sugar: 1.1g

Garlic Chicken Stir Fry Recipe

This garlic chicken stir fry is a quick and easy dinner that’s perfect for those busy weeknights. Cubes of chicken are cooked with colorful veggies and tossed in a flavorful garlic sauce for a meal that’s way better than take out!

Stir fry is almost a complete meal by itself. Just add some Egg Rolls, a Fruit Salad and some Cream Cheese Wontons for a complete meal!

When I am looking for a speedy dinner, I often turn to stir fry. It’s so easy to make and super versatile. It is fast and easy and curbs that temptation to hit the drive-thru. Stir fry is also a guarantee that I can get my kids to eat their vegetables. They love the combination of chicken and sauce. It is always a meal I can count on to feed the masses and they will leave the table with full bellies and smiles.

This garlic chicken stir fry is a quick and easy dinner that’s perfect for those busy weeknights! Cubes of chicken are cooked with colorful veggies and tossed in a flavorful garlic sauce for a meal that’s way better than take out!

PREP TIME: 5MINS

COOK TIME: 15MINS

TOTAL TIME: 20MINS

SERVINGS: 4 PEOPLE

Ingredients:

  • 1 lb. Boneless skinless chicken breast cut into cubes
  • 1 tbsp + 1 tsp Olive oil divided
  • 1 Yellow bell pepper sliced
  • 1 c Sliced mushrooms
  • 2-3 c Broccoli Florets
  • 4 Cloves garlic minced
  • Salt and pepper to taste
  • 1 tbsp Soy sauce
  • ¾ c. Chicken broth
  • 1 ½ tsp Sugar
  • 2 tsp Sesame oil
  • 2 tsp Cornstarch
How To Make Garlic Chicken Stir Fry
  1. Heat 1 tbsp of olive oil in a skillet over medium-high heat.
  2. Add the broccoli, sliced mushrooms and yellow bell pepper to the heated skillet, and cook for 5-6 minutes until the vegetables begin to become tender. Remove the vegetables, cover them and set aside for later.
  3. Place one teaspoon of olive oil in the heated skillet, and add the chicken breast pieces. Cook until the chicken is no longer pink in the center and cooked through. Add salt and pepper to taste.
  4. Mix the vegetables back into the skillet.
  5. In a separate bowl, combine the soy sauce, sugar, chicken broth, sesame oil and cornstarch, and mix well.
  6. Pour the sauce over the chicken and vegetables in the skillet, and stir to coat. Cook for 2-3 minutes until everything is coated well and the sauce has thickened.
  7. Serve over white rice if you desire.
NUTRITIONAL INFO:

Serves: 4

Calories183kcal (9%)

Carbohydrates 7g (2%)

Protein 26g (52%)

Fat 5g (8%)

Saturated Fat1g (5%)

Cholesterol 73mg (24%)

Sodium554mg (23%)

Potassium676mg (19%)

Fiber 1g (4%)

Sugar 2g (2%)

Vitamin A235IU (5%)

Vitamin C79.9mg (97%)

Calcium 22mg (2%)

Iron 1mg (6%)

Creamy Mashed Potato Salad Recipe

Creamy Mashed Potato Salad is a deliciously different way to enjoy leftover Mashed Potatoes!

Need a last-minute salad but all you have are leftovers? This take on a favorite Potato Salad uses up your leftovers and a handful of ingredients you likely have on hand.

Recipe Tips:
  • No leftover mashed potatoes? Use leftover roasted potatoes and give them a little squish with a masher.
  • Make hard-boiled eggs the day before and keep them in the refrigerator until they are ready to use (the air fryer is the easiest way to do this). This will help keep the salad cold!
  • Make an extra batch of the dressing, it’s great on macaroni salad too!
  • The dressing will keep in the refrigerator for up to 2 weeks in a salad dressing cruet or mason jar


PREP TIME: 15minutes

COOK TIME: 9minutes

TOTAL TIME: 24minutes

SERVINGS: 6

This flavorful Mashed Potato Salad is the perfect way to use up leftover mashed potatoes. Sour cream & vinegar, plus mayo give it a delicious creamy tang!

INGREDIENTS:

  • 3-4 cups prepared mashed potatoes leftover
  • 4 hard-boiled eggs chopped (optional)
  • 1 cup celery diced
  • 3 green onions sliced
  • ¼ teaspoon paprika for garnish, optional

Dressing

  • ½ cup mayonnaise
  • ¼ cup sour cream
  • ¼ cup relish (sweet or dill pickle)
  • 2 tablespoons cider vinegar
  • 1 ½ tablespoons yellow mustard or dijon
  • 1 teaspoon sugar
  • ½ teaspoon salt or to taste
  • ½ teaspoon pepper or to taste
  • ¼ teaspoon garlic powder

INSTRUCTIONS:

  1. Mix all dressing ingredients in a bowl.
  2. Combine mashed potatoes with dressing & remaining ingredients. Mix well.
  3. Refrigerate at least one hour before serving.

Notes:

This recipe is intended to be made with leftover mashed potatoes which have a creamy consistency from the addition of butter & milk with seasonings.

If you are making mashed potatoes for this recipe specifically, cook about 1 ½ to 2 pounds potatoes. Peel & boil 15 minutes or until tender. Add butter, milk, seasonings & mash. Cool completely in the fridge before using in this recipe.

NUTRITIONAL INFO:

Calories: 324, Carbohydrates: 30g, Protein: 8g, Fat: 20g, Saturated Fat: 4g, Trans Fat: 1g, Cholesterol: 137mg, Sodium: 561mg, Potassium: 471mg, Fiber: 3g, Sugar: 3g, Vitamin A: 445IU, Vitamin C: 26mg, Calcium: 52mg, Iron: 1mg

Cucumber Bites Recipe

Quick, easy, and fresh, these cucumber bites are the perfect cold appetizer with a dill cream cheese mixture piped on top of cucumber slices and topped with juicy tomatoes.

Prep Time: 15mins

Cook Time: 0mins

Total Time: 15mins

Servings: 24 

INGREDIENTS:

  • 2 cucumbers
  • 4 ounces cream cheese, softened
  • 1 tablespoon mayonnaise
  • 3 tablespoons Ranch dressing
  • 1 tablespoon fresh dill, minced fine
  • ¼ teaspoon garlic salt
  • ¼ teaspoon Italian seasoning
  • 12 cherry or grape tomatoes
  • Black pepper, for garnish

INSTRUCTIONS:

  1. Wash, peel, and slice the cucumbers into half-inch slices discarding the ends.
  2. Remove a little of the center of the cucumber with a small measuring spoon making a divot in the cucumber.
  3. Mix together the cream cheese, mayonnaise, and ranch dressing until smooth and creamy.
  4. Add dill, garlic salt, and Italian seasoning and mix until combined.
  5. Place the filling into a piping bag with a star tip and pipe about 1 tablespoon of filling onto each cucumber.
  6. Slice the tomatoes in half and place a piece onto each cucumber filling.
  7. Sprinkle with black pepper and serve.

Notes: 

A small melon baller would also work to make the divots in the center of the cucumbers.

Make sure your cream cheese is at room temperature so that it blends well with the rest of the ingredients and doesn’t leave lumps.

No piping or pastry bag? Fill a sandwich baggie and clip the corner off.

SUBSTITUTIONS AND ADDITIONS:

MAYONNAISE: You could also substitute the mayonnaise for plain Greek yogurt or sour cream in this easy recipe if you’d like.

TOMATOES: You could also top them with red bell peppers.

CREAM CHEESE: If you want to change up the flavor of the cream cheese mixture on top or to save time and eliminate the fresh herbs and spices (you’ll still need to add the ranch dressing and mayo to thin it out), there are plenty of herbed cream cheese flavors available that would be delicious

GARNISH: You could top these bites with sesame seeds, poppy seeds, or chives as well. If you like a little kick, you could add finely chopped jalapeno or crushed red pepper flakes.

VARIATIONS: Cucumbers are the perfect base for lots of yummy toppings. You could also top them with buffalo chicken dip, smoked salmon, hummus, egg salad, or tuna salad.

NUTRITIONAL INFO:

Calories: 33.79kcal | Carbohydrates: 1.21g | Protein: 0.53g | Fat: 3.08g | Saturated Fat: 1.14g | Cholesterol: 6.06mg | Sodium: 64.55mg | Potassium: 60.67mg | Fiber: 0.29g | Sugar: 0.78g | Vitamin A: 152.26IU | Vitamin C: 2.03mg | Calcium: 9.56mg | Iron: 0.12mg

Prime Rib Recipe

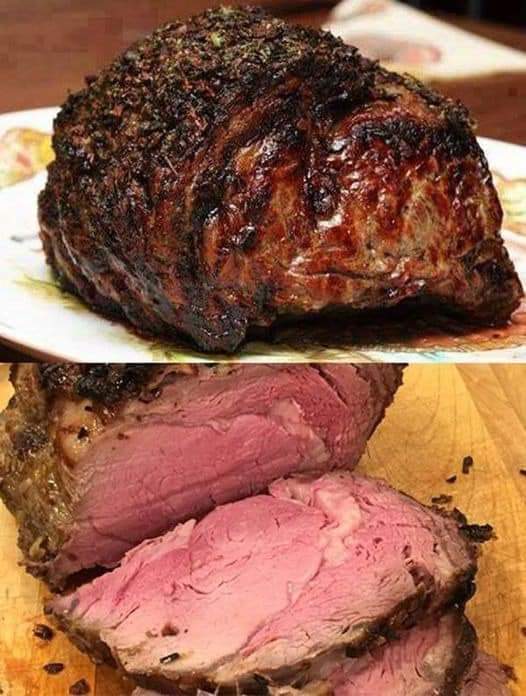
The only prime rib recipe you’ll ever need. Follow our step-by-step instructions for a prime rib roast that’s cooked to perfection. It’s a must for holidays and special gatherings!

PREP TIME: 5 mins

COOK TIME: 2 hrs 30 mins

BRING TO ROOM TEMP: 3 hrs

TOTAL TIME: 5 hrs 35 mins

SERVINGS: 10 servings

YIELD: 1 (10-pound) rib roast

Older cookbooks will sometimes instruct you to remove excess fat from the roast. “Excess” fat is any fat more than an inch thick on the roast. Fat is what you need to give the roast flavor and to make it juicy and tender. Prime rib is expensive and you are paying good money for that fat, so leave it on. Your butcher should have removed any excess fat already.

The most important piece of advice I can give you regarding cooking a prime rib roast is to use a good meat thermometer! With a remote thermometer, you can tell exactly what the temperature of the meat is without having to open the oven door.

Ingredients:

For the prime rib roast
  • 1 (10-pound) standing rib roast, 3 to 7 ribs (estimate serving 2-3 people per rib), bones cut away from the roast and tied back to the roast with kitchen string (ask your butcher to prepare the roast this way)
  • Salt
  • Freshly ground black pepper
For the gravy
  • 1/4 cup fat and drippings from the pan
  • 1/4 cup all-purpose flour
  • 3 to 4 cups water, milk, stock, or beer
  • Salt, to taste
  • Freshly ground black pepper, to taste

Method:

Salt the roast and let sit at room temp:

Remove the beef roast from the refrigerator 3 hours before you start to cook it. Sprinkle it with salt all over and let it sit, loosely wrapped in butcher paper. Roasts should be brought close to room temperature before they go into the oven to ensure more even cooking.

Tie with kitchen string:

If your butcher hasn’t already done so, cut the bones away from the roast and tie them back on to the roast with kitchen string. This will make it much easier to carve the roast, while still allowing you to stand the roast on the rib bones while cooking.

Preheat the oven and season the roast:

Preheat your oven to 500°F (or the highest temp your oven reaches, if it’s less than 500°F). Pat the roast dry with paper towels (pre-salting should have made the roast release some moisture), and sprinkle the roast all over with salt and pepper.

Place the roast fat-side-up in a roasting pan:

Insert an ovenproof meat thermometer into the thickest part of the roast, making sure that the thermometer isn’t touching a bone.

There are so many variables involved that affect cooking time, this is why you should use a meat thermometer. A prime rib roast is too expensive to “wing it”. Err on the rare side, you can always put the roast back in the oven to cook it a bit longer, if it’s too rare for your tastes.

Brown the roast at high temperature:

Brown the roast at 500°F (or as high as your oven will go) for 15 minutes.

Lower the oven to 325°F to finish roasting:

Reduce the oven temperature to 325°F. Roast in the oven until the thermometer registers 115°F for rare or 120° for medium rare, and 130°F for medium.

To estimate the total cooking time, allow about 11 to 12 minutes per pound for rare and 13 to 15 minutes per pound for medium rare. The actual cooking time will depend on the shape of the roast, how chilled your roast still is when it goes into the oven, and your particular oven. A flatter roast will cook more quickly than a thicker one. A chilled roast will take more time than one closer to room temp.

Check the temperature of the roast using a meat thermometer an hour before you expect the roast to be done. For example, with a 10 pound roast, you would expect 2 hours of total cooking time for rare (15 minutes at 500° and 1 3/4 hours at 325°). In this case, check after 1 hour 15 minutes of total cooking time, or 1 hour after you lowered the oven temp to 325°. (A benefit of using a remote thermometer is that you don’t have to keep checking the roast, you’ll be able to see exactly what the temperature is by looking at the thermometer outside of the oven.)

Simple Tip!

If the roast is cooking too quickly, lower the oven temperature to 200°F.

Let the roast rest:

Once the roast has reached the temperature you want, remove it from the oven and place it on a carving board. Cover it with foil and let it rest for 15 to 30 minutes before carving. The internal temperature of the roast will continue to rise while the roast is resting.

Slice the roast:

Cut away the strings that were used to hold the roast to the rack of rib bones. Remove the bones (you can save them to make stock for soup later.)

Then, using a sharp carving knife, slice meat across the grain for serving, making the slices about 1/2-inch to 3/4-inch thick.

Make the gravy:

To make the gravy, remove the roast from the pan. Remove excess fat, leaving 1/4 cup of fat plus the browned drippings and meat juices in the roasting pan.

Place the roasting pan on the stovetop on medium high heat. Use a metal spatula to scrape up drippings that might be sticking to the pan.

When the fat is bubbly, sprinkle 1/4 cup of flour over the fat and drippings in the pan.

Stir with a wire whisk to incorporate the flour into the fat. Let the flour brown (more flavor that way and you don’t have the taste of raw flour in your gravy.)

Slowly add 3 to 4 cups of water, milk, stock, or beer to the gravy. Continue to cook slowly and whisk constantly, breaking up any flour lumps.

The gravy will simmer and thicken, resulting in about 2 cups of gravy.

Season the gravy with salt and pepper and herbs to taste.

Nutrition Facts (per serving)

|677|CALORIES|54g|FAT|0gCARBS|0g|PROTEIN|45g|

Cranberry Salad Recipe

This creamy cranberry salad is a blend of fresh cranberries, pineapple, marshmallows, pecans, coconut and apples, all tossed in a creamy dressing. A unique and colorful salad that’s perfect for the holidays!

I’m always looking for fun ways to serve cranberries other than your standard cranberry sauce. This cranberry salad is perfectly sweet and full of different flavors and textures. If you are a cranberry fan, make sure to also bake up a loaf of fresh cranberry bread to celebrate the season!

HOW DO YOU MAKE CRANBERRY SALAD?

This recipe starts with a bag of fresh cranberries. The cranberries are chopped, then mixed with sugar. The cranberries need to sit in the sugar for at least 3 hours to temper some of the natural tart flavor of the berries.

Cranberry salad garnished with cranberries, marshmallows, pecans and apples.

This creamy cranberry salad is a blend of fresh cranberries, pineapple, marshmallows, pecans, coconut and apples, all tossed in a creamy dressing. A unique and colorful salad that’s perfect for the holidays!

Prep Time: 10mins

Cook Time: 1mins

Chill Time: 3hrs

Total Time: 11mins

Servings: 10

Ingredients:

  • 12 ounces fresh cranberries chopped
  • 2/3 cup granulated sugar
  • 1 cup chopped apple I use Granny Smith
  • 1 cup chopped pineapple fresh or canned
  • 1 cup miniature marshmallows
  • 1/2 cup chopped pecans
  • 1/4 cup shredded coconut
  • 8 ounces frozen whipped topping thawed
  • fresh cranberries, apples and marshmallows for garnish optional

Instructions:

  1. Place the cranberries and sugar in a glass or plastic bowl (do not use metal). Stir to combine.
  2. Cover the bowl and chill for at least 3 hours.
  3. Add the apple, pineapple, marshmallows, pecans and coconut to the bowl.
  4. Add the whipped topping to the bowl and fold gently to combine all the ingredients. Garnish with additional cranberries, apples and marshmallows if desired, then serve.

Nutritional Info:

Calories: 178kcal | Carbohydrates: 27g | Protein: 1g | Fat: 7g | Saturated Fat: 3g | Sodium: 27mg | Potassium: 99mg | Fiber: 2g | Sugar: 22g | Vitamin A: 45IU | Vitamin C: 12.4mg | Calcium: 25mg | Iron: 0.3mg

Chicken Fitters Recipe

If you’re looking for some delicious chicken snacks, these Chicken Fritters are perfect for you! They’re fried chicken patties that are crispy on the outside, and soft, juicy, and tender on the inside with a hint of garlic! You’re going to instantly fall in love with them as soon as you have a bite!

This chicken fritters recipe is special because it combines the classic flavors of fried chicken with a unique twist. The fritters are made with a combination of chicken breasts, garlic, onion, and seasonings that give them an amazing flavor.

These Chicken Fritters are quick and easy to make and are crispy on the outside, and soft, juicy, and tender on the inside with a hint of Garlic

Ingredients:

  • 5 lbs. – chicken breast
  • 2 large – eggs
  • 1 small – yellow onion
  • 2 large – garlic cloves
  • ¼ cup – mayonnaise
  • 1 tsp. – Mrs. Dash seasoning
  • 1 tsp. – salt (or to taste)
  • ¼ tsp. – black ground pepper (or to taste)
  • ½ cup – flour
  • Olive oil for sautéing

Instructions:

How to Prep Chicken for Chicken Fritters
  1. Start by soaking clean chicken breasts in cold water for a couple of hours, and changing the water periodically. This is certainly optional, but it’s my preferred way to cook meat while ensuring that it’s thoroughly clean.
  2. Cut all fat off the chicken breasts and rinse well, again. Place clean beasts into a strainer for excess water to drain.
  3. Then cut the chicken into tiny cubes, about ¼”. Place chicken cubes into a large mixing bowl for easier mixing.
How to Make Chicken Mixture for Chicken Fritters
  1. Next, add eggs, shredded yellow onion, crushed garlic, mayonnaise, Mrs. Dash seasoning, salt, and black ground pepper to the chicken.
  2. Stir everything together, then add flour and mix it again. The mixture should thicken a little after adding the flour.
How to Cook Chicken Fritters
  1. Now heat a large non-stick skillet or large frying pan over medium-low heat. That will be 3.5 if your stove is digital.
  2. Add 2-3 tablespoons of olive oil to the pan. When oil gets hot, place one large ice cream scoop of chicken mix onto the pan and pat down to flatten into a fritter.
  3. I like to cover the pan with a Frying Pan Splatter Screen Guard as the fritters splatter during sautéing, the guard contains most of the splatter. A regular lid traps the steam while a screen guard releases the steam but contains the splattering.
  4. This is an optional step but I love the results with it; I’ve noticed that covering with a pan lid causes the fritters to water, release their juice, then later become too dry.
  5. Sauté fritters for 5 minutes on each side. I prefer sautéing a tad longer on a lower temp to ensure the meat is well done. Then flip the fritters over and sauté for 5 more minutes.
  6. Once done, place sautéed fritters onto a plate or cutting board lined with paper towels to soak in excess oil, then place the fritters onto a serving dish of your choice before transferring another set of sautéed fritters to the lined paper towel surface.
  7. You may need to replace the paper towels every couple of batches as they get oily fast.

Banana Bread Recipe

PREP TIME: 10 mins

COOK TIME: 60 mins

TOTAL TIME: 70 mins

SERVINGS: 8 to 10 servings

YIELD: 1 loaf

No need for a mixer for this recipe! Clean-up is easy, too. If you want, you can mix everything in one bowl.

This recipe calls for an 8- x 4-inch loaf pan. If you are baking in an 8 1/2- x 4 1/2-inch pan, bake for 47 to 57 minutes. If baking in a 9- x 5-inch pan, bake for 45 to 55 minutes. Note that the larger pan size will produce a flatter loaf.

The best bananas to use for banana bread are those that are over-ripe. The yellow peels should be at least half browned, and the bananas inside squishy and browning.

Ingredients:

  • 2 to 3 medium (7″ to 7-7/8″ long) very ripe bananas, peeled (about 1 1/4 to 1 1/2 cups mashed)
  • 1/3 cup (76g) butter, unsalted or salted, melted
  • 1/2 teaspoon baking soda (not baking powder)
  • 1 pinch salt
  • 3/4 cup (150g) sugar (1/2 cup if you would like it less sweet, 1 cup if more sweet)
  • 1 large egg, beaten
  • 1 teaspoon vanilla extract
  • 1 1/2 cups (205g) all-purpose flour

Method:

Preheat the oven and prepare the pan:

Preheat the oven to 350°F (175°C), and butter an 8 x 4-inch loaf pan.

Mash the bananas and add the butter:

In a mixing bowl, mash the ripe bananas with a fork until completely smooth. Stir the melted butter into the mashed bananas.

Mix in the remaining ingredients:

Mix in the baking soda and salt. Stir in the sugar, beaten egg, and vanilla extract. Mix in the flour.

Bake the bread:

Pour the batter into your prepared loaf pan.

Bake for 55 to 65 minutes at 350°F (175°C), or until a toothpick or wooden skewer inserted into the center comes out clean. A few dry crumbs are okay; streaks of wet batter are not. If the outside of the loaf is browned but the center is still wet, loosely tent the loaf with foil and continue baking until the loaf is fully baked.

Cool and serve:

Remove from oven and let cool in the pan for a few minutes. Then remove the banana bread from the pan and let cool completely before serving. Slice and serve. (A bread knife helps to make slices that aren’t crumbly.)

Wrapped well, the banana bread will keep at room temperature for 4 days. For longer storage, refrigerate the loaf up to 5 days, or freeze it.

Nutritional Info:

220/CALORIES/7g/FAT/37g/CARBS/3g/PROTEIN

Mexican Ground Beef Casserole with Rice

No more boring beef mince recipes….. Kick off the week with THIS flavour packed Mexican Ground Beef Casserole!! With corn, capsicum/bell peppers and black beans, this rice casserole is juicy, cheesy, and packed with big Mexican flavours.

One pot, quick dinner idea that’s on the table in 30 minutes! 

 Big juicy pot of beef and rice loaded with Mexican flavours! The rice is tender and perfectly cooked, and the tomato sauce is generously flavoured with a Mexican Spice mix. A quick dinner made in one pot with not much prep!

Prep Time: 10mins

Cook Time: 20mins

Total Time: 30mins

Servings: 5 

Ingredients:

  • 2 tbsp olive oil
  • 1 onion , finely chopped
  • 3 garlic cloves , minced
  • 500g (1 lb) ground beef (mince), lean
  • 1/3 cup tomato paste
  • 1 1/4 cup long grain white rice , uncooked (Note 1)
  • 2.5 cups (625 ml) chicken broth/stock , low sodium
  • 400g (14oz) can corn kernels , drained (Note 2)
  • 400g (14oz) can black beans , drained (or other beans)
  • 1 capsicum/bell pepper , diced
  • 1 cup green onions/shallots
  • 2 cups (200g) cheese , shredded (anything that melts! Note 3)

MEXICAN SPICES:

  • 0.5 tsp cayenne pepper (Note 4)
  • 1.5 tbsp dried oregano
  • 3 tsp cumin
  • 3 tsp coriander
  • 3 tsp onion powder
  • 2 tsp paprika
  • 1.5 tsp salt

Instructions:

  1. Heat oil in a large pot over high heat. Add garlic and onion, cook 1 1/2 minutes until onion is translucent.
  2. Add beef and cook, breaking it up as you go, until you no longer see raw meat (about 2 minutes).
  3. Add Mexican Spices and cook for 30 seconds.
  4. Add capsicum and cook for 1 minute.
  5. Add tomato paste and broth, stir to mix in.
  6. Add rice, corn and black beans.
  7. Stir, bring to simmer then cover and lower heat to medium low (simmering gently). Cook 15 minutes.
  8. Remove lid, quickly stir through green onion and HALF the cheese.
  9. Smooth top then sprinkle on remaining cheese. Cover and leave for 1 minute just to melt cheese.
  10. Remove from stove and serve immediately, garnished with more green onion if desired.

Notes:

1. Rice – recipe works best with long grain white rice. Will also work with medium or short white rice grain, “standard” (unspecified) white rice, jasmine* or basmati rice*. Recipe as written won’t work with: brown rice, wild rice, risotto, paella rice, quinoa.

2. Corn – can also use frozen, 1 3/4 cups.

3. Cheese – use anything that melts! Cheddar, mozzarella, tasty, Monterey Jack, Colby.

4. Cayenne adds spiciness, this amount across a vast volume of rice is barely noticeable. Increase or eliminate if desired.

5. Leftovers will keep for 3 days in the fridge, reheat in microwave. I haven’t tried freezing but I don’t see why it wouldn’t freeze ok!

6. Nutrition per serving, this is quite a generous serving (about 2 packed cups, and it’s dense so very filling!). Every cup of cheese adds 100 calories per serving, so if you want to cut back on calories, halve the cheese (don’t skip completely!).

Nutritional Info:

Calories: 715cal | Carbohydrates: 73g | Protein: 45g | Fat: 28g | Saturated Fat: 13g | Cholesterol: 109mg | Sodium: 2039mg | Potassium: 1258mg | Fiber: 10g | Sugar: 7g | Vitamin A: 2254IU | Vitamin C: 54mg | Calcium: 437mg | Iron: 7mg