An easy healthy cauliflower cheese recipe that’s so creamy and cheesy without butter or traditional flour. Using oat flour, it’s high in protein, low in fat, and the perfect side dish for weight loss!
WHY YOU’LL LOVE THIS RECIPE
-
If you love cauliflower cheese, here are a few reasons why we think you’ll enjoy it without butter!
-
It’s comforting
-
Naturally gluten free
-
It’s really easy to make
-
Has fewer calories per serving
-
Unofficially Slimming World friendly
-
High in fibre and protein to keep you fuller for longer
-
A truly delicious side for a roast dinner or main course
SUBSTITUTIONS:
Depending on your dietary needs, here are a few simple swaps you can make to this cauliflower & cheese:
Cauliflower – you could make an easy cauliflower and broccoli bake by swapping some of the florets for more nutrition
Oats – swap for cornflour instead of blended oats to thicken the sauce if more accessible
Milk – swap for full fat, or plant based if wanting to make vegan cauliflower cheese
Dijon mustard – swap for English mustard or wholegrain mustard, or try nutritional yeast flakes for extra flavour
Cheddar cheese – you can use any good melty cheese
Slimming World cheese sauce recipe with cauliflower and cottage pie in a white Denby Natural Canvas bowl
VARIATIONS:
Here are some different ways you can take this simple cauliflower cheese to another level:
Spicy – add some spices such as cayenne pepper, curry powder or smoked paprika to the sauce for a kick of heat
Deluxe – for a luxury cauliflower cheese, try a good vintage cheddar, parmesan, or gruyére for a stronger taste
Meaty – add some crispy bacon, ham, or cooked diced gammon to the cauliflower cheese for a meaty twist
You might also like this roasted cauliflower cheese bake that requires no boiling whatsoever.
STORAGE:
Storing – we prefer eating this recipe fresh, but it can be stored in an airtight container and refrigerated for up to 3 days.
Freezing – cool to room temperature and again, store in a freezer-safe container for up to 3 months.
Reheating – If you want to eat the next day, defrost in the fridge if required and microwave until piping hot throughout, or reheat while covered with tin foil in the oven,

SERVING SUGGESTIONS
Here are some ideas on what to serve with cauliflower cheese:
Roast meats: serve as a saucy side with meats such as beef, gammon steaks, sausagess or roast chicken with gravy, mashed potatoes and cranberry sauce
Potatoes: enjoy as a vegetarian main on jacket potatoes with butter and salt
Vegetables: it’s perfect with roasted vegetables such as onion, peppers, courgette, beetroot, carrots, and sweet potatoes with garlic and lemon that need a sauce
Salad: use it as a dressing with a leafy green salad with tomatoes or shredded brussels sprout salad with balsamic vinegar and olive oil
Breads: mop up the cheese sauce with herby garlic bread or warm crusty bread
Stews: add a dollop alongside a hearty and flavourful stew with a extra indulgent taste
FAQ
Can you make cauliflower cheese in advance?
Cauliflower cheese is perfect for making in advance, then stored in the freezer. After cooking, simply defrost overnight and bake in the oven again while covered with foil.
Is this an unofficial Slimming World cauliflower cheese recipe?
The only fats used in this recipe are milk and cheese. As long as you count them or use them as part of your allowance, I don’t see why you can’t eat this as part of your Slimming club. Also, the same goes for milled oats which are used instead of flour
Can I thicken the butterless cheese sauce in a pan instead?
Yes, absolutely! Simply place all your cold milk and blended oats in a saucepan and very slowly simmer and stir to thicken. Then continue with the rest of the method.
Does it taste like porridge?
I personally think its porridge taste is extremely subtle. But so subtle, my family didn’t know it was there. I do suggest though to use plenty of sea salt and ground black pepper with a dash of mustard. Note, I’ve used oats to thicken many of my healthy beef stews for example where you can’t taste them at all! It makes them so comforting and healthy on Slimming plans.
Can I use skimmed of semi skimmed milk?
Yes, you can use lighter milk and the great thing is, it has more calcium than full fat. However, for a truly creamy tasty, I do prefer whole milk in all of my cauliflower cheeses, but it has more calories.
But at around 200 calories per person, I think this recipe for cauliflower cheese is relatively low anyway.
Can I make cauliflower cheese in the slow cooker?
Yes, you can make cauliflower cheese in a slow cooker as I do here on low heat for 2 hours without stirring.
Can I cook it in an air fryer?
Cauliflower cheese is perfect for baking in an air fryer! All you need to do is find a big enough dish to fit in your machine.
I would bake it at 180c fan/200c/400F and reduce the time to 10 minutes.
Healthy Cauliflower Cheese Recipe
This healthy cauliflower cheese recipe is so creamy and cheesy without butter and traditional flour. It’s perfect for anyone following a Slimming World plan!
PREP TIME: 6 mins
COOK TIME: 20 mins
TOTAL TIME: 26 mins
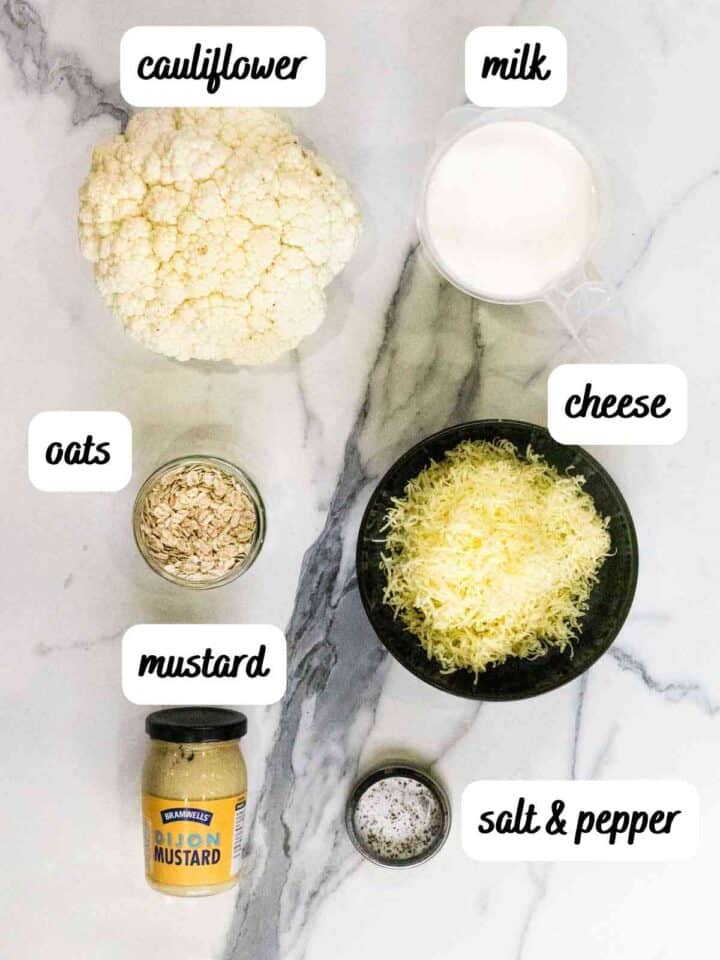
INGREDIENTS:
-
1 large cauliflower broken into florets
-
32 g oats blended
-
500 ml whole milk *or skimmed/semi if following a slimming club
-
100 g low fat cheese grated
-
1 teaspoon mustard
-
Sea salt To your taste
-
Ground Black pepper To your taste
INSTRUCTIONS:
-
Pre heat your oven at 220 degrees.
-
Meanwhile, par boil your cauliflower florets for about 10 minutes.
-
Blend the oats in a good blender or mini food processor. Note: if you prefer to use flour, feel free to use it.
-
Transfer the oats into a 1 litre microwavable jug. Note: if you have a smaller one, you’ll need to watch carefully that it doesn’t boil over. OR you continue with a saucepan.
-
Mix in the milk and generous amount of seasoning.
-
Then microwave in 1 minute bursts for 3 minutes to prevent spilling – possibly 4 minutes if you want it thicker.
-
Stir in 70g of the grated cheese and mustard.
-
Now drain your cauliflower and place in a baking dish.
-
Pour over the slimming cheese sauce, top with the remaining cheese and season again.
-
Bake for 20 minutes, top with fresh herbs and serve!
-
Any syn values are personal estimates an not verified by Slimming World.
NOTES:
-
I recommend blitzing the oats while dry first unless you have a really powerful vacuum blender, then you could blend the milk and oats together
-
If thickening the sauce in a pan, use a whisk to make the cheese sauce smooth and lump-free, and cook it over a gentle heat to avoid scorching and overboiling
-
Add some mustard to the cheese sauce for a tangy kick and to balance the richness of the cheese
-
Use a mature cheddar cheese for a stronger and cheesier flavour, and grate it coarsely for better melting
-
Sprinkle some bread crumbs or dry stuffing for a bit of crunch
-
Add some other vegetables such as broccoli, green beans or cherry tomatoes to the dish for extra colour and nutrition
-
Roast the cauliflower florets instead of boiling if preferred to enhance their flavour and prevent them from becoming too soggy
NUTRITIONAL INFO:
Calories: 203kcalCarbohydrates: 22gProtein: 15gFat: 7gSaturated Fat: 4gCholesterol: 18mgSodium: 284mgPotassium: 838mgFiber: 5gSugar: 11gVitamin A: 254IUVitamin C: 101mgCalcium: 295mgIron: 1mg